
Related Manuals for Nordelettronica KIT-NE185-12S


Summary of Contents for Nordelettronica KIT-NE185-12S
- Page 1 KIT-NE185 -12S NE273 NE185 -11S ISTRUZIONI D’USO INSTRUCTIONS MANUAL INSTRUCTIONS D’EMPLOI BEDIENUNGSANLEITUNG INSTRUCCIONES PARA EL USO...
- Page 2 mod. NE273 mod. NE185...
- Page 3 PANNELLO COMANDI NE273-S Il pannello Ne273 ha 8 tasti con funzioni diverse a seconda della videata attiva sul display. La funzione e’ indicata sul display con una immagine in corrispondenza del tasto. Nella videata principale i 4 tasti di sinistra sono dedicati all’attivazione e spegnimento dei carichi, mentre i 4 tasti di destra sono dedicati per la programmazione, lettura valore batterie e serbatoi, impostazione luminosità...
- Page 4 DERIVATORE NE185_11S LEGENDA: F1: Fusibile 5A collegato alla batteria auto per l'alimentazione delle luci side marker F2: Fusibile 20A collegato alla batteria auto per l'alimentazione del frigo. F3: Fusibile 15A collegato direttamente alla batteria servizi per l’alimentazione scalino F4: Fusibile 30A collegato direttamente alla batteria servizi per l’alimentazione WEBASTO/AUX F5: Fusibile 15A collegato all'interruttore generale luci per alimentare il gruppo Luci_1 F6: Fusibile 15A collegato all'interruttore generale luci per alimentare il gruppo Luci_2.
- Page 5 DERIVATORE NE185_11S JP13 JP16 JP15 JP14 JP11 JP10 J1: INGRESSO BATTERIA AUTO JP7: SERBATOI recupero (R1) 1. Ingresso + batteria AUTO (B1) 1. NEGATIVO 2. FULL Serbatoio recupero R1 J2: INGRESSO BATTERIA SERVIZI 1. Ingresso + batteria SERVIZI (B2) JP8: SERBATOI recupero (R2-R3) 1.
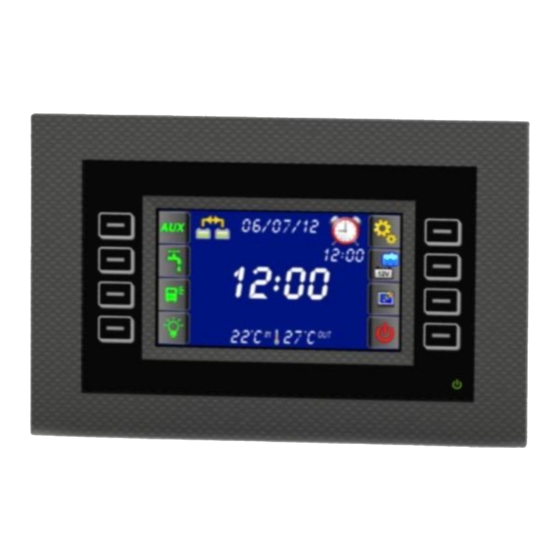
- Page 6 CONTROL PANEL NE273-S The panel Ne273 has 8 buttons with different functions depending on the active screen on the display. The function is shown on the display an image corresponding to the button. In the main screen on the left are the 4 buttons for activating and off loads, while the 4 buttons on the right are dedicated for programming, reading value batteries and tanks, setting brightness and switching off the panel .In the main screen always displays the date, time and internal temperature.
- Page 7 SHUNT NE185_11S LEGEND: F1: 5A fuse connected to the vehicle battery to power the side marker lights F2: 20A fuse connected to the vehicle battery to power the fridge F3: 15A fuse connected directly to the service battery to power the step F4: 30A fuse connected directly to the service battery to power the Webasto / Auxiliary F5: 15A fuse connected to lights master switch to power the group of lights_1 F6: 15A fuse connected to lights master switch to power the group of lights_2...
- Page 8 SHUNT NE185_11S JP13 JP16 JP15 JP14 JP11 JP10 J1: AUTO BATTERY INPUT JP7: RECYCLE TANKS (R1) 1. Input + AUTO battery (B1) 1. NEGATIVE 2. FULL recycle tanks R1 J2: SERVICE BATTERY INPUT 1. Input + SERVICE battery (B2) JP8: RECYCLE TANKS (R2-R3) J3 : NEGATIVE 1.
- Page 9 PANNEAU DE CONTROLE NE273-S Ne273 Le panneau a 8 boutons avec des fonctions différentes selon l'écran actif sur l'écran. La fonction est représentée sur l'écran une image correspondant à la touche. Dans l'écran principal des 4 boutons sur la gauche sont dédiées à l'activation des charges et désactiver les, tandis que les 4 boutons sur la droite sont dédiés à...
- Page 10 PORTEFUSIBLE NE185_11S LEGENDE: F1: Fusible 5 A relié à la batterie du véhicule pour alimenter les phares side marker F2: Fusible 20A connecté à la batterie du véhicule pour l'alimentation du frigo. F3: Fusible 15A directement connecté à la batterie de service pour l'alimentation de la marche F4: Fusible 30A directement connecté...
- Page 11 PORTEFUSIBLE NE185_11S JP13 JP16 JP15 JP14 JP11 JP10 J1: ENTREE BATTERIE AUTO JP7: RESERVOIRS de récupération (R1) 1. Entrée + batterie AUTO (B1) 1. NEGATIF 2. FULL Réservoir de récupération R1 J2: ENTREE BATTERIE de SERVICE 1. Entrée + batterie SERVICE (B2) JP8: RESERVOIRS de récupération (R2-R3) 1.
- Page 12 BEDIENPANEL NE273-S Das Panel Ne273 besitzt 8 Tasten mit unterschiedlichen Funktionen in Abhängigkeit von der aktiven Bildschirm auf dem Display. Diese Funktion ist auf der Anzeige eines Bildes entsprechend der Taste angezeigt. Auf dem Hauptbildschirm die 4 Tasten auf der linken Seite gewidmet sind zum Aktivieren und Deaktivieren der Lasten.
- Page 13 ABZWEIGDOSE NE185_11S ZEICHENERKLÄRUNG: F1: Sicherung 5A angeschlossen an die Autobatterie zur Versorgung der Side Marker Lichter F2: Sicherung 20A an die Autobatteriefür den Kühlschrank. F3: Sicherung 15A direkt an die Servicebatterie für die elektrische Stufe angeschlossen F4: Sicherung 30A direkt an die Servicebatterie für die Webasto / Zusätzlich Versorgung angeschlossen F5: Sicherung 15A angeschlossen an den Hauptlichtschalter für die Lichtgruppe_1 F6: Sicherung 15A angeschlossen an den Hauptlichtschalter für die Lichtgruppe_2...
- Page 14 ABZWEIGDOSE NE185_11S JP13 JP16 JP15 JP14 JP11 JP10 EINGANG AUTOBATTERIE JP7: ABWASSERTANK (R1) Eingang + AUTOBATTERIE (B1) 1. NEGATIV 2. FULL Abwassertank R1 EINGANG SERVICEBATTERIE Eingang + SERVICEBATTERIE (B2) JP8: ABWASSERTANK(R2-R3) 1. NEGATIV J3 : NEGATIV 2. FULL Abwassertank R2 1.
- Page 15 PANEL DE MANDOS NE273-S El panel Ne273 dispone de 8 botones con diferentes funciones dependiendo de la pantalla activa en la pantalla. La función se indica en la pantalla con una imagen, en correspondencia con la tecla. En la pantalla principal de la izquierda son los 4 botones para activar y desactivar las cargas, mientras que los 4 botones de la derecha están dedicadas a la programación, la lectura de las baterías de valor y los tanques, ajuste de brillo y apagar el panel.
- Page 16 DERIVADOR NE185_11S LEYENDA: F1: Fusible 5A conectado a la batería vehículo para alimentar las luces side marker F2: Fusible 20A conectado a la batería vehículo para la alimentación del frigorífico. F3: Fusible 15A conectado directamente a la batería de servicios para la alimentación del escalón F4: Fusible 30A conectado directamente a la batería de servicios para la alimentación Webasto/Aux F5: Fusible 15A conectado al interruptor general luces para alimentar el grupo luces_1...
- Page 17 DERIVADOR NE185_11S JP13 JP16 JP15 JP14 JP11 JP10 J1: ENTRADA BATERÍA AUTO JP7: DEPÓSITOS RECUPERACION (R1) 1. Entrada + batería AUTO (B1) 1. NEGATIVO J2: ENTRADA BATERÍA SERVICIOS 2. FULL Depósito recuper ación R1 1. Entrada + batería SERVICIOS (B2) JP8: DEPÓSITOS RECUPERACION(R2-R3) J3 : NEGATIVO 1.
- Page 19 °C °C BATTERY CONTROL PANEL CHARGER FULL FULL +12 SIDE MARKER SERVICE BATTERY BATTERY KEY-ON SIDE MARKER JP13 JP11 NE185_11S 0,5A JP16 JP14 JP15...
- Page 20 - Los datos indicados en las hojas de instrucciones pueden sufrir modificaciones sin preaviso alguno; esto se debe a las continuas mejorías técnicas. 31018 Z.I. ALBINA DI GAIARINE (TV) Viale delle Industrie 6A - ITALY Tel.+39 0434 759420 - Fax +39 0434 754620 www.nordelettronica.it KIT-NE185_12S-NE273 95.0001.076 Rev. 00...
Need help?
Do you have a question about the KIT-NE185-12S and is the answer not in the manual?
Questions and answers