Table of Contents

Subscribe to Our Youtube Channel
Related Manuals for NOVA BIOMEDICAL Max Creat eGFR


Summary of Contents for NOVA BIOMEDICAL Max Creat eGFR
- Page 1 NOVA MAX CREAT eGFR MONITORING SYSTEM Investigational Use Only For Investigational Use Only eGFR MeterIFU Manual PN64548A Personnal Meter.indd 1 eGFR MeterIFU Manual PN64548A Personnal Meter.indd 1 12/20/21 12:19 PM 12/20/21 12:19 PM...
- Page 2 eGFR MeterIFU Manual PN64548A Personnal Meter.indd 2 eGFR MeterIFU Manual PN64548A Personnal Meter.indd 2 12/20/21 12:19 PM 12/20/21 12:19 PM...
- Page 3 Supplies: Web Site: www.novabiomedical.com or contact your local distributor Nova Max® is a Registered Trademark of Nova Biomedical Corporation Made in the U.S.A. by Nova Biomedical Corporation Copyright 2021 Nova Biomedical Corporation PN 64548 Rev. A 12/2021 eGFR MeterIFU Manual PN64548A Personnal Meter.indd 3...
- Page 4 eGFR MeterIFU Manual PN64548A Personnal Meter.indd 4 eGFR MeterIFU Manual PN64548A Personnal Meter.indd 4 12/20/21 12:19 PM 12/20/21 12:19 PM...
- Page 5 Symbols The following are symbols that are used in this manual, on insert sheets, and on the Meter. Lot Number In vitro diagnostic medical device Only Prescription Use Only Authorized Representative in the European Community Electronic Waste Product fulfills the requirements of Directive 98/79 EC (IVDD) Catalog number Caution, consult accompanying...
- Page 6 Important Information! • Before you begin using your new Nova Max Creat eGFR Meter, please read all of the instructions provided in this Instructions for Use Manual as well as the instructions provided in the Nova Max Creat eGFR Test Strips and the Nova Max Creat eGFR Control Solutions.
-
Page 7: Table Of Contents
Nova Max Creat eGFR Meter .................7 General Safety ......................8 Before Testing ......................9 Test Strips ........................9 Important Nova Max Creat eGFR Test Strip Information ......10 Meter Components ....................11 Getting Started......................12 Running Nova Max Creat eGFR Control Solution ..........21 Nova Max Creat eGFR Control Solution ............21 Perform a Control Solution Test ................21... - Page 8 Table of Contents Testing a Control Solution ...................24 Testing a Blood Sample .....................29 Important Safety Instructions ................29 Test Result .........................33 Review Test Results in Memory .................35 Setting the Time, Date, Beeper, Versions ............38 Personal Settings ......................43 Basic Upkeep .........................47 Battery Check ......................47 Charging the Battery .....................48 Cleaning and Disinfecting the Meter ..............49 Displays, Meanings, Actions ..................54...
-
Page 9: Intended Use
Intended Use The Nova Max Creatinine and eGFR Monitoring System is intend- ed for in vitro diagnostic use for the quantitative measurement of creatinine in capillary whole blood obtained from the fingertip for monitoring of kidney health by calculating Estimated Glo- merular Filtration Rate (eGFR). -
Page 10: Important Safety Instructions
• Blood – Use only capillary whole blood obtained from the fingertip. Do not use serum or plasma. • Do not use the Nova Max Creat eGFR Test Strips for testing neonates. • Test results are best obtained when used within an operating rela- tive humidity of 10% to 90% (non-condensing). -
Page 11: Blood-Borne Pathogens Safety
Standard Precautions when handling or using the Nova Max Creat eGFR Monitoring System. 2. Healthcare professionals should be aware that all parts of the Nova Max Creat eGFR Monitoring System are considered potentially infectious and can potentially transmit blood-borne pathogens between patients and healthcare professionals. - Page 12 Important Safety Instructions “Guideline for Isolation Precautions: Preventing Transmission of Infectious Agents in Healthcare Settings 2007, ” http://www.cdc. gov/hicpac/2007ip/2007isolationprecautons.html. Biosafety in Microbiological and Biomedical Laboratories (BMBL) found at http://www.cdc.gov/biosafety/publications/bmbl5/. “Protection of Laboratory Workers From Occupationally Ac- quired Infections; Approved Guideline-Third Edition, ” Clinical and Laboratory Standards Institute (CLSI) M29-A3.
-
Page 13: Federal Communications Commission (Fcc) Notice
Important Safety Instructions Federal Communications Commission (FCC) Notice FCC ID: QYY-61721 IC: 4562A-61721 This device complies with Part 15 of the FCC Rules: Operation is subject to the following conditions: 1. This device may not cause harmful interference, and 2. This device must accept any interference received, Including interference that may cause undesired operation Changes and Modifications not expressly approved by Nova Bio- medical Corporation can void your authority to operate this equip-... - Page 14 Important Safety Instructions Radio Standards Specifications (RSS) Notice This device contains licence-exempt transmitter(s)/receiver(s) that comply with Innovation, Science and Economic Development Canada’s licence- exempt RSS(s). Operation is subject to the following two conditions: This device may not cause interference. This device must accept any interference, including interference that may cause undesired operation of the device.
-
Page 15: Introduction
Introduction The Nova Max Creat eGFR Meter The Meter is a hand-held testing device that measures Creatinine and eGFR levels in capillary whole blood obtained from the finger- tip. • A simple one-step process provides a Creatinine and eGFR blood test result. -
Page 16: General Safety
Introduction General Safety Persons operating this Meter must be proficient in the operating and maintenance procedures of the Meter, The following safety procedures must be followed. 1. Read the safety and operating instructions before operating the Meter. 2. Retain the safety and operating instructions for future refer- ence. -
Page 17: Before Testing
Test Strips The Nova Max Creat eGFR Test Strips are designed for use with the Nova Max Creat eGFR Meter. Use each Test Strip only once, then discard. DO NOT reapply blood to a Test Strip. -
Page 18: Important Nova Max Creat Egfr Test Strip Information
• Use only Nova Max Creat eGFR Test Strips when testing. • Remove the Test Strip from the vial only when ready to test. • Storage temperature for the Nova Max Creat eGFR Test Strips and Nova Max Creat eGFR Control Solution: 35.6°F to 46.4°F (2°C to 8°C). -
Page 19: Meter Components
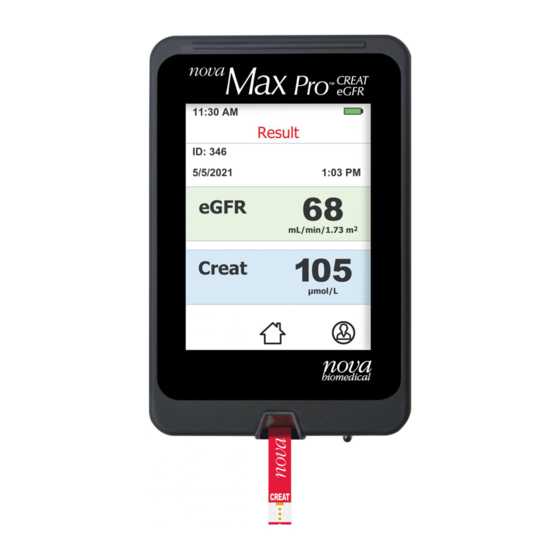
Creat Result mg/dL Home Personal Settings Button Button Creat eGFR Test Strip inserted here Nova Max Creat eGFR Meter Components eGFR MeterIFU Manual PN64548A Personnal Meter.indd 11 eGFR MeterIFU Manual PN64548A Personnal Meter.indd 11 12/20/21 12:19 PM 12/20/21 12:19 PM... -
Page 20: Getting Started
Getting Started Charge the Meter’s battery before use. Connect the in- cluded power supply to a wall outlet, then insert one end of the charging cable into the power supply and the other into the Meter’s charging cable connector. The Meter may display the charging screen for several minutes. - Page 21 Getting Started 1. Set the desired language for use on the Meter. Press the button to the right of the desired language to select it for use. Once selected, the display will switch to the Verify Date and Time screen. 2.
- Page 22 Getting Started 3. To set the current date, first select the date display order. Press icon next to the date display order to scroll through the 3 available options, MM/DD/YYYY, DD/MM/YYYY, or YYYY/MM/DD. Set Date uses 3 scroll wheels for the month (1-12), day (1-31), and year (2021-2037).
- Page 23 Getting Started return to the Verify Date and Time screen. Press Back to discard any changes and return to the Verify Date and Time screen. 4. Set Time uses 3 scroll wheels for the hour (1- 12), minute (0-59), and type (AM, PM, or 24H). The hour wheel will update (00-23) if 24H is selected.
- Page 24 Getting Started 5. Select your Birth Date using the 3 scroll wheels for month (1-12), day (1-31), and year (allows for ages 18-120). The Day scroll wheel adjusts depending on how many days are in the month. Press Continue to advance to the Select Gender screen or press Back to return to the Verify Date and Time screen.
- Page 25 Getting Started 7. From the Select Ancestry screen, select Black or Other. The selec- tion will turn dark to confirm your choice. Press Continue to review your settings or press Back to return to the Select Gender screen. 8. Your selections for Date of Birth, Gender, and Ancestry are dis- played.
- Page 26 Home Screen Battery Indicator Run Blood Test Run QC Test Settings Icon History Icon Nova Max Creat eGFR Meter Screen Display eGFR MeterIFU Manual PN64548A Personnal Meter.indd 18 eGFR MeterIFU Manual PN64548A Personnal Meter.indd 18 12/20/21 12:19 PM 12/20/21 12:19 PM...
- Page 27 Getting Started To conserve battery power, the Meter turns off the display after 60 seconds of inactivity (120 seconds if a test strip is inserted). After 30 minutes of inactivity, the Meter automatically turns itself off. To manually turn off the display, press the power button on the left side of the Meter briefly.
- Page 28 Getting Started To use the Meter, press the power button. If the Meter was off, the Meter will boot up and display the Verify Date/Time screen. Press Continue to display the Home screen. If the Meter was in sleep mode, the screen shown when the Meter entered sleep mode is displayed.
-
Page 29: Running Nova Max Creat Egfr Control Solution
Running Nova Max Creat eGFR Control Solution Nova Max Creat eGFR Control Solution Nova Max Creat eGFR Control Solution is a liquid control that con- tains a fixed amount of Creatinine. • Use this solution to test that the Meter and Test Strips are working properly. -
Page 30: When To Perform A Quality Control Test
• If there are indications that the system is not working properly. • If you drop the Meter. The Nova Max Creat eGFR Control Solution should produce results that fall within the range of results printed on the vial label of the Control being used. -
Page 31: Important Information For Control Solution
Running Nova Max Creat eGFR Control Solution Important Information for Control Solution • Use only Nova Max Creat eGFR Control Solution. • Check the expiration date on the Control Solution vial. Do not use Control Solution past the expiration date or you may get inaccurate results. -
Page 32: Testing A Control Solution
If your Control Solution test results continue to fall outside the range printed on the Control Solution vial label: • The Nova Max Creat eGFR Meter and Test Strips may not be work- ing properly. • Do not use the Meter to test your blood. - Page 33 Running Nova Max Creat eGFR Control Solution 3. The Run QC 1 or QC 2 screen displays. Touch the end of the Test Strip to the QC drop until the Test Strip fills and the on-screen countdown timer begins. (Beeper sounds if enabled.) Arrow flashes.
- Page 34 Running Nova Max Creat eGFR Control Solution 5. Press the Home button to return to the Home screen The result can be viewed later in the QC History screen. NOTE: If the strip is removed before the test starts or is not used for over 2 minutes, the screen will go blank.
- Page 35 Running Nova Max Creat eGFR Control Solution • The Control Solution may have expired or have been contaminated. Check the expiration date on the Control Solution vial. Control Solution is good for only 3 months after the first opening. Make sure the Control Solution vial is closed when not in use.
-
Page 36: Important Safety Instructions
Important Safety Instructions Standard Precautions should be adhered to when handling or us- ing the Nova Max Creat eGFR Monitoring System to reduce the risk of disease transmission. All parts of the Nova Max Creat eGFR Monitoring System are con- sidered potentially infectious and can potentially transmit blood- borne pathogens. -
Page 37: Testing A Blood Sample
Testing a Blood Sample For more information, refer to the following references: • “Guideline for Isolation Precautions: Preventing Transmission of Infectious Agents in Healthcare Settings 2007, ” http://www.cdc. gov/hicpac/2007ip/2007isolationprecautons.html. • Biosafety in Microbiological and Biomedical Laboratories (BMBL) found at http://www.cdc.gov/biosafety/publications/bmbl5/. “Protection of Laboratory Workers From Occupationally Acquired Infections;... - Page 38 Testing a Blood Sample 1. From the Home screen, press Run Blood Test. This starts the process to run your test. Arrow flashes. Blood- Drop flashes. 2. Press the Continue button to display the Insert Strip screen. The Meter waits for you to insert a strip. Once done the Meter transitions to the Apply Sample screen.
- Page 39 Testing a Blood Sample 3. Wash your hands with soap and warm water then dry thoroughly after cleaning. 4. Holding the hand downward, massage your finger with the thumb toward the tip to stimulate blood flow. 5. Use a single-use, disposable 21 gauge safety Lancet to punc- ture the finger.
- Page 40 Testing a Blood Sample 11. A countdown on the screen appears while the test is in prog- ress. The eGFR and Creat results are displayed in 30 seconds and automatically stored in memory. 13. Wash your hands thoroughly with soap and water after han- dling the Meter, Lancet, or Test Strips.
-
Page 41: Test Result
Testing a Blood Sample NOTE: Do not press the Test Strip directly against the skin. Touch the Test Strip gently to the blood drop. NOTE: Discard used Lancets and Test Strips in a puncture-proof con- tainer such as a biohazard container. Test Result Green Green... - Page 42 Test Result The Stages of Chronic Kidney Disease vs the eGFR value is shown in the table below. (National Kidney Foundation/Estimated Glomeru- lar Filtration Rate (eGFR): kidney.org.) eGFR MeterIFU Manual PN64548A Personnal Meter.indd 34 eGFR MeterIFU Manual PN64548A Personnal Meter.indd 34 12/20/21 12:19 PM 12/20/21 12:19 PM...
-
Page 43: Review Test Results In Memory
Review Test Results in Memory To review your test results that are stored in memory, start with the Meter displaying the Home screen. The Home screen has a History button . 1. Pressing this button displays the Result History screen. eGFR MeterIFU Manual PN64548A Personnal Meter.indd 35 eGFR MeterIFU Manual PN64548A Personnal Meter.indd 35 12/20/21 12:19 PM... - Page 44 Review Test Results in Memory 2. The Result History screen displays a scroll wheel with all avail- able results based on Date. Pressing the Right Arrow button for one of your result dates displays that result. 3. Press the Personal Settings icon to open your Result Set- tings screen.
- Page 45 Review Test Results in Memory 5. To review QC History, press the QC button at the bottom right of the Result History screen. 6. The QC History screen displays a scroll wheel with all available QC results based on Date. 7.
-
Page 46: Setting The Time, Date, Beeper, Versions
Setting: Time, Date, Beeper, Versions The Meter Settings menu provides a means of setting the date and time to match the local time zone or adjust for daylight savings. An alert tone can be enabled for the user if desired and the Meter Software and Strip Reader version, as well as the serial number of the Meter, are displayed. - Page 47 Setting: Time, Date, Beeper, Versions 2. The More screen displays; press Meter Settings to display the Meter Settings screen. 3. To set the current Date or Time, press Date & Time. 4. The Date & Time screen displays. 5. To set the current date, press Date.
- Page 48 Setting: Time, Date, Beeper, Versions 8. To set the current time, from the Date & Time screen press Time. The Set Time screen dis- plays. 9. Set Time uses 3 scroll wheels for the hour (1- 12), minute (0-59), and type (AM, PM, or 24H). The hour wheel will update (00-23) if 24H is selected.
- Page 49 Setting: Time, Date, Beeper, Versions 11. To enable or disable the alert sound, from the Meter Settings screen press Sound. 12. The Sound screen displays. 13. Touching the speaker icon will toggle the sound between On or OFF. Press Continue to save the Sound setting and return to the Meter Settings screen.
- Page 50 Setting: Time, Date, Beeper, Versions 14. To view the Meter’s software version and serial number, from the Meter Settings screen press Versions. 15. The Versions screen displays. 16. The Meter Software and Strip Reader version and the Meter’s Serial Number are displayed. 17.
-
Page 51: Personal Settings
Personal Settings The Meter can be personalized for your information that is needed to give an accurate eGFR calculation. Access Personal Settings from the following screens. 1. To access the Personal Settings menu; from the Home screen, press the Settings icon 4. - Page 52 Personal Settings 5. Press Date of Birth on the Personal Settings screen. Select Birth Date using the 3 scroll wheels for month (1-12), day(1-31), and year (allows for ages 18-120). The Day scroll wheel adjusts de- pending on how many days are in the month. 7.
- Page 53 Personal Settings 8. Press Gender to display the Select Gender screen and select Gender. 9. Press the Continue button to save gender and redisplay the Personal Settings screen. 10. Press Ancestry to display the Select Ancestry screen. eGFR MeterIFU Manual PN64548A Personnal Meter.indd 45 eGFR MeterIFU Manual PN64548A Personnal Meter.indd 45 12/20/21 12:19 PM 12/20/21 12:19 PM...
- Page 54 Personal Settings 11. Select Black or Other. 12. Press continue to save then on the Personal Settings screen press to return to the Home screen. 13. The meter is now set up for your personal use. eGFR MeterIFU Manual PN64548A Personnal Meter.indd 46 eGFR MeterIFU Manual PN64548A Personnal Meter.indd 46 12/20/21 12:19 PM 12/20/21 12:19 PM...
-
Page 55: Basic Upkeep
Basic Upkeep Battery Check The Meter displays a green battery progress bar when the battery charge is >33%. The battery changes color from green to yellow to red to warn the user to recharge the battery. Test results are stored in non-volatile memory to prevent test result loss. -
Page 56: Charging The Battery
Basic Upkeep Charging the Battery The Meter battery is charged like a cell phone with a special cable that is provided with a wall plug for USB. Plug the small end of the cable into the right side port and the USB into the USB port of the provid- ed plug. -
Page 57: Cleaning And Disinfecting The Meter
The Nova Max Creat eGFR Meter should be cleaned and disinfected weekly over the intended 3-year use-life of the Meter. The Nova eGFR cleaning and the disinfecting procedure was validated a total of 10,950 times by Nova Biomedical. - Page 58 Disinfecting means killing or preventing the growth of disease-carrying microorganisms. The Nova Max Creat eGFR Meter should be cleaned and disinfected weekly to minimize the risk of transmission of blood-borne patho- gens between the owner and other persons.
- Page 59 Basic Upkeep IMPORTANT: Nova recommends cleaning and disinfecting the Me- ter with the following EPA Registered products - Clorox® Germicidal Wipes, EPA Registration #67619-12 or Super Sani-Cloth® Germicidal Disposable Wipes, EPA Registration #9480-4. These products are widely available at numerous retail and wholesale providers . NOTE: Cleaning and disinfection may in rare cases damage the device(s).
- Page 60 Basic Upkeep Cleaning and Disinfecting the Meter NOTE: To properly clean and disinfect the Meter, steps 1 to 5 should be performed together. 1. Clean the Meter. • Wipe the external surface of the Meter thoroughly with a fresh Germicidal Wipe. •...
- Page 61 Basic Upkeep 3. Observe surface contact time. • Ensure the Meter surface stays wet for the recommended time (1 minute for the Clorox® Germicidal Wipes or 2 minutes for the Super Sani-Cloth® Germicidal Disposable Wipes) and is allowed to air dry for an additional 1 minute. NOTE: If you must rewet the surface of the Meter, use a new, fresh wipe.
-
Page 62: Displays, Meanings, Actions
Displays, Meanings, Actions This section addresses the messages that appear on your displays, what they mean, and what action you need to take. Display What it Means What to Do Software Error Pressing the right arrow The Meter detected an on any error will bring internal software error. - Page 63 Displays, Meanings, Actions Hardware Error Pressing the right arrow The Meter detected an on any error will bring internal hardware error. you back to the insert The Meter shall generate strip screen to run an- 3 short beeps. other strip. Call Customer Service.
- Page 64 Displays, Meanings, Actions Temperature Error The Meter is outside the When the test strip was required temperature inserted, the Meter range 59°F to 104°F (15°C detected operating to 40°C). Move the Meter temperature out of range. to a warmer or cooler area The Meter shall generate and wait a few minutes.
- Page 65 Displays, Meanings, Actions Test Strip Error Replace with a new strip. The Meter detected Pressing the right arrow the inserted test strip is on any error will bring defective. The Meter shall you back to the insert generate 3 short beeps. strip screen to run an- other strip.
- Page 66 Displays, Meanings, Actions Defective/Bad Strip Repeat the test with a Error new strip. Pressing the The test strip is defective right arrow on any error or bad. The Meter shall will bring you back to the generate 3 short beeps. insert strip screen to run another strip.
- Page 67 Displays, Meanings, Actions These Result Screens will show if eGFR or Creati- nine values are out of the specified range for the Meter. The current range is 15 - 90 ml/min/1.73 m for eGFR and 0.30 - 7.00 for Creatinine(mg/dL). These QC Result Screens will show if Creatinine values are out of the speci-...
- Page 68 Displays, Meanings, Actions Display What it Means What to Do The Meter • Test Strip inserted Insert the Test Strip does not upside down or not correctly with the Creat turn on after completely in. name and white tip facing inserting up and out.
- Page 69 Displays, Meanings, Actions The Meter • Not enough blood Repeat the test with a does not sample new Test Strip. begin test • Sample applied after Repeat the test with a countdown Meter automatically new Test Strip. after apply- turned off ing a blood •...
-
Page 70: Appendix
Appendix Specifications Test Measured Creatinine and eGFR Creat Methodology Enzyme, Amperometric Creat Blood Test Results 0.30 - 7.00 mg/dL (Plasma values) Sample type Capillary whole blood from the fingertip eGFR Test range 15 - >90 mL/min/1.73 m Limit of Detection Limit of Quantitation Length of Test 30 seconds... - Page 71 Appendix Battery Life (normal) 400 Tests Low Battery Life About 10 Tests Operating Ranges Temperature 59°F to 104°F (15°C to 40°C) Humidity 10% to 90% relative humidity Weight 3.17 oz (90 g) Size 3.75 x 2.44 x 0.74 in (95.25 x 61.98 x 18.80 mm) Meter data storage Minimum of 400 Results eGFR MeterIFU Manual PN64548A Personnal Meter.indd 63...
-
Page 72: Ordering Information
Appendix Ordering Information Supplies and parts for the Nova Max Creat eGFR Meter System are available from Nova Biomedical. DESCRIPTION .................Part # Nova Max Creat eGFR Creatinine Test Strips ........64147 Nova Max Creat eGFR Creatinine Test Strips (Dual Pack) ... 64154 Nova Max Creat eGFR Creatinine Control Solution Level 1 .. -
Page 73: Warranty
Appendix Warranty Your Nova Max Creat eGFR Meter is warranted to be free of material and workmanship defects for 3 years from the date of purchase (except as noted below). If at any time during the first 3 years after... - Page 74 Max Creat eGFR Test Strips. Therefore, we make no warranty as to the performance of the Nova Max Creat eGFR Meter when used with any Test Strips other than Nova Max Creat eGFR Test Strips. 4. There is no other express warranty for this product. The option of a replacement, described above, is the warrantor’s only...
- Page 75 eGFR MeterIFU Manual PN64548A Personnal Meter.indd 67 eGFR MeterIFU Manual PN64548A Personnal Meter.indd 67 12/20/21 12:19 PM 12/20/21 12:19 PM...
- Page 76 eGFR MeterIFU Manual PN64548A Personnal Meter.indd 68 eGFR MeterIFU Manual PN64548A Personnal Meter.indd 68 12/20/21 12:19 PM 12/20/21 12:19 PM...
Need help?
Do you have a question about the Max Creat eGFR and is the answer not in the manual?
Questions and answers