Table of Contents

Related Manuals for NOVA BIOMEDICAL STATSTRIP


Summary of Contents for NOVA BIOMEDICAL STATSTRIP
- Page 1 Quick Reference Guide Refer to the StatStrip Lactate Hospital Meter Instructions for Use Manual and Package Inserts for complete instructions for use, indications, precautions, and limitations of the system. For Export Only Lactate Hospital Meter...
-
Page 3: Table Of Contents
StatStrip Lactate Hospital Meter Table of Contents Intended Use ..............QR-1 The StatStrip Lactate Hospital Meter......QR-2 Barcode Scanning ............QR-3 Quality Control Test ............QR-4 Add Comment to a Result (Patient, QC, Linearity) ..QR-12 Running a Patient Sample ..........QR-13 Docking/Charging Station .......... -
Page 5: Intended Use
Intended Use The Nova StatStrip Lactate Hospital Meter System is intended for in vitro diagnostic use by health care professionals for clini- cal and for point-of-care usage for the quantitative determina- tion of Lactate (Lac) in fresh whole blood venous and arterial blood samples. -
Page 6: The Statstrip Lactate Hospital Meter
The StatStrip Lactate Hospital Meter Refer to this Quick Reference Manual only after you have become familiar with all of the instructions in the Instruc- tions for Use Manual. Scan/Home Buttons Test Strip Port (one on each side) Touch Screen... -
Page 7: Barcode Scanning
Barcode Scanning A built-in barcode scanner provides automated data entry. Patient ID's and lot numbers may be scanned into the meter. To scan a barcode, hold the barcode label parallel to and approximately 2 to 6 inches from the scanner. Press either the left or right side scan button. -
Page 8: Quality Control Test
Quality Control Test The following section explains how to run a Quality Control Test with one of the 2 Nova StatStrip Lactate Control Solutions. Read the StatStrip Lactate Control Solution package insert sheet for complete instructions, indications, precautions, and limitations of the system. - Page 9 NOTE: If the Strip Lot Number is invalid, the screen displays the invalid number with "is not a valid Strip Lot Try again." 3. Press the Accept soft key if the lot number is correct. Data Entry Enter Strip Lot Enter Strip Lot Op: 8636 Op: 8636 Name: ED 13:42 Name: ED 13:42 Field _________________________ _________________________ 0206506089 Accept Soft Key Scan Scan...
- Page 10 4. The Enter QC Lot screen displays. Enter the QC lot num- ber, select from the QC Lot List screen (press the List soft button), or scan the barcode. To scan the barcode, press the Scan soft key. NOTE: If the QC Lot Number is invalid, the screen dis- plays the invalid number with "is not a valid QC Lot # Try again."...
- Page 11 Data Entry Enter QC Lot Enter QC Lot Op: 8636 Op: 8636 13:42 13:42 Name: ED Name: ED Field _________________________ _________________________ 0207406081 Accept Soft Key Scan Scan Scan Soft Key Scan Accept Clear List Back 6. The Insert Strip screen displays. Insert a Test Strip as shown on the screen.
- Page 12 Op: 8636 Name: ED 13:42 the Apply Sample screen displays. Insert Test Strip in meter 8. Gently shake the StatStrip Lactate Control Solution before each use. 9. Discard the first drop of control solution from the bottle to avoid contamination. Cancel...
- Page 13 10. Place a drop of control solution from Apply Sample Op: 8636 Name: ED 13:42 the bottle to the end of the test strip Touch test strip to Level 1 QC drop until the solution is drawn into the well of the test strip. When enough sample has been drawn into the strip, an audible beep is sounded by the meter.
- Page 14 QC Result QC Result Op: 8636 Op: 8636 Lactate Result Name: ED 13:42 Name: ED 13:42 QC Lot: 0213806081 QC Lot: 0213806081 Level: 1 Level: 1 Strip Lot: 0206806099 Strip Lot: 0206806099 PASS PASS mmol/L mg/dL Range 0.3-1.0 Range 3-9 Accept Soft Key Comment...
- Page 15 WARNING: Do not test patient sample until a control solution test result is within expected range. 13. To add a comment to the result, press the Comment soft key. 14. To accept the results, press the Accept soft button. QR-11...
-
Page 16: Add Comment To A Result (Patient, Qc, Linearity)
Add Comment to a Result (Patient, QC, Linearity) To add a comment to a Data Free Text Comment Op: 8636 Name: ED 13:42 result, press the Comment Entry _________________ NOTIFIED DR SMITH soft key on the Result /+-.!, Field screen. The Free Text Comment screen displays. -
Page 17: Running A Patient Sample
Running a Patient Sample Read the Test Strip package insert sheet for com- plete instructions, indications, precautions, and limitations of the system. Patient Test Op: 8636 1. From the Patient Test screen, Name: ED 13:42 press the Accept soft key. Accept Soft Key MENU... - Page 18 2. The Enter Strip Lot screen displays. Enter or scan the strip lot number. 3. Once the Lot Number has been added, press the Accept soft key. Data Enter Enter Strip Lot Enter Strip Lot Op: 8636 Op: 8636 Name: ED 13:42 Name: ED 13:42...
- Page 19 4. If the Physician's ID is enabled, the Enter Phys ID screen displays next. Enter the Physician's ID: from Phys ID List screen (press List soft key), by pressing numeric/ alphanumeric soft keys (press the ABC... soft key), or by scanning the barcode ID. 5.
- Page 20 7. If Sample ID Type is enabled, select (soft keys) Enter Accn Num (Accession Number) or Enter Patient ID: either the Enter Accn Num screen or the Enter Patient ID screen will display. 8. From the Enter Patient ID screen, enter the Patient ID: from Patient ID List screen (press List soft key), by press- ing numeric/alphanumeric soft keys (press the ABC...
- Page 21 Data Entry Enter Patient ID Enter Accn Num Op: 8636 Op: 8636 Name: ED 13:42 Name: ED 13:42 Field _________________________ _________________________ 54821 ABC... Accept Soft Key Soft Key Scan Soft Key Scan ABC... Erase ABC... List Soft Key Clear Accept Scan List Back...
- Page 22 10. Once the Patient's ID/Accession Number has been en- tered, press the Accept soft key. 11. The Insert Strip screen displays. Insert Strip Insert Strip Op: 8636 Op: 8636 Insert a test strip as shown on the Name: ED Meter Name: NICU-1 13:42 13:42 Insert Test Strip in meter...
- Page 23 12. Draw a fresh blood sample from an artery or a vein. 13. Use either the syringe or a pipette to add a blood drop to the Lactate test strip. Apply Sample Op: 8636 Name: NICU-1 13:42 Touch test strip to blood drop from a syringe or pipette.
- Page 24 14. The Apply Sample screen should be displaying. When the blood drop appears, touch the end of the test strip to the blood drop until the well of the test strip is full and the meter beeps. WARNING: The test strip must fill completely upon touching the blood droplet. If the test strip does not fill completely, do not touch the test strip to the blood droplet a second time. Discard the test strip and repeat the test with a new...
- Page 25 15. The test results will appear in 13 seconds. NOTE: Do not remove the test strip while the count- down is in progress. NOTE: A single up arrow displays for abnormal high result and 2 up arrows for critical high value. A single down arrow displays for abnormal low result and 2 down arrows for critical low value. QR-21...
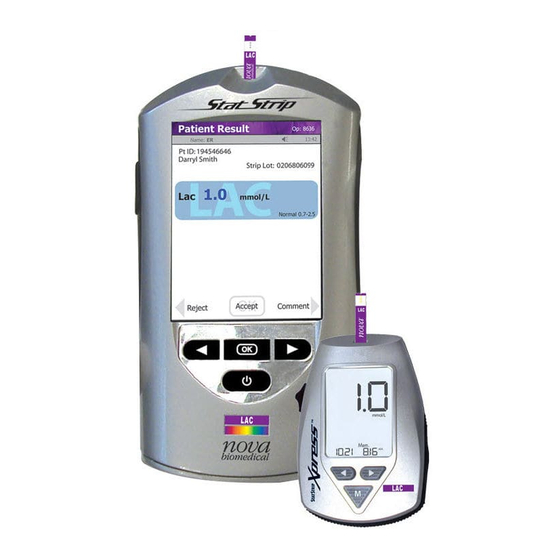
- Page 26 16. To accept the result, press the Accept soft key. To reject the result, press the Reject soft key. To add a comment, press the Comment soft key (See Section 2.4 Add Comment to Result in IFU Manual.) All data are stored into memory. Lac Result Patient Result Patient Result...
-
Page 27: Docking/Charging Station
Docking/Charging Station When the meter is not in use, place it into the Docking/ Charging Station. This enables the meter to stay fully charged and connects the meter to the computer network. When the Battery LOW symbol displays on the screen, place the meter into the Docking/Charging Station. -
Page 28: Changing The Battery
Changing the Battery If you have a spare fully charged battery, it can be changed to allow for continuous operation. WARNING: Replace the battery with Nova P/N 42215 only. Using another battery may present a risk of fire or explosion. If discarding, dispose of the battery promptly. - Page 29 date and time: see the Lactate Meter Instructions for Use Manual. 2. Push down on the 2 cover latches to release the cover. Take the battery cover off the back of the meter. 3. Push up on the battery latch. Remove the drained battery. 4. Replace with a fully charged battery. NOTE: The battery is keyed to allow only insertion from bottom first then push in top.
-
Page 30: Cleaning The Meter
5. Replace the battery cover. 6. Place the drained battery into the Charging Station. Cleaning the Meter The meters should never be immersed in any cleaning agent. Always apply the cleaning agent to a soft cloth to wipe the meter surface. Once complete, immediately dry thoroughly. - Page 31 • Commercial surface decontamination preparations that are approved for use by your facility can be used. Apply to a small test area first to ensure surface finish integrity. • Avoid harsh solvents such as benzene and strong acids. CAUTION: DO NOT immerse the meter or hold the meter under running water.
-
Page 32: Troubleshooting
Troubleshooting The Nova StatStrip Lactate Hospital Meter displays screen alerts. 1. Battery Low - Change the battery or place the meter into the Charging Station. Welcome Name: ED 13:42 Your Facility Facility: Location: Battery Low Icon Battery Low Charge/Replace Battery... - Page 33 2. Test Strip Was Removed - The test has been cancelled, repeat the test with a new test strip. Leave the test strip in place until the result is displayed on the screen. Analysis Error Op: 8636 13:42 Name: ED 13:42 Analysis CANCELED Continue...
- Page 34 3. Temperature - Meter will only work/operate within the temperature range of 59°F to 104°F (15°C to 40°C). Return the meter to an environment within the specified temperature range of 59°F to 104°F (15°C to 40°C). Analysis Error Op: 8636 Name: ED 13:42 Temperature Error...
- Page 35 4. Bad Sample - Insert a new strip and rerun the test. If the error code persists, perform the test using an alternate test strip vial or alternate method. Analysis Error Op: 8636 Name: ED 13:42 Bad Sample [B - #] Remove strip to Continue Continue QR-31...
- Page 36 5. Replace Strip - Occurs after insertion of strip or occurs during analysis. Insert another strip and retest. If the error code persists, perform the test using an alternate test strip vial or alternate method. Analysis Error Op: 8636 Name: ED 13:42 Replace Strip [A - #] Remove strip to Continue...
- Page 37 6. Flow Error - The specimen was incorrectly drawn into the test strip due to either insufficient or incorrect sample application. Repeat the test with a new strip. If the error code persists, perform test using an alternate method. Analysis Error Op: 8636 Name: ED 13:42...
- Page 38 7. Transfer Failed - Server refuses to allow dialog with meter, or Connection to server was broken. Please check the network settings, status of your network, or contact your administrator for assistance. Transfer Failed Transfer Failed Op: 8636 Op: 8636 Name: ED 13:42 Name: ED...
- Page 39 8. Transfer Failed - The meter was removed before data transfer was complete. Please re-dock the meter. Transfer Failed Op: 8636 Name: ED 13:42 The meter was un-docked before data transfer was completed. Please re-dock to finish data transfer Or, press Welcome button to continue without data transfer Welcome QR-35...
- Page 40 QR-36...
- Page 41 Flintshire, CH5 2JZ For technical assistance outside the United States, call your local Nova subsidiary or authorized distributor. Nova Biomedical GesmbH Nova Biomedical UK Nova Biomedical Canada Ltd. Laxenburgerstrasse 33/6 C3-5 Evans Business Centre 17 - 2900 Argentia Road A-1100 Vienna...
- Page 42 Lactate Hospital Meter Nova Biomedical Web: www.novabiomedical.com 200 Prospect Street Waltham, MA 02454-9141 U.S.A. Made in the USA by Nova Biomedical Corporation StatStrip is a registered trademark of Nova Biomedical. ® Copyright 2011 Nova Biomedical Corporation REF 47643B 2011-03...
Need help?
Do you have a question about the STATSTRIP and is the answer not in the manual?
Questions and answers