Table of Contents
Advertisement
Quick Links
Advertisement
Table of Contents

Related Manuals for Xite Solutions XSG3NA


Summary of Contents for Xite Solutions XSG3NA
- Page 1 XSG3NA INFOTAINMENT CENTER Owner’s Manual XiteSolutions North America Inc.
- Page 2 Disclaimer Before using this product, please read this manual fully to ensure correct operation. Keep the manual at hand for future reference. XiteSolutions North America Inc.
-
Page 3: Table Of Contents
Disclaimer Content.…………………………………………………..…………………3 7. SiriusXM®……………… …………………………......25 Disclaimer………………………………………...…………………… 2,4-6 7.1 Subscribing to SiriusXM……………………………………………25 1. Features………………………………………………………………….7 7.2 Operating SiriusXM…………………………………………………26 2. Display……………..………………………………………………..8 7.3 Tuning to a channel…………………………………………………27 2.1 Main Monitor Display…..…………………………………………….8 7.4 Parental Control Channel Locking and Skipping………………..28 2.2 Secondary Monitor Display………………………………………..9 7.4.1 Lock Code………………………………………………………. 28 2.3 Information Bar…………………………………………………..10 7.4.2 Lock Mode/Unlock Mode……………………………………….28 2.4 Main Menu…………………………………………………….……10... -
Page 4: Disclaimer
Disclaimer THIS IS A DISCLAIMER OF LIABILITY AND DAMAGE RESPONSIBILITY AS REGARDS TO THE INFOTAINMENT CENTER MANUFACTURER AND YOUR USE OF THE PRODUCT. YOU ASSUME TOTAL RESPONSIBILITY AND RISK FOR USING THIS SYSTEM. Failure to properly focus on the operation of your motor vehicle can result in death, serious injury and property damage. The Infotainment Center should never be used at a time or in a manner that distracts you from properly focusing on operation of the motor vehicle in which it is installed. - Page 5 Disclaimer Safety Information Read the operating instructions for the Infotainment Center and all other components of the system carefully before using the system. FAILURE TO OBSERVE THE INSTRUCTIONS GIVEN IN THIS MANUAL MAY CAUSE INJURY OR DAMAGE AND VOID THE WARRANTY. Warnings! Observe the following warnings when using this unit: The driver should neither watch the display nor operate the system while driving.
- Page 6 Disclaimer Notes on Use: Video Sources and On-Screen Display Your Infotainment Center is designed to only display video when the parking brake is fully engaged. • Never attempt to circumvent, defeat or bypass any of these safety features. These designs are intended to reduce driver distractions. •...
-
Page 7: Features
1. Features 10.4” Main and 7” Secondary (Optional) Touch Screen LCD Display Favorite Source Hot Key GPS Navigation (Optional) SiriusXM-Ready AM/FM/RDS Stereo Radio iPod/iPhone Interface and Control Split Screen Interface Media Center ... -
Page 8: Display
2. Display 2.1 Main Monitor Display NAVI Press the NAVI button once to go to the navigation system While viewing your navigation press the NAVI button to return to the active source (Radio, or SXM, or Bluetooth, etc.). If the navigation route is running, navigation audio voice prompts will continue to be heard over the speakers according to the Navigation audio settings you have selected in the Settings menu (See section 3.3 of this manual for more information). -
Page 9: Secondary Monitor Display
2. Display 2.2 Secondary Monitor Display Press DIM to change the brightness of the screen (1 to 5). Set to SYNC for the brightness to be controlled by the Main Monitor. NAVI Press NAVI button to enter / exit Navigation Menu. Press CAM button to directly go to camera view. -
Page 10: Information Bar
2.4.2 TPMS (Optional) TPMS (Tire Pressure Monitoring System) On information how to use TMPS please refer to doc #: 03-01-011-00 XSG3NA with TPMS 2.4.3 Aux Zone Select Aux Zone to change display source on the Aux output. See the next section for more information. -
Page 11: Aux Zone
2. Display 2.5 Aux Zone From the Main Menu, select Aux Zone. Aux Zone allows selection of source for display on in-dash secondary monitors (Secondary monitor) or house mode (AUX ZONE). A/V selections include MAIN (mirrors main screen), NAVI (Navigation), HDMI, AUX, CAMERA, RADIO, SXM and OFF. -
Page 12: Setup
3. Setup Settings Access the Settings by selecting the Setup icon in the Main Menu. There are three Settings that can be changed and these are System, Video, and Audio. In addition, there are Settings for Radio, Sirius XM, and Bluetooth and to access these, you must go to the setup icon while one of these sources is active. - Page 13 3. Setup 3.1 System Setup (continued) Auto uses Dim (Day Time) when no illumination signal is present, and it uses Dim (Night Time) when illumination signal is present. Auto (GPS) uses information from GPS to determine Dim (Day Time) vs Dim (Night Time).
-
Page 14: Video Setup
3. Setup 3.2 Video Setup By touching the VIDEO button, the settings for the video part of the Infotainment Center can be changed. Brightness: Sets the brightness level (-10 to +10). Contrast: Sets the contrast level (-10 to +10). Tint: Sets the tint level (-10 to +10). Sharpness: Sets the sharpness level (0 to 8) Note: The Infotainment Center has a factory default for optimal LCD settings, however the level can be adjusted to set the display according to individual preference. -
Page 15: Audio Setup
3. Setup 3.3 Audio Setup By touching the AUDIO button, the settings for the audio part of the Infotainment Center can be changed. Treble Gain: Sets the treble level (-10 to +10). Mid Gain: Sets the mid level (-10 to +10). Bass Gain: Sets the bass level (-10 to +10). -
Page 16: Radio Operation
4. Radio Operation Radio can be selected from the Main Menu by pressing the RADIO icon on the LCD display. The Radio can be left at any time by pressing the Radio icon at the top left of the Radio screen. There are two different radio modes (Basic and Extended). - Page 17 4. Radio Operation Tap to allow the selection between the FM and AM bands. There are 3 FM and 2 AM ranges available, all with 6 available presets. TA means Traffic Announcement and will interrupt any audio source when a traffic announcement message is relayed from a radio station supporting this functionality.
-
Page 18: Media Center
5. Media Center 5.1 Copy, Paste, Delete, Select, Select All, File View Media center can be selected from the Main Menu by tapping the Media Center icon on the LCD display. The Media Center can be left at any time by tapping the Media Center icon at the top left of the LCD display. -
Page 19: Play Audio/Video Files
5. Media Center 5.2 Playing Audio/Video Files Media Center supports the following file formats: MP3, MP2, WAV, WMA, FLAC, APE, HE-AAC, OGG, BSAC, MPEG4-ASP, MPEG4, AVC, MPEG1/2, VC-1, H.263, RV, Sorenson H.263(S/W), WMV7, WMV8(S/W), AVI, ASF, MP4, M2TS, RMFF, FLV, MKV, TS. To play the audio, video or image file, tap on one of the files in the folder or subfolder on the right hand side of the LCD. -
Page 20: Bluetooth Operation
6. Bluetooth Operation Bluetooth mode can be selected from the Main Menu by tapping the Bluetooth icon on the LCD display. The Bluetooth mode can be left at any time by tapping the Bluetooth icon at the top left of the Bluetooth screen. The Infotainment Center supports Bluetooth wireless connections. -
Page 21: Pairing Your Phone
6. Bluetooth Operation Notes on Pairing: If PAIR START appears temporarily, the pairing cannot start due to an active connection. Please disconnect any active mobile phones. Only when PAIRING is displayed, the Infotainment Center becomes visible for mobile phones. Use your mobile phone to search for the Infotainment Center to connect to your mobile phone. - Page 22 6. Bluetooth Operation Notes on Phonebook Feature: Phonebook function is matched with OPP (Object Push Profile) in user's mobile phone. To update changes to the phonebook of a paired mobile phone, you must perform the phonebook download step again. The contents in incoming call list, outgoing call list, and missed call list will be only call lists when system and mobile phone are paired.
-
Page 23: Incoming Calls
6. Bluetooth Operation 6.3 Incoming Calls While the mobile phone is connected, incoming calls will be handled by the Infotainment System. When an incoming call is present, the LCD display will switch to Bluetooth mode and show the phone number (when available) from the person calling. -
Page 24: Av (A2Dp Audio Playback Over Bluetooth)
6. Bluetooth Operation Phonebook Dialing Calls can be made by accessing your downloaded phonebook. to access your Phonebook. Tap the contact name on the right you wish to call. Tap the number you wish to call. Tap the green phone icon. Note: Outgoing calls can also be made on the mobile phone itself. -
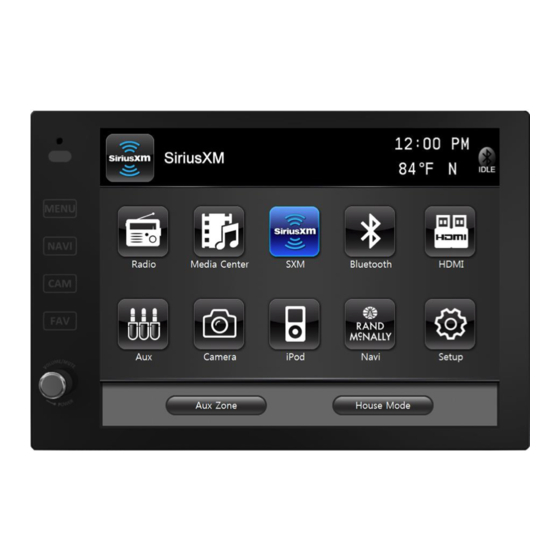
Page 25: Siriusxm
7. SiriusXM® Satellite Radio Only SiriusXM® brings you more of what you love to listen to, all in one place. Get As part of the activation process, the SiriusXM satellites will send an activation over 140 channels, including commercial-free music plus the best sports, news, talk, message to your tuner. -
Page 26: Operating Siriusxm
7. SiriusXM® Satellite Radio 7.2 Operating SiriusXM Satellite Radio The display for the SiriusXM mode is laid out to provide you with the required information and icons to allow maximum enjoyment of your SiriusXM subscription. Pressing the “FUNC” button will toggle between function buttons. CAT, CAT+, SCAN, P.DEL will change to ALERT, ALERT+, SKIP, LOCK. -
Page 27: Tuning To A Channel
7. SiriusXM® Satellite Radio 7.3 Tuning to a channel Press once to tune to the next/previous channel. Press and hold to rapid tune. To page through a channel or category list, press found to the right of the channel list. The Infotainment Center will store up to 18 preset stations of your choice. -
Page 28: Parental Control Channel Locking And Skipping
7. SiriusXM® Satellite Radio Once you have successfully entered the lock code SiriusXM will remain in Unlocked mode until the Infotainment Center is turned off, put into standby mode or you repeat step one above. 7.4.3 Mature Channel Locking The Infotainment Center is set to default the Mature Channel Locking to OFF. This feature will automatically lock all mature themed channels determined by SiriusXM. -
Page 29: Artist & Song Alerts
7. SiriusXM® Satellite Radio 7.5 Artist & Song Alerts While listening to SiriusXM Satellite Radio, you can be alerted when your favorite songs or artists are playing on other channels. You can store up to 50 of your favorite Artists and 50 favorite songs. The Infotainment Center will display an Alert message when a matching artist or song is found on another channel or you can choose either My Artists or My Songs categories to have access to all channels that have current alerts playing. -
Page 30: Replay
7. SiriusXM® Satellite Radio 7.6 Replay The Replay feature allows you to pause, rewind, and replay up to 60 minutes of live SiriusXM Satellite Radio. The status bar shows you the current buffer capacity. Once full, the oldest track will be removed allowing the newest live track to be added. -
Page 31: Siriusxm Settings Menu
7. SiriusXM® Satellite Radio 7.7 SiriusXM Settings Menu There are many features that can be changed to customize your SiriusXM Radio experience. To enter the SiriusXM settings menu you must currently have SiriusXM selected. From there press the SiriusXM icon top left corner of display, and select Setup icon. -
Page 32: Understanding Siriusxm Advisory Messages
7. SiriusXM® Satellite Radio 7.8 Understanding SiriusXM Advisory Messages Check Antenna Channel Not Available The radio has detected a fault with the SiriusXM antenna. The antenna cable is The channel that you have requested is not a valid SiriusXM channel that you were either disconnected or damaged. -
Page 33: Ipod & Iphone Av Interface
8. iPod and iPhone AV Interface The Infotainment Center can also be connected to your Apple iPod or iPhone. When the iPod is connected, press the iPod icon in the Main Menu. The iPod mode can be left any time by pressing the iPod icon at the top left of the screen. To access and use the iPod feature please connect your iPod/iPhone device first to the iPod cable provided. -
Page 34: Hdmi
9. HDMI Infotainment Center is capable of receiving and transmitting HDMI signal. To view HDMI on your Infotainment Center, connect your HDMI compatible device (Smartphone, Tablet, etc.) to the HDMI port located at the front of the Core. To exit HDMI source, simply tap anywhere on the LCD display, and then tap the top left corner of the display to get to the Main Menu. -
Page 35: Split Screen
10. Split Screen Your Infotainment Center is capable of Split Screen or PiP (Picture-in-Picture) technology. This option allows you to view your Navigation as well as the other Infotainment Center options on one split screen at the same time. Split Screen Setup To access split screen, go to Main Menu, and tap the Setup icon. -
Page 36: Camera (Optional)
11. Camera (Optional) The Infotainment Center can be connected to an optional rearview camera or camera control box (for multiple cameras) to enhance viewing around your vehicle while performing maneuvers. When connected, the camera AV source can be displayed in two ways: Manual Viewing: By selecting the Camera icon from the Main Menu you can have full screen display of your rear camera. -
Page 37: Navigation (Optional)
12. Navigation (Optional) The Infotainment Center is capable of providing navigation. If you have purchased If you are using the Premium Remote Control accessory to operate your navigation this option please see your Navigation Program User Manual for instructions on please ensure that the Navigation is the current display (full screen) on the using the navigation software. -
Page 38: Premium Remote Control (Optional)
13. Premium remote control (Optional) The Infotainment Center is compatible with the Premium Remote Control accessory. MAIN Random Power Reverse (Rear Zone) Mute Play/Pause (Rear Zone) Mode Forward (Rear Zone) Numeric 1 (Preset 1) Stop (Rear Zone) Numeric 2 (Preset 2) Previous (Rear Zone) Numeric 3 (Preset 3) Next (Rear Zone) - Page 39 13. Premium remote control (Optional) iPod To use the Premium Remote please reference the chart below view the functionality Function Description the remote will provide for each feature of your Infotainment Center. The remote will UP/DOWN Search Track list Up/Down. only control the current function on the main LCD display.
- Page 40 13. Premium remote control (Optional) Radio Navigation Function Description Function Description Next 20-24 Directional Pan Map Tune/ Hold for Seek Previous MENU Main Menu Band Go to next set of Preset Channels (3X6) Address search Numeric (Preset *) Tune to saved Channel Preset 1-6 Numeric 7 (Radio AF) Alternative Frequency ON/OFF Numeric 8 (Radio PTY)
-
Page 41: Customer Feedback
Customer Feedback Your Infotainment Center has been designed specifically for use in Recreational Vehicles. This system has been designed to offer a rich and intuitive feature set that is simple to use and even easier to enjoy. We have engineered this system based off input from real RV’ers like you! We want your feedback. -
Page 42: Product Registration
Product Registration Please take a moment to fill out your Infotainment Center Registration Card and mail it to the address provided on it or contact us by phone or email at the address below. By registering your product you will be kept up to date on any enhancements to the Infotainment Center. -
Page 43: Notes
Notes XiteSolutions North America Inc.
Need help?
Do you have a question about the XSG3NA and is the answer not in the manual?
Questions and answers