Table of Contents
Advertisement
Quick Links
Advertisement
Table of Contents

Related Manuals for Meris LVX


Summary of Contents for Meris LVX
- Page 1 M A N U A L (Preliminary Release - Features subject to change at the sole discretion of Meris, LLC) M O R E T H A N L O G I C . U N I T I N G A R T + E N G I N E E R I N G .
-
Page 2: Table Of Contents
TAB LE O F CONTENTS SECTION 1 PG. 1 - 2 OVERVIEW - LVX - Navigation Controllers (C1, C2, C3) - Highlighted Features - Back Connections SECTION 2 PG. 2 PRESET PAGE SECTION 3 PG. 3 EDITING (EDIT PAGE) - EDIT PAGE - Navigation Controllers, Favorited Parameters... - Page 3 SECTION 11 PG. 1 7 MIDI CC TABLE (PRELIMINARY) SECTION 12 PG. 2 1 TUNER SECTION 13 PG. 22 GLOBALS SECTION 14 PG. 23 TEXT VIEW (ALTERNATIVE VIEW OF EDIT PAGE) SECTION 15 PG. 23 FACTORY RESET SECTION 16 PG. 24 FIRMWARE UPDATE SECTION 17 PG.
-
Page 4: Overview
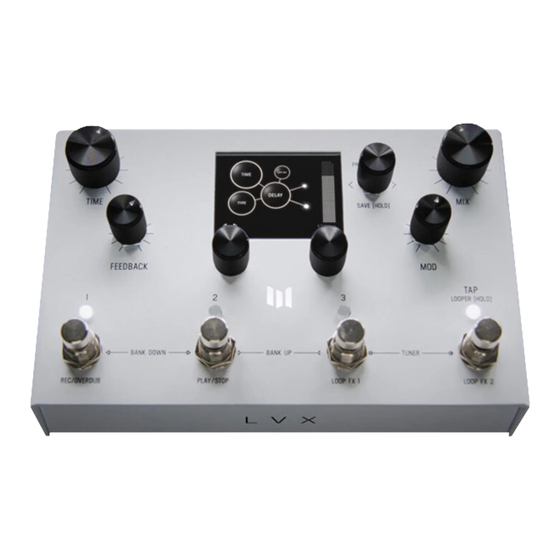
Make Room for New Memories. LVX is what we’ve been dreaming of for many years. It is a Modular Delay System which breaks the paradigm of pre-set delay types in favor of freedom and flexibility. The architecture of LVX allows ultimate creative freedom to design a custom delay, exactly as you’ve dreamed of. -
Page 5: Back Connections
- PRESET PAGE (GRAPHIC VIEW) When you first power up LVX, you will enter the Preset Page. By default, LVX is shipped in “GRAPHIC VIEW”. In GRAPHIC VIEW, 3 knobs are your navigation controllers: C1, C2, C3. The Preset Page consists of a preset bubble that contain the name and num- are controlled by C1 and C2 (located directly above the controllers). - Page 6 - EDITING (EDIT PAGE IN GRAPHIC VIEW) EDIT PAGE From the PRESET PAGE, push C3 to enter EDIT PAGES. The EDIT PAGE is where you select categories and change parameters within each preset. The middle bubble is your category. Turn C3 to cycle through categories. Turn C1 knob to carousel through the parameters.
- Page 7 UI MAP - (IN GRAPHIC VIEW) (home), push C3 to navigate into the EDIT PAGES (2nd level). The 2nd level, consists of EDIT PAGES, From the PRESET PAGE GLOBALS, SYSTEM INFO and TACTILE PAGE that wrap around when turning C3. Preset Page - (Home) From Preset Page, push C3 to go to Edit Page.
- Page 8 GLOBALS Globals is located at the end of the Edit Page, after you cycle thru all categories. A shortcut to Globals is to start from Edit Page and turn C3 L. Globals is before System Info. Globals carousels the same way as the Edit Page but will be colorized in solid gold. - SAVING (SAVE AS PAGE IN GRAPHIC VIEW) SAVE AS PAGE Once edits are made within a preset, hold down C3 knob to enter SAVE AS PAGE.
- Page 9 2 FAVORITE PARAMETERS (ASSIGNABLE TO EACH PRESET) 2 FAVORITE PARAMETERS can be assigned to each preset. They are located on each side of the preset bubble, directly above C1 and C2. In the SAVE AS PAGE, turn C3 to select either the L or R field. The field will highlight as an outlined box AND a dot will appear on either side of the preset bubble to indicate which side is selected.
-
Page 10: Save Preset Or Cancel
SAVE PRESET OR CANCEL Hold down C3 knob again to save. Or QUICK SAVE. To CANCEL a save, press any of the four footswitches. This will exit the SAVE AS PAGE without writing over your preset. If you cancel, no edits are saved. QUICK SAVE To QUICK SAVE without changing the name or favorite status, hold the active/lit LED button or foot switch directly below. -
Page 11: Favorites Bank
- FAVORITES BANK We created what we call the FAVORITES bank. The purpose of the FAVORITES BANK is to have a shortcut access to your top 3 favorite presets without the need navigate thru banks. The FAVORITES bank is located before bank 1. To jump to the FAVORITES bank, HOLD 1 + 2 footswitches. -
Page 12: Modifiers
- MODIFIERS LVX has MODIFIERS which allow automatic control of your knobs. In Edit Page, turn C3 to MODIFIERS (named in middle bub- ble). Choose parameters: LFOs, Envelope Generator, Sample and Hold and Sequencer. For MODIFIERS, you can set the speed, note division, assignment, and the min and max knob scale values. -
Page 13: Expression
- EXPRESSION An expression pedal on LVX works the same way as the Modifiers. Turn C3 to navigate to the Expression Pedal section, to get ready to make our first assignment. You get six in total (labeled A through F). -
Page 14: Looper
- LOOPER LVX has an always available 60 second stereo looper. The looper has customizable footswitches and the loop itself can also be moved, before the delays, after the delays, in the dry path, and even in the feedback of the delay lines. You also get a unique warp control that scrubs through the current loop with the expression pedal. -
Page 15: Delay Structures
- DELAY STRUCTURES The heart of LVX are the stereo delay lines. The first two delay parameters are Structure and Type. Structure reorganizes the delay lines to add delay taps and filters, reverse the direction, and twist the delays into a dual poly structure adapted from our Polymoon. -
Page 16: Categories And Elements
Important: the Modulation Category is separate from the front panel Mod knob which directly controls the modulations built into the delays. All the processing elements in LVX, with the exception of Poly Chorma, are stereo and can process the left and right audio signal completely independently. -
Page 17: Preamp Category
Also shown in the above diagram is the Mixer for LVX. The Mixer is directly connected to the front panel mix knob. To adjust the Dry and Wet Trim levels, use C3 to enter Edit View and page over to the MIX section. -
Page 18: Filter Category
Parameters: Depth (milliseconds), Resonance, Level, Spread Pitch Category Poly Chroma - LVX is a fully polyphonic chromatic pitch shifter. The only mono element, the Poly Chroma sums your stereo channels together and perfectly shifts the audio no matter how complicated the chords. - Page 19 Dynamic Flanger - envelope driven flanging from the PolyMoon, this element can provide a wide range of creative effects from subtle double-tracking, wild pitch bends, and deep flanging that tears across the frequency spectrum. Parameters: Attack Speed, Depth, Feedback, Direction, Mix Cassette - the Cassette element provides the warbles and degradations of a failing reel of tape.
-
Page 20: Midi Cc Table (Preliminary)
- MIDI CC TABLE (PRELIMINARY) control change lvx control receive value range CC# 01 CC# 02 dry trim CC# 03 wet trim CC# 04 expression pedal CC# 05 preamp type CC# 06 preamp loCation CC# 07 preamp parameter CC# 08... - Page 21 CC# 22 delay parameter CC# 23 delay parameter CC# 24 delay parameter CC# 25 delay parameter CC# 26 delay parameter CC# 27 delay parameter CC# 28 delay parameter CC# 29 delay parameter CC# 30 delay parameter CC# 31 delay parameter CC# 32 delay parameter CC# 33...
- Page 22 CC# 46 delay parameter CC# 47 delay parameter CC# 48 delay parameter CC# 49 delay parameter CC# 50 delay parameter CC# 51 delay parameter CC# 52 delay parameter CC# 53 delay parameter CC# 54 delay parameter CC# 55 delay parameter CC# 56 delay parameter CC# 57...
- Page 23 CC# 70 pitCh type CC# 71 pitCh loCation CC# 72 pitCh parameter CC# 73 pitCh parameter CC# 74 pitCh parameter CC# 75 pitCh parameter CC# 76 pitCh parameter CC# 77 pitCh parameter CC# 78 filter type CC# 79 filter loCation CC# 80 filter parameter CC# 81...
-
Page 24: Tuner
- TUNER To engage TUNER, HOLD 3 + TAP footswitches. Notes are automatically detected and turn green when accurately tuned. Tuner reference frequency can be adjusted if desired. HOLD 3 + TAP footswitches to engage TUNER. -
Page 25: Globals
Noise Gate: Sets the threshold to enable the gate to help with noisy setups • Kill Dry: When kill dry is enabled, the LVX only passes audio when active. In bypass, the LVX is muted. This is useful when working with an external mix control used in some amplifiers, processors, and mixing boards. -
Page 26: Text View (Alternative View Of Edit Page)
TEXT VIEW edit page (when set) utilizes 6 knobs to simultaneously control settings. See knobs indicated with grey arrows. - FACTORY RESET To put your LVX back to factory fresh condition, press and hold C2 when powering up the LVX. -
Page 27: Firmware Update
To enter firmware update mode, press and hold footswitch 1 and 3 while powering up LVX. The screen will show a Copy File graphic screen. Connect to your computer via the rear USB C jack. LVX will appear on your computer as a USB drive.
Need help?
Do you have a question about the LVX and is the answer not in the manual?
Questions and answers