Advertisement
Quick Links
INS972D - 12/13
Installation Guide
Please Contact Moen First
For Installation Help, Missing or
Guía de Instalación
Replacement Parts
(USA)
Guide d'installation
1-800-BUY-MOEN (1-800-289-6636)
Mon - Fri 8:00 AM to 7:00 PM, Eastern
Sat. 9:00 AM to 3:00 PM Eastern
WWW.MOEN.COM
(Canada)
1-800-465-6130
Mon - Fri 7:30 AM to 7:00 PM, Eastern
WWW.MOEN.CA
Por favor, contacte primero con Moen
Para la ayuda de Instalación, los
Desaparecidos o las Piezas de Recambio
01-800-718-4345
Lunes a viernes de 8:00 a 20:00 hs.
(Costa Este)
Sáb. 8:00 a 18:30 hs. (Costa Este)
WWW.MOEN.MX
Veuillez d'abord contacter Moen
en cas de problèmes avec l'installation, ou pour
obtenir toute pièce manquante ou de rechange
1-800-465-6130
Du lundi au vendredi :
de 7 h 30 à 19 h, HE
WWW.MOEN.CA
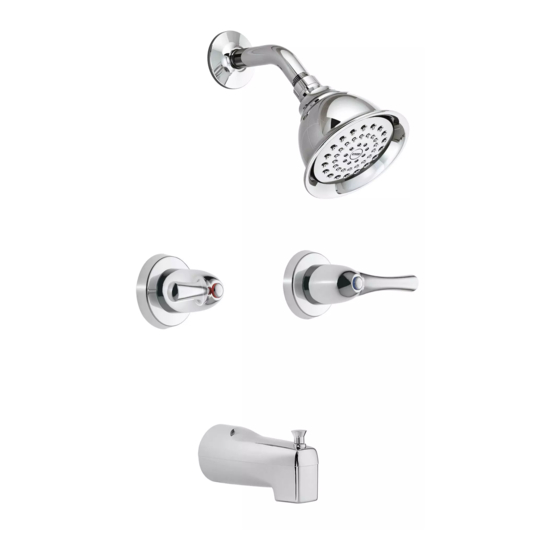
TWO HANDLE TUB/SHOWER
MODEL 82009, 82402, 82402EP
MEZCLADORA PARA TINA/
REGADERA DE DOS MANERALES
MODELO 82009, 82402, 82402EP
ROBINET À DEUX POIGNÉES
POUR DOUCHE/BAIGNOIRE
MODÈLE 82009, 82402, 82402EP
Advertisement

Related Manuals for Moen 82009


Summary of Contents for Moen 82009
- Page 1 WWW.MOEN.COM (Canada) 1-800-465-6130 Mon - Fri 7:30 AM to 7:00 PM, Eastern WWW.MOEN.CA Por favor, contacte primero con Moen Para la ayuda de Instalación, los Desaparecidos o las Piezas de Recambio 01-800-718-4345 Lunes a viernes de 8:00 a 20:00 hs.
- Page 2 For safety and ease of faucet replacement, Moen recommends the use of these helpful tools. HERRAMIENTAS ÚTILES Para que el cambio de la llave sea fácil y seguro, Moen le recomienda usar estas útiles herramientas. OUTILS UTILES Par mesure de sécurité et pour faciliter l’installation, Moen suggère l’utilisation des outils suivants.
- Page 3 INS972D - 12/13 For ease of operation and best performance, install the valve body 32” above the Use 1/2” Copper or 2"-2 7/8" floor and the shower arm at 78” above the floor. The tub spout can be installed be- IPS Pipe Only tween 6”...
- Page 4 Supply Lines From Above Valve / Supply Lines From Above Valve / Supply Lines From Above Valve SUPPLY LINES FROM ABOVE VALVE SUPPLY LINES FROM ABOVE VALVE SUPPLY LINES FROM ABOVE VALVE Position the valve as seen in 1b. Locate and remove the Flow Director (D) Rotate the valve over as seen in 2b.
- Page 5 INS972D - 12/13 INS1970 - 12/11 Optional/Optionnel/Opcional Thread seal tape Cinta para sellar roscas Ruban pour joints filetés GO TO GO TO VAYA AL PASO VAYA AL PASO ALLER À L'ÉTAPE ALLER À L'ÉTAPE This valve (E) can be plumbed using threaded connections (IPS). The water If soldering copper tubing (CC) into valve (E) insert ½”...
- Page 6 Option/Opción/Option Blue Azul Bleu Thread seal tape Cinta para sellar roscas Ruban pour joints letés Option/Opción/Option Rojo Rouge If desired, the blue cold temperature indicator (M) and the red hot tempera- Wrap thread seal tape onto the shower arm (B) threads clockwise. Thread ture indicator (L) can be installed onto the handles and are held in place by the shower arm (B) clockwise into shower arm elbow in wall.
- Page 7 INS972D - 12/13 INS1970 - 12/11 Thread seal tape Cinta para sellar roscas Ruban pour joints letés Handle Adapter Handle Adapter Handle Adapter 3 - 3 / 4 " ( 9 5 Wrap thread seal tape clockwise on the pipe threads. Thread the tub spout IF HANDLE ROTATION IS REVERSED: To adjust handle orientation, note handle (K) onto the pipe.
- Page 8 Defects or damage caused by the use of que cambian de un estado a otro o de una provincia o nación a otra. Moen lo other than genuine Moen parts is not covered by this warranty. This warranty is asesorará...