Table of Contents
Advertisement
Quick Links
Advertisement
Table of Contents

Related Manuals for Retro Games THEA500 MINI


Summary of Contents for Retro Games THEA500 MINI
- Page 1 USER MANUAL v1.0.0...
- Page 2 Retro Games Ltd. cannot be held responsible for any errors found in the supplied games. Retro Games Ltd. reserves the right to change without notice the specification of this product and the content of this manual to reflect any such changes. The latest version of the manual will always be available from the Retro Games Ltd.
-
Page 4: Table Of Contents
Unpacking the box Connecting THEA500 Mini Turning THEA500 Mini on and off First-time setup Language........3 Television settings . - Page 5 Options Display options System options Language Shutdown device Advanced options Television settings ......15 System information .
- Page 6 I have chosen a video output mode that is not supported by my TV The edges of the TV picture are being chopped off The TV picture appears to lag behind the game action USB stick is not recognised THEA500 Mini gets warm...
-
Page 7: Repetitive Motion Injuries I
THEA500 Mini. ● Stop using THEA500 Mini immediately and consult a doctor if you or anyone using or viewing THEA500 Mini experiences dizziness, eye or muscle twitches, disorientation, affected vision, involuntary movements, convulsions or seizures. -
Page 8: Eyestrain And Motion Sickness
Do not touch THEA500 Mini or any connected cables during an electrical storm. ● Do not touch any of the metal parts of the connectors on THEA500 Mini. ● Do not use any power cables, HDMI cables or peripherals if they are split, frayed or otherwise damaged. -
Page 9: Handling And Use
Make sure all cables are connected only to the correct ports, and make sure to hold plugs straight when inserting. ● Keep THEA500 Mini and all cables and peripherals out of the reach of young children. ● Do not position THEA500 Mini where it or any connected cables might cause someone to trip or stumble. -
Page 10: Introduction
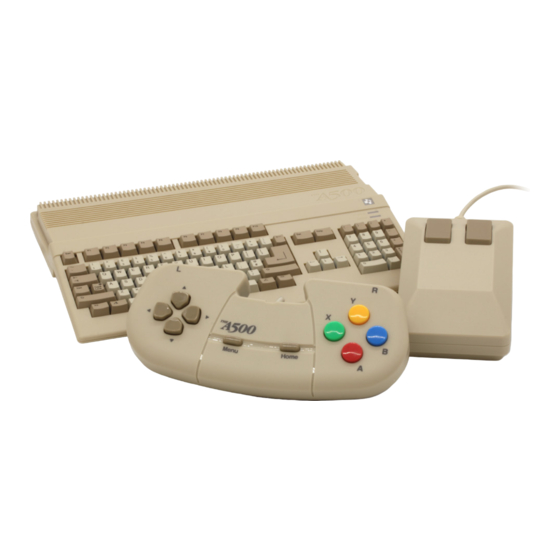
Introduction THEA500 Mini is a modern recreation of the Amiga home computer series first released by Commodore in 1985. THEA500 Mini is instantly reminiscent of the original Amiga 500 (although the keyboard is purely aesthetic and non-functional). However, looks can be deceiving as THEA500 Mini is packed... -
Page 11: Setting Up Thea500 Mini
Setting up THEA500 Mini Unpacking the box Before connecting any cables, check the contents of the packaging: ● THEA500 Mini ● THEGAMEPAD USB gamepad ● THEMOUSE USB mouse ● HDMI cable ● USB power cable ● THEA500 Mini Quick Guide You will also need to have the following items available (not included): ●... -
Page 12: Turning Thea500 Mini On And Off
To turn off THEA500 Mini, press and hold the power button for two seconds. First-time setup The first time you turn on THEA500 Mini you will be asked a few questions about some essential settings needed to get you going with your new THEA500 Mini. -
Page 13: Television Settings
Television settings To complete the set up, THEA500 Mini will ask you to choose the video output requirement of your television, either 50 Hz output or 60 Hz output. Move the selector to the required video output mode and select it by pressing A. -
Page 14: The Game Carousel
The game carousel 3 a b 1 Current game title 2 Current game description 3 Current game information icons a Control type icons These indicate what types of control are needed for the game. All built in games show indicating they can be played with THEGAMEPAD, and some also show indicating they can additionally be controlled using THEMOUSE, depending on preference. -
Page 15: Selecting A Game
Selecting a game Use - to scroll through the carousel of games and select the game you want. As each game is selected, the game title, description and information icons displayed at the top-left of the screen will update accordingly. Giving a game a favourite rating Press X to add a favourite star to the current game. -
Page 16: Getting Help For A Game
Getting help for a game Press 8 to view control help for the current game. This will show a diagram of THEGAMEPAD with each button labelled with its function within the game. Some games have a set of secondary controls (see "Playing a game"... -
Page 17: Resuming A Suspended Game
Resuming a suspended game Press H on THEGAMEPAD to resume a currently suspended game. Using the virtual keyboard While playing a game, pressing M will bring up a virtual keyboard on the right hand side of the screen. This allows you to virtually press any of the standard Amiga keyboard keys. -
Page 18: Saving And Loading Suspended Games
Saving and loading suspended games Pressing 2 will show the Saved game slots for the current game, where you can save a currently suspended game, or resume a previously saved game. Each game has four slots for saved games, represented by four floppy disks. 1 Filled saved game slot 2 Empty saved game slot 3 Elapsed game time... -
Page 19: Loading A Game
Loading a game If there is a currently suspended game, the miniaturised suspended game will move down and hover above the first available Saved game slot. If this is the case and you want to discard it and load a previously saved game, press 2 to move the selector down to one of the occupied game slots. -
Page 20: Options
Options Press M on the game carousel to show the Options menu. These options control the operation of the entire console. Move the selector with | and press A to select a menu option. Press B to back out of any menu. Display options This menu contains options to control how a game’s image is displayed on the TV. - Page 21 Fixed size / Choose one of these three display modes to change Moderate zoom / how THEA500 Mini scales the game image. The Screen fit amount of scaling applied will depend on the size of the game image (which varies between games) and the scaling mode selected.
-
Page 22: System Options
LED will mimic the behaviour of the original Amiga’s power LED: that of being controlled by the running game. When this option is turned off, the power LED will remain lit while THEA500 Mini is turned on (this is the default behaviour). -
Page 23: Language
Language This menu allows you to change the language THEA500 Mini uses to display the game descriptions and menus. The choices are English, Deutsch, Français, Italiano, Español and Polski. It does not affect the 25 included games, which are in English. -
Page 24: Advanced Options
Advanced options This menu contains options for more advanced users and rarely used functions. Television settings This menu contains options for controlling THEA500 Mini’s output to a television or monitor. -
Page 25: System Information
This is enabled by default. System information This shows THEA500 Mini’s current firmware build, and will also allow you to upgrade to a newer firmware build if one is present on an inserted USB stick (see "Updating the firmware"... -
Page 26: Loading Your Own Programs
WHDLoad programs for the Amiga and helps THEA500 Mini load and run them. On selecting USB Media Access and pressing A, THEA500 Mini will tell you if THEA500 WHDLoad Package is not installed on the USB stick. -
Page 27: Installing Thea500 Whdload Package
You should regularly check our website for updates to THEA500 WHDLoad Package. Installing THEA500 WHDLoad Package THEA500 Mini requires THEA500 WHDLoad Package to be installed on the USB stick that is being used with THEA500 Mini. Full instructions and THEA500 WHDLoad Package ZIP file can be found at retrogames.biz/products/thea500/support/whdload /... -
Page 28: Browsing Programs On The Usb Stick
Browsing programs on the USB stick Selecting the USB Media Access carousel item and pressing A will launch a file browser that you can use to load your own program files. Only directories and files with an .lha file extension will be shown. Use 5 to navigate through the contents of the USB stick. -
Page 29: Adjusting The Settings Of A Usb Stick Program
THEA500 Mini will default to showing the full resolution of the Amiga, which will include these black borders. -
Page 30: Auto Centre
To maximise the size of the image and remove the unused and unnecessary black borders at the top and bottom of the screen, a Crop rectangle can be configured to define the region of the image that THEA500 Mini will display. THEA500 Mini can perform this configuration automatically, and is described "Auto crop"... - Page 31 When configured, THEA500 Mini will know exactly how much and what part of the image is important, and will present that according to the Display...
-
Page 32: Auto Crop
To set the Crop rectangle correctly it will usually be necessary to repeatedly suspend the game, adjust the Crop rectangle and then resume the game to make a visual check. It is therefore recommended that you enable Screen fit in the Display options menu when performing a visual check, since it will make it easier to see when the settings are correct. -
Page 33: Ntsc
PAL models. The NTSC option will switch THEA500 Mini into NTSC mode so that the running program will act as if it is running on an NTSC Amiga. -
Page 34: Mapping The Gamepad
Amiga port 1 (being the first non-Mouse port) and if another THEGAMEPADs is plugged into THEA500 Mini, it will be connected to port 2. By default THEGAMEPAD will operate as both a Joystick or a CD32 pad, depending on how the port is configured. -
Page 35: Assigning Joystick Actions
● To make a selection from a different action group, press L Once an assignment is made, cleared, or skipped, THEA500 Mini will move the blue indicator to the next button, where you repeat the process until all buttons have been assigned, cleared, or skipped. -
Page 36: Assigning Keyboard Actions
Assigning keyboard actions Assigning Keyboard actions to THEGAMEPAD follows the same process as assigning Joystick actions. THEA500 Mini will display a representation of an Amiga keyboard and allow keys to be assigned to THEGAMEPAD buttons. Note: You can only assign a single keypress to a THEGAMEPAD button. -
Page 37: Assigning Mouse Actions
Assigning special actions Assigning Special actions to THEGAMEPAD follows the same process as assigning Joystick actions. THEA500 Mini will display a list of Special actions that can be chosen from which, at the time of writing, is the single action Show virtual keyboard. - Page 38 Insert the USB stick into THEA500 Mini. Go to Options → Advanced options → System information. THEA500 Mini will check if there is a newer firmware on the USB stick and, if so, give you the options to Update or Cancel.
- Page 39 While installing, THEA500 Mini will display a progress bar which will fill up from left to right as the update proceeds. It is important not to remove the USB stick or power from THEA500 Mini while the update is in process.
- Page 40 Expert-user game settings The majority of programs that are run on THEA500 Mini will behave as they did on the original Amiga. Occasionally a program might make unusual or heavy use of the CPU, co-processor or blitter which may impact its performance or sometimes cause display glitches.
- Page 41 The blitter is a component of the Amiga that can efficiently transfer large sections of data in memory on behalf of the CPU, freeing the CPU to do other things. The behaviour of THEA500 Mini blitter can be modified by setting the Blitter mode to one of three modes:...
- Page 42 Adjusting the memory available to a program By default THEA500 Mini provides 8 MB of Amiga chip memory for a program to run, which should be more than enough for most programs. However, there may be some that expect less than this, and others that run better with a little more.
- Page 43 Start Using third-party mice THEA500 Mini may be compatible with other USB mice, but you may find that the sensitivity is different to the included THEMOUSE. If this is the case, you can alter the system mouse sensitivity by adjusting Options → System settings →...
- Page 44 Some Amiga keyboard keys do not exist on a modern USB keyboard, so are mapped to the following keys: Amiga key USB keyboard key(s) Left solid Amiga ‘A’ Left Windows logo / Left Meta / Insert Right hollow Amiga ‘A’ Right Windows logo / Right Meta / Home Help Page Down...
- Page 45 TV" on page No sound heard from my DVI monitor THEA500 Mini is not designed to be used with a DVI monitor nor is it supported when done so. THEA500 Mini may appear to be compatible with DVI monitors through an HDMI-to-DVI converter, but the DVI standard does not support audio, so even if you see a picture you will hear no sound.
- Page 46 TV cannot display, or are now using a TV that doesn’t support that mode, there are two options. Either: ● Plug THEA500 Mini into a TV that does support the current output mode and then change the mode in Options → Advanced settings → Television settings (See "Television settings"...
- Page 47 Amiga, and in doing so it generates a little heat. THEA500 Mini contains lots of vents on the upper and lower surfaces of the case for this reason, and it is important not to block or impede this ventilation (see "Ventilation"...
Need help?
Do you have a question about the THEA500 MINI and is the answer not in the manual?
Questions and answers