Table of Contents
Advertisement
Available languages
Available languages
Quick Links
Í
NDICE
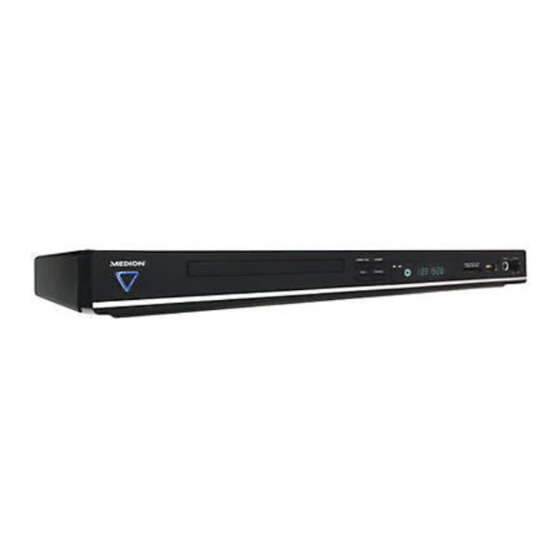
Aparato principal
Parte frontal
Parte posterior
Pantalla
1. Piloto LED azul para el modo standby
2. Compartimento para los discos
3. PLAY: Reproducción
4. OPEN/CLOSE: Abrir y cerrar el compartimento para los discos
5. STANDBY: Encender desde el modo standby y volver al modo
standby
6. STOP/RES: Parar la reproducción;
Pulsar repetidas veces: Seleccionar la resolución para HDMI y
Progressive Scan
7. IR : Receptor para el emisor del mando a distancia
8. USB: Piloto LED para el modo USB
9. Pantalla (ver más abajo)
10. Lectores para diferentes tarjetas de memoria
11. Conexión USB
12. PHONES: Toma de auriculares
13. VOLUME: Regulador de volumen para los auriculares
1. Interruptor de funcionamiento
2. Cable de red
3. HDMI: Salida HDMI (transmisión digital de imagen y sonido)
4. FRONT: Conexiones para los altavoces delanteros izquierdo/derecho
5. REAR: Conexiones para los altavoces traseros izquierdo/derecho
6. CENT: Conexión para el altavoz central
7. S-VIDEO: Salida S-VIDEO (transmisión de la imagen al televisor)
8. SUB: Conexión para subwoofer (altavoz de bajos)
9. VIDEO OUT: Salida VIDEO (transmisión de la imagen al televisor)
10. OPTICAL: Salida de audio digital
11. AV CONNECTOR (RGB) - TV: Euroconector para el televisor o el
aparato de vídeo
12. Y Pr Pb: Salidas de componentes
13. COAXIAL: Salida de audio digital
1. Medio: DVD
2. Reproducción
3. Pausa activada
4. Reproducción activada
5. Repetición activada
6. Disco en formato de sonido „dts"
7. Disco en formato de sonido Dolby Digital
8. Tiempo transcurrido en formato H:MM:SS
9. título actual / capítulo actual
10. PBC: Función Playback-Control activada (video-CD )
11. Medio: MP3
12. Medio: VCD
ES
1
Advertisement
Chapters
Table of Contents
Troubleshooting

Related Manuals for Medion MD 82333


Summary of Contents for Medion MD 82333
-
Page 1: Índice
Í NDICE Aparato principal Parte frontal 1. Piloto LED azul para el modo standby 2. Compartimento para los discos 3. PLAY: Reproducción 4. OPEN/CLOSE: Abrir y cerrar el compartimento para los discos 5. STANDBY: Encender desde el modo standby y volver al modo standby 6. -
Page 2: Mando A Distancia
Mando a distancia Mando a distancia DVD y mando a distancia universal En estas instrucciones están descritas las funciones de las teclas para el manejo del reproductor DVD. No obstante, con este mando a distancia se podrá manejar aún más aparatos. La funcionalidad del mando a distancia como mando a distancia universal se describe en el capítulo “El mando a distancia universal”, página 36. - Page 3 : Parar la reproducción 34. : Interrumpir la reproducción 35. OPEN/CLOSE: Abrir y cerrar el compartimento para los discos 36. SLOW/F: Avance lentos 37. SLOW/R: Retroceso lentos 38. REPEAT: Repetición 39. REPEAT A-B: Repetición de un fragmento definido 40. RANDOM: Reproducir el título de forma aleatoria 41.
-
Page 4: Table Of Contents
Í NDICE Índice ......... . 1 Aparato principal . - Page 5 Ajustes en el menú SETUP ......29 Menú AJUSTES DE SISTEMA ....... .30 Menú...
-
Page 6: Advertencias De Seguridad
DVERTENCIAS DE SEGURIDAD Acerca de las presentes instrucciones Antes de la puesta en marcha, lea atentamente las presentes advertencias de seguridad. Preste atención a las advertencias que aparecen en el propio aparato y en las instrucciones de funcionamiento. Mantenga siempre a su alcance las instrucciones de funcionamiento. Si vende o cede el aparato a otra persona, entréguele sin falta también las presentes indicaciones. -
Page 7: Nunca Efectúe Usted Mismo La Reparación Del Aparato
Si el aparato es trasladado de un lugar frío a un lugar caliente, espere un rato antes de conectarlo a la red. El agua condensada que se forma podría dañar el aparato. Cuando el aparato haya alcanzado la temperatura ambiental, se lo podrá poner en funcionamiento sin ningún peligro. Tormenta En caso de ausencia prolongada o de tormenta, desconecte el aparato de la red eléctrica y de la antena. -
Page 8: Manejo Seguro De Las Pilas
Manejo seguro de las pilas El mando a distancia del aparato necesita pilas. Para ello, observe las siguientes indicaciones: Mantenga las pilas alejadas de los niños. Las pilas pueden representar un peligro de muerte si se tragan. En caso de ingestión accidental de una pila hay que avisar inmediatamente a un médico. -
Page 9: Aspectos Generales
SPECTOS GENERALES Acerca de los DVDs El DVD - Digital Versatile Disc (inglés para „disco digital versátil”) es un medio de almacenamiento digital de información. Los DVDs están señalizados con uno de los símbolos que aparecen en el margen. Dependiendo de cómo ha sido grabada la información, existen diferentes tipos de DVD con diferentes capacidades de almacenamiento. -
Page 10: Otros Formatos Reproducibles
Otros formatos reproducibles MP3 y WMA Los formatos MP3 y WMA son formatos de compresión para datos de Los títulos en formato WMA están señalizados en pantalla audio. WMA significa „Windows Media Audio“ y es más reciente que el con el siguiente símbolo. formato MP3. -
Page 11: Preparación
REPARACIÓN Desembalar el aparato Retire la totalidad del material de embalaje, incluidas las láminas plásticas en la parte frontal del aparato. ¡ATENCIÓN! No permita que los niños pequeños jueguen con el plástico. ¡Existe peligro de asfixia! Compruebe el volumen de suministro Cuando desembale la caja, asegúrese de que están incluidos los siguientes artículos: Reproductor DVD... -
Page 12: Conexiones Y Posibilidades De Conexión
ONEXIONES Y POSIBILIDADES DE CONEXIÓN El aparato puede conectarse de muchas formas distintas con otros aparatos de entrada o salida. Apague todos los aparatos antes de conectarlos. No conecte los aparatos a la red hasta que no haya realizado todas las conexiones. Colocación del aparato Coloque el aparato sobre una superficie firme y lisa. - Page 13 Conexión con el televisor a través de un cable S-VHS. En caso de que su televisor no disponga de una conexión de Euroconector, puede utilizar un cable S-VHS para conectarlo al aparato (enchufe S-VIDEO) . De este modo conseguirá una buena calidad de imagen.
-
Page 14: Conexión Tv Con Función Progressive Scan
Conexión TV con función Progressive Scan Progressive Scan A través de las conexiones de componentes y la conexión HDMI el aparato puede transmitir las señales de vídeo en el formato PROGRESSIVE SCAN y por ello alcanzar una muy buena calidad de imagen. Esto presupone, por supuesto, que su televisor (o proyector) también pueda procesar este formato. - Page 15 Transmisión digital de imagen y sonido: HDMI Su reproductor DVD dispone de una toma HDMI (OUT). HDMI („High HDMI, el logotipo HDMI y High Definition Multimedia Interface“) es, dentro de la gama de la electrónica Definition Multimedia Interface recreativa, el único interfaz capaz de transmitir simultáneamente datos de son marcas comerciales o audio y de vídeo.
-
Page 16: Conexión Home Cinema Con Transmisión Analógica De Sonido
Conexión home cinema con transmisión analógica de sonido Una de las ventajas del DVD es el almacenamiento y la reproducción de sonido multicanal: Para reproducir el sonido 5.1, el reproductor DVD pone a su disposición las señales en la salida Dolby Digital 5.1. -
Page 17: Transmisión De Sonido Digital
Transmisión de sonido digital Conecte un cable coaxial o un cable óptico con la salida COAXIAL o OPTICAL del reproductor DVD y con la entrada correspondiente del amplificador. Para la transmisión de la imagen también puede emplear un cable S-Video o un cable cinch de vídeo: Conexión a la red Cuando ya haya efectuado todas las conexiones, enchufe el aparato con una toma de corriente (230 V ~ 50 Hz). -
Page 18: Funciones De Las Teclas
UNCIONES DE LAS TECLAS Control en el aparato o desde el mando a distancia Las teclas en la parte frontal del aparato le permiten activar las funciones Teclas de función en la parte frontal del aparato de reproducción esenciales de su aparato. Además de estas funciones básicas, el mando a distancia le ofrece muchos Las teclas del mando a distancia otros elementos de control para la plena funcionalidad del aparato. -
Page 19: Leer Tarjetas De Memoria O Memory Sticks Usb
Leer tarjetas de memoria o Memory Sticks USB Su reproductor DVD dispone de un lector de tarjetas de memoria para tarjetas SD, tarjetas multimedia y un Memory Stick, así como una conexión para un Memory Stick USB u otro reproductor USB. Tarjeta de memoria Introduzca una tarjeta de memoria con los contactos hacia abajo y la parte biselada hacia delante y a la derecha dentro del lector de tarjetas... -
Page 20: Funciones De Reproducción
Funciones de reproducción PAUSE/STEP (reproducción imagen a imagen) Para interrumpir la reproducción, pulse PAUSE/STEP. En pantalla aparecerá el símbolo de pausa: Pulse PAUSE/STEP repetidas veces, para avanzar imagen a imagen. En pantalla aparecerá el símbolo de la reproducción imagen a imagen: PLAY Para continuar con la reproducción, pulse PLAY . -
Page 21: Funciones De Repetición
Avance y retroceso rápidos Durante la reproducción pulse la tecla FAST para iniciar el avance o el retroceso rápidos. En pantalla aparecerá el símbolo de avance/retroceso rápidos así como la velocidad: : doble velocidad (2 x )Pulsando Pulsando una sola vez dos veces: velocidad por cuatro (4 x )Pulsando tres veces: velocidad por ocho (8 x )Pulsando cuatro veces: velocidad por dieciséis (1 6 x ) -
Page 22: Programación Del Orden De Reproducción - Program
Vuelva a pulsar la tecla A - B para definir el punto final de la secuencia A B . El fragmento definido se a repetir. En la pantalla aparece repetirá ahora ininterrumpidamente. Pulse A - B una tercera vez para finalizar la repetición de la secuencia. Con los CDs MP3 y los CDs Xvid no es posible activar la función REPEAT A-B. -
Page 23: Selección Directa De Título/Tiempo - Search
Selección directa de título/tiempo – SEARCH Con la tecla SEARCH puede acceder directamente a la reproducción de un capítulo, un título o un momento determinado del disco. Cada vez que pulse la tecla, irá modificando la selección. La reproducción se iniciará en el mismo lugar. -
Page 24: Seleccionar Síntesis - Digest (Dvd Y Vcd)
Para seleccionar una marca de lectura diferente, vaya a la casilla correspondiente con las teclas de navegación y pulse PLAY Las marcas de lectura se conservan si pulsa dos veces STOP (modo Stop). En el modo standby o si apaga el aparato por completo, no obstante, las marcas de lectura se perderán. -
Page 25: Random E Intro (Sólo Cd Audio)
Intervalo de tiempo Vaya al menú Digest, seleccione la opción T i t l e I n t e r v a l y confirme con ENTER. Verá un avance de las escenas del título en un intervalo preajustado de diez minutos. Si aparece sólo una imagen, es que el título tiene menos de diez minutos. -
Page 26: Funciones De Sonido
Posición de la cámara – ANGLE (sólo DVD) Algunos DVDs disponen de escenas especiales grabadas con distintas posiciones de cámara. Pulse la tecla ANGLE, para activar la función. Si la escena dispone de distintas posiciones de cámara, aparecerá el símbolo así... -
Page 27: Title Menu, Dvd Menu
TITLE MENU, DVD MENU Los menús del DVD Normalmente los DVDs disponen de uno o varios menús mediante los que puede navegar por ellos. Los nombres de dichos menús dependen de cada DVD; pueden denominarse, por ejemplo, "Menú DVD", "Menú Disco", "Menú... -
Page 28: Navegar En Los Soportes De Datos Mp3 Y Jpeg
Navegar en los soportes de datos MP3 y JPEG En los soportes de datos MP3 y JPEG los títulos de música y las imágenes se almacenan en carpetas, como en un medio de datos. Coloque un medio de reproducción MP3 o JPEG en el reproductor. En pantalla aparece un menú... -
Page 29: Ajustes En El Menú Setup
SETUP JUSTES EN EL MENÚ En el menú SETUP, al que se accede pulsando la tecla SETUP , pueden efectuarse todos los ajustes. Tales como, por ejemplo, los formatos de imagen, los ajustes de sonido o el bloqueo infantil. Pulse SETUP. En la pantalla aparece la página principal del menú S E T U P con los cuatro menús G e n e r a l S e t u p P a g e , A u d i o S e t u p P a g e , D o l b y D i g i t a l S e t u p asi como P r e f e r e n c e P a g e . -
Page 30: Menú Ajustes De Sistema
Menú AJUSTES DE SISTEMA Formato TV En este submenú puede ajustar el aparato al formato de imagen de su televisor. P S: Selección para televisores con formato 4:3. El formato Pan Scan presenta las películas en formato 16:9 en su altura íntegra; los dos laterales quedan recortados. - Page 31 Idioma OSD Aquí puede ajustar el idioma del OSD („ On-Screen-Display”), es decir, el idioma de los menús del reproductor DVD. Puede escoger entre inglés, español, alemán francés, italiano y neerlandés. Cuando seleccione uno de los idiomas, el menú cambiará también inmediatamente de idioma.
-
Page 32: Menú Altavoces
Menú ALTAVOCES Configuración de los altavoces D o w n m i x : En caso de que utilice la salida analógica 5.1, en este menú puede realizar los correspondientes ajustes.. L T/ R T: Se emite el sonido a través de los canales izquierdo y derecho. E s t é... -
Page 33: Menú Dolby Digital
Retardo del canal Si conecta altavoces independientes, la forma ideal de colocarlos es en disposición circular (ver el lado izquierdo de la ilustración). Si eso no es posible, en esta opción puede compensar las desviaciones de la línea circular. En el ejemplo que aparece más abajo (ver el lado derecho de la ilustración), el valor para el altavoz trasero izquierdo se desplazaría unos 50 cm;... -
Page 34: Menú Preferencias
Menú PREFERENCIAS Únicamente podrá acceder al menú P r e f e r e n c e s cuando el aparato esté en modo Stop. Si el aparato está reproduciendo, pulse dos veces STOP En este menú podrá realizar los ajustes de los idiomas, el control para padres así... - Page 35 7 NC 1 7 : no es apta para menores de 17 años; 8 A D U L T : únicamente para adultos. Si un DVD ha sido codificado, por ejemplo, con el nivel de autorización 7 (N C 1 7 ) u 8 (Ad ult ) y Usted ha seleccionado uno de los niveles entre 1 y 6 aparecerá...
-
Page 36: El Mando A Distancia Universal
Aplicaciones Este mando a distancia universal es utilizable para los siguientes tipos de dispositivos: Televisor Reproductor DVD MD 82333 SAT, AUX Otros aparatos (p. ej. receptor de satélite analógico, otros reproductores DVD, amplificador, sintonizador, etc.). La inscripción indica el tipo de aparato que no se puede programar. -
Page 37: Búsqueda Manual De Códigos
Para confirmar cada una de sus pulsaciones la iluminación del teclado se apagará durante un instante. Si ha introducido un código válido, la iluminación de la tecla de selección de fuentes se apagará en cuanto haya introducido el último dígito. Si ha introducido un código incorrecto, la LED roja parpadeará... -
Page 38: Búsqueda De Códigos Por Marcas
3. Pulse brevemente la tecla de fuentes (TV, SAT, A U X ). 4. Introduzca el código de un dígito según la siguiente tabla: Tecla 1 = Medion, Tchibo Tecla 2 = Philips, Radiola, Philco, Erres, Pye Tecla 3 = Sony, Akai, Panasonic, JVC, Sharp, Toshiba, Daewo... -
Page 39: Funcionamiento Normal
5. Para encontrar el primer número, pulse las teclas numéricas de 0 a 9. Si la tecla de fuentes se apaga brevemente, entonces se trata del primer número memorizado. 6. Para determinar el segundo número, vuelva a pulsar las teclas numéricas de 0 a 9. -
Page 40: Funciones Universales ("Punch Through")
Funciones universales ("Punch Through") Las funciones universales (también denominadas funciones „Punch Through“) le permiten ejecutar algunas funciones para un tipo de aparato diferente del que tenga seleccionado actualmente. Estas son las funciones volumen, MUTE, así como las funciones de reproducción. Si su mando a distancia se encuentra en uno de los modos VCR, DVD, SAT o CBL, las teclas de volumen y mute controlarán el televisor (siempre que los otros aparatos no dispongan de un control de volumen propio);... -
Page 41: Solución De Problemas
5. Vuelva a pulsar la tecla Mute; la iluminación de la tecla de selección de fuentes se apaga. Volver a activar la función universal de volumen / MUTE En caso de que haya modificado las funciones universales de volumen y MUTE como se describe en los dos apartados anteriores, puede volver a restablecer los ajustes de fábrica para volver a disponer del efecto „Punch- Through”. -
Page 42: En Caso De Problemas
N CASO DE PROBLEMAS En caso de que se produzca algún problema, compruebe primero si puede solucionarlo Usted mismo. La siguiente tabla puede ayudarle a ello. En ningún caso trate de arreglar Usted mismo el aparato. Si fuera necesario reparar el aparato, diríjase a nuestro servicio de reparación o a un taller especializado. -
Page 43: Eliminación
Imagen muy distorsionada Eventualmente la norma de su DVD no coincide con la norma de su televisor (PAL – NTSC, menú S E T U P > G e n e r a l S e t u p P a g e > T V Imagen sin colores T y p e ). -
Page 44: Especificaciones Técnicas
SPECIFICACIONES TÉCNICAS Alimentación: 230 V ~ 50 Hz Potencia: 15 vatios Consumo de energía en standby: 3 W Pilas para el mando a distancia: 2 x 1,5 V - AAA/LR03 Sistema de color del televisor: PAL/NTSC Potencia del láser: Láser clase 1 Formatos de disco compatibles: DVD (Digital Versatile Disc), DVD+R, DVD+RW, DVD-R, DVD-RW;... -
Page 45: Overview
VERVIEW Main device Front view 1. Blue LED light for standby mode 2. Disc compartment 3. PLAY: Play 4. OPEN/CLOSE: Open and close disc compartment 5. STANDBY: Switch standby mode on and off 6. STOP/RES: Stop playback; Press repeatedly: Select resolution for HDMI and Progressive Scan 7. -
Page 46: Remote Control
Remote control DVD remote control and universal remote control This view describes the button functions on the remote control. The remote control can be used for other units devices. The use of the remote control as a universal remote control is described in the“The universal remote control”, page 36 section. - Page 47 36. SLOW/F: Slow forward 37. SLOW/R: Slow rewind 38. REPEAT: Repeat functions 39. REPEAT A-B: Repeat a defined section 40. RANDOM: Play tracks in random order 41. ANGLE: Camera position (perspective) 42. 3D: Virtual surround function 43. DISPLAY:Display current title/lapsed time...
- Page 48 ABLE OF CONTENTS Overview ........1 Main device .
- Page 49 Settings in the SETUP menu ..... . . 29 SYSTEM SETTINGS menu ........30 SPEAKERS menu .
-
Page 50: Safety Instructions
AFETY INSTRUCTIONS About these instructions Please read these instructions carefully before using the device. Note the warnings on the device and in the operating instructions Always keep the operating instructions close to hand. If you sell or give the unit away, please ensure that you also pass on these instructions. -
Page 51: Never Undertake Your Own Repairs
damage the unit. The device can be operated as soon as the unit has reached room temperature. Thunder storms Unplug the device and pull out the aerial if you are away for a long period of time or there is a storm. Never undertake your own repairs Never try to open and/or repair the device yourself. -
Page 52: Safe Handling Of Batteries
Safe handling of batteries The remote control is battery operated. Please note the following: Keep the batteries out of reach of children. They can be fatal if swallowed. If a battery is swallowed, please obtain immediate medical assistance. Do not throw batteries into a fire, do not short-circuit them and do not dismantle them. -
Page 53: General Information
ENERAL INFORMATION About DVDs A DVD – Digital Versatile Disc – is a digital medium for storing information. DVDs are marked with one of the symbols shown here. There are different types of DVD with different storage capacities depending on how the information is stored. DVD structure Video DVDs are divided into titles and chapters. -
Page 54: Other Playable Formats
Other playable formats MP3s and WMA files MP3 and WMA formats are compression formats for audio data. WMA WMA tracks are shown on the screen with the following stands for ”Windows Media Audio” and was introduced more recently symbol: than the MP3 format. MP3 and WMA files have to be saved with the file extension *.mp3 or *.wma in order to be recognised. -
Page 55: Preparation
REPARATION Unpacking the device Remove all packaging materials including the film on the front of the unit. WARNING! Do not let children play with the plastic wrapping. There is a risk of suffocation. Check package contents When unpacking, ensure that the following parts are included: DVD player SCART cable Remote control... -
Page 56: Connections And Connection Options
ONNECTIONS AND CONNECTION OPTIONS The unit can be connected in various ways to other input and output devices. Switch off all devices before connecting them. Only connect the units to the mains when the other connections are complete. Setting up the unit Place the unit on a sturdy, level surface. - Page 57 Connection with the television via the S-VHS cable If your television does not have a SCART connection you can connect with the unit via the S-VHS cable (S-VIDEO socket). This will provide good image quality. An audio cinch cable must also be connected. Please note the colour codes for left/right on the cinch plugs.
-
Page 58: Tv Connection With Progressive Scan Function
TV connection with progressive scan function To Progressive Scan The unit can transmit video signals in PROGRESSIVE SCAN format via the component connections and the HDMI connection, which gives good image quality. It goes without saying that your TV (or data projector) must be able to process this format. - Page 59 Digital image and sound: HDMI Your DVD player has a HDMI (OUT) connection. HDMI (”High Definition HDMI, the HDMI logo and High Multimedia Interface“) is the only interface in the consumer entertainment Definition Multimeadia electronics sector that can digitally transmit audio and video data Interface are registered simultaneously.
-
Page 60: Home Cinema Connection With Analogue Sound Transmission
Home cinema connection with analogue sound transmission One of the advantages of DVD technology is that multi-channel sound can be saved and used for playback: To play back 5.1 sound the DVD player transmits signals to the 5.1 Dolby Digital output. -
Page 61: Digital Sound Transfer
Digital sound transfer Connect either a coaxial cable or an optical cable to the COAXIAL or OPTICAL output on the DVD/ player and the corresponding input on the amplifier. For image transfer you can use either an S-Video cable or a video cinch cable: Power connection Once you have made all the connections, connect the plug to the mains... -
Page 62: Button Functions
UTTON FUNCTIONS Operating the player using the controls on the player or remote control You can activate the main play functions of the player using the buttons Buttons on the front of the player on the front of the unit. In addition to these basic controls the remote control also provides Buttons on the remote control numerous additional options for using all functional elements of your... -
Page 63: Reading The Memory Card And Usb Memory Stick
Reading the memory card and USB Memory Stick. Your DVD player has a special memory card drive for SD cards, multi- media cards and a memory stick, as well as a connection for a USB Memory Stick or other USB Memory card Insert a memory card into the memory drive at the front of the unit with the contacts facing down and the bevelled corners on the front right-... -
Page 64: Playback Functions
Playback functions PAUSE/STEP (plays a single image) You can interrupt the play mode by pressing PAUSE/STEP. The pause icon is displayed on the screen: Press PAUSE/STEP repeatedly to move from image to image. The icon for the single image display appears on the screen: PLAY To continue playing press PLAY . -
Page 65: Repeat Functions
Slow motion – SLOW During playback press the SLOW/R or SLOW/F to play forward or backwards in slow motion. The slow motion symbol and level are displayed on the screen. SLOW press once: 1 / 2 Speed SLOW press twice: 1 / 4 Speed SLOW press three times: 1 / 8 Speed SLOW press four times: 1 / 1 6 Speed Press PLAY... -
Page 66: Program Playback Sequence - Program
Program playback sequence - PROGRAM The program function allows you to play up to 20 chapters (DVD) or titles (audio) in your own, defined sequence. Programming is not possible with MD3 media. DVDs Press PROGRAM. A table with spaces for programs appears on the screen. -
Page 67: Direct Title/Time - Search
Direct title/time – SEARCH You can use the SEARCH button to jump to a chapter, title or time. You change the selection each time the button is pressed. Playback starts at the selected spot. You can enter a title directly via the numbered buttons without previously pressing SEARCH . -
Page 68: Select Section - Digest (Dvd And Vcd)
The bookmarks remain stored after pressing STOP twice (stop mode). However, the bookmarks are deleted if the unit goes in to standby mode or is switched off. The bookmark function will not work with some formats An overview of the bookmarks with a preview can be found under the fifth menu item of the DIGEST menu. -
Page 69: Random And Intro (Audio Cd Only)
Chapter interval Select the C h a p t e r i n t e r v a l option from the digest menu and confirm with ENTER. A preview of the scenes within the chapter will be played for a default interval of 10 minutes If only one image is displayed, the chapter is shorter than 10 minutes. -
Page 70: Sound Functions
Camera position – ANGLE (DVD only) On some DVDs certain scenes have been recorded from multiple camera angles. Press ANGLEto activate this function. If the scene has various camera angles the symbol and the current perspective/total number of camera angles are displayed. Press the ANGLE key again to switch to the next camera position. -
Page 71: Title Menu, Dvd Menu
TITLE MENU, DVD MENU DVD menus DVDs usually have one or more menus stored on them and you can use these to navigate through the DVD. The names of these menus depend on the DVD; they may be called "DVD menu", "Disc menu", "Main menu", "Title menu", "Root menu"... -
Page 72: Locating Tracks Or Pictures On Mp3 And Jpeg Data Carriers
Locating tracks or pictures on MP3 and JPEG data carriers The music titles on MP3 and JPEG data carriers may be organised into folders just like on data carriers. Insert an MP3 or JPEG CD into the player. A menu showing the top-level folders saved on the CD appears on the screen. -
Page 73: Settings In The Setup Menu
SETUP ETTINGS IN THE MENU All settings are made in the SETUP menu, which you can open using the SETUP key. These settings relate to such items as image format, sound settings and child protection. Press SETUP. The main page of the S E T U Pmenu appears on the screen with the four main G e n e r a l S e t u p P a g e , A u d io Se t u p P a g e , D o l b y D i g i t a l S e t u p and P r e f e r e n c e P a g e . -
Page 74: System Settings Menu
SYSTEM SETTINGS menu TV format Here you set the unit's display format to match that of the television. P S: Selection for televisions with 4:3 format. The Pan Scan format depicts 16:9 film formats in full height, the sides of the image will be cropped. - Page 75 OSD Language This sets the OSD (On-Screen-Display) language, i.e. the language for the DVD player menus. You can choose between English, Spanish, German, French, Italian or Dutch. When selecting a language the menu changes immediately. HDMI-Setup To use the progressive scan functions select the corresponding resolution for your HDMI or DVI television 4 8 0 p , 7 2 0 p , 5 7 6 p or 1 0 8 0 p (p = “progressive”).
-
Page 76: Speakers Menu
SPEAKERS menu Speaker configuration D o w n m i x : If you use the analogue 5.1 output you can change the loudspeaker settings from this menu.. L T/ R T: The left and right audio channels are used. S t e r e o : This option produces stereo sound. -
Page 77: Dolby Digital Menu
Channel delay If you connect separate loudspeakers they should ideally be set up in a circle (refer to left side of the diagram). If this is not possible you can compensate for differences in the circle shape here. In the example below (see the right side of the illustration) the left and rear left loudspeakers are moved by 50 cm and by 40 cm for the rear right loudspeakers. -
Page 78: Preferences Menu
PREFERENCES menu You can only access the P r e f e r e n c e s menu in stop mode. If playback is in progress press STOP twice. In this menu you choose the settings for the language, parental control and password. - Page 79 1 to 6, a message appears and the viewer must enter a password. Parts of a DVD – certain scenes, for example – may also be encoded with an authorisation class or a range of authorisation classes. You have to enter the password to change the authorisation class. Password With this option a password can be entered so as to restrict access to the player by others.
-
Page 80: The Universal Remote Control
Do not use any corrosive or aggressive cleaning products. Scope of application This universal remote control can operate the following types of devices: Television DVD player MD 82333 SAT, AUX Other devices (e. e. analogue satellite receivers, other DVD players, loudspeakers, tuners, etc.). The label indicates the device type to be programmed. -
Page 81: Manual Code Search
If the device does not respond as expected, repeat the programming, or try a different manufacturers code. Select the code to which most of the remote control commands react correctly. If this is also unsuccessful, the try one of the search methods described in the following sections. -
Page 82: Code Searching By Brand Name
3. Briefly press the required source key (TV, SAT, A U X). 4. Enter the one-digit code according to the following table: Key 1 = Medion, Tchibo Key 2 = Philips, Radiola, Philco, Erres, Pye Taste 3 = Sony, Akai, Panasonic, JVC, Sharp, Toshiba, Daewo... -
Page 83: All Off" Function
Activate the functions by pressing the corresponding function key of your universal remote control. The source key will light up briefly each time the key is pressed. Please note: - In certain circumstances, not every function of your original remote control may be directly available on the universal remote control. -
Page 84: Troubleshooting
You can program the universal remote control so that the universal functions “Volume” and “Mute” will actuate another device type than the TV set. 1. Keep the CODE key pressed down for approx. 3 seconds until the background lighting of the source key briefly flashes and then remains on. -
Page 85: Universal Remote Control Technical Specifications
The devices only respond to a few remote control commands: Continue testing further codes until the devices respond to the commands accordingly. If manual code entry and automatic code search are unsuccessful, it may be that the device is not compatible to your universal remote control. Universal remote control technical specifications Batteries: 2 x 1,5 V Micro (LR03/AAA) –... -
Page 86: Troubleshooting
ROUBLESHOOTING If errors occur, check first whether you can correct the problem yourself. The following overview may help you. Never try to repair the device yourself. Contact our service centre or other qualified personnel if a repair is necessary. PROBLEM POSSIBLE CAUSE / REMEDY GENERAL No standby display... -
Page 87: Disposal
Incorrect image format (4:3, 16:9) In the S E T U P menu > G e n e r a l S e t u p P a g e > T V D i s p l a y check whether the selected format matches that of the TV set. -
Page 88: Technical Data
ECHNICAL DATA Voltage supply: 230 V ~ 50 Hz Power consumption: Standby power consumption: Batteries for remote control: 2 x 1,5 V AAA/LR03 Colour TV system: PAL/NTSC Laser output: Class 1 laser product Compatible disc formats: DVD (Digital Versatile Disk), DVD+R, DVD+RW, DVD-R, DVD-RW; VCD, SVCD, CD-Audio;... - Page 89 Ü BERSICHT Hauptgerät Vorderseite 1. Blaue LED-Leuchte für Standby-Modus 2. Diskfach 3. PLAY: Wiedergabe 4. OPEN/CLOSE: Diskfach öffnen und schließen 5. STANDBY: Vom Standby-Modus ein- und wieder in Standby schalten 6. STOP/RES: Wiedergabe stoppen; Wiederholt drücken: Auflösung für Progressive Scan wählen 7.
- Page 90 Fernbedienung DVD-Fernbedienung und Universal-Fernbedienung In dieser Übersicht sind die Tastenfunktionen für die Bedienung des DVD-Players beschrieben. Mit dieser Fernbedienung können Sie jedoch noch weitere Geräte bedienen. Die Funktionalität der Fernbedienung als Universalfernbedienung wird im Kapitel “Die Universalfernbedienung”, Seite 36, beschrieben. Falls der DVD-Player nicht auf einen Tastendruck reagiert, drücken Sie ggf.
- Page 91 37. SLOW/R: Langsamer Rücklauf 38. REPEAT: Wiederholfunktionen REPEAT A-B: Wiederholung eines definierten Abschnitts 40. RANDOM: Titel in zufälliger Reihenfolge abspielen 41. ANGLE: Kameraposition (Blickwinkel) 42. 3D: Virtuelle Surround-Funktion 43. DISPLAY:Anzeige aktueller Titel/ abgelaufene Zeit...
- Page 92 NHALTSVERZEICHNIS Übersicht ............1 Hauptgerät .
- Page 93 Einstellungen im SETUP-Menü ......... . 29 Menü...
-
Page 94: Das Gerät Sicher Aufstellen
ICHERHEITSHINWEISE Zu dieser Anleitung Lesen Sie vor Inbetriebnahme die Sicherheitsvorschriften aufmerksam durch. Beachten Sie die Warnungen auf dem Gerät und in der Bedienungsanleitung. Bewahren Sie die Bedienungsanleitung immer in Reichweite auf. Wenn Sie das Gerät verkaufen oder weitergeben, händigen Sie unbedingt auch diese Anleitung aus. Elektrische Geräte nicht in Kinderhände Kinder können Gefahren, die von elektrischen Geräten ausgehen, nicht er- kennen. -
Page 95: Niemals Selbst Reparieren
Warten Sie mit dem Anschluss an das Stromnetz, wenn das Gerät von ei- nem kalten in einen warmen Raum gebracht wird. Das dabei entstehende Kondenswasser kann unter Umständen das Gerät zerstören. Wenn das Ge- rät Zimmertemperatur erreicht hat, kann das Gerät gefahrlos in Betrieb ge- nommen werden. -
Page 96: Sicherer Umgang Mit Batterien
Sicherer Umgang mit Batterien Die Fernbedienung des Geräts benötigt Batterien. Beachten Sie hierzu fol- gende Hinweise: Halten Sie Batterien von Kindern fern. Sie können bei Verschlucken le- bensgefährlich sein. Wurde eine Batterie verschluckt, muss sofort medi- zinische Hilfe in Anspruch genommen werden. Werfen Sie die Batterien nicht ins Feuer, schließen Sie sie nicht kurz und nehmen Sie sie nicht auseinander. -
Page 97: Allgemeines
LLGEMEINES Über DVD Die DVD - Digital Versatile Disc (englisch für „vielseitige digitale Scheibe“) ist ein digitales Speichermedium für Informationen. DVDs sind durch eins der nebenstehenden Symbole gekennzeichnet. Abhängig davon, wie die Informationen aufgebracht sind, ergeben sich verschiedene DVD-Typen mit unterschiedlichen Speicherkapazitäten. DVD-Aufbau Video-DVDs sind in Titel und Kapitel unterteilt. -
Page 98: Andere Spielbare Formate
Andere spielbare Formate MP3 und WMA Das MP3- und WMA-Format sind Kompressionsformate für Audio-Daten. WMA-Titel werden auf dem Bildschirm mit folgendem Sym- WMA steht für „Windows Media Audio“ und ist jünger als das bol gekennzeichnet: MP3-Format. MP3-/WMA-Dateien müssen zur Erkennung mit den entsprechenden Da- teierweiterung *.mp3 bzw. -
Page 99: Vorbereitung
ORBEREITUNG Gerät auspacken Entfernen Sie sämtliches Verpackungsmaterial, auch die Folien an der Gerätefront. ACHTUNG! Lassen Sie kleine Kinder nicht mit Folie spielen. Es besteht Ersti- ckungsgefahr! Lieferumfang prüfen Vergewissern Sie sich beim Auspacken, dass folgende Teile mitgeliefert wurden: DVD-Player SCART-Kabel Fernbedienung 2 Batterien (1,5 V;... -
Page 100: Anschlüsse Und Anschlussmöglichkeiten
NSCHLÜSSE UND NSCHLUSSMÖGLICHKEITEN Das Gerät kann auf vielseitige Weise mit anderen Eingangs- und Aus- gangsgeräten verbunden werden. Schalten Sie alle Geräte aus, bevor Sie sie anschließen. Nehmen Sie die Geräte erst ans Netz, wenn die Anschlüsse vorgenommen wur- den. Gerät aufstellen Stellen Sie das Gerät auf eine ebene, feste Oberfläche. - Page 101 Verbindung mit dem Fernseher über S-VHS-Kabel Falls Ihr Fernsehgerät nicht über einen SCART-Anschluss verfügt, können Sie ihn über ein S-VHS-Kabel mit dem Gerät (S-VIDEO-Buchse) verbinden. Sie erreichen damit gute Bildqualität. Zusätzlich muss ein Audio-Cinch-Kabel angeschlossen werden. Achten Sie bei den Cinch-Steckern auf die Farbkodierung für links/rechts. Stellen Sie zur Wiedergabe des STEREO-Tons die Downmix-Option im L a u t s p r e c h e r k o n f i g u r a t i o n S T E R E O...
-
Page 102: Tv-Anschluss Mit Progressive Scan-Funktion
TV-Anschluss mit Progressive Scan-Funktion Zu Progressive Scan Über die Komponenentenanschlüsse und den HDMI-Anschluss kann das Gerät die Videosignale im PRO- GRESSIVE SCAN-Format übertragen und dadurch eine sehr gute Bildqualität erzielen. Voraussetzung ist natürlich, dass Ihr TV-Gerät (oder Beamer) dieses Format ebenfalls verarbeiten kann. Im Progressive-Scan-Format wird das Bild statt in 50 Halb- in 50 Vollbildern ausgegeben. - Page 103 Digitale Bild- und Tonübertragung: HDMI Ihr DVD-Player verfügt über einen HDMI (OUT)-Anschluss. HDMI („High HDMI, das HDMI-Logo und Definition Multimedia Interface“) ist im Bereich der Unterhaltungselektro- High Definition Multimedia In- nik die einzige Schnittstelle, die gleichzeitig Audio- und Videodaten digital terface sind Markenzeichen überträgt.
-
Page 104: Heimkino-Verbindung Mit Analoger Tonübertragung
Heimkino-Verbindung mit analoger Tonübertragung Ein Vorzug der DVD ist die Speicherung und Wiedergabe von Mehrkanal- Ton: Um den 5.1-Ton wiederzugeben, stellt Ihnen der DVD-Player die Si- gnale am 5.1-Dolby Digital-Ausgang zur Verfügung. -
Page 105: Digitale Tonübertragung
Digitale Tonübertragung Verbinden Sie entweder ein Koaxialkabel oder ein optisches Kabel mit dem COAXIAL OPTICAL Ausgang bzw. am DVD-Player und dem entspre- chenden Eingang am Verstärker. Für die Bildübertragung können Sie wie- derum entweder ein S-Video-Kabel oder ein Video-Cinch-Kabel einsetzen: Netzanschluss Wenn Sie alle Anschlüsse vorgenommen haben, verbinden Sie das Netz- kabel mit einer Steckdose (230 V ~ 50 Hz). -
Page 106: Tastenfunktionen
ASTENFUNKTIONEN Steuerung am Gerät oder über die Fernbedienung Mit den Tasten an der Gerätefront können Sie die wesentlichen Wiederga- Tasten an der Gerätefront befunktionen Ihrem Geräts aktivieren. Die Fernbedienung bietet über diese Grundfunktionen hinaus zahlreiche Tasten an der Fernbedienung zusätzliche Bedienelemente für die volle Funktionalität Ihres Geräts. Insbe- sondere können Sie sich nur mit der Fernbedienung in den Menüs, die auf dem Fernsehbildschirm dargestellt werden, bewegen. -
Page 107: Speicherkarte Und Usb Memory Stick Einlesen
Speicherkarte und USB Memory Stick einlesen Ihr DVD-Player verfügt über ein Speicherkarten-Laufwerk für SD-Karten, Multimedia-Karten und einen Memory Stick, sowie einen Anschluss für ei- nen USB Memory Stick oder anderes USB-Abspielgerät. Speicherkarte Schieben Sie eine Speicherkarte mit den Kontakten nach unten und der abgekanteten Ecke nach vorne rechts in das Speicherkarten-Laufwerk an der Gerätefront ein. -
Page 108: Wiedergabefunktionen
Wiedergabefunktionen PAUSE/STEP (Einzelbildwiedergabe) PAUSE/STEP Unterbrechen Sie die Wiedergabe, indem Sie drücken. Auf dem Bildschirm erscheint das Pause-Symbol: PAUSE/STEP Drücken Sie weitere Male, um Bild für Bild weiterzuge- hen. Auf dem Bildschirm erscheint das Symbol für die Einzelbildwieder- gabe: PLAY PLAY Um die Wiedergabe fortzusetzen, drücken Sie . -
Page 109: Wiederholungsfunktionen
Zeitlupe – SLOW SLOW/R SLOW/ Drücken Sie während der Wiedergabe die Taste oder F, um in Zeitlupe zurück- oder vorzugehen. Auf dem Bildschirm erschei- nen das Zeitlupensymbol sowie die Zeitlupenstufe: SLOW 1 / 2 einmal drücken: Geschwindigkeit SLOW 1 / 4 zweimal drücken: Geschwindigkeit SLOW... -
Page 110: Abspielreihenfolge Programmieren - Program
Abspielreihenfolge programmieren – PROGRAM Die Programmier-Funktion ermöglicht Ihnen, bis zu 20 Kapitel (DVD) oder Titel (Audio) in einer selbst-definierten Reihenfolge abzuspielen. Bei MP3-Medien ist keine Programmierung möglich. DVDs Drücken Sie PROGRAM. Auf dem Bildschirm erscheint eine Tabelle mit Programmplätzen. Die Tabelle enthält Titel und Kapitel. Die Anzahl der Titel auf der DVD erscheint in der Kopfzeile. -
Page 111: Direktanwahl Titel/Zeit - Search
Direktanwahl Titel/Zeit – SEARCH SEARCH Mit der Taste können ein Kapitel, einen Titel oder eine Zeit direkt ansteuern. Mit jedem Tastendruck verändern Sie die Auswahl. Die Wieder- gabe beginnt an der gewählten Stelle. Sie können einen Titel auch direkt über die Zifferntasten eingeben, SEARCH zu drücken. -
Page 112: Auszug Wählen - Digest (Dvd Und Vcd)
Um ein anderes Lesezeichen auszuwählen, gehen Sie wiederum mit den Navigationstasten in das entsprechende Feld und drücken Sie PLAY STOP Die Lesezeichen bleiben erhalten, wenn Sie zweimal drückt haben (Stopp-Modus). Im Standby-Modus oder wenn Sie das Gerät ausschalten, gehen die Lesezeichen jedoch verloren. Bei einigen Formaten funktioniert die Bookmark-Funktion nicht. -
Page 113: Random Und Intro (Nur Audio-Cd)
Zeitintervall Z e i t : I n te r v a l l Wählen Sie im Digest-Menü die Option an und bestäti- gen Sie mit ENTER. Sie erhalten eine Vorschau der Szenen des Titels in einem voreingestellten Abstand von zehn Minuten. Wenn nur ein Bild angezeigt wird, ist der Titel kürzer als zehn Minuten. -
Page 114: Klangfunktionen
Kameraposition – ANGLE (nur DVD) Auf wenigen DVDs sind einzelne Szenen aus verschiedenen Kame- rapositionen aufgenommen. Drücken Sie die Taste ANGLE, um die Funktion zu aktivieren. Sofern die Szene verschiedene Blickwinkel enthält, werden das Symbol wie der aktuelle Blickwinkel/die Gesamtzahl der Blickwinkel eingeblen- det. -
Page 115: Title Menu, Dvd Menu
TITLE MENU, DVD MENU DVD-Menüs Auf DVDs sind üblicherweise ein oder mehrere Menüs hinterlegt, mit dem Sie auf der DVD navigieren können. Die Namen dieser Menüs hängen von der DVD ab; sie können z. B. „DVD-Menü“, „Disk-Menü“, „Hauptmenü“, „Titelmenü“, „Root-Menü“ oder „Stammmenü“ heißen. Das Menü... -
Page 116: Navigieren Auf Mp3- Und Jpeg-Datenträgern
Navigieren auf MP3- und JPEG-Datenträgern Auf MP3- und JPEG-Datenträgern können die Musik-Titel bzw. Bilder wie auf einem Datenmedium in Ordnern zusammengefasst sein. Legen Sie ein Wiedergabemedium mit MP3- oder JPEG-Daten ein. Auf dem Bildschirm erscheint ein Menü mit der obersten Ordnerstruktur auf der CD. -
Page 117: Einstellungen Im Setup-Menü
SETUP-M INSTELLUNGEN IM ENÜ SETUP Im SETUP-Menü, das Sie über die Taste aufrufen, nehmen Sie alle Einstellungen vor. Diese Einstellungen umfassen z. B. Bildformate, Tonein- stellungen oder die Kindersicherung. Drücken Sie SETUP. Auf dem Bildschirm erscheint die Hauptseite des S E T U P SY S T E M EI N S T E L L U N G E N , -Menüs mit den vier Menüs A U D I O , D O L B Y D I G I T A... -
Page 118: Menü Systemeinstellungen
Menü SYSTEMEINSTELLUNGEN TV-Format Stellen Sie hier das Gerät auf das Anzeige-Format des Fernsehgeräts ein. Auswahl für Fernsehgeräte mit 4:3- Format. Das Pan Scan-Format stellt 16:9-Filmformate in voller Höhe dar, seitliche Bildanteile wer- den abgeschnitten. Auswahl für Fernsehgeräte mit 4:3- Format. Das Letterbox-Format ver- kleinert das 16:9-Filmformat auf Bildschirmbreite. - Page 119 OSD-Sprache Hier stellen Sie die Sprache des OSD („On-Screen-Display“) ein, das heißt die Sprache für die Menüs des DVD-Players. Sie haben die Auswahl zwi- schen Englisch, Spanisch, Deutsch, Französisch, Italienisch und Niederlän- disch. Bei der Auswahl einer Sprache stellt sich das Menü unmittelbar um. HDMI-Setup Um die Progressive Scan-Funktion zu realisieren, wählen Sie die zu Ihrem 4 8 0 p...
-
Page 120: Menü Lautsprecher
Menü LAUTSPRECHER Lautsprecherkonfiguration D o w n m i x : Falls Sie den analogen 5.1-Ausgang benutzen, können Sie in diesem Menü hierfür Einstellungen vornehmen. L T/ R Es werden der linke und der rechte Kanal ausgegeben. S t e r e o Es wird ein Stereoton ausgegeben. -
Page 121: Menü Dolby Digital
Kanalverzögerung Wenn Sie separate Lautsprecher anschließen, werden diese idealerweise kreisförmig aufgestellt (siehe linke Seite der Abbildung). Wenn dies nicht möglich ist, können Sie Abweichungen von der Kreislinie hier ausgleichen. Im unten stehenden Beispiel (siehe rechte Seite der Abbildung) würde der Wert für den linken Rear-Lautsprecher um 50 cm und für den rechten Rear- Lautsprecher um 40 cm versetzt. -
Page 122: Menü Präferenzen
Menü PRÄFERENZEN P R ÄF E RE N Z EN Auf das Menü können Sie nur im Stopp-Modus zugrei- STOP fen. Bei laufender Wiedergabe drücken Sie zweimal Im diesem Menü treffen Sie Einstellungen für die Sprachen, die Elternkon- trolle sowie das Passwort. Sprachen auswählen Bitte beachten Sie, dass für jede Sprachauswahl gilt: Es kann nur eine Sprache wiedergegeben werden, die auf der DVD... - Page 123 (N C 1 7) oder 8 (A d u lt) ko- Wurde eine DVD z. B. mit der Freigabeklasse 7 diert und Sie haben eine der Freigabeklassen 1 bis 6 eingestellt, so erfolgt eine Meldung und es muss das Passwort eingegeben werden. Es können auch nur Teile der DVD, das heißt bestimmte Filmszenen, mit einer Freiga- beklasse oder verschiedenen Freigabeklassen kodiert sein.
-
Page 124: Die Universalfernbedienung
Anwendungsumfang Diese Universal-Fernbedienung kann folgende Gerätetypen bedienen: Fernsehgerät Set-Top-Box bzw. SAT- oder DVB-T-Receiver DVD-Player MD 82333 Video-, Festplatten oder DVD-Recorder Andere Geräte (z. B. Verstärker, Tuner etc.) Die Beschriftung bezeichnet nicht den zu programmierenden Gerätetyp. Sie dient der leichteren Übersicht. -
Page 125: Manueller Code-Suchlauf
Wenn das Gerät nicht erwartungsgemäß reagiert, wiederholen Sie die Pro- grammierung mit einem anderen Code des Herstellers. Wählen Sie den Code aus, auf den die meisten Befehle der Fernbedienung korrekt reagieren. Wenn Sie damit auch keinen Erfolg haben, dann versuchen Sie es mit einer der in den folgenden Abschnitten beschriebenen Suchmethoden. -
Page 126: Codesuche Nach Handelsname
3. Drücken Sie die gewünschte Quellentaste (TV, SAT, A U X) kurz. 4. Geben Sie den einstelligen Code laut folgender Tabelle ein: Taste 1 = Medion, Tchibo Taste 2 = Philips, Radiola, Philco, Erres, Pye Taste 3 = Sony, Akai, Panasonic, JVC, Sharp, Toshiba, Daewo... -
Page 127: Normaler Betrieb
Normaler Betrieb Einzelgeräte bedienen Nachdem Sie die Programmierung Ihrer Fernbedienung für Ihre Audio/Vi- deo-Geräte vorgenommen haben, arbeitet die Fernbedienung in den ge- bräuchlichsten Hauptfunktionen wie die Original-Fernbedienung des je- weiligen Gerätes. Richten Sie Ihre Fernbedienung auf das gewünschte Gerät und drücken Sie die entsprechende Quellentaste. -
Page 128: Universal-Funktionen („Punch Through")
Universal-Funktionen („Punch Through“) Die Universal-Funktionen (auch „Punch Through“-Funktionen genannt) ermöglichen Ihnen, bestimmte Funktionen an einem anderen Gerätetyp als dem eingestellten auszuführen. Dies sind die Funktionen Lautstärke, Stummschaltung sowie die Abspielfunktionen. Wenn die Fernbedienung im VCR-, DVD-, SAT- oder CBL-Betrieb ist, steu- ern die Tasten Lautstärke und Stummschaltung das TV-Gerät an (sofern die anderen Geräte nicht über eine eigene Lautstärkeregelung verfügen);... -
Page 129: Fehlerbehebung
Universal-Funktion Lautstärke/Stummschaltung wieder einstellen Falls Sie die Universal-Funktionen Lautstärke und Stummschaltung wie in den vorangehenden zwei Abschnitte beschrieben verändert haben, kön- nen Sie die Funktionen wieder auf ihre Werkseinstellung zurückstellen und so den „Punch-Through“-Effekt wiederherstellen. 1. Halten Sie die CODE-Taste für ca. 3 Sek. gedrückt, bis die Hinter- grundbeleuchtung der Quellentaste nach kurzem Blinken dauerhaft aufleuchtet. -
Page 130: Wenn Störungen Auftreten
TÖRUNGEN AUFTRETEN Sollten Störungen auftreten, prüfen Sie bitte zunächst, ob Sie das Problem selbst beheben können. Die folgende Übersicht kann Ihnen dabei helfen. Versuchen Sie auf keinen Fall, das Gerät selbst zu reparieren. Wenn eine Reparatur notwendig ist, wenden Sie sich bitte an un- ser Service-Center oder eine andere geeignete Fachwerkstatt. -
Page 131: Entsorgung
Sehr verzerrtes Bild Die Norm Ihrer DVD stimmt eventuell nicht mit der Norm Ihres Fernseh- S E T U P > S y s t e m e i n s t e l l u n g e n Keine Farbe im Bild geräts überein (PAL –... -
Page 132: Technische Daten
ECHNISCHE ATEN Spannungsversorgung: 230 V ~ 50 Hz Leistungsaufnahme: 15 W Standby-Stromaufnahme: Batterien für Fernbedienung: 2 x 1,5 V AAA/LR03 Farbfernsehsystem: PAL/NTSC Laserleistung: Laser Klasse 1 Kompatible Disk-Formate: DVD (Digital Versatile Disk), DVD+R, DVD+RW, DVD-R, DVD-RW; VCD, SVCD, CD-Audio; CD-R, CD-RW, JPEG-CD, MP3-CD; WMAs; XVID Kompatible Speicherkarten: SD-Karten, Multimedia-Karten, Memory Sticks, Memory Stick PRO... - Page 133 Code list CAPSONIC 0002 CARREFOUR 0027 CASCADE 0009 CATHAY 0051 0169 CENTRUM 0168 0205 CENTURION 0051 0169 CENTURY 0000 0129 0047 0131 0043 CIMLINE 0009 0028 ACME 0011 CITY 0009 0018 CLARIVOX 0169 0037 0006 0007 CLATRONIC 0009 0011 0051 0002 0083 0003...
- Page 134 EMERSON 0141 0127 0000 INDESIT 0024 0101 ERAE 1003 INDIANA 0051 0169 ERRES 0169 0051 INGELEN 0021 0245 INGERSOL 0009 ETRON 0009 INNO HIT 0009 0011 0003 0004 0051 0169 0245 0093 EURO-FEEL 0002 0123 EUROLINE 0149 0169 0088 INNOVATION 0171 0111 0002 0009...
- Page 135 0072 0186 0101 0141 MCMICHAEL 0041 0021 0151 0142 0124 0152 MEDIATOR 0051 0169 PATHE CINEMA 0003 0083 0131 0037 MEDION 0177 0038 0171 0002 0009 0206 1015 0200 PATHE MARCONI 0022 0045 0126 0139 0037 0046 0205 0207 0208...
- Page 136 SCHWAIGER 1024 TRIUMPH 0013 0123 0082 0171 0002 0205 0003 0169 0009 0014 0027 0088 0129 0131 1014 0043 0168 SEI-SINUDYNE 0014 0013 0021 0026 0075 0123 0000 UHER 0051 0157 0021 0043 SELECO 0019 0027 0131 0108 0157 0021 ULTRAVOX 0003 0014...
- Page 137 0291 0245 MANESTH 0275 0265 ETZUKO 0275 MARANTZ 0257 0271 0281 0299 MATSUI 0233 0256 0248 0301 MEDIATOR 0257 MEDION 0233 0311 0262 0269 0319 0256 0248 0291 FERGUSON 0294 0259 0271 0278 0293 0281 0305 0338 0905 0906 FIDELITY...
- Page 138 PROFEX 0275 PROLINE 0231 0288 UHER 0256 PROSONIC 0233 0245 UNITED QUICK STAR 0245 0257 UNIVERSUM 0290 0235 0263 0257 0315 0256 0231 0237 0239 0253 0271 QUARTZ 0258 QUELLE 0257 0263 0258 0231 0271 0301 VICTOR 0294 0295 VIDEON 0233 0262 0311...
- Page 139 0351 MAXDORF 0894 GO-VIDEO 0383 1059 1061 0338 0367 0971 0351 MAXIM 0331 0350 0910 0396 0383 0382 GRADIENTE 0373 MEDION 0356 0930 0373 0932 0330 0335 0339 0340 GRAETZ 0392 0341 0342 0345 0352 0358 0371 0351 0895 GRAN PRIX...
- Page 140 MERIDIAN 0362 RAITE 0392 METZ 0368 0350 0922 0399 0384 MICROMAXX 0356 0893 0930 0373 0932 0330 0335 0339 REDSTAR 0894 0340 0341 0342 0345 0352 0358 0371 0895 RELISYS 0923 0895 0896 0897 0898 0899 0900 0901 0902 0903 REOC 0341 0904...
- Page 141 YAMAKAWA 0397 0392 0382 MAGNUM 0730 0742 0743 0744 0745 0746 0747 YUKAI 0383 MARANTZ 0695 0732 MATSUI 0696 0732 MEDION 0843 0664 0668 0674 0675 0694 0730 0742 ZENITH 0375 0907 0743 0744 0745 0746 0747 0801 0802 0803...
- Page 142 SAMSUNG 0768 CANAL+ 0569 0599 SANSUI 0847 0709 0710 0711 0732 CHAPARRAL 0507 SCHNEIDER 0860 0732 CHESS 0547 0586 SCOTT 0859 CITYCOM 0508 0640 0459 SHARP 0672 0712 0713 0714 CLATRONIC 0444 SHERWOOD 0782 CLEMENS KAMPHUS 0491 SILVERCREST 0811 0409 SINGER 0803 COLUMBUS 0477...
- Page 143 0582 0583 MBOX 0442 0602 0619 0432 0456 MEDIABOX 0569 GALAXY 0424 MEDIAMARKT 0419 GLOBECAST 1141 MEDIASAT 0569 0432 GLOBO 1156 MEDION 0412 0413 0423 0428 0442 0466 0478 0484 0419 0493 0504 0511 0514 0535 0546 0566 0583 GOLDSTAR...
- Page 144 PRIESNER 0445 0419 TECO 0419 0502 PRO2 0412 0413 0423 0428 0442 0466 0478 0484 TELASAT 0640 0493 0504 0511 0514 0535 0546 0566 0583 TELEFUNKEN 0560 0508 0565 0566 0567 0574 0405 0586 0587 0618 0619 0644 0650 0652 0653 TELEKA 0438...
- Page 145 0923 0959 1071 1117 FILMNET COMCRYPT 0474 LITEON 1056 1059 0959 FOXTEL 0602 LUMATRON 1051 0452 MAGNAVOX 0979 0980 0494 0554 MEDION 0895 0905 0906 0923 0959 1071 1117 MICROMAXX 0895 0905 0906 0923 0959 1071 1117 MICROSTAR 0895 0905...
- Page 146 0423 0514 0644 0653 1130 0959 DENON 0252 0318 1071 1117 LITEON 0959 LORENTZEN 1156 GRUNDIG 0318 MARMITEK OCTOPUS 0655 MITSUBISHI 0318 MEDION 0905 0412 0423 0514 0644 0653 1130 0959 1071 1139 1115 1181 1117 MICROMAXX 0905 0412 0423...
- Page 147 1006 LUMATRON 0245 1085 & 1007 1086 & 1008 1087 & 1008 1088 & 1009 MAGNUM 0291 MATSUI 0248 MEDION 0248 0291 MICROMAXX 0248 0291 H & B 0343 & 0228 MICROSTAR 0248 0291 1089 & 1011 ORION 0248 0283...
- Page 148 MEDION 0894 EMERSON 0339 & 0231 0343 & 0228 0375 & 0256 0924 & 0210 0933 & 0228 MEMOREX 0920 FUNAI 0339 & 0231 MICROMAXX 0894 0343 & 0228 0924 & 0210 0933 & 0228 GO-VIDEO 0338 MICROSTAR 0894 0367...
- Page 149 0650 VIVANCO 0684 Digital Set Top Boxes MARMITEK OCTOPUS 0655 ECHOSTAR 0657 MATSUI 0649 0526 0451 TEVION 0650 0645 0423 MEDION 0645 0650 YUNG 1166 MICO 1135 MICROMAXX 0645 0650 Misc. Set Top Boxes MICROSTAR 0645 0650 PARDY LIGHT 1171...
- Page 150 0698 0727 KOSS 0373 HARMON/KARDON 0682 KENWOOD 0761 LIFETEC 0841 0775 0776 LINN 0857 LENOXX 0931 MARANTZ 0727 0972 MEDION 0841 0775 0776 LIFE 1118 MICROMAXX 0841 0775 0776 LIFETEC 0334 MICROSTAR 0841 0775 0776 0372 0735 0736 0737 0738...
- Page 151 0820 0819 MEDION 0852 0858 0704 0745 0808 0810 0811 0812 MEDION / LIFETEC / MICROMAXX / MICROSTAR / TEVION / VIDEON / TCM / 0820 0819 GENERAL TECHNIC / INNOVATION / MAGNUM MICROMAXX 0852 0858 0704 0745 0808 0810...
Need help?
Do you have a question about the MD 82333 and is the answer not in the manual?
Questions and answers