Table of Contents
Advertisement
Quick Links
Advertisement
Table of Contents

Related Manuals for Ness L300

Summary of Contents for Ness L300
- Page 1 NESS L300 User Guide NESS L300 User Guide...
- Page 2 NESS L300 is a trademark of NESS Ltd. Disclaimer NESS Ltd. Shall not be liable for any injury or damage suffered by any person, either directly or indirectly, as a result of the unauthorized use or repair of NESS Ltd's products. NESS Ltd.
- Page 3 Manufacturer NESS Ltd. 19 Ha'haroshet St., Keidar Center P.O. Box 2500, Ra'anana 43654, Israel Tel: (972) 9-748-5738 Fax: (972) 9-748-5740 Email: ness@ness.co.il Website: www.NESSLTD.com U.S. Distributor Bioness Inc. 25134 Rye Canyon Loop Suite 300 Santa Clarita, California 91355 Tel: (800) 211-9136 Fax: (661) 702-6707 Email: info@bionessinc.com...
-
Page 4: Table Of Contents
Control Unit Display and Audio Indications...........16 OPERATING MODES................18 ..................18 TANDBY MODE ....................18 AIT MODE ..................18 RAINING MODE DAILY USE OF YOUR NESS L300 ............. 19 ............19 CTIVATING AND SING THE YSTEM ..............19 UTTING ON THE ORTHOSIS Positioning the orthosis on the leg............20 ..............24... - Page 5 REPLACING AND INSTALLING SYSTEM COMPONENTS ..33 ...........33 EPLACING AND REGISTERING COMPONENTS ...35 EMOVING AND NSTALLING THE RTHOSIS LECTRONIC ODULE Placing a Foot Sensor in your Shoe .............36 ACCESSORIES..................38 TROUBLESHOOTING................39 SPECIFICATIONS................. 44 ..................50 IST OF YMBOLS NESS L300 User Guide...
- Page 6 Table of Figures Figure 1: L300 System Components ..............7 Figure 2: The Orthosis ..................8 Figure 3: Foot Sensor ..................10 Figure 4: Control Unit..................12 Figure 5: Positioning the Leg ................20 Figure 6: Placing the Orthosis on the Leg ............21 Figure 7: Fastening the Strap ................
-
Page 7: Introduction To Your Ness L300
During the swing phase of gait, the NESS L300 electrically stimulates muscles in the weak leg to provide flexion of the foot; thus, it may improve the individual’s gait. The NESS L300 also may facilitate muscle re-education, reduce muscle spasm, prevent/retard disused atrophy, maintain or increase joint range of motion and increase local blood flow. - Page 8 The NESS L300 system stimulates the common peroneal nerve in the lower leg causing the muscles that lift the foot and toes to contract. During walking the foot sensor detects when the foot is off the ground and sends a radio signal which initiates the stimulation causing the foot...
-
Page 9: For Your Health And Safety
• Do not use the NESS L300 in close proximity (less than 3 feet) to short wave or microwave therapy equipment as it may produce instability in the orthosis electronic module output. -
Page 10: Precautions
• Inflammation in the region of the NESS L300 may be aggravated by motion, muscle activity or pressure from the orthosis. Use of the device should be temporarily halted until the inflammation clears. - Page 11 • Do not leave the NESS L300 stored in a car in hot weather where the temperature may exceed the recommended storage temperature and could cause damage to the device.
-
Page 12: Adverse Reactions
(2) This device must accept any interference received, including interference that may cause undesired operation. Parts of the NESS L300 communicate via radio communication and have been tested and found to comply with the limits for a Class B digital device, pursuant to Part 15 of the FCC Rules. -
Page 13: General Overview Of Your Ness L300
2. General Overview of your NESS L300 Components of the NESS L300 The NESS L300 is supplied with the following components: o Control Unit o Orthosis o Orthosis Electronic Module o Foot sensor o Electrodes o Carrying case o User Manual... -
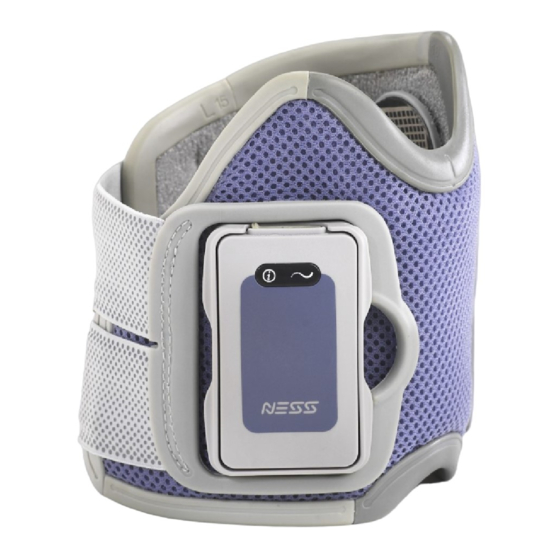
Page 14: The Orthosis
The Orthosis Electrode base & electrode Elastic Strap Locator Handle Electronic Module Cradle Stimulation light Status light Figure 2: The Orthosis • The orthosis is light weight and has a low profile allowing it to be easily positioned under trousers. •... -
Page 15: Indicator Lights On The Orthosis Electronic Module
The foot sensor consists of a pressure sensor worn underneath the inner sole of the shoe, along with a small transmitter attached to the upper edge of the shoe by a special clip. NESS L300 User Guide... -
Page 16: Figure 3: Foot Sensor
There is no need to detach the foot sensor between uses. The foot sensor transmitter is powered by a small non-rechargeable battery which needs replacing approximately every six months of use. The foot sensor by default should be placed under the paretic (weak) foot. -
Page 17: The Control Unit
Operating Button Description ON/OFF Turns the control unit ON and OFF Trigger mode Selects Gait, Training or Standby Mode Adjusts the volume of the audio Volume Adjustment indications Intensity Adjustment Adjusts the intensity of stimulation NESS L300 User Guide... -
Page 18: Control Unit Buttons And Display
Control Unit Buttons and Display Volume Adjustment Neck Strap Hole buttons ON/OFF Button Control Unit indicator light Trigger Mode Button Intensity Indicator Orthosis Foot Sensor Indicator Light Intensity Level Indicator Light Buttons Figure 4: Control unit buttons and display... -
Page 19: Operating The Control Unit
“t” alternating with the intensity. To go back to the Standby Mode: from the Gait or Training mode, press the trigger button again briefly, you should hear a beep, and the trigger mode button will stop blinking. NESS L300 User Guide... - Page 20 Adjusting the stimulation intensity level During the fitting process your clinician set the stimulation type and intensity according to your exact needs, normally there is no need to adjust the stimulation intensity however it may be necessary while walking on different surfaces or with various footwear. To lift the foot higher If the foot slightly drags or catches on the floor while walking the stimulation level should be increased by pressing the "+"...
- Page 21 • When you turn the system off, the volume level will be saved unless the volume was set to "mute," in which case the volume level will be automatically adjusted to the default level. NESS L300 User Guide...
-
Page 22: Control Unit Display And Audio Indications
Control Unit Display and Audio Indications Visual Display Color Flash Meaning On/Off Button Green Slow System is activated System in gait or training Trigger mode Slow mode but not stimulating button Yellow System in gait or training Rapid mode and stimulating Red, Alternating colors one All display... - Page 23 There is an indication, such as a malfunction, which will be indicated visually on the control unit. • When the control unit is separated from the system, for example when the system is worn, and the controller is left on a table. NESS L300 User Guide...
-
Page 24: Operating Modes
Standby mode. While using the system, the various components of your NESS L300 must not be separated. If the system components are separated for any reason, radio contact will be lost and the system will cease all activity until communication is reestablished. -
Page 25: Daily Use Of Your Ness L300
4. Daily Use of your NESS L300 Activating and Using the System Make sure the foot sensor is installed, if not, then install it according to the section “Placing the Foot Sensor in your Shoe.” 1. Remove the protective covers from the electrodes Put on the orthosis. -
Page 26: Positioning The Orthosis On The Leg
Positioning the orthosis on the leg While seated, slightly extend the lower leg as in Figure 5. This causes the outline of the kneecap to be clearly defined. It may be helpful to place the foot on a small stool or footrest. This point under your knee is where the locator (see fig. -
Page 27: Figure 6: Placing The Orthosis On The Leg
2. After the locator is in position, slide the orthosis against the leg so that it fits snugly under the kneecap. The orthosis will gently grip the leg. Make sure it remains in place until you fasten the strap according to one of the methods described below. NESS L300 User Guide... -
Page 28: Figure 7: Fastening The Strap
Fastening the strap The fastening of the strap is meant to be performed with one hand although if the other hand is functional, it is easier to use both hands. 1. With the orthosis in place as in Figure 7, carefully grasp the handle of the elastic belt with the fingers of the opposite hand. -
Page 29: Figure 8: Orthosis Fastened In Place
If for any reason there is no contact between the electrodes and the skin, all the indication lights will Note start flashing red and no stimulation will be applied, to resolve this see the troubleshooting section. NESS L300 User Guide... -
Page 30: Taking Off The Orthosis
Taking off the Orthosis 1. Press the On/Off button once to shut the system OFF. 2. Unhook the strap handle of the orthosis, and remove the orthosis. 3. Moisten the electrodes and place protective covers over them. 4. Charge the battery fully at the end of your daily use. -
Page 31: Care And Maintenance
Medium speed flash, audio Control unit battery is low- unit indication every 10 minutes Approx. 1 hours use left. Rapid Flashing and an audio Control unit battery is low- indication every 1 minute Approx. 10 minutes use left. NESS L300 User Guide... - Page 32 Starts to flash slowly Foot sensor battery is low- accompanied by an audio Approx. 14 days of use left. indication. Low Battery in Medium speed flash, audio Foot sensor battery is low- the Foot indication every 2 hours. Approx. 7 days of use left. sensor Rapid Flashing and an audio Foot sensor battery is low-...
-
Page 33: Charging The Batteries
Control Unit and Orthosis Only the Control and Orthosis units' batteries are rechargeable. Note 1. Open the cover of the charger socket at the bottom of the control unit as in Figure 9. Figure 9: Control Unit Charger Socket NESS L300 User Guide... -
Page 34: Figure 10: Charging The Batteries
2. Connect the charger cable to the control unit and the orthosis electronic module as in Figure and plug into the wall socket. You should see a circular charging icon on the control units' digital display and the status light on the module should start flashing alternating between yellow and green. -
Page 35: Replacing The Batteries
Replacing the Batteries Orthosis Electronic Module The electronic module’s battery needs replacing approximately every 2 years by a NESS certified technician. Foot Sensor The battery in the foot sensor is not rechargeable, and needs replacing approximately every 6 months. To install a new battery (Lithium coin cell, CR2430): 3. -
Page 36: Control Unit
Control Unit The control unit’s battery is a rechargeable AAA battery and needs replacing approximately every 2 years. The batteries must be charged before the first use, after every day’s use, and after extended storage. Note 1. Remove the screw from the battery cover on the back of the control unit. -
Page 37: Replacing Electrodes
The electrodes should be replaced every 2-3 weeks. It is recommended to replace the electrodes regularly in order to maintain optimum efficiency. The NESS L300 should be used only with electrodes supplied by NESS Ltd. Attention 1. Make sure the system is off 2. -
Page 38: Cleaning Your Ness L300
Cleaning your NESS L300 All parts may be cleaned by wiping with a damp cloth. Electrical components are not waterproof, so do not immerse them in water. When the orthosis needs a thorough cleaning: 1. Remove the electronic module. 2. Immerse in lukewarm water with a small amount of mild detergent. -
Page 39: Replacing And Installing System Components
System Components Replacing and registering components When one or more of the NESS L300 electronic components are replaced, a procedure must be performed to register the new component as part of the system. This ensures that there is radio communication between the components of the system. -
Page 40: Figure 14: Digital Display While Registering
The letter “E” (short for Error) will appear if the registration was unsuccessful. If the letter “E” appears, repeat steps 1-3, if the problem persists see the section "troubleshooting." In the process of Registration Registration registering Complete Unsuccessful Figure 14: Digital Display while Registering... -
Page 41: Removing And Installing The Orthosis Electronic Module
Figure 15: Removing the electronic module from the orthosis No more than one control and stimulation unit can be registered in your system at any time, registering a new unit will automatically remove your old unit from Note the system. NESS L300 User Guide... -
Page 42: Placing A Foot Sensor In Your Shoe
5. Attach the transmitter of the foot sensor to the upper edge of the inner side of the shoe The NESS logo on the transmitter should face away from the foot. -
Page 43: Figure 17: Transmitter In Place On A Right Shoe
Figure 17: Transmitter in Place on a Left Shoe Up to four different foot sensors can be used with one L300 system, allowing you to use several pairs of shoes without the need to transfer your foot sensor Note from shoe to shoe. -
Page 44: Accessories
7. Accessories The NESS L300 comes with a variety of accessories that are designed to help you avoid the inconvenience and distraction of holding your control unit. 1. Neck strap: The neck strap allows you to hang the control unit around your neck. If you find it more convenient you may insert it into your shirt pocket. -
Page 45: Troubleshooting
8. Troubleshooting To locate your local NESS L300 distributor, call 972-9-7485738 or visit our website: www.nessltd.com Error light indications Indicators Color Flash Meaning Cycles between Control Radio unit, Orthosis, and Foot All three communication Sensor, also “E” appears Component lost... - Page 46 Contact your NESS L300 distributor. occurs Try to reconnect the charger cable, if this During charging, "E" doesn’t help contact your NESS L300 appears on the screen. distributor. Replace with new electrodes according Electrodes are frayed, to the section "Replacing Electrodes"...
- Page 47 4. Turn ON the Control Unit again, and press the Trigger Button. If there is still no ankle movement contact your NESS L300 distributor. 1. Make sure that the Orthosis is snug against your calf and that the electrodes are in close contact with the skin.
- Page 48 7. Check that the orthosis electronic module is in place and locked it (see the section Removing and Installing the Orthosis Electronic Module), if not reattach it to the orthosis. If the problem persists then contact your NESS L300 distributor.
- Page 49 Problem Solution Make sure that all the components are in "Radio communication radio range of each other, the system will lost" indication appears. not work if all components aren’t present. NESS L300 User Guide...
-
Page 50: Specifications
9. Specifications Control Unit Specifications Classification Internally powered, continuous operation Operation Modes Gait, Training Operating voltage 1.2 V Operation current 30 mA Battery type Rechargeable AAA NiMH 1.2V, 750 mAh Charging time 4.5 Hours (typical) using provided power supply Charging cycles At least 300 charging cycles Operation period At least 2 days between charges... - Page 51 Battery discharge time when stored : Status (fault, battery, charging) & Stimulation LEDs Indications Buzzer for audible indications Pulse Parameters Constant current Drive method: 0-80 mA, 1 mA resolution (measured at positive phase) Intensity Symmetric Asymmetric Shape: NESS L300 User Guide...
- Page 52 1-8 Sec, 1 Sec resolution On time 2-15 Sec, 1 Sec resolution Off time 0-4 Sec, 1 Sec resolution Ramp up 0-4 Sec, 1 Sec resolution Ramp down 1-60 Min Total time Attached to a cradle in the NESS L300 Orthosis Application...
- Page 53 28 – 50 cm limb circumference Limb size Immerse in cold water when needed and let dry in free air. Maintenance NOTE: First remove stimulator NOTE: DO NOT use drier Height: 160mm Dimensions Width: 100mm Depth: 125mm Approx 160 grams Weight NESS L300 User Guide...
- Page 54 Electrode specifications Two, 45 mm reinforced hydrogel electrodes. Electrodes NOTE: Use only electrodes provided by NESS Ltd. Two relocateable polymer electrode bases for individual fitting Electrode base Foot Sensor Specifications Internally powered, continuous operation with type BF applied part Classification 3.0 V...
- Page 55 Power Supply specifications 5V ± 5% Voltage 1300 mA Current Note: Use only power supply provided/approved by NESS Wireless link specifications 2.4 GHz, ISM band Frequency band Complies with regulations (FCC 15.247 for US / ETSI EN300-440 Transmission for Europe).
-
Page 56: List Of Symbols
List of Symbols Attention, See Instructions for Use Serial Number Drip - proof IPX1 Splash -proof IPX4 Watertight (immersible) IPX7 Class II Type BF Applied Part Non-Ionizing Radiation...
Need help?
Do you have a question about the L300 and is the answer not in the manual?
Questions and answers