Table of Contents
Advertisement
Advertisement
Table of Contents

Related Manuals for Singer Elite CE677


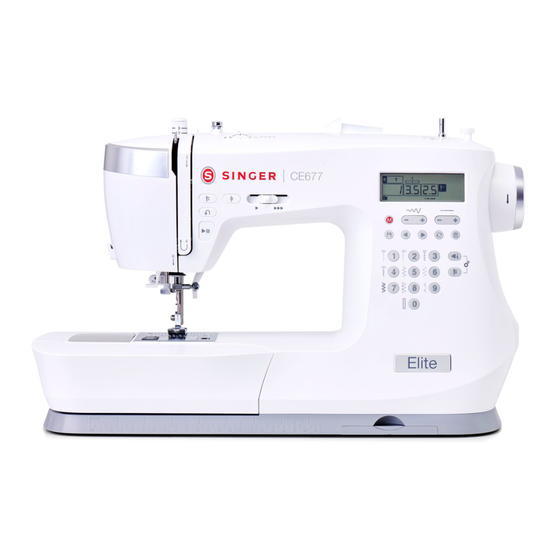
Summary of Contents for Singer Elite CE677
- Page 1 INSTRUCTION MANUAL CE677...
- Page 3 This household sewing machine is designed to comply with IEC/EN 60335-2-28 and UL1594. IMPORTANT SAFETY INSTRUCTIONS When using an electrical appliance, basic safety precautions should always be followed, including the following: Read all instructions before using this household sewing machine. Keep the instructions at a suitable place close to the machine.
- Page 4 SAVE THESE INSTRUCTIONSFOR EUROPE ONLY: FOR EUROPE ONLY: This appliance can be used by children aged from 13 years and above and persons with reduced physical, sensory or mental capabilities or lack of experience and knowledge if they have been given supervision or instruction concerning use of the appliance in a safe way and understand the hazards involved.
-
Page 6: Table Of Contents
TABLE OF CONTENTS SEWING ............23 INTRODUCTION ..........1 Sewing ................23 Intended Use ..............1 Start to Sew – Straight Stitch........23 Machine Overview ............1 Change Needle Position ............. 23 Needle Area Overview ............ 2 Change Sewing Direction ..........24 Top of Machine ............... -
Page 7: Introduction
Intended Use Optimal use and maintenance are described in these instructions. This product is not intended for industrial or commercial use. Additional assistance, by region, may be found online at www.singer.com. Machine Overview 7. Presser Foot Pressure — controls the pressure the presser foot 1. -
Page 8: Needle Area Overview
Needle Area Overview 1. Needle Plate — provides a flat area around presser foot for sewing. Guidelines indicate various seam allowances used to guide fabric while sewing. 2. Feed Teeth — feed the fabric under the presser foot when sewing. 3. -
Page 9: Overview Accessories
Overview Accessories Bobbin x4 — Only use the type of transparent bobbins delivered with your machine (SINGER® Class 15 transparent bobbins). One of the bobbins is inserted in the machine upon delivery. Felt Pad — Used to cushion the spool of thread when using the Auxiliary Spool Pin. -
Page 10: Presser Feet
The foot sits on top of the button, with the opening positioned around the holes. Optional Accessories Additional optional accessories are available for your machine. Check with your authorized SINGER® retailer for more information. 4 – Introduction 4 –... -
Page 11: Stitch Overview
Stitch Overview Utility Stitches The stitches described in the below chart are utility stitches, used mainly for utility sewing. The most frequently used stitches are printed next to the stitch selection buttons on the front of the machine (Stitch Menu 1). Those stitches are selected by touching the corresponding button (if Menu 1 is active). - Page 12 Closed Over- Sew decorative hems and overlapped seams, belts and bands. For medium/heavy stretch lock Stitch fabrics. Honeycomb For elastic insertion, decorative stitching, smocking, couching and hemming. Stitch Buttonhole Sew buttonholes on home decór, garments, crafts and more. Rounded Bar- For light weight fabrics.
-
Page 13: Decorative Stitches
Decorative Stitches In addition to utility stitches, your machine features decorative and lettering stitches. When sewing these stitches, it is recommended to use a stabilizer underneath the fabric to help prevent the dense stitching from possibly puckering the fabric. It is also helpful to slightly reduce the upper thread tension. -
Page 14: Preparations
PREPARATIONS Unpacking the Machine 1. Place the box on a steady, flat surface. Lift the machine out of the box, and remove the packaging. 2. Remove all outer packing material and the plastic bag. 3. Wipe off the machine with a dry cloth to remove any lint and/or excess oil around the needle area. Note: Your sewing machine is adjusted to provide the best stitch result at normal room temperature. -
Page 15: Free Arm/Removable Accessory Tray
Free Arm/Removable Accessory Tray Store presser feet, bobbins, needles and other accessories in the accessory tray so that they are easily accessible. Keep the accessory tray on the machine to provide a larger, flat work surface. Use the free arm to facilitate sewing trouser legs and sleeve hems. -
Page 16: Spool Pin
Spool Pin Your machine has two spool pins, a main spool pin and an Auxiliary Spool Pin. The spool pins are designed for various types of thre- ad. The main spool pin is used in a horizontal position (the thread reels off the spool) and the Auxiliary Spool Pin in a vertical position (the thread spool rotates). -
Page 17: Wind The Bobbin
Wind the Bobbin 1. Place the thread spool on the spool pin. Slide a spool cap firmly After a few turns, take your foot off the foot control to against the spool. stop winding. Cut the excess thread tail above the bobbin, making sure to trim it close to the bobbin. -
Page 18: Thread The Machine
Thread the Machine Important! Make sure that the presser foot is raised and the needle is in its highest position by turning the handwheel toward you. This is very important to help ensure that the machine is correctly threaded. Not doing so can result in poor stitch quality when you start to sew. -
Page 19: Needle Threader
Needle Threader The built-in needle threader allows you to thread the needle quickly and easily. The needle must be in its highest position to use the built-in needle threader. Turn the hand wheel towards you until the needle is in its highest position, or press the needle up/down button. -
Page 20: Important Needle Information
Important Needle Information Change the needle often. As a general rule, needles should be changed every 6-8 hours of actual stit- ching time. Always use a straight needle with a sharp point and make sure the point is not bent or damaged (A). A damaged needle (B) can cause skipped stitches, breakage or snapping of the thread. -
Page 21: Thread Tension
Thread Tension To set the thread tension, turn the dial on top of the machine. Depending on the fabric, thread, etc, the tension may need to be adjusted. For the best stitch appearance and durability, make sure the needle thread tension is correctly adjusted. For general sewing, the threads evenly meet between the two layers of fabric (A). -
Page 22: Change The Presser Foot
Change the Presser Foot 1. Make sure that the needle is in the highest position and the presser foot is lifted. The presser foot release button extends out the back of the presser foot holder. Press this lever to release the presser foot. 2. -
Page 23: Operating Your Machine
OPERATING YOUR MACHINE Machine Operation Controls Reverse Button The Reverse Button has two different functions, depending on what stitch has been selected. Stitch Menu 1 (stitch no. 1–5) and Stitch Menu 2 (stitch no. 01) Press and hold the Reverse button to sew in reverse. Release it to resume sewing forward. The machine sews in reverse only as long as the reverse button is pressed. -
Page 24: Stitch Control Panel
Stitch Control Panel The functions on the Stitch Control Panel are used to select and adjust stitches and program fonts. Each functionality is listed and described further below. 1. Display 2. Stitch menu / Sound on/off 3. Sequence mode 4. Selection arrows 5. -
Page 25: Sequence Controls
Sequence Controls 1. Sequencing — Press to enter Sequence mode. 2. Navigation Arrows — Use these buttons to move back and forth in your sequence. 3. Repeat — Press to sew your sequence repeatedly. 4. Delete — Press to delete the selected stitch in a sequence. Automatic Stop Setting Press this button to activate the Automatic Stop setting. -
Page 26: Select A Stitch
Select a Stitch Your machine has four stitch menus. Menu 1 includes the most frequently used utility stitches, and are printed on the machine next to the stitch selection buttons. Menus 2–3 have both utility and decorative stitches. Menu 4 is a Font menu. Here, you will find letters and numbers you can use to create sequences. -
Page 27: Sequence Mode
Sequence Mode Display in Sequence Mode Press the Sequence Button to enter sequence mode. Letters and numbers that can be programmed and are found on Stitch Menu 4, Fonts. This menu is selected automatically when ente- ring sequence mode. Sequence Button 1. -
Page 28: Create A Sequence
2. Pull out the Stitch Chart to see which stitch number refers to which letter/number. To program “SINGER”, would be stitch number 29, 19, 24, 17, 15, 28 (B). 3. Select the stitch you will use. On the display, you can see the selected stitch number (C) and what position it has in the sequence (D). -
Page 29: Sewing
SEWING Sewing Next to each stitch or sewing technique described in this secti- on of the manual is a chart showing the recommended settings and presser foot. See sample of the chart to the right. The recommended settings are also shown on the display, but might need adjustment to fit a special technique. -
Page 30: Change Sewing Direction
Change Sewing Direction To change sewing direction, stop the machine. Press the Needle Stop button to activate the Needle Down position. The needle is brought down into the fabric. Raise the presser foot. Pivot the fabric around the needle to change sewing direction as desired. -
Page 31: Multi-Step Zigzag Stitch
Multi-Step Zigzag Stitch Multi-step zigzag stitch is used to overcast raw edges. Make sure the needle pierces the fabric on the left side and overcasts the edge on the right side. 3.0–5.0 3–5 The stitch can also be used as an elastic stitch to allow seams to stretch when sewing knit fabrics. -
Page 32: Closed Overlock Stitch
Closed Overlock Stitch The closed overlock stitch can be used for sewing medium to heavier weight stretch fabrics. Use this stitch to hem stretch fabrics (A) and for belt loops (B). 3–5 Fold a hem to the wrong side and stitch with closed overlock stitch from the right side. -
Page 33: Darning And Mending
Darning and Mending Repair Large Holes To cover large holes it is necessary to sew a new piece of fabric onto the damaged area. Baste the new piece of fabric onto the damaged area on the 4.0–6.0 3–5 right side of the fabric. Set up for zigzag Sew over the fabric edges with the zigzag or the multi-step zigzag stitch. -
Page 34: Repair Small Holes
Repair Small Holes A small hole or tear is easily darned with the darning stitch. This stitch automatically sews small stitches back and forth to cover small holes or tears. 2–4 Thread your machine with a thread in a color as close to your fabric as possible. -
Page 35: One-Step Buttonhole
One-Step Buttonhole Sew buttonholes perfectly sized for your button. The fabric should be interfaced and/or stabilized where buttonholes are to be sewn. 3–5 1. Mark the start position of the buttonhole on the fabric (A). Set up for buttonhole 2. On the One-Step Buttonhole Foot, push the button holder open by pushing the lever backwards (B). -
Page 36: Sew Zippers
Sew Zippers The Zipper Foot can be attached on either the right or the left of the needle, making it easy to sew both sides of the zipper. To sew the right side of the zipper, attach the foot in the left 2.0–3.0 3–5 presser foot position (A). -
Page 37: Hand-Look Quilt Stitch
Hand-Look Quilt Stitch Simulate the look of hand sewn quilting with the Hand-look Quilting stitch. Thread the needle with either transparent thread or with a thread that blends with the color of the top of the fab- ric. Thread the bobbin with a thread color that coordinates or 2.0–3.0 6–9 contrasts with the top of the fabric, depending on the look you... -
Page 38: Maintenance
MAINTENANCE Cleaning the Machine To keep your sewing machine operating well, clean it often. No lubrication (oiling) is needed. Wipe the exterior surface of your ma- chine with a soft cloth to remove any dust or lint built up. Cleaning the Bobbin Area Raise the needle and turn off the machine. -
Page 39: Troubleshooting
Solution: Clean bobbin holder. Possible cause: Wrong bobbins being used. Use bobbins that are the same style as those that come with the machine (SINGER® Class 15 transparent Solution: bobbins) – don’t substitute. Bobbin Thread Showing on Top of Fabric Possible cause: Top thread too tight. - Page 40 Make sure power cord/foot control are correctly seated in machine and power supply. Possible cause: Wrong bobbins being used. Use bobbins that are the same style as those that come with the machine (SINGER® Class 15 transparent Solution: bobbins)– don’t substitute.
- Page 41 Needles Breaking Possible cause: Bent, dull or damaged needle. Solution: Discard needle, insert new needle. Possible cause: Wrong size needle for fabric. Solution: Insert appropriate needle for fabric type. Possible cause: Machine not threaded correctly. Solution: Rethread the machine completely. Possible cause: “Pushing”...
-
Page 42: Technical Specification
Possible cause: Sewing was started with no fabric under the presser foot. Solution: Place fabric under foot, making sure that needle comes down into fabric; lightly hold both thread tails for first few stitches. Possible cause: Stabilizer may be needed for technique. Solution: Place stabilizer underneath fabric. - Page 43 INTELLECTUAL PROPERTY SINGER, and the Cameo “S” Design, are exclusive trademarks of The Singer Company Limited S.à.r.l. or its Affiliates. Please note that on disposal, this product must be safely recycled in accordance with relevant National legislation relating to electrical/ electronic products.
- Page 44 4710852-26F • English • ©2020 The Singer Company Limited S.à.r.l. or its Affiliates. • All rights reserved • Printed on environment friendly paper 021H7F0101...
Need help?
Do you have a question about the Elite CE677 and is the answer not in the manual?
Questions and answers