
Related Manuals for RedBack Lasers LLRMM30

Summary of Contents for RedBack Lasers LLRMM30
- Page 1 Thank you very much for purchasing RedBack LLRMM30 line laser ranging detector. LLRMM30 Receiver Feature & Function II. User Security III. Instrument Structure IV. Operation Manual V. Technical Specifications VI. Maintenance VII. Packing List...
- Page 2 I. Feature & Function LLRMM30 laser ranging detector is an essential accessory for line lasers to detect the position of the laser signal emitted by the line lasers. Used in conjunction with the line laser give horizontal vertical reference plane quickly and accurately.
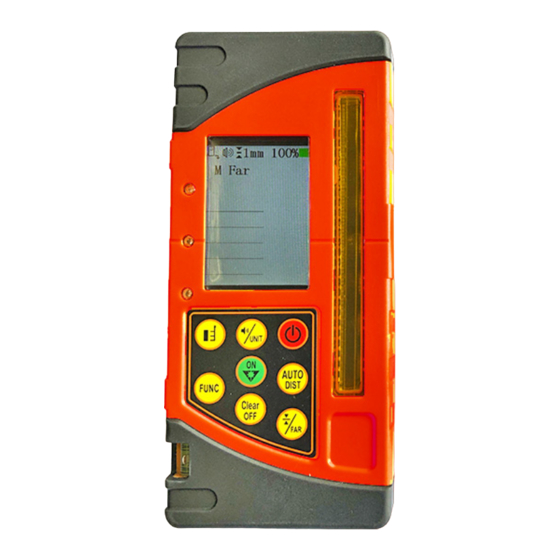
- Page 3 can only be made through an authorized service center. Make sure the instrument is in place. III. Instrument Structure LCD display Receiving window Upper indicator center Lower indicator keypad Long blister...
- Page 4 buzzer screw Clamp postioning hole Round magnet Battery flap Side LED indicator Safety label Round magnet Figure 1 Top round blister Long magnet Ranging receiving window Ranging emitting window Bottom round blister Figure 2 Power:switch on/off; fine/coarse measurement switch: short press to switch to detection accuracy/ long...
- Page 5 press to switch between short and long distance; sound/unit switch: short press switch buzzer function/ long press switch to unit; Ranging reference selection: short press to switch the ranging reference; Mode: Short press to switch area measurement, volume measurement, Pythagorean measurement, and Pythagorean 2 measurement;...
- Page 6 1. Switch on/off Press once, the LCD displays the instrument model and version number (Figure 3), the LED indicator lights up from top to bottom and then goes out ; the buzzer emits a “didi” power-on prompt, and then enters the normal detection state.
- Page 7 between fine measurement (±1mm) and coarse measurement (±3mm) modes. The detection accuracy indicator on the LCD is shown in the figure below. As shown in the figure: the top one is the fine measurement, the bottom one is the coarse measurement;...
- Page 8 4. Sound state selection Short press the key in the power-on state, and the instrument will switch between sound and silent state. The sound indicator on the LCD is as shown in the figure below. Figure 6 sound silent Prompt: The sound and silent state is for the sound indication when receiving;...
- Page 9 there is a button operation, the backlight will automatically turn on. 6. Value display & unit switch function Long press to switch the value unit. On the left corner of the screen displays:M, Ft. M means meters, and Ft means foot. 7.
- Page 10 The laser line is on the upper part of the zero position, and the lower indicator LED is long on, and the instrument emits a quick short tone. Example: The laser line is emitting 1mm above the zero line, the LCD displays an upward arrow, and the offset...
- Page 11 The laser line coincides with the zero position, the centered LED is on, and the instrument emits a long beep. Note: When the distance between the laser level and LS723 is less than 1 meter, it may cause the display position to be abnormal. Please use it when the distance is greater than this.
- Page 12 planes: upper end surface, zero line, lower end surface, etc.; Upper end zero line lower end Figure 9.2 Single measurement Press the key for the first time to light up the laser dot (Figure 9), aim at the target with the laser dot, and press again to measure...
- Page 13 the distance measurement is performed multiple times, the latest distance value is always in the first row; Simultaneously display the results of the last 5 distance measurements; Operate to clear the last ranging result; Laser dot lit up Figure 9 Figure 10 9.3 Area measurement...
- Page 14 9.3.1 Short press the key once in the routine measurement to enter the area measurement, as shown in Figure 11; press the key to light up the laser, and press clear last measurement; Figure 11 Figure 12 9.3.2 First measure the first edge, the measurement result is shown in Figure 12;...
- Page 15 row; the instrument will automatically calculate the area value and display it on the third row, as shown in Figure 13; Figure 13 9.4 Volume measurement 9.4.1 Short press the key twice in the routine measurement to enter the volume measurement, as shown in Figure 14;...
- Page 16 9.4.4 Finally measure the third edge, and the measurement result is displayed in the third row; the instrument will automatically calculate the volume value and display it in the fourth row, as shown in Figure 17; Figure 14 Figure 15 Figure 16 Figure 1 7...
- Page 17 9.5 Pythagorean 1 measurement 9.5.1 Short press the key three times in the routine measurement to enter the Pythagorean 1 measurement, as shown in Figure 18; press the key to light up the laser, and press the key to clear the last measurement;...
- Page 18 Figure 18 Figure 19 Figure 20 9.6 Pythagorean 2 measurement 9.6.1 Short press the key four times in the routine measurement to enter the Pythagorean 1 measurement, as shown in Figure 21; press the keyto light...
- Page 19 up the laser, and press the keyto clear the last measurement; Figure 21 Figure 22 Figure 23 Figure 24 9.6.2 First measure the first side a (hypotenuse), and the measurement result...
- Page 20 is displayed in the first row, as shown in Figure 22; 9.6.3 Then measure the second side b (right-angled side), and the measurement result is displayed in the second row, as shown in Figure 23; 9.6.4 Finally measure the third side c (hypotenuse), and the measurement result is displayed in the third row;...
- Page 21 9.7.1 Press the key in the normal measurement mode to enter the automatic measurement subroutine, as shown in Figure 25; Figure 25 At this time, the measurement reference changes to the laser line as the reference (see the first icon in the status bar); a line of prompt lines is displayed at the bottom of the LCD;...
- Page 22 the offset value and the indicator arrow, as shown in Figure 26; the prompt line information is cleared; Figure 26 Figure 27 9.7.3 When the mobile receiver receives the laser signal, when the indication deviation is centered and lasts for more than 1.6 seconds, the instrument will measure the distance once and display the distance measurement value;...
- Page 23 entering the hold state, pressing will clear the current value and start a new measurement; if you want to exit the automatic measurement interface, press the 10. Power saving function If the instrument has no signal for 2 minutes, and the instrument is still, the display and backlight will automatically turn off;...
- Page 24 will affect the ranging accuracy; when the battery is 0, it will automatically shut down; 12. Battery installation Open the battery cover, insert 3 5# batteries according polarity instructions, and close the battery cover. When the instrument displays that the remaining battery power is less than 15%, the instrument can still receive operations.
- Page 25 note: If the instrument will not be used for a long time, please remove the battery. Please replace the battery in time when the voltage is low. 13. Application a. When detecting the horizontal laser line, the top round blister should be centered. The deflection of the receiver will affect the receiving accuracy (if detecting the vertical laser line, the side long blister should also be centered).
- Page 26 Connecting with staff...
- Page 27 V. Technical Specifications Item Specifications Detecting range Detecting Fine detecting ±1mm accuracy coarse detecting ±3mm Detecting resolution Laser class ClassII ranging 0.3~50m Ranging ±2mm accuracy sound Sound, silent Upper(red), center(green), lower(yellow) indicator Power supply 3*AA...
-
Page 28: Maintenance
Battery life 25 hours Timing 6±0.5min power off Working 0℃~+40℃ temperature Storage -20℃~+70℃ temperature Size 172×78×32mm Weight Ca.300g (battery included) VI. Maintenance ※ attempt to disassemble the instrument, non- professional dis-assembly will damage the instrument; ※ Please put the instrument in the carrying case VII. - Page 29 item quantity LS723II LS305 clamp AA battery Manual Q.C. Date Warranty 12 Months – see included sheet for details. RedBack Lasers Distributed Industries Pty Ltd. www.redbacklasers.com.au...
Need help?
Do you have a question about the LLRMM30 and is the answer not in the manual?
Questions and answers