Advertisement
Quick Links
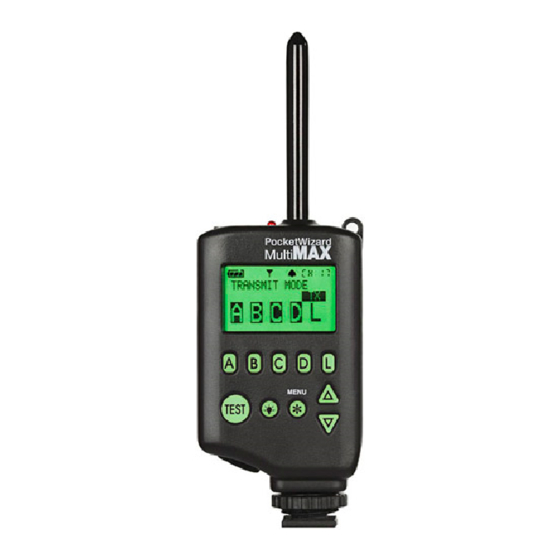
PocketWizard MultiMAX Transceiver
Quick Guide
STATUS LIGHT
FLASH/ PORT 2
CAMERA/ PORT 1
POWER /
TRANSMIT /
RECEIVE
SWITCH
AC ADAPTER
INPUT
TEST BUTTON
HOT SHOE
LCD Display
RADIO FREQUENCY LOCKED
BEEP MODE
BATTERY LEVEL
CONFIRMED RADIO
FAILED RADIO
CONFIRMED RADIO
& FLASH
Cable Connection
Camera PC Sync: Connect miniphone plug to Camera/PORT 1 on the
MultiMAX (set for TRANSMIT mode) then connect the PC cord to
camera's PC connector. PC cable not needed if camera hot shoe is
used.
FLEXIBLE ANTENNA
Flash: Connect miniphone plug from proper flash cable to Flash/PORT 2
on the MultiMAX (set for RECEIVE mode), then connect the other end
to the flash unit.
Electronic Shutter Release: Connect miniphone plug from proper
motor drive cable to Camera/PORT 1 on the MultiMAX (set for
RECEIVE mode), then connect the other end to the camera's motor
LANYARD LOOP
drive port. Trigger camera with transmitter.
Power On/Off
LCD (LIQUID
Transmitter: Set power switch to TRANSMIT on MultiMAX. Battery
CRYSTAL DISPLAY)
level icon will appear
will be displayed indicating mode selected.
ZONE / MENU/
NUMBERIC ENTRY KEYS
Receiver: Set the power switch to RECEIVE on MultiMAX. Battery
level icon will appear
LOCAL KEY
be displayed indicating mode selected.
CHANNEL /
TIP: All equipment should be in the OFF position while connecting
NUMERIC ENTRY
the MultiMAX to cameras or flash units.
UP / DOWN KEYS
Channel Selection
Transmitter: Set channel using the
*
/ MENU KEY
located in the upper right hand corner of the screen (
Channels 1-16 (Classic Channels) are for standard remote triggering.
BACK LIGHT / KEY LOCK
Channels 17-32 are for Selective Quad Triggering.
Receiver: Set channel using the
channel setting. If Quad triggering channels are selected, the proper
zone letter A, B, C or D must be selected using the A, B, C or D keys.
Classic Channels
(Compatible with PocketWizard Plus/Classic Models)
Channels 1-16 offer LOCAL/BOTH/REMOTE triggering. Pressing the A
key on the MultiMAX (set for TRANSMIT mode) turns the R (remote)
CHANNEL
on or off. Press the L key to turn L (Local) on or off. Set the MultiMAX
RADIO MODE
(set for RECEIVE mode) to the same channel as the transmitter.
FAILED FLASH
Note: Local and Remote modes can not be deactivated at the same time.
Selective Quad-Triggering
CONFIRMED RADIO
Pressing the A, B, C or D keys selects or deselects the four individual
triggering zones. Channels 17-32 each contain four triggering zones.
Pressing the L key turns L (Local) on or off. The MultiMAX (set for
RECEIVE mode) must be set to the same channel and zone as the
transmitter.
Basic Operation
MultiMAX Transceiver
on display. TRANSMITTER Mode and
on display. RECEIVER Mode and
keys. Channel number is
keys to match the transmitter
Basic Operation
MultiMAX Transceiver
Local Triggering
Connect the flash unit to Flash/PORT 2 on the MultiMAX (set for
TRANSMIT mode). Pressing the L key allows the connected flash
unit to be turned on or off.
Test Button
Press the TEST button on the MultiMAX (set to TRANSMIT mode)
and release. Confirm that remote flash or camera has fired. In
channels 17-32, automatic radio trigger confirmation is displayed
as a plain letter (example
). If triggering was not confirmed, a
reversed screen display letter will appear (example
Multiple Receivers
Unlimited remote flash units or cameras can be triggered in sync
with each other. Set all MultiMAX units (set to RECEIVE mode) to
the same channel as the MultiMAX (set to TRANSMIT mode). If
Quad Triggering channels are selected, set each receiver to its zone
letter A, B, C or D. Confirmation does not function when using
multiple Receivers set to the same zone.
will
Confirmation
Classic Channel mode: The Status Light blinks in sync with every
trigger and a beep is heard (if selected). Radio and flash
confirmation are not performed or displayed for Classic Channels.
Quad-Triggering mode: A cleared zone letter on the display in
addition to a beeping sound indicates send/receive signaling.
)
Flash Confirmation Sensor
Connect flash confirmation cable to Camera/PORT 1 on MultiMAX
(set for RECEIVE mode). Position the sensor towards flash output
and attach with Velcro. Confirms on all four Quad-Triggering
zones. Displays
next to each confirmed zone A, B, C or D letter.
Beeper Setting */ MENU B B
Press the */ MENU key to enter the main menu. Press the B key
twice to select Beep/
menu. Select the desired setting by
pressing the A, B, C or D choices from the menu.
beep on trigger
beep on error/zero
Counter Setting */ MENU C
In either TRANSMIT or RECEIVE mode press the */ MENU key to
enter the Main menu. Press the C key to select the Counter menu.
Select the desired trigger counter setting by pressing A, B, C or D
choices from the menu.
)
both
Advertisement

Related Manuals for PocketWizard MultiMAX


Summary of Contents for PocketWizard MultiMAX
- Page 1 MultiMAX (set for TRANSMIT mode) turns the R (remote) BATTERY LEVEL CHANNEL on or off. Press the L key to turn L (Local) on or off. Set the MultiMAX RADIO MODE (set for RECEIVE mode) to the same channel as the transmitter.
- Page 2 (a small D will appear under on the main 0.25 seconds 1/200 0.005 seconds Press down the C key while turning MultiMAX on. MultiMAX resets LCD). Both Ports delay triggering by set delay time. All Receiver 0.125 seconds 1/250 0.004 seconds to original factory settings.
Need help?
Do you have a question about the MultiMAX and is the answer not in the manual?
Questions and answers