Table of Contents
Advertisement
Available languages
Available languages
Quick Links
Headquarter: ORTHOSERVICE AG
Via Milano 7 · CH-6830 Chiasso (TI) · Switzerland
Tel. 0041 91 8220088 · Fax 0041 91 8220089
info@orthoservice.com · www.orthoservice.com
Niederlassung Deutschland: Orthoservice Deutschland GmbH
Flugstraße 8 · D-76532 Baden-Baden · Deutschland
Tel. 0049 (0)7221 9913911 · Fax 0049 (0)7221 9913913
info@orthoservice.de · www.orthoservice.de
Sede italiana: RO+TEN s.r.l.
Sede legale: Via Fratelli Ruffini, 10 · I-20123 Milano (MI) · Italia
Sede operativa e amministrativa:
Via Comasina, 111 · I-20843 Verano Brianza (MB) · Italia
Tel. 0039 039 6014094 · Fax 0039 039 6014234
info@roplusten.com · www.roplusten.com
Società soggetta a Direzione e Coordinamento (art. 2497bis CC):
Orthoservice AG (CH) · 6830 Chiasso (TI) · Switzerland
pluspoint
4
REF. 9530 · 9540 · 33040
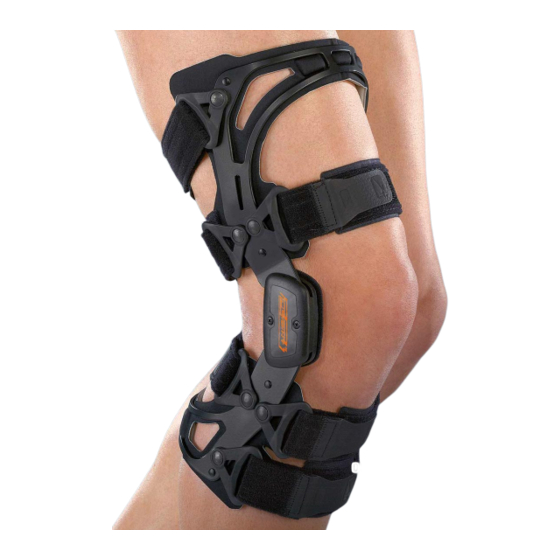
Funktionelle Knieorthese
nach 4-Punkt-Prinzip
Functional knee brace
4 points
Genouillère fonctionnelle
4 points
Ginocchiera funzionale
4 punti
Функциональный
наколенник 4-точечный
Advertisement
Table of Contents

Related Manuals for ORTHOSERVICE RO+TEN pluspoint 3


Summary of Contents for ORTHOSERVICE RO+TEN pluspoint 3
- Page 1 pluspoint REF. 9530 · 9540 · 33040 Funktionelle Knieorthese nach 4-Punkt-Prinzip Headquarter: ORTHOSERVICE AG Functional knee brace Via Milano 7 · CH-6830 Chiasso (TI) · Switzerland 4 points Tel. 0041 91 8220088 · Fax 0041 91 8220089 info@orthoservice.com · www.orthoservice.com Genouillère fonctionnelle 4 points Niederlassung Deutschland: Orthoservice Deutschland GmbH...
- Page 2 Headquarter: ORTHOSERVICE AG Via Milano 7 · CH-6830 Chiasso (TI) · Switzerland Tel. 0041 91 8220088 · Fax 0041 91 8220089 info@orthoservice.com · www.orthoservice.com Niederlassung Deutschland: Orthoservice Deutschland GmbH Flugstraße 8 · D-76532 Baden-Baden · Deutschland Tel. 0049 (0)7221 9913911 · Fax 0049 (0)7221 9913913 info@orthoservice.de ·...
- Page 3 Bitte lesen Sie diese Anweisung sorgfältig ZWECKBESTIMMUNG Die Pluspoint 3 Knieorthese ist ausschließlich für die orthetische Versorgung des Kniegelenks einzusetzen. Einsatzbereich ist das Kniegelenk. MATERIALIEN Polyamid PA, Polyurethan PU, Polyester PL ; Aluminiumschienen und Klettbänder. KONFORMITÄTSERKLÄRUNG Die ORTHOSERVICE AG erklärt als Hersteller in alleiniger Verantwortung, dass es sich bei diesem Produkt um ein Medizinprodukt der Klasse I handelt und dass es gemäß...
- Page 4 PFLEGE Nicht bleichen Keine chemische Reinigung Nicht bügeln Nicht im Trockner trocknen Waschanweisung: Handwäsche bis 30° C mit neutraler Seife, nicht in der Nähe von Wärmequellen trocknen. Waschanweisung • Rahmen: Mit einem Schwamm in handwarmen Wasser mit Neutralseife reinigen. Mit einem Tuch trocken reiben •...
- Page 5 L I E F E R U M F A N G Die Pluspoint-Knieorthese wird vormontiert inklusive der folgenden Komponenten geliefert: 1x Knieorthese mit 6 regulierbaren Riemen 2x flache Kondylenpolster(, von den eines an der Knieorthese vormontiert ist) 2x dicke Kondylenpolster (größere Stärke) 8 Paar Keile zur Flexionseinstellung auf 0°, 10°, 20°, 30°, 45°, 60°, 75°, 90°...
- Page 6 A N P A S S E N F Ü R D E N A R Z T / T E C H N I K E R Alle Klettriemen öffnen, sie aus den jeweiligen Schnallen ziehen und sie provisorisch wieder um sich selbst verschließen.
- Page 7 A N P A S S E N F Ü R D E N A R Z T / T E C H N I K E R EINSTELLUNG DER FLEXION-EXTENSION NUR PP3 Die Schrauben, die die Flexions-/Extensionskeile im Sitz blockieren, aufschrauben (Abb. H) Die eventuell bereits eingeführten Keile herausnehmen.
- Page 8 A N L E G E N F Ü R D E N P A T I E N T E N Alle Klettriemen öffnen, sie aus den jeweiligen Schnallen ziehen und sie provisorisch wieder um sich selbst verschließen. Das Knie bei sitzender Position um etwa 30° beugen. Die Knieorthese am Bein anbringen und die Mitte des Gelenks etwa 1–2 cm über der Mitte der Patella (Abb.
- Page 9 E I G E N S C H A F T E N • Neues anatomisches Design, passt sich optimal dem Kniegelenk an • Innovativer Rahmen aus Aluminium-Speziallegierung, leicht und stabil, einfach verformbar durch den Techniker verformbar (für eine erleichterte Modellierung an Oberschenkel und Wade), mattschwarz hartlackiert •...
-
Page 10: Declaration Of Conformity
Please read the instructions carefully and thoroughly DECLARATION OF CONFORMITY As the manufacturer, ORTHOSERVICE AG declares with sole responsibility that this product is a Class I medical product and has been manufactured in accordance with the basic requirements of the directives 93/42/EEC and 2007/47/EEC. These operating instructions were created in accordance with the specification of the above-mentioned directives. -
Page 11: Maintenance
MAINTENANCE do not bleach no chemical cleaning do not iron do not tumble-dry Washing instructions: hand wash at max. 30° C with neutral soap. Dry away from heat sources. Washing instructions: • Frame: Clean using a sponge with lukewarm water and a neutral soap. Then dry with a cloth •... - Page 12 A D A P T I N G F O R T H E D O C T O R / T E C H N I C I A N Open all Velcro straps, remove them from the corresponding buckles ®...
- Page 13 A D A P T I N G F O R T H E D O C T O R / T E C H N I C I A N FLEXION-EXTENSION ADJUSTMENT PP3 ONLY: Remove the screws that hold the flexion/extension wedges in place (fig. H). Remove any pre-inserted wedges.
- Page 14 P U T T I N G O N T H E A P P L I A N C E F O R T H E P A T I E N T Open all Velcro straps, remove them from the corresponding buckles and close ®...
- Page 15 C H A R A C T E R I S T I C S A N D M A T E R I A L S • New anatomical design that adapts perfectly to the knee joint • Innovative frame made from a special aluminium alloy, light and stable, shapeable (for a facilitated modellation at the thigh and calf), matt black hard paint coat •...
-
Page 16: Déclaration De Conformité
Veuillez lire ces instructions avec attention DÉCLARATION DE CONFORMITÉ Le fabricant ORTHOSERVICE AG déclare, sous sa seule responsabilité, que le présent produit est un produit médical de classe I et qu’il a été fabriqué conformément aux exigences des directives 93/42/CEE et 2007/47/CEE. Le présent mode d’emploi a été rédigé selon les prescriptions des directives mentionnées ci-dessus. -
Page 17: Entretien
ENTRETIEN Ne pas blanchir Pas de nettoyage chimique Ne pas repasser Ne pas sécher en séchoir Instructions de lavage : lavage à la main jusqu’à 30 °C avec du savon neutre, ne pas sécher à proximité de sources de chaleur. Instructions de lavage •... - Page 18 A D A P T A T I O N P O U R L E M É D E C I N / L’ O R T H O P É D I S T E - O R T H É S I S T E Ouvrir tous les straps, les enlevés du scratch correspondant et les attachés temporairement.
- Page 19 A D A P T A T I O N P O U R L E M É D E C I N / L’ O R T H O P É D I S T E - O R T H É S I S T E AJUSTEMENT DES FLEXIONS ET EXTENSIONS SEULEMENT PP3: Retirer les vis qui retiennent les cales de flexion/ extension (fig.
- Page 20 E N F I L A G E P O U R L E P A T I E N T Ouvrir tous les straps, les enlevés du scratch correspondant et les attachés temporairement. Se positionner avec la jambe fléchis à 30 degrés, mettre l’attelle sur le membre et positionner le centre du joint 1–2 cm au dessus du centre du genou (fig.
- Page 21 C A R A C T É R I S T I Q U E S E T M A T É R I A U X • Nouveau design anatomique s’adaptant de manière optimale à l’articulation du genou • Cadre innovant en alliage aluminium spécial, léger et stable, malléable (pour faciliter la modulation des prises au niveau de la cuisse et de la jambe), vernis-laque dur noir mat •...
-
Page 22: Меры Предосторожности
У ХОД Не отбеливать не подвергать химической чистке не гладить не сушить в сушилке Инструкции по мытью: Ручная стирка до 30 ° C с мягким мылом; высушить вдали от прямого тепла Инструкции по уходу • Корпус: Промыть губкой, смоченной в тёплой воде с мылом. Обтереть сухой тканью •... - Page 23 Х А Р А К Т Е Р И С Т И К А И М А Т Е Р И А Л Ы • Инновационный анатомический дизайн, который оптимально соответствует конечности • Инновационный лёгкий и прочный каркас из специального алюминиевого формуемого сплава...
- Page 24 ПЕРЕД ИСПОЛЬЗОВАНИЕМ, ДЛЯ ВРАЧА / ТЕХНИКА Раскройте все ремни с липучкой, освободите их от соответствующих пряжек, и залепите их временно Усадите пациента, разогните колено примерно на 30°, надевайте наколенник на ногу и разместите центр шарнирного соединения примерно на 1-2 см выше центра коленной чашечки (рис.A). Закрепите...
- Page 25 ПЕРЕД ИСПОЛЬЗОВАНИЕМ, ДЛЯ ВРАЧА / ТЕХНИКА РЕГУЛИРОВКА СГИБАНИЯ-РАЗГИБАНИЯ TОЛЬКО PP3: Удалите винты, которые крепят клинья сгибания / разгибания в гнезде (рис. L). Удалите клинья, которые, возможно, предварительно установлены. Вставьте клинья с желаемой степенью сгибания / разгибания (рис. M), так чтобы пазы клиньев...
- Page 26 П О С Л Е Д У Ю Щ И Е П Р И М Е Н Е Н И Я Раскройте все ремни с липучкой, освободите их от соответствующих пряжек, и залепите их временно. Сядьте, разогните колено примерно на 30°, надевайте наколенник на ногу и разместите центр шарнирного...
-
Page 27: Д Е К Л А Ра Ц И Я О С О О Т В Е Т С Т В И И
Прочитайте внимательно данную инструкцию Д Е К Л А РА Ц И Я О С О О Т В Е Т С Т В И И Kak производителя , ORTHOSERVICE AG заявляет о своей исключительной ответственности, что это медицинское изделие класса I и изготовлено в соответствии с требованиями Директивы... -
Page 28: Manutenzione
MANUTENZIONE Non candeggiare Pulizia chimica non consentita Non stirare Non asciugare in asciugatrice Istruzioni per il lavaggio: Lavaggio a mano fino a 30°C con sapone neutro; lasciare asciugare lontano da fonti di calore Istruzioni di lavaggio • Telaio: Lavare con una spugna imbevuta in acqua tiepida e sapone neutro. Asciugare con un panno •... - Page 29 C A R A T T E R I S T I C H E E M A T E R I A L I • Innovativo design anatomico che si adatta in modo ottimale all’arto • Innovativo telaio leggero e resistente, in speciale lega di alluminio, sagomabile (modellazione facilitata sulle prese di coscia e polpaccio);...
- Page 30 P R I M A A P P L I C A Z I O N E P E R I L M E D I C O / T E C N I C O Aprire tutti i cinturini a Velcro , sfilarli dalle fibbie corrispondenti e richiuderli ®...
- Page 31 P R I M A A P P L I C A Z I O N E P E R I L M E D I C O / T E C N I C O REGOLAZIONE DELLA FLESSO-ESTENSIONE SOLO PP3 Togliere le viti che bloccano i cunei di flessione/estensione nella sede (fig.
- Page 32 A P P L I C A Z I O N I S U C C E S S I V E Aprire tutti i cinturini a Velcro , sfilarli dalle fibbie corrispondenti e richiuderli ® provvisoriamente su loro stessi. Sedersi con il ginocchio flesso a circa 30°, infilare la ginocchiera sull’arto e portare il centro dell’articolazione circa 1–2 cm sopra il centro della rotula (fig.
-
Page 33: Dichiarazione Di Conformità
Leggere accuratamente le presenti istruzioni DICHIARAZIONE DI CONFORMITÀ Quale fabbricante, la ORTHOSERVICE AG dichiara, sotto la propria unica responsabilità, che il presente dispositivo medico è di classe I ed è stato fabbricato secondo i requisiti richiesti dalle Direttive 93/42/CEE e 2007/47/CEE. Le presenti istruzioni sono state redatte in applicazione delle Direttive sopra menzionate.
Need help?
Do you have a question about the pluspoint 3 and is the answer not in the manual?
Questions and answers