
Related Manuals for Elite ERO-2008SC


Summary of Contents for Elite ERO-2008SC
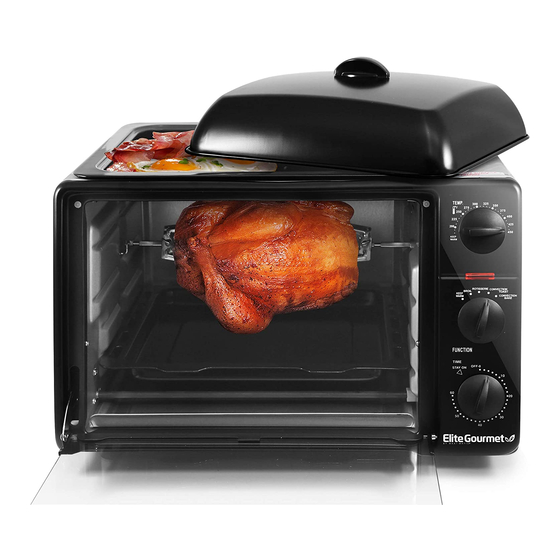
- Page 1 COUNTERTOP OVEN WITH CONVECTION & ROTISSERIE PLUS GRILL & GRIDDLE Model ERO-2008SC OWNER’S MANUAL & RECIPES Before operating your new appliance, please read all instructions carefully and keep for future reference.
-
Page 2: Important Safety Instructions
IMPORTANT SAFETY INSTRUCTIONS Basic safety precautions should always be followed when using electrical products, especially when children are present. WARNING: TO AVOID THE RISK OF ELECTRICAL SHOCK, ALWAYS MAKE SURE THE PRODUCT IS UNPLUGGED FROM THE ELECTRICAL OUTLET BEFORE ASSEMBLING, DISASSEMBLING, RELOCATING, SERVICING, OR CLEANING. - Page 3 CAUTION: This appliance is equipped with a polarized plug (one blade is wider than the other blade) as a safety feature to reduce the risk of electrical shock. This plug is intended to fit into a polarized outlet only one way. If you are unable to fit the plug into the electrical outlet, try reversing the plug.
-
Page 4: Parts & Identification
PARTS & IDENTIFICATION A) Housing M) Bake/Roasting Pan B) Power Cord N) Wire Rack C) Back Feet O) Tray Handle D) Front Feet P) Crumb Tray E) Face Plate Q) Rotisserie Skewer F) Timer Knob R) Skewer Clamps (2pcs) G) Function Control Knob S) Thumbscrew (2pcs) H) ON-Light Indicator T) Griddle... - Page 5 BEFORE USING YOUR TOASTER OVEN WITH ROTISSERIE & GRIDDLE Before using your appliance for the first time, be sure to: Read all the instructions included in this manual. 2) Remove all packaging materials from the appliance. 3) Make sure that the oven is unplugged and the Timer Knob (F) is in the “OFF”...
- Page 6 USING YOUR TOASTER OVEN WITH ROTISSERIE & GRIDDLE continued… ON-Light Indicator (H): It is illuminated whenever the oven is turned on. Wire Rack (N): For toasting, baking and general cooking for casserole dishes and standard pans. Bake/Roasting Pan (M): For use in broiling and roasting. Tray/Rack Handle (O): Allows you to pick up the wire rack (N), bake tray (M) when they are hot and remove from the oven.
-
Page 7: Rotisserie Cooking
ROTISSERIE COOKING We recommend that you do not cook a roast/chicken weighing more than 4-5lbs. on the skewer (Q). Chicken should be bound in food ties/string to prevent chicken legs or wings from unraveling during cooking; and to keep the rotisserie assembly rotating smoothly. -
Page 8: Roasting Guide
ROASTING IN YOUR OVEN Roast your favorite cut of meat to perfection. The oven can cook up to a 6lb. chicken, turkey and up to a 6lb. roast. A guide has been provided to assist you with roasting times. However, we suggest that you periodically check the cooking progress with a meat thermometer. -
Page 9: Broiling Guide
BROILING IN YOUR OVEN For best results, we recommend that you preheat the oven for 15-minutes on 450°F. OPERATION: Set Temperature Control Knob ( I ) to 450°F. Turn the Function Control Knob (G) to Broil. Preheat the oven. Place the Wire Rack (N) into the oven in one of the higher top slots. Place the Crumb Tray (P) in a slot right under the Wire Rack. - Page 10 USING THE OVEN-TOP GRIDDLE The Griddle (T), located on the top of the oven, is a convenient way to cook a large variety of foods without having to use additional pots and pans. It is also perfect for cooking your dinner side dishes while using the Rotisserie or broiling meat, fish or poultry.
-
Page 11: Using The Convection
BAKING IN YOUR OVEN Bake your favorite cookies, cakes, pies, brownies, etc. The bakeware that will fit in your oven are up to 9-inches in length. We do not recommend the use of oven roasting bags or glass containers inside the oven that are not heat resistant. NEVER use plastic, cardboard, paper or anything flammable in the oven. -
Page 12: Care And Cleaning
KEEP WARM Keep cooked food warm for up to 30-minutes. Longer periods of time are not recommended as food will become dry or spoiled. OPERATION: Set the Temperature Control Knob ( I ) to Keep Warm. Turn the Function Control Knob (G) to Keep Warm. Turn the Timer Control Knob (F) to ON. - Page 13 RECIPES Roasts [For Oven Roast or Rotisserie] These recipes can all be used by cooking the roasting rack OR by using the Rotisserie Spit & Fork. CHERRY-GLAZED PORK ROAST (Can substitute with Beef Roasts) 14 oz. Jar of cherry preserves 3 lb.
- Page 14 CAJUN PORK ROAST (Can substitute with Beef Roasts) Ingredients: 2 lbs. Boneless Single Loin Pork Roast 2 Tbsp. Paprika ½ Tsp. Cayenne Pepper ½ Tsp. Garlic Powder 2 Tsp. Oregano 1 Tsp. Thyme ½ Tsp. Salt ½ Tsp. White pepper 1 Tsp.
- Page 15 RECIPES Chicken [For Oven Roast or Rotisserie] These recipes can all be used by cooking the roasting rack OR by using the Rotisserie Spit & Fork. JAMAICAN CHICKEN ½ Cup Water 5-6 thin slices fresh ginger 2 dried chili peppers, crumbled ½...
- Page 16 SPICY CUBAN ROTISSERIE CHICKEN 1 large whole chicken (4 lbs.) 2 Tsp. Dried oregano 1 Tsp. Salt & pepper ¼ Cup fresh lime juice 1 Tsp. Ground cumin 3 Tbsp. Olive Oil 1 Shallot, minced ¼ Tsp. Pepper lime slices 2 Large garlic cloves Minced Cilantro sprigs 1 Tsp.
- Page 17 RECIPES Hams [For Oven Roast or Rotisserie] These recipes can all be used by cooking the roasting rack OR by using the Rotisserie Spit & Fork. APPLE CIDER GLAZED HAM 1 (3 lb - 5 lb) Boneless shank of Ham 1 Cup Apple Cider 4 Tsp.
- Page 18 HONEY BAKED HAM 1 (5 lb) boneless Ham 2 Cups Honey 2 Cups Brown Sugar 5 1/3 Tbsp. Cider Vinegar 2 Tsp. Nutmeg 2 Tsp. Ground cinnamon 2 Tsp. Ground cloves Combine all ingredients except for the Ham and the string into a saucepan. Stir over medium heat until warm.
- Page 19 HONEY MUSTARD GRILLED CHICKEN SANDWICHES 4 Chicken breast breasts ¼ Cup Dijon mustard 2 Tbsp Honey ¼ Tbsp Garlic powder 1 Tablespoon Chopped oregano leaves (Fresh or dried) 1/8 Tsp Red cayenne pepper 1 Tsp Water 2 Tbsp Mayonnaise Thin slices of tomatoes Lettuce Whole grain sandwich buns Mix mustard, honey, oregano, garlic powder, red pepper and water;...
- Page 20 Remove chicken from the marinade. Reserve the remaining marinade for later use. Cover and grill for 15-20 minutes, brushing occasionally with reserved marinade. APPLE HONEY GRILLED CHICKEN 4 Boneless, skinless chicken breasts 1/3 Cup Apple jelly 1 Tbsp Honey 1 Tbsp Dijon Mustard ½...
- Page 21 Mix the remaining ingredients except the salt and pepper. Brush thinly onto steaks. Set aside remaining mixture. Cover and grill steaks for 5-10 minutes depending on desired doneness. Serve with remaining butter mixture and sprinkle with salt and pepper. TEQUILA LIME STEAKS 2 lb.
- Page 22 with salt. Grill steaks uncovered for 5-10 minutes depending on desired doneness. Occasionally brush the mixture onto steaks while grilling. Reserve remaining mixture and serve the steaks. RECIPES Seafood [For Oven Top Grill & Griddle] Note: Most recipes to be used on the Oven Top GRILL can be incorporated to be used with grilling INSIDE the oven as well by using the Grilling Rack.
- Page 23 Remove fish and serve hot with chilled sauce. LEMON SAGE RED SNAPPER 4 Red Snapper fillets (½ inch thick) ½ Tsp. Salt ¼ Tsp. Scallion (minced) 1 Tsp. Sage (crumbled) 3 Tbsp. Butter ½ Cup Chicken Broth Marinade fish in chicken broth for 4-5 hours or over night. Season fish on both sides with salt and pepper.
- Page 24 RECIPES Miscellaneous [For Oven Top Grill & Griddle] Note: Most recipes to be used on the Oven Top GRILL can be incorporated to be used with grilling INSIDE the oven as well by using the Grilling Rack. GRILLED PEACHES 6 Peaches ½...
- Page 25 GRILLED MIXED VEGETABLES 2 Zucchini, sliced length wise. ½ Cup Sliced mushrooms ½ Cup Sliced red bell peppers ½ Cup Sliced yellow bell peppers 1 Tablespoon Olive oil Salt and pepper Combine all ingredients into bowl. Toss to coat well. Heat up your indoor/outdoor grill to desired temperature.
- Page 26 RECIPES Baking Cookies [For Oven Baking Feature] APPLE SAUCE COOKIES Makes 36 1 lb. Cooking apples, peeled, cored and diced. 3 Tbsp Water ½ Cup Sugar ½ Cup Butter or Margarine 1 Cup All-purpose flour ½ Tsp Baking Powder ¼ Tsp Baking Soda Pinch Salt ½...
- Page 27 ¼ Tsp Ground Cloves ½ Cup Butter or Margarine 1 ½ Cups Sugar 1 Egg, well beaten 4 Tbsp Black molasses 1 Tsp Fresh lemon juice Preheat the oven to 325F. Grease baking sheet. (Make sure the baking sheet is the right size to fit into the oven.) Sift the flour, baking soda and all the spices into a bowl.
- Page 28 4 Cups All-purpose flour 1 envelope Active dry yeast Pinch Salt 1 2/3 cups Hot water 12 Bacon strips 1 Egg, well beaten Mix the flour, yeast and salt in a bowl and blend together. Add a little water to the mixture and mix with a knife. Add the remaining water and use hands to pull the mixture together to make a sticky dough.
- Page 29 In a saucepan, bring water and butter to a boil. Remove from heat and add flour mixture all at once, beating until the dough forms a ball. Return to the heat and beat constantly for 1-2 minutes to dry out. Remove from heat and let cool for 5 minutes.
- Page 30 LIMITED WARRANTY* ONE (1) YEAR WARRANTY IS ONLY VALID WITH A DATED PROOF OF PURCHASE 1. Your small kitchen appliance is built with precision, inspected and tested before leaving our factory. 2. It is warranted, to the original purchaser to be free from any manufacturing defects under normal use and conditions for one (1) year, cord excluded.
-
Page 31: Return Instructions
RETURN INSTRUCTIONS RETURNS: A. Any return of defective merchandise to the manufacturer must be processed accordingly by first contacting customer service (contact information shown below) to obtain an RA # (Return Authorization Number). We will not accept any returns of merchandise without an applicable RA B. - Page 32 DISCRIPCION DE PARTES A) Horno Tostador B) Cable Eléctrico C) Soporte trasero D) Soporte delantero E) Panel de control F) Temporizador de 60 Min. – Controla el tiempo para cocinar con alarma de campana G) Selector de calor– Dirige la posición del calor en los alimentos, arriba abajo o los dos al mismo tiempo.
- Page 33 COMO USAR SU HORNO COMO COCINAR Cocina trozos de carne a la perfección como pollos, pavos,carne de res, cerdo, borrego y tambien vegetales. Su nuevo horno podra cocinar hasta 3 y 4 kilos de su alimento favorito. Favor de segir las instrucciones recomendadas abajo en como cocinar usando su nuevo horno tostador. OPERACIÓN: Ponga el alimento a cocinar en la charola asadora.
- Page 34 Tome la varilla de metal, inserte un gancho y asegurelo apretando el tornillo de mariposa para evitar que el gancho se mueva y con las puntas hacia el interior opuesto a la terminal de la varilla . Para apretar los ganchos simplemente apriete los tornillos de mariposa contra la varilla. Para soltar simplemente afloje los tornillos de mariposa.
- Page 35 OPERACIÓN: Asegurese de que cuando use la parrilla y plancha para asar tambien este el horno en funcionamiento y esté cocinando dentro al mismo tiempo. Nunca encienda el horno sin nada dentro. Mientras use el horno deje que la parrilla y la palncha asadora se calienten por 5 min. aproximadamente antes de cocinar en el.
- Page 36 COMO LIMPIAR SU HORNO SIEMPRE ASEGURESE DE QUE EL HORNO ESTE FRÍO Y DESCONECTADO DEL TOMA CORRIENTE ANTES DE LIMPIAR. Su nuevo horno, tiene una caracteristica unica. Tiene una capa de material antiadherente en el interior del horno, que se limpia automatico y continuamente por si solo mientras lo esta usando. Cualquier salpicadura de alimento en las paredes del horno se oxidarán por el calor generado dentro del horno mientras esté...
- Page 37 GARANTÍA LIMITADA * UN (1) AÑO GARANTIA ES VALIDA CON UNA PRUEBA DE COMPRA FECHADA 1. Su aparato de cocina está construido con precisión, inspeccionados y probados antes de salir de nuestra fábrica. 2. Se garantiza, al comprador original, de estar libres de defectos de fabricación en condiciones de uso normales y las condiciones para un (1) año, cordones excluidos.
- Page 38 INSTRUCCIONES DE DEVOLUCIÓN DEVOLUCIONES: A. Cualquier devolución de mercancía defectuosa al fabricante deben ser procesados apropiadamente contactando primero al servicio al cliente (información de contacto se muestra a continuación) para obtener un # RA (Número de autorización de devolución). No se aceptará ninguna devolución de mercancía sin un # RA aplicable.
Need help?
Do you have a question about the ERO-2008SC and is the answer not in the manual?
Questions and answers