Olimpia splendid LIMPIA 6 Instructions For Use And Maintenance Manual
Hide thumbs
Also See for LIMPIA 6:
- Instructions for use and maintenance manual (52 pages) ,
- Instructions for use and maintenance manual (52 pages)
Table of Contents
Advertisement
Available languages
Available languages
Quick Links
ISTRUZIONI PER USO E MANUTENZIONE
ISTRUZIONI PER USO E MANUTENZIONE
INSTRUCTION FOR USE AND MAINTENANCE
INSTRUCTION FOR USE AND MAINTENANCE
MODE D'EMPLOI ET D'ENTRETIEN
HINWEISE FÜR DIE VERWENDUNG UND PFLEGE
HINWEISE FÜR DIE VERWENDUNG UND PFLEGE
INSTRUCCIONES PARA EL USO Y EL MANTENIMIENTO
INSTRUCCIONES PARA EL USO Y EL MANTENIMIENTO
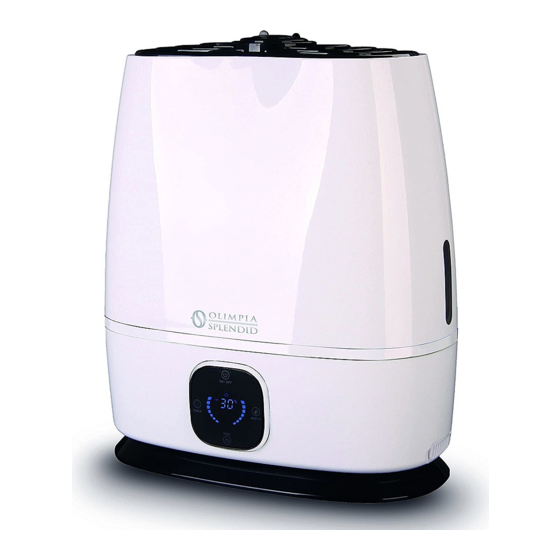
LIMPIA 6
LIMPIA 6
On/O
TEMP
C
%RH
TUMID
1 2 4 8
Timer
TIMER
MIST+/-
Heat
MODE D'EMPLOI ET D'ENTRETIEN
IT
EN
FR
DE
ES
Advertisement
Table of Contents

Related Manuals for Olimpia splendid LIMPIA 6


Summary of Contents for Olimpia splendid LIMPIA 6
- Page 1 LIMPIA 6 LIMPIA 6 On/O TEMP TUMID 1 2 4 8 Timer TIMER MIST+/- Heat ISTRUZIONI PER USO E MANUTENZIONE ISTRUZIONI PER USO E MANUTENZIONE INSTRUCTION FOR USE AND MAINTENANCE INSTRUCTION FOR USE AND MAINTENANCE MODE D'EMPLOI ET D'ENTRETIEN MODE D’EMPLOI ET D’ENTRETIEN HINWEISE FÜR DIE VERWENDUNG UND PFLEGE...
- Page 3 1. L’apparecchio può essere utilizzato da bambini di età non inferiore a 8 anni e da persone con ridotte capacità fisi- che, sensoriali o mentali, o prive di esperienza o della necessaria conoscenza, purché sotto sorveglianza oppure dopo che le stesse abbiano ricevuto istruzioni relative all’uso sicuro dell’apparecchio e alla comprensione dei pericoli ad esso inerenti.
- Page 4 1. Kindern ab 8 Jahren und Personen mit eingeschränkten körperlichen, sinnlichen oder geistigen Fähigkeiten, von unerfahrenen oder unwissenden Personen können das Gerät benutzen, wenn diese überwacht werden oder Anleitungen zum sicheren Gebrauch des Geräts erhalten und dessen Gefahren verstanden haben. Kinder dürfen nicht mit dem Gerät spielen.
- Page 5 19 - Non riempire la tanica dell’acqua con acqua calda o bollente. 20 - Non utilizzare questo prodotto sotto la luce diretta del sole o vicino a fonti di calore come una stufa, calorifero o radiatore. 21 - Se la tanica dell’acqua è danneggiata, non utilizzare. IT - 1 LIMPIA 6...
- Page 6 22 - Non tenere il prodotto in funzione per un periodo di tempo prolungato. 23 - Scollegare il cavo quando l’unità non è in uso per un periodo di tempo prolungato e/o quando nes- suno si trova in casa. 24 - Non tenere l’acqua nella tanica se non in uso per un periodo di tempo prolungato. 25 - Non pulire l’unità, la tanica o serbatoio dell’acqua con detergenti o sostanze chimiche di alcun tipo.
- Page 7 Finestra trasparente per verificare il livello dell’acqua. • Vano per aggiunta aroma. Uscita nebbia Coperchio decorativo Finestra livello acqua Tanica dell’acqua Filtro purificatore (se fornito a corredo) Coperchio Tappo della tanica Galleggiante dell’acqua Corpo Pannello di controllo Vano aroma Filtro aria IT - 3 LIMPIA 6...
- Page 8 2- ISTRUZIONI PRIMA DELL’USO Selezionare un’ubicazione stabile, livellata, e piana distante almeno 15 cm da pareti o oggetti per un corretto flusso dell’aria. Collocare l’umidificatore su una superficie resistente all’acqua, poiché l’acqua può danneggiare il mobilio e alcu- ni tipi di pavimenti. Non collocare l’unità direttamente su tappeti, asciugamani, lenzuola o altre superfici assorbenti. Non si accettano responsabilità per danni causati da versamenti d’acqua. 2a- RIEMPIMENTO Accertarsi che l’unità sia scollegata.
-
Page 9: Istruzioni Per L'uso
Premere il pulsante MIST per regolare il livello di emissione su basso, medio o alto. Si consiglia di impostare un livello di emissione di nebbia basso per l’uso notturno. D) Timer Premere il pulsante TIMER, da apparecchio in funzione, per impostare il tempo (ore) allo spegnimento. IT - 5 LIMPIA 6... -
Page 10: Manutenzione Giornaliera
4- MANUTENZIONE GIORNALIERA Prima di pulire, disattivare l’alimentazione e scollegare l’apparecchiatura dalla presa di corrente. Sollevare la tanica dell’umidificatore dall’alloggiamento. Scaricare in un lavabo tutta l’acqua rimanente dalla tanica dell’acqua e alloggiamento. Scaricare e risciacquare la tanica dell’acqua e l’alloggiamento per rimuovere qualsiasi sedimento o sporcizia. Pulire e asciugare con un panno morbido e pulito o con un tovagliolo di carta. - Page 11 • Asciugare completamente l’umidificatore prima dello stoccaggio. NON riporre con acqua all’interno della vasca o tanica dell’acqua. • Imballare l’unità nel suo cartone originale e conservare in luogo fresco e asciutto. SE SI RISCONTRA UN PROBLEMA NON TENTARE DI APRIRE DA SOLI L’ALLOG- GIAMENTO DEL MOTORE. QUESTA OPERAZIONE POTREBBE ANNULLARE LA GARANZIA E CAUSARE DANNI ALL’UMIDIFICATORE O LESIONI PERSONALI. IT - 7 LIMPIA 6...
-
Page 12: Guida Per La Risoluzione Dei Problemi
6- GUIDA PER LA RISOLUZIONE DEI PROBLEMI PROBLEMA SOLUZIONE Vapore d'acqua e umidità non vengono • Spina di alimentazione: Scollegare e quindi riprovare. prodotti. • Interruzione di corrente: Quando la corrente torna, riprovare. • Installazione della tanica: Accertarsi che la tanica sia collegata correttamente. • La superficie del disco ultrasonico è sporca: Pulire il disco ultrasonico. - Page 13 18 - Do not inhale the mist/vapor expelled from the product or drink water from the tank. 19 - Do not fill the water tank with hot or boiling water. 20 - Do not use this product in direct sunlight or near a heat source such as a stove, heater or radiator. EN - 1 LIMPIA 6...
- Page 14 21 - If the water tank becomes cracked or damaged, do not use. 22 - Do not keep this product running for an extended period of time. 23 - Unplug the cord when unit is not in use for an extended period of time and/or when no one is home.
- Page 15 Transparent window to verify water level. • Flavour addition compartment. Mist outlet Decorative cover Water level window Water tank Purifier filter (if provided) Cover Float switch Water tank cap Body Control panel Flavour compartment Air filter EN - 3 LIMPIA 6...
- Page 16 2- PRE-OPERATING INSTRUCTION Select a firm, level, flat location at least 15cm from any wall or object for proper air flow. Place the humidifier on a water-resistant surface, as water can damage furniture and some flooring. Do not place unit directly on carpet, towels, blankets or other absorbent surfaces. We will not accept responsibility for damage caused by water spillage. 2a- FILLING Make sure unit is unplugged. 2. Flip over water tank and open the tank lid, 1. Separate the tank from the base of the unit. turning it to the left. 3.
- Page 17 Press the MIST button to adjust the emission level to low, medium or high. To set a low mist emission level for night use is advised. D) Timer Press the TIMER button, when the appliance is working, to set the time (hours) left until the appliance turns off. EN - 5 LIMPIA 6...
-
Page 18: Daily Maintenance
4- DAILY MAINTENANCE Before clearing, turn off the power and unplug the appliance from the electrical outlet. Lift off the tank of the humidifier from the housing. Carry the water tank and the housing to a sink, drain all the remaining water. Drain and rinse water tank and housing to remove any sediment and dirt. Wipe clean and dry with clean soft cloth or paper towel. - Page 19 5d- END OF SEASON STORAGE • Follow the Cleaning and Descaling instructions when the humidifier will be stored at the end of the season. • Dry the humidifier completely before storing. DO NOT store with water inside the bowl or Water Tank. • Pack the unit in its original carton and store in a cool, dry location. IF YOU EXPERIENCE A PROBLEM DO NOT ATTEMPT TO OPEN THE MOTOR HOUS- ING YOURSELF. DOING SO MAY VOID YOUR WARRANTY AND CAUSE DAMAGE TO THE HUMIDIFIER OR PERSONAL INJURY. EN - 7 LIMPIA 6...
-
Page 20: Troubleshooting Guide
6- TROUBLESHOOTING GUIDE PROBLEM SOLUTION Water vapor and humidity are not • Power plug: Unplug and then try again. produced. • Power Failure: When the power is returned, try again. • Tank Installation: Make sure the tank is correctly attached. •... - Page 21 20 - Ne pas utiliser ce produit à la lumière directe du soleil ou à proximité de sources de chaleur, telles que poêles ou radiateurs. 21 - Si le réservoir d’eau présente des fissures ou des dommages, ne pas l’utiliser. FR - 1 LIMPIA 6...
- Page 22 22 - Ne pas tenir le produit en fonction de façon prolongée. 23 - Débrancher le cordon d’alimentation quand l’unité n’est pas utilisée de façon prolongée et/ou quand personne n’est à la maison. 24 - Ne pas garder d’eau dans le réservoir en cas d’inutilisation prolongée. 25 - Ne pas nettoyer l’unité...
- Page 23 Compartiment pour l’ajout d’arômes. Sortie brume Couvercle décoratif Fenêtre de niveau d’eau Réservoir de l’eau Filtre purificateur (si fourni en dotation) Couvercle Bouchon du réservoir Flotteur de l’eau Corps Pupitre de contrôle Compartiment pour arôme Filtre à air FR - 3 LIMPIA 6...
- Page 24 2- INSTRUCTIONS AVANT L’UTILISATION Sélectionner un emplacement stable, à niveau et plan éloigné d’au moins 15 cm de murs ou d’objets, pour assurer une bonne circulation de l’air. Placer l’humidificateur sur une surface résistante à l’eau, car l’eau peut endommager le mobilier et certains types de sol. Ne pas placer l’unité directement sur des tapis, serviettes, draps ou autres surfaces absorbantes. Le fabricant décline toute responsabilité en ce qui concerne les dommages causés par l’eau. 2a- REMPLISSAGE S’assurer que l’unité est débranchée. 2. Retourner le réservoir d’eau et ouvrir le 1.
-
Page 25: Instructions Pour L'utilisation
Appuyer sur la touche MIST pour régler le niveau d’émission sur faible, moyen ou fort. Il est recommandé de régler un faible niveau d’émission de brouillard faible dans le cadre d’une utilisation nocturne. D) Minuterie Appuyer sur le bouton TIMER (minuterie) de l’appareil en marche pour régler l’heure d’extinction. FR - 5 LIMPIA 6... -
Page 26: Entretien Quotidien
4- ENTRETIEN QUOTIDIEN Avant de nettoyer, désactiver l’alimentation et débrancher l’appareil de la prise électrique. Soulever le réservoir de l’humidificateur de son logement. Evacuer dans un lavabo toute l’eau restant dans le réservoir de l’eau et le logement. Vider et rincer le réservoir d’eau et le logement pour enlever tout sédiment ou saleté. Nettoyer et essuyer avec un chiffon doux et propre ou avec une serviette en papier. - Page 27 Essuyer soigneusement l’humidificateur avant le remisage. NE PAS remiser avec de l’eau à l’intérieur du bac ou du réservoir d’eau. • Emballer l’unité dans son carton d’origine et conserver dans un endroit frais et sec. SI L’ON CONSTATE UN PROBLEME, NE PAS ESSAYER D’OUVRIR PAR SOI MEME LE LOGEMENT DU MOTEUR. CETTE OPERATION POURRAIT ANNULER LA GA- RANTIE ET CAUSER DES DOMMAGES A L’HUMIDIFICATEUR OU LESIONS PER- SONNELLES. FR - 7 LIMPIA 6...
- Page 28 6- GUIDE POUR LA RESOLUTION DES PROBLEMES PROBLEME SOLUTION La vapeur d'eau et humidité ne sont pas • Fiche d’alimentation: Débrancher puis réessayer. produits. • Interruption de courant : Quand l’électricité est rétablie, réessayer. • Installation du réservoir : s’assurer que le réservoir est branché correctement. •...
- Page 29 18 - Inhalieren Sie nicht den vom Produkt ausgestoßenen Nebel/Dampf und trinken Sie kein Wasser aus dem Behälter. 19 - Füllen Sie den Wasserbehälter nicht mit heißem oder kochenden Wasser. 20 - Verwenden Sie dieses Produkt nicht unter direktem Sonnenlicht oder in der Nähe von Wärmequellen wie einem Ofen, Heizkörper oder. DE - 1 LIMPIA 6...
- Page 30 21 - Verwenden Sie den Wasserbehälter nicht, wenn dieser Risse oder sonstige Schäden aufweist. 22 - Halten Sie dieses Produkt nicht für längere Zeit in Betrieb. 23 - Trennen Sie das Kabel, wenn die Einheit für längere Zeit außer Betrieb ist oder sich niemand im Haus befindet. 24 - Lassen Sie kein Wasser im Tank, wenn das Gerät für längere Zeit außer Betrieb gesetzt wird.
- Page 31 1- HAUPTEIGENSCHAFTEN UND BETRIEB • 3 Ausgabelevels. • Heißer/kalter Nebel. • Durchsichtiges Fenster zur Kontrolle des Wasserstands. • Öffnung für die Zugabe von Aroma. Nebelaustritt Dekorationsdeckel Wasserstandsfenster Wassertank Reinigungsfilter (falls mitgeliefert) Deckel Schwimmer Wassertankverschluss Korpus Bedientafel Aromaöffnung Luftfilter DE - 3 LIMPIA 6...
- Page 32 2- BEDIENUNGSANWEISUNGEN Wählen Sie einen stabile, nivellierte und ebene Lage in einem Abstand von mindestens 15 cm von Wänden oder Gegenständen, sodass ein korrekter Luft- strom gewährleistet ist. Stellen Sie den Befeuchter auf eine wasserabweisende Oberfläche, da das Wasser Möbel und einige Fußbodentypen beschädigen kann. Stellen Sie die Einheit nicht direkt auf Teppiche, Handtücher, Betttücher oder andere absorbierende Oberflächen.
- Page 33 Die Taste MIST drücken, um die Ausgabestufe auf niedrig, mittel oder hoch einzustellen. Es wird geraten, eine niedrige Ausgabestufe des Nebels für die Nacht einzustellen. D) Timer Bei laufendem Gerät die Taste TIMER drücken, um die Zeit (Stunden) bis zur Abschaltung einzustellen. DE - 5 LIMPIA 6...
-
Page 34: Tägliche Wartung
4- TÄGLICHE WARTUNG Vor dem Reinigen deaktivieren Sie die Speisung und trennen Sie das Gerät von der elektrischen Steckdose. Heben Sie den Behälter des Befeuchters aus dem Sitz. Lassen Sie das gesamte im Wasserbehälter und im Sitz ver- bliebene Wasser in ein Waschbecken aus. Entleeren und spülen Sie den Wasserbehälter und den Sitz, um jegliche Ablagerung oder Verschmutzung zu entfernen. - Page 35 Verpacken Sie die Einheit nur im Originalkarton und bewahren Sie diese an einem kühlen und trockenen Ort auf. VERSUCHEN SIE BEIM AUFTRETEN EINES PROBLEMS NICHT, DEN SITZ DES MO- TORS SELBSTSTÄNDIG ZU ÖFFNEN: DIESER EINGRIFF KÖNNTE ZUM VERFALL DER GARANTIE FÜHREN UND ZU SCHÄDEN AM BEFEUCHTER ODER VERLET- ZUNGEN VON PERSONEN FÜHREN. DE - 7 LIMPIA 6...
- Page 36 6- ANLEITUNG ZUR BEHEBUNG VON PROBLEMEN PROBLEM LÖSUNG Es werden keine Wasserdampf und keine • Versorgungsstecker: Trennen und erneut versuchen. Feuchtigkeit produziert. • Stromausfall: Versuchen Sie es erneut, sobald der Strom zurückkehrt. • Installation des Wasserbehälters: Stellen Sie sicher, dass der Behälter korrekt angeschlossen ist. •...
- Page 37 18 - No inhale la niebla/vapor expulsado por el aparato; no beba el agua del bidón. 19 - No llene el bidón con agua caliente o en ebullición. 20 - No utilice este aparato bajo la luz directa del sol o cerca de fuentes de calor (estufa, calefactor o radiador). ES - 1 LIMPIA 6...
- Page 38 21 - No utilice el bidón de agua si presenta grietas o averías. 22 - No tenga el aparato en funcionamiento durante un período prolongado. 23 - Desconecte el cable cuando la unidad no se utiliza por un período prolongado y/o cuando no hay nadie en casa.
- Page 39 Caja para añadir aromas. Salida de niebla Tapa decorativa Ventana nivel del agua Bidón de agua Filtro purificador (si suministrado) Tapa Flotador Tapón del bidón de agua Cuerpo Panel de control Caja de aromas Filtro del aire ES - 3 LIMPIA 6...
-
Page 40: Instrucciones Antes Del Uso
2- INSTRUCCIONES ANTES DEL USO Seleccione una ubicación estable, nivelada y plana, distante al menos 15 cm de las paredes y objetos para garantizar un correcto flujo de aire. Coloque el humidificador sobre una superficie resistente al agua, ya que esta puede dañar el mobiliario y algunos tipos de pisos. No coloque la unidad directamente sobre alfombras, toallas, sábanas u otras superficies absorbentes. No se asume responsabilidad alguna en caso de daños provocados por derra- mes de agua. 2a- LLENADO Verifique que la unidad esté desconectada. 1. -
Page 41: Instrucciones De Uso
Presione el botón MIST para ajustar el nivel de emisión sobre bajo, medio o alto. Se recomienda configurar un nivel de emisión de niebla bajo para el uso nocturno. D) Timer Presione el botón TIMER, cuando el aparato está encendido, para establecer el tiempo (horas) al apagado del aparato. ES - 5 LIMPIA 6... -
Page 42: Mantenimiento Diario
4- MANTENIMIENTO DIARIO Antes de proceder a la limpieza, interrumpa la alimentación y desconecte el aparato de la toma de corriente. Levante el bidón para extraerlo de su alojamiento. Descargue en un lavabo toda el agua presente en el bidón de agua y en su alojamiento. Descargue y enjuague el bidón de agua y el alojamiento para extraer los sedimentos y la suciedad. - Page 43 Embale la unidad en su caja original y consérvela en un lugar fresco y seco. SI SE OBSERVA UN PROBLEMA, NO INTENTE ABRIR EL ALOJAMIENTO DEL MOTOR. ESTA OPERACIÓN ANULA LA GARANTÍA Y PUEDE PROVOCAR DAÑOS AL HUMIDIFICADOR Y LESIONES PERSONALES. ES - 7 LIMPIA 6...
-
Page 44: Guía Para La Resolución De Problemas
6- GUÍA PARA LA RESOLUCIÓN DE PROBLEMAS PROBLEMA SOLUCIÓN No se produce vapor de agua y • Clavija de alimentación: desconecte y reinténtelo. humedad. • Interrupción de la corriente: reinténtelo cuando vuelve la corriente. • Instalación del bidón: verifique que el bidón esté conectado correctamente. •...
Need help?
Do you have a question about the LIMPIA 6 and is the answer not in the manual?
Questions and answers