Table of Contents
Advertisement
Quick Links
Manual
Videoscope PCE-VE 500
Version 1.0
Date of creation: 15.01.2015
Date of last change: 03.02.2015
PCE Americas Inc.
711 Commerce Way
Suite 8
Jupiter
FL-33458
USA
From outside US: +1
Tel: (561) 320-9162
Fax: (561) 320-9176
info@pce-americas.com
www.pce-instruments.com/english
www.pce-instruments.com
PCE Instruments UK Ltd.
Units 12/13
Southpoint Business Park
Ensign way
Hampshire / Southampton
United Kingdom, SO31 4RF
From outside UK: +44
Tel: (0) 2380 98703 0
Fax: (0) 2380 98703 9
info@pce-instruments.com
Advertisement
Table of Contents

Subscribe to Our Youtube Channel
Related Manuals for PCE Instruments PCE-VE 500

Summary of Contents for PCE Instruments PCE-VE 500
- Page 1 PCE Americas Inc. PCE Instruments UK Ltd. 711 Commerce Way Units 12/13 Suite 8 Southpoint Business Park Jupiter Ensign way FL-33458 Hampshire / Southampton United Kingdom, SO31 4RF From outside US: +1 From outside UK: +44 Tel: (561) 320-9162 Tel: (0) 2380 98703 0...
-
Page 2: Table Of Contents
Zoom-In ............................12 5.8.8 Mirror ............................13 5.8.9 To re-charge the battery ......................13 Disposal ......................... 14 Contact ........................14 PCE Instruments UK ........................ 14 PCE Americas .......................... 14... -
Page 3: Introduction
Please read this manual carefully and completely before you use the device for the first time. The device may only be used by qualified personnel and repaired by PCE Instruments personnel. There is no warranty of damages or injuries caused by non-observance of the manual. -
Page 4: Specification
Manual Specification Flexible cable length 2000 mm Cable type flexible Cable diameter 5.5 mm horizontal 46º Field of view / angle vertical 34º diagonal 56º Image sensor CMOS Minimum illumination 0 lx Size of the display 3.5 " LCD Pixels 640 x 480 Video PAL / NTSC... -
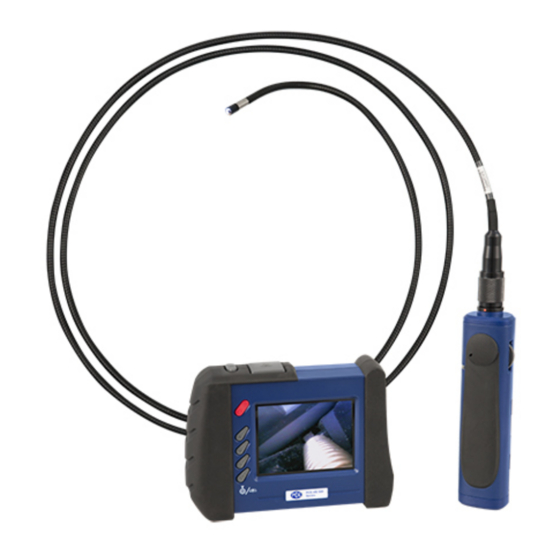
Page 5: System Description
Manual System description... - Page 6 Manual...
-
Page 7: Instructions
Manual Instructions To get started 1. Screw the insertion tube into the connector according to the direction of the arrow and tighten the screw nut. (Figure 1) 2. To activate the handle bar with the insertion tube, turn the LED adjustment wheel clockwise until you hear a “click”... -
Page 8: Operation Modes
Manual Operation modes This device has 3 operation modes which are Preview, Browse and Menu mode. Preview mode Preview mode will be activated as soon as the handle bar is powered on. When you target the camera tip at an object, the image will be displayed at the same time. -
Page 9: Video Output
Manual 5.5.3 Video output 1. Plug one end of the included AV cord into the AV socket located on the right-hand side of the LCD unit and plug the other end of the AV cord into the “AV in” socket on the external monitor. 2. -
Page 10: Tv System
Manual 5.5.6 TV system Set up your video format (NTSC / PAL). 5.5.7 Auto power off Set the time after which the device will power off automatically. To adjust the channel The handle bar and the LCD unit must be on the same channel during wireless transmission. Adjust the channel by using a small slotted screwdriver, following the direction of the arrows as shown below. -
Page 11: Lights Of The Handle Bar
Manual Lights of the handle bar LED light colour Battery status Note Green In use Working with full battery Dark red Low battery Please recharge the battery when the dark red light appears during operation Orange Charging while in use Charging while in use Charging while switched off Charging while switched off... -
Page 12: Video Recording
Manual 5.8.4 Video recording 1. Push the button to start video recording. Image status: Recording time will appear at the left-hand bottom side of the display 2. Push the button again to stop recording. Image status: Recording time disappears. 5.8.5 To view photos / videos 1. -
Page 13: Mirror
Manual 5.8.8 Mirror Push and hold the ESC button for 3 seconds to activate mirror view while appears on the right-hand bottom side of the display. Then push and hold the ESC button for 3 seconds to return to the original view. -
Page 14: Disposal
In order to comply with the EU directive 2012/19/EU we take our devices back. We either re-use them or give them to a recycling company which disposes of the devices in line with law. If you have any questions, please contact PCE Instruments. Contact If you have any questions about our range of products or measuring instruments please contact PCE Instruments.
Need help?
Do you have a question about the PCE-VE 500 and is the answer not in the manual?
Questions and answers