Table of Contents
Advertisement
Quick Links
Important instructions
WARNING: If the instructions contained in this manual are not followed
precisely, fire or explosion may result causing property damage, personal
injury or death.
READ AND SAVE THESE INSTRUCTIONS
others are very important.
We have provided many important safety messages throughout this manual and
on the appliance.
Read all the instructions before using the appliance and always obey all safety
messages.
• To reduce the risk of fire or electric shock, do not remove the
WARNING
• No user-serviceable parts inside!
• Repair should be done by authorized service personnel only.
Contents
cover (or back).
- Your safety and the safety of
8
8
8
8
9
9
9
10
10
11
11
12
13
19
19
19
19
20
21
3
Advertisement
Table of Contents

Subscribe to Our Youtube Channel
Related Manuals for Smeg DCF02BLUS


Summary of Contents for Smeg DCF02BLUS
-
Page 1: Table Of Contents
Contents 1 Instructions 1.1 Introduction 1.2 This user’s manual 1.3 Intended use 1.4 Manufacturer’s liability 1.5 Identification plate 1.6 Disposal 2 Description 2.1 Product Description 3 Use 3.1 Before first use 3.2 First use 3.3 How to make coffee 4 Cleaning and maintenance 4.1 Warnings 4.2 Cleaning the drip coffee maker 4.3 Cleaning the parts of the drip coffee maker... - Page 2 Important instructions RECOGNIZE SAFETY INFORMATION This is a safety alert symbol. This symbol alerts you to potential hazards that can result in severe personal injury or death. UNDERSTAND SIGNAL WORDS A signal word - DANGER, WARNING or CAUTION - is used with the safety alert symbol.
- Page 3 Important Safeguards WARNING When using electrical appliances, basic safety precautions should always be followed to reduce the risk of fire, electric shock, and/or injury to persons including the following: Follow all safety precautions to ensure safe • To protect against fire, electrical shock use of the appliance.
- Page 4 Important Safeguards • Do not touch hot surfaces. Use handles • Use only original spare parts from the manufacturer. The use of spare parts not and knobs. recommended by the manufacturer may • Do not place the appliance near faucets cause fire, electric shock or injury to or sinks.
- Page 5 Important instructions Electrical Cord: A short power-supply cord (or detachable power-supply cord) is provided to reduce risks resulting from becoming entangled in or tripping over a longer cord. Longer detachable power-supply cords or extension cords are available and may be used if care is exercised in their use. If a long detachable power-supply cord or extension cord is used: 1.
-
Page 6: Instructions
Important instructions 1 Instructions 1.2 This user’s manual This user’s manual is an integral part of the 1.1 Introduction appliance and must be kept intact and available to the user throughout its life cycle. Key information for the user: Warnings 1.3 Intended use •... -
Page 7: Manufacturer's Liability
Important instructions 1.4 Manufacturer’s liability 1.6 Disposal The manufacturer accepts no liability for Power voltage damage to persons and property caused Risk of electric shock • using the appliance in ways other than • Unplug the appliance. those provided; • Unplug the cord from the wall outlet. •... -
Page 8: Description
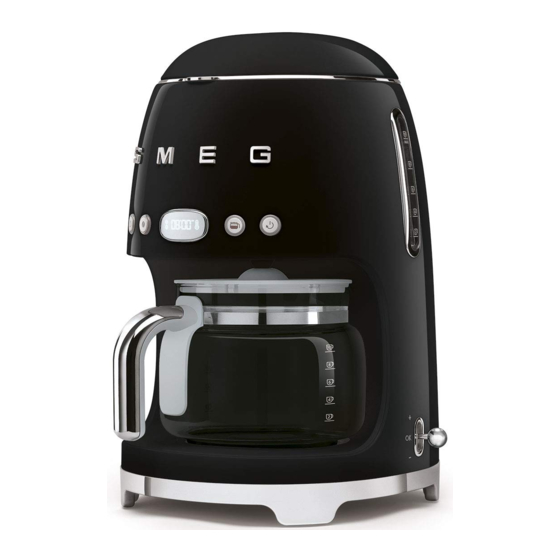
Description 2 Description 2.1 Product Description Model DCF01 - Drip coffee maker 1 Lid 10 Grouphead 2 Water tank (1.4 liters) 11 Carafe lid 3 Filter holder with anti-drip valve system 12 Carafe (10 cups) 4 Permanent filter 13 Carafe handle 5 ON/OFF button 14 Time/Timer setting lever 6 AROMA setting button... -
Page 9: Use
3 Use 3. Fill the tank (3) with cold and clean water using the carafe (4), taking care not to exceed the maximum level shown on the Risk of electric shock level indicator (5) (1.4 liters). • Plug the cord into a grounded socket of the correct current. -
Page 10: First Use
3.2 First use Setting the water hardness 1. Insert the plug into an electrical socket. Set the water hardness value by selecting one of the three levels available: HARD, 2. Press the ON /OFF button. The MEDIUM and SOFT. display shows the flashing symbols. 1. -
Page 11: How To Make Coffee
3.3 How to make coffee Rinsing the internal circuits 1. Fill the water tank as indicated in the Rinse the internal circuits once the tank is full: paragraph “3.1 Before first use”. 1. Place the carafe (6) on the Keep Warm plate (7) WITHOUT adding ground 2. - Page 12 6. Press the ON/OFF button to • One level scoop of ground activate BREW mode the LED on the coffee is approximately ON/OFF button lights up and equivalent to one cup. However, flashes quickly for the entire time that the the amount of ground coffee to coffee brews.
- Page 13 8. Once the coffee has been brewed, the • Pressing all the buttons except the appliance will beep and the KEEP ON/OFF button does not WARM mode is activated, indicated by affect the coffee preparation and the icon on the display. When this brewing operation in any way.
- Page 14 AROMA setting 4 CUPS function setting This setting allows you to choose the This function allows you to dispense a small intensity of the aroma for your coffee from amount of coffee, corresponding to about 4 two levels: DELICATE AROMA or cups.
- Page 15 KEEP WARM mode Setting the time for AUTO START mode The KEEP WARM mode is activated Use this setting to program the appliance to automatically after the coffee has been switch on automatically to prepare the drip brewed, keeping the Keep Warm plate on coffee at a time selected by the user.
- Page 16 AUTO START mode 1. Press the AUTO START button to activate the AUTO START mode: the LED of the AUTO START button will light up and the hours and minutes set for the coffee preparation will flash on the display for a few seconds. Then the current time will be displayed.
-
Page 17: Cleaning And Maintenance
Cleaning and maintenance 4 Cleaning and maintenance 4.2 Cleaning the drip coffee maker To maintain the outer surfaces, you must 4.1 Warnings clean them regularly after each use after letting them cool down. Clean with a soft, Misuse damp cloth. Risk of electric shock 4.3 Cleaning the parts of the drip coffee maker... -
Page 18: Descaling
• Use a descaling solution recommended To activate the descaling cycle: by Smeg to avoid damage to the drip 1. Pour water and descaler into the water coffee maker. tank. -
Page 19: What To Do If
Cleaning and maintenance 4.5 What to do if... Problem Possible cause Solution No water in the tank. Fill the tank. The coffee does not come Presence of limescale. Run the descaling cycle. Coffee takes a long time Presence of limescale. Run the descaling cycle. - Page 20 Cleaning and maintenance Problem Possible cause Solution Only water comes out of Add the desired quantity of No ground coffee in the filter. the drip coffee maker coffee to the filter. Set the current time as described in paragraph The current time and/or the time The AUTO START mode is “3.1 Before first use”...
Need help?
Do you have a question about the DCF02BLUS and is the answer not in the manual?
Questions and answers