Smeg DCF01 Instruction Manual
Drip coffee maker
Hide thumbs
Also See for DCF01:
- Original instructions manual (20 pages) ,
- User manual ,
- Manual (20 pages)

Subscribe to Our Youtube Channel
Related Manuals for Smeg DCF01


Summary of Contents for Smeg DCF01
- Page 1 INSTRUCTION MANUAL DRIP COFFEE MAKER MANUEL D’UTILISATION CAFETIÈRE GOUTTE-À-GOUTTE...
- Page 2 A Smeg appliance always goes perfectly with the other products of the line and at the same time can be an object of design in the kitchen. We hope you fully enjoy all the features of your appliance.
-
Page 3: Table Of Contents
Contents 1 Instructions 1.1 Introduction 1.2 This user’s manual 1.3 Intended use 1.4 Manufacturer's liability 1.5 Identification plate 1.6 Disposal 2 Description 2.1 Product Description 3 Use 3.1 Before first use 3.2 First use 3.3 How to make coffee 4 Cleaning and maintenance 4.1 Warnings 4.2 Cleaning the drip coffee maker 4.3 Cleaning the parts of the drip coffee maker... - Page 4 Important Safeguards RECOGNIZE SAFETY INFORMATION This is a safety alert symbol. This symbol alerts you to potential hazards that can result in severe personal injury or death. UNDERSTAND SIGNAL WORDS A signal word - DANGER, WARNING or CAUTION - is used with the safety alert symbol.
- Page 5 Important Safeguards WARNING To reduce the risk of fire, electrical shock, personal injury, or damage when using the appliance, follow basic safety precautions, including the following: Follow all safety precautions to ensure safe • Do not use the appliance if the power use of the appliance.
- Page 6 Important Safeguards For this appliance • Do not use abrasive cleaners or sharp • Leave a space of 10 cm around the drip objects to clean the drip coffee maker. coffee maker. • Make sure the lid is firmly inserted on the •...
-
Page 7: Instructions
Important Safeguards 1 Instructions 1.2 This user’s manual This user's manual is an integral part of the 1.1 Introduction appliance and must be kept intact and available to the user throughout its life cycle. Key information for the user: Warnings 1.3 Intended use •... -
Page 8: Manufacturer's Liability
Important Safeguards 1.4 Manufacturer's liability 1.6 Disposal The manufacturer accepts no liability for Power voltage damage to persons and property caused Risk of electric shock • using the appliance in ways other than • Unplug the appliance. those provided; • Unplug the cord from the wall outlet. •... -
Page 9: Description
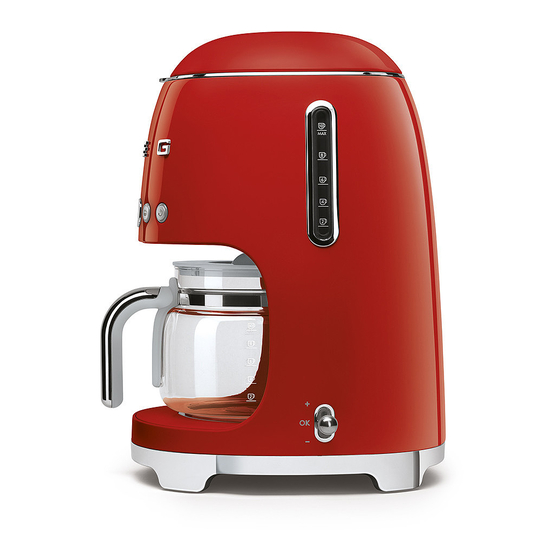
Description 2 Description 2.1 Product Description Model DCF01 - Drip coffee maker 1 Lid 10 Grouphead 2 Water tank (1.4 liters) 11 Carafe lid 3 Filter holder with anti-drip valve system 12 Carafe (10 cups) 4 Permanent filter 13 Carafe handle... -
Page 10: Use
3 Use 4. Fill the tank (3) with cold and clean water using the carafe (4), taking care not to exceed the maximum level shown on the Risk of electric shock level indicator (5) (1.4 liters). • Plug the cord into a grounded socket of the correct current. -
Page 11: First Use
3.2 First use Setting the water hardness 1. Insert the plug into an electrical socket. Set the water hardness value by selecting one of the three levels available: HARD, 2. Press the ON /OFF button. MEDIUM and SOFT. display shows the flashing symbols. 1. -
Page 12: How To Make Coffee
Rinsing the internal circuits 3.3 How to make coffee 1. Fill the water tank as indicated in the Rinse the internal circuits once the tank is full: paragraph “3.1 Before first use”. 1. Place the carafe (6) on the Keep Warm plate (7) WITHOUT adding ground 2. - Page 13 6. Press the ON/OFF button to • One level scoop of ground activate BREW mode the LED on the coffee is approximately ON/OFF button lights up and equivalent to two cups. However, the amount of ground flashes quickly for the entire time that the coffee to be used may vary coffee brews.
- Page 14 8. Once the coffee has been brewed, the AROMA setting appliance will beep and the KEEP This setting allows you to choose the WARM mode is activated, indicated by intensity of the aroma for your coffee from two levels: DELICATE AROMA or the icon on the display.
- Page 15 1-4 CUPS function setting KEEP WARM mode The KEEP WARM mode is activated This function allows you to dispense a small automatically after the coffee has been amount of coffee, corresponding to about 4 brewed, keeping the Keep Warm plate on cups.
- Page 16 Setting the time for AUTO START mode AUTO START mode Use this setting to program the appliance to 1. Press the AUTO START button to switch on automatically to prepare the drip activate the AUTO START mode: the LED coffee at a time selected by the user. of the AUTO START button will light To set the auto start time, proceed as...
-
Page 17: Cleaning And Maintenance
Cleaning and maintenance 4 Cleaning and maintenance 4.2 Cleaning the drip coffee maker To maintain the outer surfaces, you must 4.1 Warnings clean them regularly after each use after letting them cool down. Clean with a soft, Misuse damp cloth. Risk of electric shock 4.3 Cleaning the parts of the drip coffee maker... -
Page 18: Descaling
To activate the descaling cycle: • Use a descaling solution recommended 1. Pour water and descaler into the water by Smeg to avoid damage to the drip tank. coffee maker. 2. Press the ON/OFF and AUTO... -
Page 19: What To Do If
Cleaning and maintenance 4.5 What to do if... Problem Possible cause Solution No water in the tank. Fill the tank. The coffee does not come Presence of limescale. Run the descaling cycle. Coffee takes a long time to Presence of limescale. Run the descaling cycle. - Page 20 Cleaning and maintenance Problem Possible cause Solution Only water comes out of Add the desired quantity of No ground coffee in the filter. the drip coffee maker coffee to the filter. Set the current time as described in paragraph The current time and/or the time The AUTO START mode is “3.1 Before first use”...
- Page 22 éléments décoratifs. Un appareil Smeg convient toujours parfaitement avec les autres produits de la ligne et peut être, en même temps, un objet de design dans la cuisine.
- Page 23 Sommaire 1 Instructions 1.1 Introduction 1.2 Ce manuel d’utilisation 1.3 Utilisation prévue 1.4 Responsabilité du fabricant 1.5 Plaque d’identification 1.6 Élimination 2 Description 2.1 Description du produit 3 Utilisation 3.1 Avant la première utilisation 3.2 Première utilisation 3.3 Comment faire du café 4 Nettoyage et entretien 4.1 Avertissements 4.2 Nettoyage de la cafetière goutte-à-goutte...
- Page 24 Consignes de sécurité importantes RECONNAISSEZ L’INFORMATION SUR LA SÉCURITÉ Ceci est un symbole d’alerte de sécurité. Ce symbole vous alerte des dangers potentiels qui peuvent provoquer des blessures ou entraîner la mort. COMPRENEZ LES MOTS D’AVERTISSEMENT Un mot d’avertissement - DANGER, AVERTISSEMENT ou ATTENTION - est utilisé avec le symbole d’alerte de sécurité.
- Page 25 Consignes de sécurité importantes AVERTISSEMENT Pour réduire les risques d’incendie, de choc électrique, de blessure ou de dommage lors de l'utilisation de l’appareil, suivez les précautions de sécurité de base, y compris ce qui suit : Suivez toutes les avertissements de sécurité •...
- Page 26 Consignes de sécurité importantes Pour cet appareil • N’utilisez pas de nettoyants abrasifs ou • Laissez un espace de 10 cm autour de d’objets pointus pour nettoyer la la cafetière goutte-à-goutte. cafetière. • N'utilisez pas la cafetière sans eau dans •...
-
Page 27: Instructions
Consignes de sécurité importantes 1 Instructions 1.2 Ce manuel d’utilisation Ce manuel d’utilisation est une partie 1.1 Introduction intégrante de l’appareil, et doit être conservé intact et disponible pour Informations clés pour l’utilisateur : l’utilisateur tout au long de son cycle de vie. Avertissements 1.3 Utilisation prévue Renseignements généraux sur le... -
Page 28: Responsabilité Du Fabricant
Consignes de sécurité importantes 1.4 Responsabilité du fabricant 1.6 Élimination Le fabricant décline toute responsabilité Tension d’alimentation pour les dommages corporels et matériels Risque de choc électrique causés par : • l’utilisation de l’appareil à d’autres fins • Débranchez l'appareil. que celles prévues;... -
Page 29: Description
Description 2 Description 2.1 Description du produit Modèle DCF01 - Cafetière goutte-à-goutte 1 Couvercle 10 Douche chaudière 2 Réservoir d’eau (1,4 litres) 11 Couvercle de la carafe 3 Porte-filtre avec système anti-goutte 12 Carafe (10 tasses) 4 Filtre permanent 13 Poignée de la carafe 5 Bouton MARCHE / ARRÊT... -
Page 30: Utilisation
Utilisation 3 Utilisation 4. Remplissez le réservoir (3) d’eau froide et propre en utilisant la carafe (4), en prenant soin de ne pas dépasser le Risque de choc électrique niveau maximum indiqué sur l’indicateur de niveau (5) (1,4 litres). • Branchez le cordon dans une prise de courant correct mise à... -
Page 31: Première Utilisation
Utilisation 3.2 Première utilisation Réglage de la dureté de l’eau 1. Insérez la fiche dans une prise électrique. Réglez la dureté de l’eau en sélectionnant l’un des trois niveaux disponibles : DURE, 2. Appuyez sur le bouton MARCHE / MOYENNE et DOUCE. ARRÊT . -
Page 32: Comment Faire Du Café
Utilisation Rincer les circuits internes 3.3 Comment faire du café 1. Remplissez le réservoir d'eau comme Rincez les circuits internes une fois le indiqué dans le paragraphe « 3.1 Avant réservoir rempli : la première utilisation ». 1. Placez la carafe (6) sur la plaque Garder au chaud (7) SANS ajouter du 2. - Page 33 Utilisation 6. Appuyez sur le bouton MARCHE / • Une mesure de niveau de café ARRÊT pour activer le mode moulu équivaut à environ deux ÉCOULEMENT le voyant sur le bouton tasses. Cependant, la quantité MARCHE / ARRÊT s'allume et de café...
- Page 34 Utilisation 8. Une fois le café infusé, l’appareil émettra Réglage ARÔME un bip et le mode GARDER AU CHAUD Ce réglage vous permet de choisir l’intensité de l’arôme de votre café à partir est activé, indiqué par l’icône de deux niveaux : ARÔME DÉLICAT ou l’écran.
- Page 35 Utilisation Réglage de la fonction 1-4 TASSES Mode GARDER AU CHAUD Le mode GARDER AU CHAUD est activé Cette fonction vous permet de distribuer automatiquement une fois le café préparé, une petite quantité de café, correspondant en gardant la plaque Garder au chaud à...
- Page 36 Utilisation Réglage de l’heure pour le mode Mode DÉMARRAGE AUTOMATIQUE DÉMARRAGE AUTOMATIQUE 1. Appuyez sur le bouton DÉMARRAGE Utilisez ce réglage pour programmer AUTOMATIQUE pour activer le l’appareil afin qu’il s’allume mode DÉMARRAGE AUTOMATIQUE : automatiquement pour préparer le café le voyant du bouton DÉMARRAGE filtre à...
-
Page 37: Nettoyage Et Entretien
Nettoyage et entretien 4 Nettoyage et entretien 4.2 Nettoyage de la cafetière goutte- à-goutte 4.1 Avertissements Pour maintenir les surfaces extérieures, vous devez les nettoyer régulièrement après Mauvaise utilisation chaque utilisation, une fois refroidies. Risque de choc électrique Nettoyez-les avec un chiffon doux et humide. -
Page 38: Détartrage
• Utilisez une solution de détartrage Pour activer le cycle de détartrage : recommandée par Smeg pour éviter 1. Versez de l'eau et du détartrant dans le d’endommager la cafetière goutte-à- réservoir d'eau. -
Page 39: Que Faire Si
Nettoyage et entretien 4.5 Que faire si... Problème Cause possible Solution Pas d’eau dans le réservoir. Remplissez le réservoir. Le café ne coule pas Exécutez le cycle de Présence de calcaire. détartrage. Le café prend beaucoup Exécutez le cycle de Présence de calcaire. - Page 40 Nettoyage et entretien Problème Cause possible Solution Seule l'eau sort de la Ajoutez la quantité de café Pas de café moulu dans le filtre. cafetière goutte-à-goutte désirée au filtre. Réglez l’heure actuelle comme décrit au paragraphe « 3.1 Avant la L’heure actuelle et / ou l’heure première utilisation »...
- Page 42 914778173/A...
- Page 43 The manufacturer reserves the right to make any changes deemed useful for improvement of its products without prior notice. The illustrations and descriptions contained in this manual are therefore not binding and are merely indicative. Le fabricant se réserve la faculté d’apporter, sans préavis, toutes les modifications qu’il jugera utiles pour l’amélioration de ses produits.
- Page 44 914778173/A...
Need help?
Do you have a question about the DCF01 and is the answer not in the manual?
Questions and answers