Table of Contents
Advertisement
Available languages
Available languages
Quick Links
Advertisement
Table of Contents

Related Manuals for gorilla sports 101198


Summary of Contents for gorilla sports 101198
- Page 1 FALTBARES WASSERRUDERGERÄT 101198...
- Page 2 INHALTSVERZEICHNIS Seite 2 ............................TInhaltsverzeichnis Seite 3-4 .................. Wichtige Informationen und Sicherheitshinweise Seite 5 .......................... Übersicht technische Daten Seite 6 ................................Teileliste Seite 7-10 ............................. Aufbauanleitung Seite 11-14 ........................... Filling the Water Tank Seite 15 ............................ Adjusting the Pedals Seite 16-17 ......................Reinigung/Wartung/Entsorgung Seite 18 ...............................
-
Page 3: Allgemeine Informationen
WICHTIGE INFORMATIONEN UND SICHERHEITSHINWEISE Allgemeine Informationen Bitte stelle sicher, dass alle Personen, die das Gerät verwenden, die Aufbau- und Gebrauchsanleitung gelesen und verstanden haben. Die Montage- und Bedienungsanleitung ist als Teil des Produktes zu betrachten und an einem sicheren Ort aufzubewahren, um im Bedarfsfall jederzeit darauf zurückgreifen zu können. -
Page 4: Montage
WICHTIGE INFORMATIONEN UND SICHERHEITSHINWEISE Es sind Trainingskleidung und Schuhe zu tragen, die für ein Fitness-Training mit dem Gerät geeignet sind. Die Kleidung muss so beschaffen sein, dass diese aufgrund ihrer Form (z.B. Länge) während des Trainings nicht hängen bleiben kann. Die Trainingsschuhe sollten passend zum Trainingsgerät gewählt werden, grundsätzlich dem Fuß... - Page 5 ÜBERSICHT TECHNISCHE DATEN Max. Belastbarkeit: 120 kg...
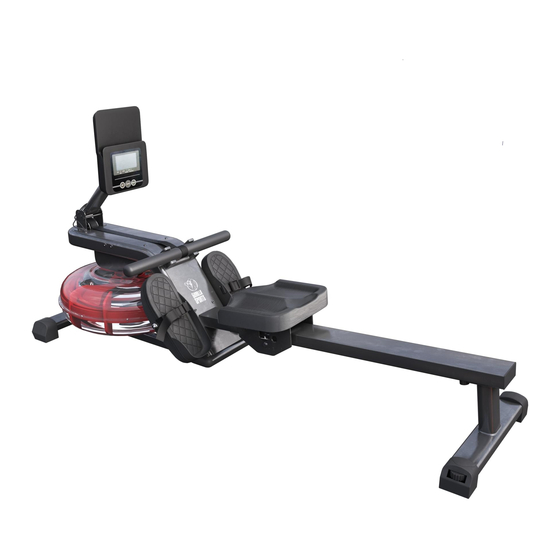
- Page 6 TEILELISTE Accessories package φ φ φ φ φ...
- Page 7 AUFBAUSCHRITTE STEP 1: Take out the slide rail(G) and rear feet tube(C), Allen screwM8*15 (1) 4PCS, spring washer φ8(2) 4PCS and flat washer φ8(3) 4PCS in the component bag. Use a #5wrench to lock it together. PIG.1 STEP 2: Take out the seat set(E) and install it into the slide rail along the arrow direction. PIG.2...
- Page 8 AUFBAUSCHRITTE STEP 3: Take out the block for seat cushion(F) and screw it into the slide rail by hand. PIG.3 STEP 4: Take out the forefeet tube(B), whole rower machine(A), step bolt M8*55(1) 2PCS, washerφ8(2) 2PCS and cap nuts M8(3) 2PCS in the component bag. Use #5 wrench and cross wrench to assemble it as shown in PIG.4. PIG.4...
- Page 9 AUFBAUSCHRITTE STEP 5: Take out the Allen screw M8*15 (1) 8PCS, spring washerφ8(2) 8PCS and flat washerφ8(3) 8PCS from the component bag. Use a #5 wrench to lock the assembly(G) assembled in step 3 and the assembly(K) assembled in step 4 together. PIG.5 STEP 6: Take out the Allen screwM6*10(6) 2pcs from the component bag.
- Page 10 AUFBAUSCHRITTE STEP 7: Use a cross wrench to take out the cross pan head screw M4*10 (7) and flat washer φ4 (8) that pre-locked on the console (H). Install the console(H) on the rower as shown in the PIG.7. Note: The outlet wire(N) of the console and outlet wire(M) of the console holder should be connected and placed according to the method of PIG.1 to avoid pressing the wire.
-
Page 11: Filling The Water Tank
FILLING THE WATER TANK There is of course a direct link between rowing and the element of water. The OCEAN ROWER is therefore the ideal training device on which to implement your rowing training realistically as it provides a realistic simulation of rowing on water. - Page 12 pools. This can damage the device tank. Replace the water in the tank every 6 months and add a water treatment tablet to the tank each time you do this. FILLING THE WATER TANK Water Tank Display and Filling Amount On the water tank there is a water level scale showing 6 different levels of filling.
- Page 13 FILLING THE WATER TANK Filling the Water Tank Step 1: Remove the tank cap (21) Step 2: Insert the funnel into the opening of the tank. Step 3: Fill the desired amount of water into the tank. CAUTION: Do not overfill above the maximum filling level of Level 6 and do not underfill the minimum filling level of Level 1.This can lead to damages to your training device.
-
Page 14: Emptying The Water Tank
FILLING THE WATER TANK Emptying the Water Tank Step 1: Remove the tank cap (21). Step 2: Place a suitable container such as a bucket next to the tank of the rowing device. Step 3: Insert the tube on the pump into the tank and place the hose into the container made available. Step 4: Pump out the water completely or to the water level you require. -
Page 15: Adjusting The Pedals
ADJUSTING THE PEDALS Your rowing machine is equipped with a special support system for your feet. You should wear suitable sports shoes for rowing training. We recommend running shoes because they are ideal for foot movement during rowing due to their slightly curved shape. Make sure that you do not over-tighten the shoes before training as this is can restrict circulation during Adjusting the Pedals exerciseand cause numbness in the feet. -
Page 16: Wartung
REINIGUNG/WARTUNG/ ENTSORGUNG Reinigung Bitte nutze zur Reinigung nur ein leicht angefeuchtetes Tuch. Achtung! Benutze niemals Benzin, Verdünner oder andere aggressive Reinigungsmitiel zur Oberflächenreinigung, da dadurch Beschädigungen verursacht werden können. Das Gerät ist nur für den privaten Heimgebrauch und zur Benutzung in Innenräumen geeignet. Halte das Gerät sauber und Feuchtgkeit vom Gerät fern. Beschädigungen, die durch Körperschweiß... - Page 17 REINIGUNG/WARTUNG/ ENTSORGUNG Recommended Accessori This accessory is the optimal supplement for your training device. All prod- Dispos ucts are available in our online shop at www.gorillasports.de European Disposal Directive POLAR® Transmitter Chest Belt T34 (uncoded) European Disposal Directive Never dispose of your training equipment in the normal household waste. All consumers are legally obliged to Chest belt with optimised transmission range for determining heart rates.
-
Page 18: Power Supply
POWER SUPPLY The cockpit is powered by two batteries type AA. If the display on the cockpit should become weak or go out completely, replace these batteries with new ones. Please observe the disposal instructions included in this manual when you dispose of the old batteries. The battery compartment is on the back of the cockpit. - Page 19 Ware unfrei an unsere Adresse. Eine Inanspruchnahme von Garantieleistungen erwirkt keine Verlängerung der Garantiezeit. Ansprüche auf Ersatz von Schäden welche evtl. außerhalb des Gerätes entstehen (sofern eine Haftung nicht zwingend gesetzlich geregelt ist) sind ausgeschlossen. Hersteller: Gorilla Sports GmbH Nordring 80 64521 Groß-Gerau Hier findest Du unsere internationalen Partner:...
-
Page 20: Step 2: Starting Position
TRAININGSINFORMATIONEN In the following you will find instructions and tips to help you to do the rowing movements correctly. Rowing Movement – complete body Step 1: Preparation Make sure that your feet are in positioned correctly on the pedals and that they are adjusted correctly to fit yourshoe size with the straps firmly around your feet. - Page 21 In the following you will find instructions and tips to help you to do the rowing movements correctly. Rowing Movement – complete body TRAININGSINFORMATIONEN Step 1: Preparation Make sure that your feet are in positioned correctly on the pedals and that they are adjusted correctly to fit your shoe size with the straps firmly around your feet.
- Page 22 TRAININGSINFORMATIONEN Rowing Movement – Arms Only Step 1: Preparation Make sure that your feet are in the optimum position, ie, that the shoe size is adjusted correctly and the foot straps are tightened properly. Hold the rowing grip with both hands gripping over the bar. Your hands should be approximately 20 cms apart.
- Page 23 TRAININGSINFORMATIONEN Trainingsvorbereitungen Bevor mit dem Training begonnen wird, muss sich nicht nur das Trainingsgerät in einem einwandfreien Trainingszustand befinden, auch Du bzw. Dein Körper sollte ebenfalls für das Training bereit sein. Daher solltest Du, wenn Du seit längerer Zeit kein Kraft-/Ausdauertraining mehr absolviert hast, vor Beginn Deines Trainings in jedem Fall Deinen Hausarzt konsultieren und ein Fitness-Check-Up durchführen.
- Page 24 TRAININGSINFORMATIONEN Warm-Up vor dem Training Absolviere ein Warm-Up vor jeder Trainingseinheit. Wärme Deinen Körper auf, in dem Du 5 - 7 Minuten vor der eigentlichen Trainingseinheit bei geringer Belastung mit einem Springseil, Crosstrainer oder ähnlichem trainierst. So bereitest Du Dich optimal auf die bevorstehende Belastung vor.
- Page 25 AUFWÄRMEN/DEHNEN Vordere Oberschenkelmuskulatur Vordere Oberschenkelmuskulatur Stütze Dich mit der rechten Hand an einer Wand oder Ihrem Trainingsgerät Stütze Dich mit der rechten Hand an einer Wand oder Ihrem Trainingsgerät ab. Hebe den linken Fuß nach hinten an und halte ihn mit der linken Hand fest. ab.
- Page 26 AUFWÄRMEN/DEHNEN Flüssigkeitszufuhr Vor und während des Trainings ist eine ausreichende Flüssigkeitszufuhr unerlässlich. Während einer Trainingseinheit von 60 Minuten ist es durchaus möglich, bis zu 0,5 Liter Flüssigkeit zu verlieren. Um diesen Flüssigkeitsverlust auszugleichen, ist Apfelschorle im Mischverhältnis von einem Drittel Apfelsaft und zwei Dritteln Mineralwasser ideal, da sie alle Elektrolyte und Mineralien enthält und ersetzt, die der Körper über den Schweiß...
- Page 27 NOTIZEN...
- Page 28 NORDRING 80, 64521 GROß-GERAU WWW.GORILLASPORTS.EU...
Need help?
Do you have a question about the 101198 and is the answer not in the manual?
Questions and answers