Alcedo AE174 Quick Start Manual
Oled pulse oximeter
Hide thumbs
Also See for AE174:
- Quick start manual (2 pages) ,
- Manual (16 pages) ,
- Quick start manual (15 pages)
Advertisement
Quick Links
Pulse Oximeter
AE174 (OLED)
Date of Issue: 2019.11, Version: V1.0
Precau�ons
Do not a�empt to maintain the Oximeter unless you are professional engineers. Only professionals with
maintenance qualifica�on are allowed to perform interior maintenance necessary.
Periodically change the contact posi�on between the Oximeter probe and the finger for a measurement
that lasts a long �me. Adjust the posi�on of the probe before the measurement lasts two hours, and check
the integrity of skin, the blood circula�on condi�on of the finger as well as the posi�on of the finger.
This product is not applicable to the examina�on of newborn babies.
Seek for medical care in �me if the measured value goes beyond the normal range while you are sure that
the instrument does not malfunc�on.
Do not directly expose your eyes to light-emi�ng components of the Oximeter, as that could cause harm
to your eyes.
For details about clinical limita�ons and contraindica�ons, please carefully consult relevant medical
literatures.
The following factors may cause disturbance to or affect the accuracy of examina�on:
This product is used in an environment involving high-frequency devices, such as high-frequency electric
knives and CT apparatuses.
The probe of the Oximeter is placed on the same body part or limb as with blood pressure cuff arterial
duct or intravenous injec�on.
The user suffers from hypotension, severe vascular atrophy, severe anemia, or low oxygen.
The user is in sudden cardiac arrest or shock state.
The finger with nail polish or a fake fingernail may cause wrong readings of pulse oxygen satura�on.
Warnings
Warning: Do not use the Oximeter in an environment with any flammable gases, flammable anesthe�c, or other
flammable substances.
Warning: Keep unit and lanyard away from children as the included lanyard may present an entanglement or choking
hazard to small children. Adult supervision required; never leave children una�ended with unit or lanyard
Warning: Do not throw the ba�eries into fire, as that could cause an explosion.
Warning: Do not a�empt to charge the included ba�eries, as that could cause leakage, fire disaster, or even
explosion. Dispose the used ba�eries in accordance to the local laws and regula�ons.
Warning: Do not use the Oximeter in an MRI or CT environment.
Warning: Do not operate the Oximeter if it is wet. Avoid moving the oximeter from a cold to a hot and humid
environment.
Warning: Install the ba�eries properly before powering on the Oximeter for normal use. Please remove the ba�eries
if you are not planning to use the Oximeter for a long �me.
Warning: Close the ba�ery cover when the instrument is in use.
Warning: The pa�ent is an intended operator.
Warning: Do not modify the device and use the device for other purposes.
Warning: The Func�onal tester cannot be used to evaluate the accuracy of pulse oximetry probes or pulse
oximetry monitors.
Product Accessories
1.One lanyard;
2.Carrying case;
2.Two AAA ba�eries;
3.One user manual;
4.One quick start guide
Symbol Conven�ons
Symbol
Descrip�on
Type BF applied part
Cau�on: Please see this manual.
%SpO2
Symbol of oxygen satura�on.
bpmPR
Symbol of pulse rate.
No SpO
alarms.
2
Consult the instruc�ons for use.
IP22
The degree of protec�on against harmful ingress of water and par�culate ma�er.
When end users abandon this product, they must send the product to the collec�on
place for recycling.
Overview
Oxygen satura�on is the percentage of oxyhemoglobin (HbO2) that is combined with oxygen against all combinable
hemoglobin (Hb). It is an important physiological parameter involved in respira�on and circula�on. The oxygen
satura�on of arterial blood in a normal human body is 98%. Oxygen satura�on is an important indicator of the
oxygen condi�on in the human body. In general, the normal values of oxygen satura�on shall not be lower than 94%.
If the measured value of oxygen satura�on is lower than 94%, an insufficient supply of oxygen is considered.
The pulse rate is the number of pulse beats per minute. Normally, the pulse rate is consistent with the heart rate. In
general, the pulse rate of every people is 60 to 90 beats per minute.
The Perfusion Index (PI) usually reflects the limb perfusion status of an examined pa�ent, and shows the detec�on
precision of the instrument as well; that is, examina�on can s�ll be performed even in the low or weak perfusion
condi�on. The PI of a normal human body is 3% or greater.
Working Principles, Expected Usage, and Applicable Scope
Based on full digital technology, the Finger Pulse Oximeter non-invasively measures the actual content (oxygen
satura�on) of oxyhemoglobin (HbO2) in arterial blood using the op�cal transmi�ance method.
The Finger Pulse Oximeter measures the blood oxygen satura�on and pulse rate of a human body via finger artery. It
is applicable to a wide range of fields, such as families, oxygen bars, and sports & health. Use this instrument for
measurement before or a�er sports. You are not advised to use this instrument during sports ac�vi�es.
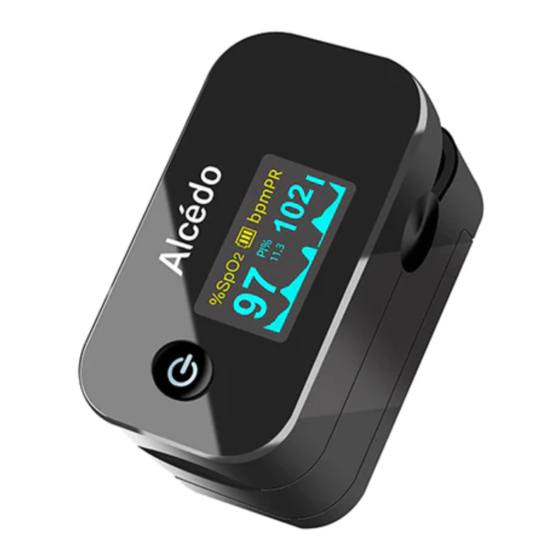
Appearance of the structure
Screen Display
The following figure shows the informa�on display on the OLED screen of the Oximeter in normal detec�on state:
Power-On bu�on/Func�onal bu�on Opera�ons
Press and release the bu�on to turn on, hold the bu�on for about one second. The Oximeter shows a parameter
se�ng interface. Press or hold the bu�on to perform corresponding opera�ons. Hold it to set an item, or press it to
switch an op�on. Press means no more than 0.5 seconds, while Hold means more than 0.5 seconds.
Alert Sound Se�ng
Hold the func�onal bu�on while the Oximeter is in powered-on state. Parameter se�ng interface 1 is displayed, as
shown in the following figure. Move "*" to the corresponding op�on, and hold the func�onal bu�on to set Alm to on
and set Beep to off. When Alm is set to on and the measured values of the blood oxygen satura�on and pulse rate
go beyond the upper limit or lower limit, the Oximeter gives off an alert sound. When Alm is set to off and the
measured values go beyond the limit, the Oximeter will not give any alert sound. When Beep is set to on, a �ck will
be heard along with pulse beats during pulse rate measurement. When Beep is set to off, no sound will be output
along with pulse beats during pulse rate measurement. While the "*" symbol stays on the Restore op�on, hold the
func�onal bu�on to restore factory se�ngs.
Brightness Se�ng
On parameter interface 1, press the func�onal bu�on to select the Brightness op�on and then hold the func�onal
bu�on to set the brightness to a value ranging from 1 to 5. The greater the value, the greater the brightness of the
screen.
Alert Range Se�ng
On parameter interface 2, press the func�onal bu�on to switch between op�ons. On this interface, you can set the
upper limit and lower limit of SpO2 Alm and PR Alm. While the "*" symbol stays on the +/- op�on, hold the
func�onal bu�on to set the op�on to + or -. In + mode, select the corresponding op�on and hold the func�onal
button to increment the upper or lower limit; in - mode, hold the func�onal bu�on to decrement the upper or lower
limit. Move "*" to the Exit op�on, and hold the func�onal bu�on to return to the monitoring interface.
V2.12
V2.12
Alm setup
*
Sounds Setup *
Alm
on
SpO2 Alm Hi
Beep
off
SpO2 Alm Lo
Demo
off
PR Alm Hi
Restore
ok
PR Alm Lo
Brightness
4
+/-
Exit
Interface 1
Opera�on Guide
S�ck one finger completely into the measuring parts of the Oximeter, keep the fingernail surface upward, and release
the clip. Then press the power bu�on to power on the Oximeter.
If you do not yet completely insert your finger into the cavity, the
measurement result may be inaccurate.
Do not vibrate your finger during measurement. Preferably, ensure
that your body does not move. A�er the readings become stable, read
the measured values of oxygen satura�on and the pulse rate on the
screen.
NOTE: The Oximeter will automa�cally shut down 10 seconds later
a�er your finger leaves away.
Replace the ba�eries when the ba�ery capacity is insufficient and the symbol
Open the ba�ery cover with your fingers, you can replace the ba�eries according to the correct ba�ery polarity.
Cleaning
Power off the instrument and remove the ba�eries before cleaning. Ensure that the appearance of the instrument is
neat, dust-free, and dirt-free. Clean the outer surface of the instrument (including the OLED screen) using 75%
medical alcohol and a piece of dry so� cloth.
Cau�on: Avoid liquid flowing into the instrument during cleaning.
Caution: Do not immerse any part of the instrument into any liquid.
Disinfec�on
Before measurement with the instrument, wipe the rubber finger pad using a piece of dry so� cloth dipped with 75%
medical alcohol. Clean the finger to be measured using the medical alcohol for disinfec�on purposes before and a�er
use.
Do not disinfect the instrument by means of high-temperature /high-pressure or gas disinfec�on.
Maintenance
Remove the ba�eries from the ba�ery slot and properly store them if you do not plan to use the Oximeter for
a long period of �me.
Avoid using the Oximeter in an environment with inflammable gases or using it in an environment where the
temperature or humidity is excessively high or low.
Check the accuracy of the oxygen saturation and pulse rate readings by using an appropriate calibra�on
apparatus.
Technical Specifica�ons
1. Dimensions: 58.2 mm (Width) × 32.2 mm (Depth) × 32.0 mm (Height)
Weight: 51.5 g (without ba�eries)
2. Peak wavelength range of the light emi�ed from the probe: red light 660 nm ± 3; infrared light 905 nm ± 5.
3. Maximum op�cal output power of the probe: 1.2 mW for infrared light (905 nm).
4. Manufacturing date: see the label
5.
Normal working condi�on
Working Temperature
Rela�ve Humidity
Atmospheric Pressure
Rated Voltage
6.
Default values and condi�ons of alert
7.
Technical parameters
100
94
130
50
+
Exit
Interface 2
5 C to 40 C (41 F to 104 F)
15% to 80%, non-condensing
70 kPa to 106 kPa
DC 3.0 V
Parameter
Value
Upper limit: 100
Oxygen satura�on
Lower limit: 94
Upper limit: 130
Pulse rate
Lower limit: 50
When the alert switch is on and the actual measured
Alert condi�on
value goes beyond the preset alert parameter range, the
Oximeter gives an alert sound.
flickers on the screen.
Advertisement

Related Manuals for Alcedo AE174


Summary of Contents for Alcedo AE174
- Page 1 Opera�on Guide Pulse Oximeter AE174 (OLED) The pulse rate is the number of pulse beats per minute. Normally, the pulse rate is consistent with the heart rate. In S�ck one finger completely into the measuring parts of the Oximeter, keep the fingernail surface upward, and release general, the pulse rate of every people is 60 to 90 beats per minute.
- Page 2 Common communica�ons equipment. Parameter Value mode Separa�on distance according to frequency of transmi�er Oxygen satura�on 35% to 100% voltage Display range Voltage dips, <5% UT not applicable not applicable Pulse rate 25 bpm to 250 bpm short (>95% dip (For INTERNALLY POWERED ME EQUIPMENT Maximum Oxygen satura�on 80 MHz to 800...
Need help?
Do you have a question about the AE174 and is the answer not in the manual?
Questions and answers