Advertisement
Quick Links
Amazon Kinesis Video Streams Producer
on AmebaPro – Getting Started Guide
Getting Started Guide
Realtek Semiconductor Corp.
No. 2, Innovation Road II, Hsinchu Science Park, Hsinchu 300, Taiwan
Tel.: +886-3-578-0211. Fax: +886-3-577-6047
www.realtek.com
All information provided in this document is subject to legal disclaimers.
1
Ameba-Pro KVS Getting Started Guide
© REALTEK 2020. All rights reserved.
Advertisement

Related Manuals for Realtek AmebaPro RTL8715AD


Summary of Contents for Realtek AmebaPro RTL8715AD
- Page 1 AmebaPro – Getting Started Guide Realtek Semiconductor Corp. No. 2, Innovation Road II, Hsinchu Science Park, Hsinchu 300, Taiwan Tel.: +886-3-578-0211. Fax: +886-3-577-6047 www.realtek.com Getting Started Guide All information provided in this document is subject to legal disclaimers. © REALTEK 2020. All rights reserved.
- Page 2 Use of Realtek Resources may require a license from a third party under the patents or other intellectual property of the third party, or a license from Realtek under the patents or other Realtek’s intellectual property.
- Page 3 Customers’ own risk. Customers are solely responsible for compliance with all legal and regulatory requirements in connection with such selection. Customer will fully indemnify Realtek and its representatives against any damages, costs, losses, and/or liabilities arising out of Designer’s non- compliance with the terms and provisions of this Notice.
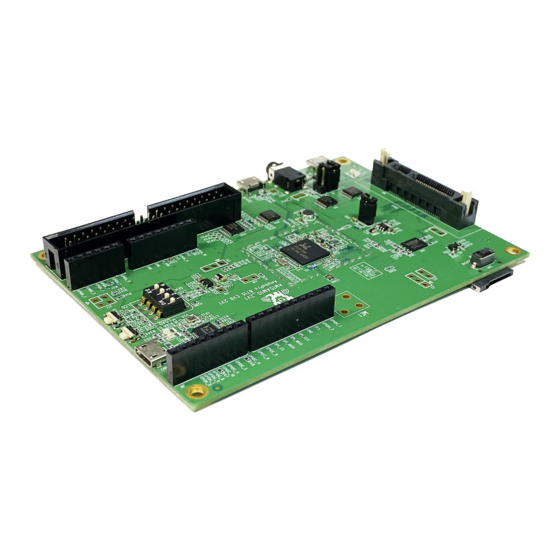
- Page 4 Ameba-Pro KVS Getting Started Guide AmebaPro RTL8715AD Board AmebaPro Demo EVB Ameba Demo board home page: https://www.amebaiot.com/zh/amebapro/ Getting Started Guide All information provided in this document is subject to legal disclaimers. © REALTEK 2020. All rights reserved.
- Page 5 Fig 1-1 Demo board − PCB layout (2D) LOGUART The LOGUART is shown in Fig 1-2. Fig 1-2 Demo board – LOGUART Getting Started Guide All information provided in this document is subject to legal disclaimers. © REALTEK 2020. All rights reserved.
- Page 6 Image Sensor There is an image sensor socket as shown in Fig 1-4. Fig 1-4 Demo board – image sensor Getting Started Guide All information provided in this document is subject to legal disclaimers. © REALTEK 2020. All rights reserved.
- Page 7 IAR Embedded Workbench - IAR Systems: Please use IAR version 8.3 (There may be some compiler problems with v8.4) GCC toolchain: Linux: asdk-6.4.1-linux-newlib-build-3026-x86_64 Cygwin: asdk-6.4.1-cygwin-newlib-build-2778-i686 Getting Started Guide All information provided in this document is subject to legal disclaimers. © REALTEK 2020. All rights reserved.
- Page 8 Choose the Security credentials tab, and choose Create access key. Record the Access key ID. Choose Show under Secret access key, and then record the Secret access key. Getting Started Guide All information provided in this document is subject to legal disclaimers. © REALTEK 2020. All rights reserved.
- Page 9 3.1.1 Cloning the Repository by Git Command On GitHub, navigate to the main page of the repository, and check its web URL. Getting Started Guide All information provided in this document is subject to legal disclaimers. © REALTEK 2020. All rights reserved.
- Page 10 Please check image sensor module name is correct in “sensor.h” located in \project\realtek_amebapro_v0_example\inc For example, if I use the sensor model IMX307, the SENSOR_USE should be defined as SENSOR_IMX307. Getting Started Guide All information provided in this document is subject to legal disclaimers. © REALTEK 2020. All rights reserved.
- Page 11 However, if you don’t want to use the multi-media framework for KVS producer example, you can use the following demo alternatively: #define CONFIG_EXAMPLE_KVS_PRODUCER Getting Started Guide All information provided in this document is subject to legal disclaimers. © REALTEK 2020. All rights reserved.
- Page 12 Confirm application_is in WorkSpace, right click application_is and choose “Rebuild All” to compile. step 3. Make sure there is no error after compile. Getting Started Guide All information provided in this document is subject to legal disclaimers. © REALTEK 2020. All rights reserved.
- Page 13 If the application code is modified and need to build again, you just need to build the application project: $ make -f application.is.amazon_kvs.mk all -j4 Note: If there is compile error with shell script in "component/soc/realtek/8195b/misc/gcc_utility/", you may need to run following command $ dos2unix component/soc/realtek/8195b/misc/gcc_utility/* Getting Started Guide All information provided in this document is subject to legal disclaimers.
- Page 14 Generate: concat separate images and generate a final image Fig 5-1 ImageTool UI Environment Setup 5.2.1 Hardware Setup The hardware setup is shown in Fig 5-2. Getting Started Guide All information provided in this document is subject to legal disclaimers. © REALTEK 2020. All rights reserved.
- Page 15 Connect USB->UART to PC by using micro-USB wire. step 3. Switch“1”to ON from SW7(2V0、2V1) or Switch“2”to ON from SW7(1V0) step 4. Push reset button. Getting Started Guide All information provided in this document is subject to legal disclaimers. © REALTEK 2020. All rights reserved.
- Page 16 7. Switch“1”to OFF from SW7(2V0、2V1) or Switch“2”to OFF from SW7(1V0) step 8. Push reset button to start the program. Getting Started Guide All information provided in this document is subject to legal disclaimers. © REALTEK 2020. All rights reserved.
- Page 17 GDB server. Note that this terminal should NOT be closed if you want to download software or enter GDB debugger mode. $ /opt/SEGGER/JLink/JLinkGDBServer -device cortex-m33 -if SWD Getting Started Guide All information provided in this document is subject to legal disclaimers. © REALTEK 2020. All rights reserved.
- Page 18 “J-Link GDB Server”. Execute the J-Link GDB Server tool and choose the target device to Cortex-M33 and target interface to SWD to start GDB server: Getting Started Guide All information provided in this document is subject to legal disclaimers. © REALTEK 2020. All rights reserved.
- Page 19 GDB debug mode: $ make -f Makefile_amazon_kvs debug For further information about GDB debugger and its commands, please check https://www.gnu.org/software/gdb/ https://sourceware.org/gdb/current/onlinedocs/gdb/. Getting Started Guide All information provided in this document is subject to legal disclaimers. © REALTEK 2020. All rights reserved.
- Page 20 ATW0=<WiFi_SSID> : Set the WiFi AP to be connected ATW1=<WiFi_Password> : Set the WiFi AP password ATWC : Initiate the connection Getting Started Guide All information provided in this document is subject to legal disclaimers. © REALTEK 2020. All rights reserved.
- Page 21 After connecting to the wifi and get an IP address, the AmebaPro will run the example and put the media to KVS… Getting Started Guide All information provided in this document is subject to legal disclaimers. © REALTEK 2020. All rights reserved.
- Page 22 Ameba-Pro KVS Getting Started Guide Now the AmebaPro have started to put the media (video/audio) to the kinesis video streams. Getting Started Guide All information provided in this document is subject to legal disclaimers. © REALTEK 2020. All rights reserved.
- Page 23 Set the AWS region, Credential key, Stream name step 3. Select the “LIVE” playback mode and press the “Start Playback” button to validate the result. Getting Started Guide All information provided in this document is subject to legal disclaimers. © REALTEK 2020. All rights reserved.
- Page 24 Choose the AWS region that you create the stream (default: us-east-1) step 3. Click the Video streams on the left and choose the stream that created by AmebaPro … Getting Started Guide All information provided in this document is subject to legal disclaimers. © REALTEK 2020. All rights reserved.
- Page 25 4. Using Media playback to playback the video If success, you will get the video/audio from AmebaPro on the console… Getting Started Guide All information provided in this document is subject to legal disclaimers. © REALTEK 2020. All rights reserved.
- Page 26 Naming the stream as “AmazonRekogntionResults” step 4. For data stream capacity, select 1 shards for the stream. step 5. Create data stream Getting Started Guide All information provided in this document is subject to legal disclaimers. © REALTEK 2020. All rights reserved.
- Page 27 Ameba-Pro KVS Getting Started Guide Use the AWS Management Console and click the data stream you create (AmazonRekogntionResults), then record the ARN number. Getting Started Guide All information provided in this document is subject to legal disclaimers. © REALTEK 2020. All rights reserved.
- Page 28 Or you can create stream processor in Python: create_response = self.rekognition_client.create_stream_processor( Input={ 'KinesisVideoStream': { 'Arn': KinesisVideoStreamArn Output={ 'KinesisDataStream': { 'Arn': KinesisDataStreamArn Getting Started Guide All information provided in this document is subject to legal disclaimers. © REALTEK 2020. All rights reserved.
- Page 29 = cv2.VideoCapture(URL) self.capture.set(cv2.CAP_PROP_BUFFERSIZE, 2) self.frame_width = self.capture.get(cv2.CAP_PROP_FRAME_WIDTH) self.frame_height = self.capture.get(cv2.CAP_PROP_FRAME_HEIGHT) self.status, self.Frame = self.capture.read() # Read KVS video from URL Getting Started Guide All information provided in this document is subject to legal disclaimers. © REALTEK 2020. All rights reserved.
- Page 30 Run a python code locally to get the video frame from KVS and Rekognition result from Data Stream (Python packages: AWS Boto3 + OpenCV) Display the video frame rendered with bounding boxes Getting Started Guide All information provided in this document is subject to legal disclaimers. © REALTEK 2020. All rights reserved.
- Page 31 After finishing the python code, you should check the stream processor is stop and deleted. It can avoid unnecessary expense: $ aws rekognition stop-stream-processor --name my-stream-processor $ aws rekognition delete-stream-processor --name my-stream-processor Getting Started Guide All information provided in this document is subject to legal disclaimers. © REALTEK 2020. All rights reserved.
- Page 32 If using the example without multi-media framework – example_kvs_producer.c (CONFIG_EXAMPLE_KVS_PRODUCER), you can modified the video parameter in sample_config.h and kvs_producer.c, including sample_config.h: video resolution and FPS… kvs_producer.c: H264 GoP, bitrate… Getting Started Guide All information provided in this document is subject to legal disclaimers. © REALTEK 2020. All rights reserved.
- Page 33 The additional include directories of KVS Producer example is temporarily independent. You can add additional include path by right clicking kvs_producer and choosing options C/C++Compiler Preprocessor Getting Started Guide All information provided in this document is subject to legal disclaimers. © REALTEK 2020. All rights reserved.
- Page 34 Failed to Connect to AWS Server Please check AWS Access Key, AWS Secret Key, Stream name and Region are provided in sample_config.h properly. Getting Started Guide All information provided in this document is subject to legal disclaimers. © REALTEK 2020. All rights reserved.
- Page 35 You may not compile the small CPU before the big CPU. Method: Build the small CPU and then build the big CPU again, the correct image can be obtained. Getting Started Guide All information provided in this document is subject to legal disclaimers. © REALTEK 2020. All rights reserved.
Need help?
Do you have a question about the AmebaPro RTL8715AD and is the answer not in the manual?
Questions and answers