Table of Contents
Advertisement
Quick Links
Advertisement
Table of Contents

Related Manuals for Power Breezer MACH 4 PLUS


Summary of Contents for Power Breezer MACH 4 PLUS
- Page 1 USER MANUAL Version 3.0 For use with models: PB4BASE and PB4MAX...
-
Page 2: Table Of Contents
Congratulations on your selection of a Power Breezer® evaporative cooler. We are proud of our products and have designed your Power Breezer for years of safe, reliable service. This user manual will instruct you in the proper operation and maintenance of your Power Breezer. Please read through this manual before operating your Power Breezer. -
Page 3: War Nings
• This Power Breezer can be used by children aged from 8 years and above and persons with reduced physical, sensory or mental capabilities or lack of experience and knowledge if they have been given supervision or instruction concerning use of the Power Breezer in a safe way and understand the hazards involved. -
Page 4: Key Co Mponents
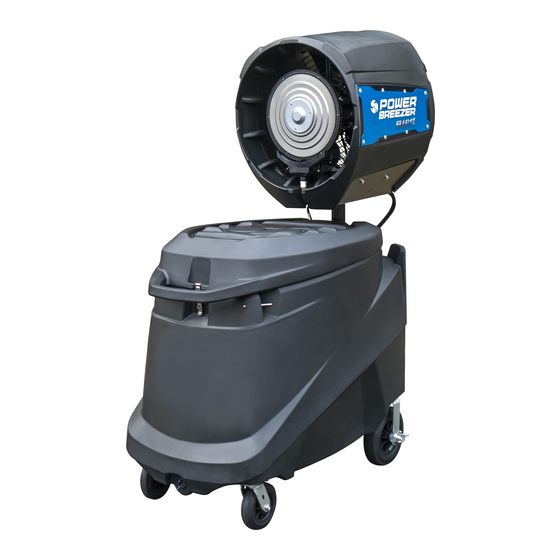
Key Components I. KEY COM PONENTS Front View Fan head Atomizer Tank Lid Lid latch Tie down points (4) Transport handle Water tank Drain plug Front casters Rear View Fan Head Handles Fan head power cord Atomizer drain hose Control panel Water inlet hose Electronic Box “E-Box”... - Page 5 Key Components Control Panel Fan Speed Atomizer (Misting) up/down on/off Power Head Rotation on/off on/off Storage View Fan head support pole Power cord holder Inside Water Tank View Water valve MAX FILL LINE MAX FILL LINE ENGLISH...
-
Page 6: Se Tup
Setup II. SE TUP 1. Mounting the fan head: To set up your Power Breezer, you will need: • 2 people • An AC outlet • Access to water to fill the water tank Remember: • Lift fan head only by the head handles. - Page 7 Setup 2b. Finish opening the lid latch by pulling the upper portion of the latch forward and away from the lid. 3. Remove tank lid by first lifting up on the transport handle and then pulling forward. 4. Tilt up the four fan head handles, if they are folded down, prior to lifting the head.
- Page 8 Setup 5a. To lift the fan head out of the water tank, each person should stand on opposite sides of Power Breezer. 5b. Both people should grasp the fan head by the fan head handles, as shown. Remember: • Lift fan head only by the head handles.
- Page 9 Once installed, the atomizer (metal disk) will be facing the water tank, air will be blown over the water tank when the Power Breezer is turned ENGLISH...
-
Page 10: Using The Correct Outlet
Setup 2. Using the correct outlet: Electrical current of 110v is required. For safety, only plug your Power Breezer into an outlet equipped with GFCI. DO NOT plug into standard outlet without a GFCI feature. GFCI Equipped Outlet NOTE: A live power outlet can be verified when the Power Breezer is... -
Page 11: Routing Power And Water Lines And Replacing Tank Lid
Setup 4. Routing power and water lines and replacing tank lid: 4a. Route the fan head power cord, atomizer drain hose, and water inlet hose through the openings in the back of the water tank as shown above. Tank Lid Tabs Water Tank Notches Lid Latch... -
Page 12: O Per Ation
The LED light for the power button will be lit and the fan blades will begin to slowly rotate to indicate the Power Breezer is powered on. 2b. Press the fan speed button to increase the fan speed. -
Page 13: Adjusting The Misting Level
Operation WARNING NEVER touch the any portion of the Atomizer while it is spinning. Doing so may cause bodily injury. 3. Adjusting the misting level: 1a. Press the power button hold for one second if Power Breezer is not already on. 1b. -
Page 14: Disa Ssem Bly
• Never lift from the fan guards or metal disk. • The Fan Head weighs 86 lbs. 1a. Power off the Power Breezer by holding down the power button for one second. 1b. Unplug power cord. -
Page 15: Dismounting Fan Head
Disassembly 1. Dismounting fan head: Before you get started, be sure to lock both of the rear wheels by pressing down on the brake lever to set them to the ON position. 2a. Unlock lid latch. 2b. Remove the tank lid by first lifting up on the transport handle and then pulling forward. - Page 16 Disassembly 3b. Carefully rest the fan head on the edge of the tank. Both people should grasp the fan head by the fan head handles, as shown. Remember: • At this step, lift the fan head only by the head handles. •...
-
Page 17: Routing Power And Water Lines And Replacing Tank Lid
Disassembly 2. Routing power and water lines and replacing tank lid: 2a. Route the fan head power cord, atomizer drain hose, and water inlet hose through the openings in the back of the water tank as shown above. Tank Lid Tabs Water Tank Notches Lid Latch... -
Page 18: Moving / Transporting Your Power Breezer
Transporting | Maintenance V. MOVING / TRANSPORTING YOUR POWER BREEZER DO NOT reposition or move your Power Breezer by the fan head (if mounted) or the fan head support pole (if stored). Doing so may damage your Power Breezer. Only reposition or move your Power Breezer by the transport handle. -
Page 19: Monthly Or Quarterly
Maintenance Continued • Reseal Drain Plug, add water and operate as needed. • Clean the outside with mild soap and water. Do not use harsh chemicals or abrasives. Monthly or Quarterly: NOTE: If you have excessively hard or sandy water, monthly is recommended. •... -
Page 20: Warranty
Power Breezer Limited Warranty WHAT IS COVERED: Power Breezer. (“Manufacturer”) warrants the following products: Power Breezer Mobile (“Unit”) for the following two concurrent time periods (“Coverage Periods”): • Two (2) years, the fan blades, fan motor, air straighteners, and the polyethylene exterior of the Unit to be free from defects in materials or workmanship. - Page 21 Warranty Continued BUYER’S HOW TO MAKE A CLAIM: Any and all repairs and replacements must be performed by or under the instruction of the Manufacturer, authorized dealer and or representative. Warranty claims must be made as soon as reasonably possible after a defect is discovered, but before the end of the warranty coverage on the particular part.
-
Page 22: Co Ntac T Inf Ormatio N
Contact Information IX. CONTAC T I NFO RMAT IO N General Information or Product/Installation Support Email: customerservice@powerbreezer.com Phone: 844.233.5673, Option 1 Visit: PowerBreezer.com/support For Sales Information sales@powerbreezer.com Phone: 844.233.5673 User Videos www.youtube.com/powerbreezer www.powerbreezer.com Follow Us www.linkedin.com/company/2561996 www.facebook.com/PowerBreezer www.twitter.com/PowerBreezer ENGLISH... - Page 23 PowerBreezer.com 4835 Sirona Drive, Suite 400 Charlotte, NC 28273 ©2022 Maxify Solutions, Inc. All Rights Reserved. Power Breezer® is licensed under U.S. Patent No. 6,789,787.
Need help?
Do you have a question about the MACH 4 PLUS and is the answer not in the manual?
Questions and answers