Table of Contents
Advertisement
Quick Links
Advertisement
Table of Contents

Related Manuals for Calnex Paragon-neo


Summary of Contents for Calnex Paragon-neo
- Page 1 Paragon-neo Getting Started Guide Page 1 of 21...
-
Page 2: Warranty
Calnex Solutions Ltd shall not be liable for errors contained herein and for incidental or consequential damages in connection with the furnishing, performance, or use of this material. - Page 3 The equipment is provided with a side mounted strap handle. This should be used for carrying the equipment. Cleaning If the surface of the Paragon-neo becomes dirty, remove the AC power and clean with a soft lint- free cloth. Never use flammable liquids to clean the instrument. Warning Use of this equipment in a manner not specified by Calnex Solutions may impair the protection afforded by the equipment and invalidate the warranty.
-
Page 4: Supplied Accessories
Welcome to the Calnex Paragon-neo Getting Started Guide This guide shows you how to install and operate the Calnex Paragon-neo hardware and User Interface. The operational guidance is generic. Please refer to appropriate Calnex Test Guides and Software Release Notes for detailed operational steps and result interpretation in relation to specific tests. - Page 5 To allow accurate SyncE Jitter testing (for 25G, 40G and 100G rates), certain performance characteristics and internal settings must be applicable to the inserted Optics. For the complete list of Calnex supported optics please see the relevant section of the Calnex FAQ (keyword “optics”) accessed through the support pages at calnexsol.com...
-
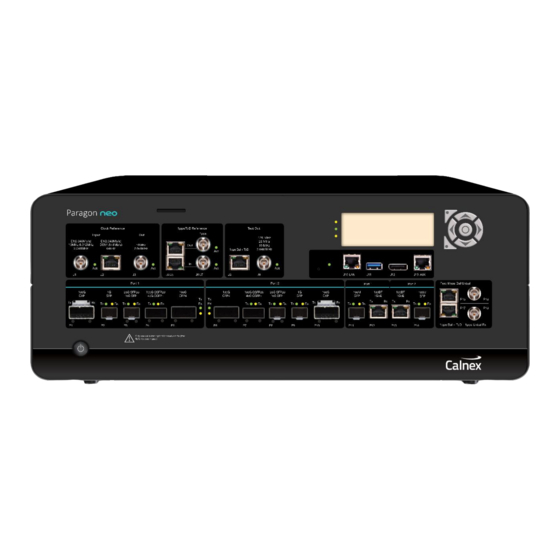
Page 6: Front Panel Description
Front Panel Description 1. On/Off Switch Use this button to switch Paragon-neo On or Off. Switch off at the front panel before switching off the AC input on the rear panel. 2. 100G CXP Ethernet ports (P1, P10) These are for connections to 100G interfaces on Ethernet devices. The pluggable interface supported is CXP SR10 (10*10G) 3. - Page 7 Pins 4 and 5 – ground. All other pins must be left unconnected. Max differential input voltage: +/-6V Input impedance: 100Ω (Differential) 9.(b) Unbalanced 1pps Measurement Input (P18 BNC connector) Connection to unbalanced 1pps measurement input. Paragon-neo Getting Started Guide Page 7 of 21...
- Page 8 13. LAN (J10) This is for connection to the network or a to a PC/laptop running a browser such as Internet Explorer, Firefox or Chrome. The connection to the Paragon-neo LAN control port (RJ45) is 1GbE. 14. Reset Switch Using a pointed instrument, press the RESET button to return the Paragon-neo to its power-on condition.
- Page 9 Connection to balanced clock reference signals (RJ48): E1, T1, 64k+8k, 64k+8k+400. Impedance is 100ohm or 120ohm as appropriate for selected clock signal. Pin 1 (Ring), Pin 2 (Tip) – All other pins must be left unconnected Paragon-neo Getting Started Guide Page 9 of 21...
-
Page 10: Rear Panel Description
For details of power requirements refer to the earlier ‘Power Requirements’ section on Page 2. 2. AC Power Switch Use this switch to turn the Paragon-neo AC Input On or Off. 3. GPS Antenna Input SMA connector for direct connection to an external GPS Antenna. This is reserved for a future release. - Page 11 At the end of life please dispose of the equipment through a recognized and approved scheme fulfilling the local environmental requirements. Alternatively contact Calnex Solutions Ltd to have them arrange for return and disposal.
-
Page 12: Connecting To The Network
3. Connect the AC power cord to the rear-panel AC power input and plug into an AC outlet. 4. Use Paragon-neo’s rear panel power switch, marked 1/0, to switch ON the Paragon-neo. 5. Wait for the Paragon-neo to power up and an IP address is displayed on the LCD Status Display. -
Page 13: Configuring Your Computer
To control the Paragon-neo over a networked connection, the recommended approach is to connect the Paragon-neo directly to the network. Ensure that you understand the IP address range used in that network and any associated subnet mask and default gateway addressing requirements. -
Page 14: User Interface Basics
To connect to the Calnex Paragon-neo, enter the IP address shown on the front panel status display into your browser address bar and then the user interface should be displayed as shown below: 1. -
Page 15: Switch Off
This selection, in the bottom right of the User Interface allows the user to switch the instrument Off. It doesn’t enable you to power the instrument On. The instrument needs to be switched On before you can control it via the User Interface. Paragon-neo Getting Started Guide Page 15 of 21... -
Page 16: Instrument Mode
The colors of the following are indications of their status, with green = no alarms, red = current alarm, yellow= historical alarm and white = not active in selected Paragon-neo configuration. • Link: indicates if there is a physical Ethernet connection to Paragon-neo test ports by detecting transitions on the selected port Rx side. •... - Page 17 Port1 and Port2 Measurements. Select Stop All to stop all active Measurements. 6. Analysis This section enbles the Calnex Analysis Tool (CAT). Select CAT to open up a separate tab in your browser. The CAT provides graphical Timing Analysis measurements and results as well as Pass/Fail performance against selected metrics and masks, for example to ITU-T standards.
- Page 18 Example Paragon-neo Workflow Connect to the Calnex Paragon-neo by entering the IP address shown on the front panel status display into your browser address bar and then the user interface is displayed as shown below: From the Workflow keys: 1. Start the Paragon-neo GUI.
- Page 19 7. Select the button on the connected port (Port 1 or Port 2) or select button to start the measurement. 8. To stop the measurement after running the test, select the button. Paragon-neo Getting Started Guide Page 19 of 21...
- Page 20 9. Select to pull up the results in a separate TAB on the browser. Please refer to appropriate Calnex Application Notes and Release Notes for detailed operational steps and result interpretation in relation to specific tests. Paragon-neo Getting Started Guide...
- Page 21 Oracle Campus Linlithgow West Lothian EH49 7LR United Kingdom tel: +44 (0) 1506 671 416 email: info@calnexsol.com calnexsol.com © Calnex Solutions Ltd, 2019 This document is subject to change without notice. April 2019 Paragon-neo Getting Started Guide Page 21 of 21...
Need help?
Do you have a question about the Paragon-neo and is the answer not in the manual?
Questions and answers