
Related Manuals for Schuchmann carrot 3


Summary of Contents for Schuchmann carrot 3
- Page 1 3. Instructions for use. carrot 3. & carrot 3 XL. The car seat that grows with the child.
- Page 2 Instructions for use may deviate from your prod- uct due to differing equipment. We reserve the right to make technical modifications. Important information! Ensure that these Instructions for use remain with the product. Your schuchmann Team...
-
Page 3: Table Of Contents
2.7 Product overview ..................14 carrot 3. 2.8 How the grows ..................15 carrot 3 XL. 2.9 Product overview ................17 3. Installation................. 18 3.1 Installation on the passenger seat ..............18 3.2 Installation on the back seat ................19 3.3 Installation in aircraft .................... - Page 4 5.7 Therapy table / low arm support pads ............32 5.8 Therapy table XL ...................... 32 5.9 Support wedge / triangular wedge ..............32 carrot 3 XL. 5.10 3D torso pelotte pads for the ..........32 5.11 Anti-adduction / knee separator pad ............33 5.12 Removable incontinence absorber ...............
- Page 5 7.5 Duration of use and re-use..................50 8. Technical data................51 carrot 3. 8.1 Dimensions of ..................51 carrot 3 XL. 8.2 Dimensions of ................. 52 9. Guarantee................... 53 9.1 Guarantee period ..................... 53 9.2 Limitations of guarantee period ............... 53 9.3 Form for guarantee claims ...................
-
Page 6: Preparation
1. Preparation. 1.1 Delivery On receiving the product, please check it for completeness, lack of faults and any transport damage. Inspect the goods in the presence of your forwarder. Should transport damage have occurred, please arrange for an inventory (determination of the faults) to be made in the presence of the forwarder. -
Page 7: Where To Store The Instructions For Use
15 kg as well as young people weighing more than 36 kg up to approx. 50 kg and in the carrot 3 XL. up to 75 kg. However, a doctor's prescription must be obtained for this. (For Germany, see the medical certificate (see Point 11) as well as the "Third Ordinance on... -
Page 8: Indication
3-point strap in the vehicle. The straps built in the seat serve only to support and position the user. carrot 3. is also approved for use on aircraft. This does apply to the carrot 3 XL. seat variant. (see Point 3.3). -
Page 9: Use Not In Accordance With The Intended Purpose / Warning Guidelines
• We recommend to use this seat only for users who can sit upright (i.e. not for children under 6 months). • Do not use the carrot 3. on the passenger seat if it obstructs you when operating the gearstick or the handbrake or if the child can reach control buttons there unintentionally. - Page 10 • Re-use of the car safety seat following use by the patient named in the prescription is not permitted according to the manufacturer's instruc- tions. Schuchmann advises against the purchase or sale of used car seats as they have incurred damage that may not be visable which could significantly reduce the safety of the product.
- Page 11 When the carrot 3. should not be used • Do not use the carrot 3. if you cannot fix it correctly as described in the instructions for use. • Do not use the carrot 3. if it is not firmly attached.
- Page 12 So, for example, never try to remove the 5-point strap and the black fastening straps of the carrot 3. Never remove the strap buckle or the buckle tongues of the 5-point strap or the black fastening straps.
- Page 13 • Before you tilt the backrest of the vehicle seat to which the carrot 3. is attached, you must loosen and slacken the straps of the vehicle seat (Fig.1).
-
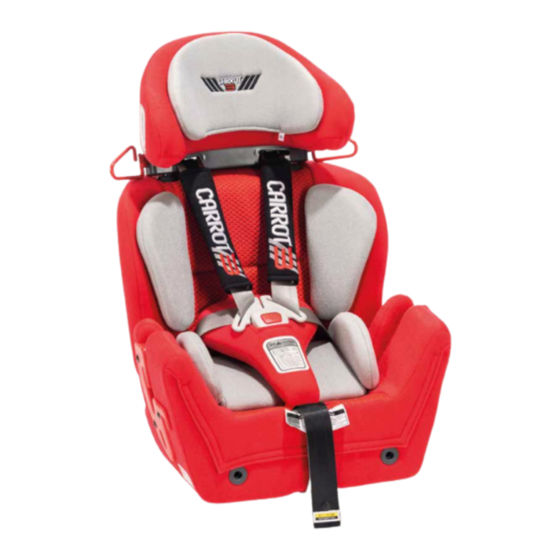
Page 14: Equipment For Basic Model
• Seat depth extension • Triangular wedge • Leg rest pad 2.7 Product overview carrot 3. The fig. below is intended to show you the designation of the most im- portant components as well as the terms which you will find in these instructions for use. -
Page 15: How The Carrot 3. Grows
2. Product description. 2.8 How the carrot 3. grows The illustrations below are intended to show you the growth possibilities of the car seat. Without the extension module, you can extend both the height of the back and the depth of the seat by 25 mm. - Page 16 2. Product description. Buttons for shoulder width Strap buckle adjustment Shoulder module Strap anchor Pocket for user manual Strap guide tab Seat depth adjustment button 5-point strap adjustment 150 mm & 50 mm 150 mm & 100 mm extension extension 150 mm extension 50 mm extension 100 mm extension...
-
Page 17: Product Overview Carrot 3 Xl
2. Product description. 2.9 Product overview carrot 3 XL. Headrest Head pad Vehicle strap guide tab Shoulder module Strap pads Backrest 4-point strap Therapy table fixture Headrest Vehicle strap guide tab Upper fastening strap Shoulder module Back height adjustment (D-ring) -
Page 18: Installation
Pull both adjustment straps at the same time. Make sure that as a result the carrot 3. is firmly connected to the backrest of the car, as shown in picture A and B. -
Page 19: Installation On The Back Seat
3. Installation. 3.2 Installation on the back seat When you attach the carrot 3. to a back seat, you may find that the attachment straps are too short to be placed horizontally around the seat. In this case, the fastening straps can be connected vertically, as shown in the adjacent picture. -
Page 20: Securing The Carrot 3
3. Installation. 3.3.1 Securing the carrot 3. The Federal Aviation Administration (FAA) recommends that you transport your child for air travel in an appropriate safe child seat, suitable for your child's weight and size. Turbulence can occur with little or no warn- ing. -
Page 21: Preparation Of The Carrot 3. Before Use
This system allows you to fasten, loosen and tighten the strap on both sides of the seat so that the carrot 3. can be placed on any seat in the aircraft. Install the fastening strap before boarding the airplane. Please also have a look at our tutorial video (QR code see Point 3.3.1). -
Page 22: Installing The Carrot 3. Facing Forwards
• Fasten the fastening strap (A) around the back of the aircraft seat and tighten it. • Place the child in the carrot 3. and fasten the strap on the carrot 3.. • Then they guide the safety belt installed in the aircraft (B) through the lower strap guides (C) and over the child. -
Page 23: Operation
4. Operation. 4.1 Headrest adjustment The headrest (A) can be individually adjusted to the shape of the user's head, thus creat- ing a higher level of protection. The headrest (A) can be adjusted forwards or backwards by 15 mm. To adjust the headrest to the desired posi- tion, loosen the Allen screws (B) with a stand- ard Allen key and position the headrest in one of the three possible settings (C) on the... -
Page 24: 4-Point Strap ( Carrot 3 Xl. )
4. Operation. 24 24 4.3 4-point strap (carrot 3 XL.) To fasten the 4-point strap, hold the strap buckle (A) with one hand and insert the buckle tongue (B) into the buckle with the other hand. To open the 4-point strap, hold the... -
Page 25: Adjusting The Length Of The 5-Point Strap (Positioning Strap)
(positioning strap) • Turn the black button (A) on both sides of the carrot 3. anticlockwise and remove it. • Disconnect the carrot 3. seat from the back section. • Remove the strap from the seat rod. • Replace the strap band using the lower loop. -
Page 26: Backrest
4. Operation. 26 26 4.5 Backrest You can adjust the height of the backrest by 25 mm without extensions. To do this, unlock the backrest by pulling the D-shaped ring (A) in the middle of the upper end of the back- rest. -
Page 27: Strap Pads
4. Operation. 27 27 In general, the seat depth (A) should be slightly shorter than the distance from the pelvis to the back of the knee. This means that the seat should stop before the back of the knee, when the child's pelvis is positioned as far back as possible on the seat. -
Page 28: Compensation Pads
Instead of the standard size shown, you can choose a smaller version for the carrot 3. in the standard size, which is 50 mm shorter in depth and 13 mm less high. -
Page 29: Accessories
5. Accessories. 5.1. Filling pads (50 mm / 100 mm) With the filling pads you can close the gap that is created when the back is extended upwards. To fit the filling pads, you must pull the D-ring (A) on the upper edge of the back- rest. -
Page 30: Installation Of The Shoulder Protection Wing
5. Accessories. 5.2.1 Installation of the shoulder protection wing • Remove the shoulder strap from the strap (Fig. A). • Remove the strap and comfort pads from the headrest (Fig. B). • Press and hold the headrest release buttons and remove the headrest (Fig. -
Page 31: Plug-In Extension (50 Mm)
Insert the two metal rods (B) into the round open- ings on the seat. 5.5 Foot support (carrot 3.) The foot support (C) is available in three siz- es, each with Velcro fleece straps to position the lower legs and feet. -
Page 32: Seat Extension (50 Mm / 100 Mm)
Vel- cro fasteners. 5.8 Therapy table XL The XL therapy table is specially designed for the carrot 3 XL. seat and can be used as additional support to secure the child's up- per limbs. 5.9 Support wedge / triangular wedge... -
Page 33: Anti-Adduction / Knee Separator Pad
5. Accessories. 5.11 Anti-adduction / knee separator pad The anti-adduction / knee separator pad is waterproof and breathable to prevent dirt or moisture and maintain comfort. To attach, release the strap. To do this, open the Velcro fastener and wrap it around the chest strap to secure it. -
Page 34: Anti-Escape Waistcoat
5.14 Hinge buckle strap The hinge buckle strap makes it easier to carry the car safety seat carrot 3.. To do this, slide the loop onto the red metal strap guide on the shoulder. Now release the strap buckle on the strap. -
Page 35: Iso-Base And Iso-Turn With Isofix Connection
Please transport the child with the 4-point or 5-point strap of the carrot 3. or carrot 3 XL. and the 3-point safety belt of the car. Any modification of the product is your responsibility. We are not responsible for any damage that occurs as a result of incorrect conversion. -
Page 36: When The Iso-Base Or Iso-Turn Should Not Be Used
If you have any questions about use or repair work, please contact your specialist dealer. 5.16 ISO-BASE with ISOFIX connection ISOFIX connection Holder for the carrot 3. Push bar for releasing the ISOFIX connection... -
Page 37: Fastening The Car Safety Seat On The Iso-Base
5.16.2 Proper fixing on a car seat with ISO- FIX connection Now place the ISO-BASE with the attached carrot 3. or carrot 3 XL. on the car seat. Make sure that the ISOFIX connection of the ISO- BASE and that of the vehicle are at the same height. -
Page 38: Iso-Turn With Isofix Connection
If you have such a cavity in your vehicle, please contact your spe- cialist dealer (see Point 10.5). They will find a solution with you. The ISO-TURN is only approved for the carrot 3. and must not be used with the carrot 3 XL. -
Page 39: Fastening The Car Safety Seat On The Iso-Turn
5.17.1 Fastening the car safety seat on the ISO-TURN First loosen and remove the adjustment screws (A) of the carrot 3. Now place the car safety seat on the turntable so that it sits be- tween the holder of the back adjustment (B). -
Page 40: Proper Fixing On A Car Seat With Isofix Connection
(E). Here too, make sure that the clamp- ing levers are firmly tightened. Now you can adjust the back (C) of the carrot 3. to the car seat (D). The safest and most stable sitting position for your child is achieved when the back is at an angle of approximately 90°... -
Page 41: Adjustment Of The Footwell Support To The Footwell Height
(D) is found on the outside top of the turntable. Pull it upwards to unlock and turn the lever 180 degrees. Turn the carrot 3. with the ISO-TURN towards the car door to exit. Fix the ISO-TURN in the desired position with the pull-catch (D). -
Page 42: Removal Of The Iso-Turn
Push the ISO-TURN back a few milli- metres and lift it up. Now you can remove the ISO-TURN together with the carrot 3. from the vehicle. 5.17.7 Installation / changing the direction of rotation... -
Page 43: Foot Support Fixture
5. Accessories. 5.17.8 Foot support fixture To attach a carrot 3. foot support to the ISO-TURN, you need the foot support fixtures (A) as an accessory. Please note that, depending on the design of the car seat, the cover fab- ric may be damaged by friction due to these fixtures. -
Page 44: Other Accessories
5. Accessories. 5.18 Other accessories • Torso guide pads, height adjustable (23-29 cm) and side adjustable (chest width 16-24 cm), can be fitted in a special design as required to reinforce lateral support. This takes place in the factory. • An abduction wedge can be installed as a customised design. This takes place in the factory. -
Page 45: Securing The Child
6. Securing the child. When the carrot 3. is fitted in your vehicle and all adjustments have been made, follow these instruc- tions to ensure the safety of your child: 6.1 Positioning the child with the 5-point strap Loosen the 5-point strap by pressing the yellow button (A) in the front area of the seat and pull the shoulder straps (B) forward. -
Page 46: Securing The Child With The Car's 3-Point Strap
After positioning the child with the 5-point strap of the carrot 3. or 4-point strap of the carrot 3 XL., pull out the 3-point strap of the car and insert its buckle tongue into the strap buckle. Again, you can recognise a secure connection by the click you hear when the vehicle three-point strap en- gages with the lock tab on your vehicle. - Page 47 6. Securing the child. The 5-point strap of the carrot 3. and the 4-point strap of the carrot 3 XL. do not serve as a safety-relevant restraint device, but as a positioning aid for your child. It is compulsory by law to wear the vehicle's 3-point strap in road traffic.
-
Page 48: Cleaning And Maintaining
Thorough drying of the cleaned areas is important. Please also pay attention to our general cleaning and hygiene advice. This www.schuchmann.de/mediathek can be found at 7.1.2 Removal of the cover Please do not attempt to remove or replace the cover or the 5-point strap or 4-point strap or any part of it. -
Page 49: 4-Point Or 5-Point Strap And Fastening Straps
7. Cleaning and maintaining. • Damage to the straps (clamping devices, fasteners, seams) • Strength of the connections (loose screws or missing screws) • Functionality of other adjustment elements (screws, release lever, back, headrest, pelotte pads, footrests and guides in the leg area) •... -
Page 50: Duration Of Use And Re-Use
The expected duration of use does not refer to wear parts such as covers, pads …… Schuchmann excludes the purchase and sale of used child seats since they could have invisible damage which could significantly reduce the safety of the child seat. -
Page 51: Technical Data
8. Technical data. 51 51 8.1 Dimensions of carrot 3. 42 cm 26 cm 25 cm 46 cm 3.5 cm 38 cm 25 cm 42 cm 3.5 cm carrot 3. Inside seat depth 25 cm /28.5 cm Inside seat width... -
Page 52: Dimensions Of Carrot 3 Xl
8. Technical data. 8.2 Dimensions of carrot 3 XL. 46 - 56 cm 51 cm 42 (38) cm carrot 3 XL. Seat depth 42 cm (38 cm) Seat width 51 cm Extendable back height 74.5 - 87 cm User size... -
Page 53: Guarantee
The use of covers that are not part of the carrot 3. inserts, toys and ac- cessories is not covered. Their use could result in the car seat not meeting the safety requirements of ECE Regulation No. -
Page 54: Identification
10. Identification. 10.1 EU Declaration of Conformity... -
Page 55: Serial Number / Date Of Manufacture
10.2 Serial number / date of manufacture The serial number, date of manufacture and other information can be found on the product label (A), which is located on the back of the carrot 3. safety seat under the cover on the right. -
Page 56: Issue Of The Document
10. Identification. 10.4 Issue of the document Instructions for use carrot 3. - change status A; issue 07.2022 10.5 Name and address of the manufacturer, importer, dealer and sup- plying specialist dealer This product was manufactured by: Seeds Co., Ltd... -
Page 57: Medical Certificate
11. Medical certificate. Certificate in terms of the Third Ordinance on Exemptions from Road Traffic Regulations of 05.06.1990 (BGBI.I p. 999) It is hereby certified that the patient Surname: First name: Born on: Street: Town: cannot be transported in a type-approved restraint device within the meaning of §... - Page 58 11. Medical certificate. § 1 Deviating from § 22a(1)(27) of the Road Traffic Licensing Regulations, spe- cial restraint devices for disabled children in motor vehicles need not be of an officially approved design if 1. the design corresponds with the current status of technology, 2.
- Page 59 Notes.
- Page 60 schuchmann.de...
Need help?
Do you have a question about the carrot 3 and is the answer not in the manual?
Questions and answers