Advertisement
Add a Gimbal Mount to Your ELEV-8 V2
Level: Intermediate
Skills required: Soldering, Mechanical Assembly, Multirotor Piloting
One of the most common uses of multirotors is aerial photography and videography. In order to
capture quality media, a Brushless Gimbal must be used to correct for the constant movements
of multirotors which would otherwise cause extremely shaky footage. In this project, a very
simple mount was made to attach a Tarot T-2D Gimbal with a GoPro Hero 3 camera to the front
of an ELEV-8 V2. By moving the battery to the rear of the ELEV-8, balance can be maintained.
The tilt of the gimbal will be set up so that it can be controlled by the 6th channel of the RC
receiver. Properly done, this setup will give you very smooth footage; it's been used to capture
most of the promotional images and videos distributed by Parallax.
What's Needed:
Parts
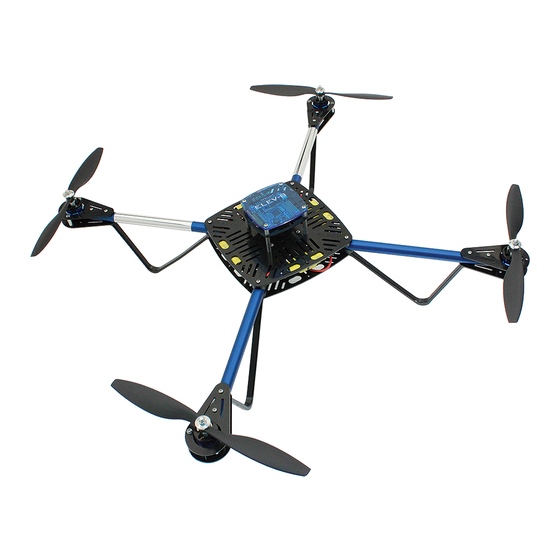
● 1 - ELEV-8 v2 Quadcopter (Assembled, Tested, Tuned) - 80200
● 1 - Tarot T-2D Brushless Gimbal (Assembled, Tested, Tuned)
■
Assembly Manual v1.1
■
Software v1.5
■ Recommended starting PID values for Gimbal Controller and Motor Driver
(following two images, respectively)
Copyright © Parallax Inc.
Web Site:
w ww.parallax.com
Learn:
l earn.parallax.com
Forums:
f orums.parallax.com
Sales:
s ales@parallax.com
Technical:
s upport@parallax.com
- Revised by John C. Lin (3rd Party)
Add a Gimbal Mount to Your ELEV-8 V2
Office: (916) 624-8333
Fax: (916) 624-8003
Sales: (888) 512-1024
Tech Support: (888) 997-8267
EDU Hotline: (916) 625-6801
07/30/2018 Page 1 of 8
Advertisement
Table of Contents

Related Manuals for Parallax ELEV-8 V2


Summary of Contents for Parallax ELEV-8 V2
- Page 1 Tarot T-2D Gimbal with a GoPro Hero 3 camera to the front of an ELEV-8 V2. By moving the battery to the rear of the ELEV-8, balance can be maintained. The tilt of the gimbal will be set up so that it can be controlled by the 6th channel of the RC receiver.
- Page 2 ■ Properly Assembled for this project, it should appear as in the following image: Copyright © Parallax Inc. Add a Gimbal Mount to Your ELEV-8 V2 07/30/2018 Page 2 of 8...
- Page 3 ● Vice or Clamps ● #1 Philips Head Screwdriver ● Soldering Iron (We recommend the Parallax Basic Soldering Kit, #700-10011) ● Rosin-Core Solder (Also in the Parallax Basic Soldering Kit) ● Work-Holding Vise (Also in the Parallax Basic Soldering Kit) ●...
- Page 4 Gimbal Control Board. See the ELEV-8 V2 Assembly Guide for Soldering Instructions. 6. Apply Heat-shrink tubing to the two bullet connectors, as detailed in the ELEV-8 V2 Assembly Guide and shown in the image below. 7. Remove the bottom plate from the ELEV-8 to access the power distribution cable outputs.
- Page 5 Gimbal mount, so don’t drill out or enlarge the hole! Tighten the machine screw until the resistance suddenly increases (don't over tighten!). Copyright © Parallax Inc. Add a Gimbal Mount to Your ELEV-8 V2 07/30/2018 Page 5 of 8...
- Page 6 Locktite. Use the Flat-Nose pliers to tighten them. 12. Bolt the Gimbal and mount assembly to the top of the ELEV-8 into the standoffs using the machine screws. Copyright © Parallax Inc. Add a Gimbal Mount to Your ELEV-8 V2 07/30/2018 Page 6 of 8...
- Page 7 13. Connect the Red wire of the signal cable from the gimbal control board to the signal pin on the 6th channel of your RC receiver. You may need to use an extension cable, as shown below. Copyright © Parallax Inc. Add a Gimbal Mount to Your ELEV-8 V2 07/30/2018 Page 7 of 8...
- Page 8 14. Install the battery straps on the back of the ELEV-8 and mount the battery as shown. This will help to balance out the weight of the camera and gimbal. Copyright © Parallax Inc. Add a Gimbal Mount to Your ELEV-8 V2 07/30/2018 Page 8 of 8...
Need help?
Do you have a question about the ELEV-8 V2 and is the answer not in the manual?
Questions and answers