Table of Contents
Advertisement
Quick Links
Advertisement
Table of Contents

Related Manuals for Allied LEISTER WELDPLAST S2

Summary of Contents for Allied LEISTER WELDPLAST S2
- Page 1 WELDPLAST S2 - PVC S2 - TPO...
- Page 2 Operating Instructions (Translation of the original operating instructions) Read the operating instructions carefully before starting the device and keep them for future reference. Leister WELDPLAST S2 / S2-PVC / S2-TPO Hand Extruder Application Extrusion welding of the following materials: WELDPLAST S2...
-
Page 3: Technical Data
Conformity EU Declaration of Conformity Leister Technologies AG, Galileo-Strasse 10, 6056 Kaegiswil, Switzerland confirms that this product in the version put into circulation by us, fulfils the requirements of the following EU directives. Directives: 2006/42/EC, 2014/30/EU, 2011/65/EU Harmonised standards: EN ISO 12100, EN 55014-1, EN 55014-2, EN 61000-6-2, EN 61000-3-2, EN 61000-3-3, EN 62233, EN 60335-1, EN 60335-2-45, EN IEC 63000 Kaegiswil, 04/15/2021 Bruno von Wyl, CTO... -
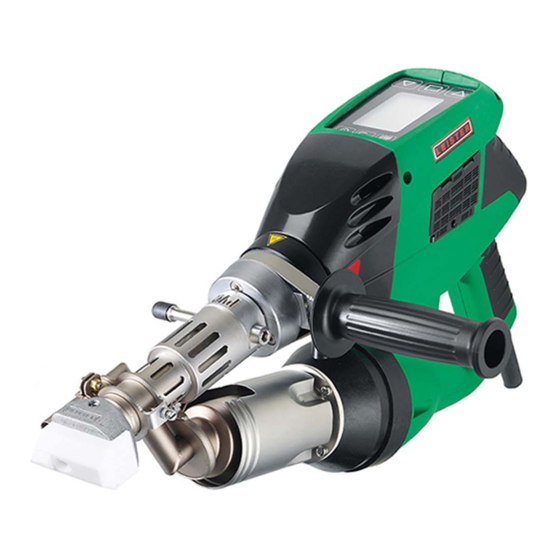
Page 4: Device Description
Device Description With external air duct With integrated air duct 1 Main switch 10 Pipe clip 2 On/off switch for drive 11 Protection tube 3 Potentiometer 12 Filler rod insertion point 4 Drive locking device 13 Device grip 5 Display 14 Power supply cord 6 Guide handle 15 Heating element protection tube... -
Page 5: Extension Cables
Work environment/Safety The hand extruder must not be used in areas where there is danger of explosion or flammable materials. Ensure a safe posture during work. The power cable and filler rod must be free to move and must not obstruct the user or third parties during work. Place hand extruder on a fire resistant base. -
Page 6: Welding Preparation
Welding preparation The temperature control prevents the hand extruder from being started while it is cold. Start-up waiting period: 220 seconds Motor disabled Drive status Heating M free Ready* display (30) Heating until ideal Motor release Ready to weld values are reached The device heats up to the last ideal temperature set directly after switching on the main switch (1). - Page 7 Welding preparation Setting the output volume The output volume and the pre-heating time can be coordinated with each other according to the type of seam. • Presetting on the display – Move the cursor to the «SPEED» position by pressing the Select key (28).
-
Page 8: Starting The Welding Process
Starting the welding process • Fit the appropriate welding shoe (8) according to requirements. • Set potentiometer (3) to max. • When the operating temperature has been reached (Status Ready*), welding can begin. • Press on/off switch for the drive (2). •... -
Page 9: Welding Parameters
Welding parameters Menu Free Select program setting Selection Enter Program: the display of the materials may vary according to the machine and software versions. Programs 1-3 are provided with preset parameters which can be adjusted during the welding process. The adjustments are not saved! The free settings 1-4 are preset in the factory and can be programmed freely. -
Page 10: Additional Settings
Additional settings Menu guide Contrast setting Menu Functions In unfavourable lighting conditions and with Menu Selection ambient temperature fluctuations, the contrast can be set by using the Back key (25). Selection Select and Back Heating ON /OFF Select During a longer period on standby, the heating for Back to PLAST and AIR can be switched off using the Standby/ workspace... - Page 11 Standby If the drive of the extruder is switched off and no key input is made for a certain time, the cool down mode starts automatically after the standby time has elapsed. The cooling process is initiated. If any key is pressed before the countdown has elapsed in standby mode (180 seconds), the display returns to the initial state.
-
Page 12: Error Messages
Error messages If an error occurs, this will be shown in the status display (30) (e.g. Err04 Motor overheated). Display ErrXX If an error occurs, the heating for AIR and PLAST and the drive motor will be switched off immediately. If this does not happen, the device should be disconnected from the power supply immediately!. -
Page 13: Replacing Accessories
Replacing accessories Danger – can cause burns! Only work with heat-resistant gloves. Changing the welding shoe The welding shoe must be changed while the device is still warm from operation. Disassembly – Turn off the device while warm and disconnect from the power supply. –... - Page 14 Changing the pre-heating nozzle Disassembly: For the pre-heating nozzle (9), unscrew clamp screw (43) and pull pre-heating nozzle (9) off the hot air duct (44). Assembly: Push pre-heating nozzle (9) onto the hot air duct (44). Make sure that it is aligned parallel to the nozzle shoe. Tighten clamp screw (43).
-
Page 15: Maintenance
Accessories Only Leister accessories may be used. Stand Transportable welding rod de-reeler • The de-reeler is designed for rolls of welding rod with Ø 300 mm. • To ensure that the filler rod is unwound as smoo- thly as possible, it should be fed through the specially designed eyes (41). - Page 16 © Copyright by Leister Your authorised Service Centre is: Allied Power Tools 12/ 76 Rushdale St, Knoxfield VIC 3180 Australia T: + 61 3 9764 2911 E: sales@alliedpowertools.com.au W: www.alliedpowertools.com.au...
Need help?
Do you have a question about the LEISTER WELDPLAST S2 and is the answer not in the manual?
Questions and answers