
Related Manuals for nVent RAYCHEM FROSTEX

Summary of Contents for nVent RAYCHEM FROSTEX
- Page 1 FROSTEX nVent RAYCHEM Frostex Pipe Freeze Protection System Using the 9800 FlexFit Plug Kit Installation Instructions and User Guide Keep pipes from freezing APPROVALS 60J9 Residential and Mobile Home Pipe Heating Cable...
-
Page 2: Table Of Contents
1 Installation instruction Troubleshooting ........... 9 Make sure you have sufficient braided Limited Warranty ........10 Frostex heating cable for the job. Do not use earlier versions of Frostex heating cable that have no braid. Also make sure you have the following items:... -
Page 3: Five Important Safety Warnings
• Remove any old heating tapes and insulation before you install the Frostex heating cable. 4. Keep the entire Frostex system dry. • Do not use more than 50 feet (15 meters) of Frostex This includes the insulation. heating cable with each 9800 FlexFit plug. Longer lengths will blow the nonreplaceable fuse in the plug. -
Page 4: Cable Length Selection Tables
The water connection is in a crock. 1 1/2 in 3/4 in From Table 2, Plastic Pipe, for –20°F 1 in (–30°C), either two or three runs of Frostex 1 1/4 in heating cable is required depending on pipe 1 1/2 in insulation thickness. - Page 5 Step 2. Install the end seal Note: The end seal can only be used once, so do not install it until step 2D. Heating Cable Construction Clear plastic Black core wrap (bus wires inside) Braid Blue jacket Install the end seal 2A.
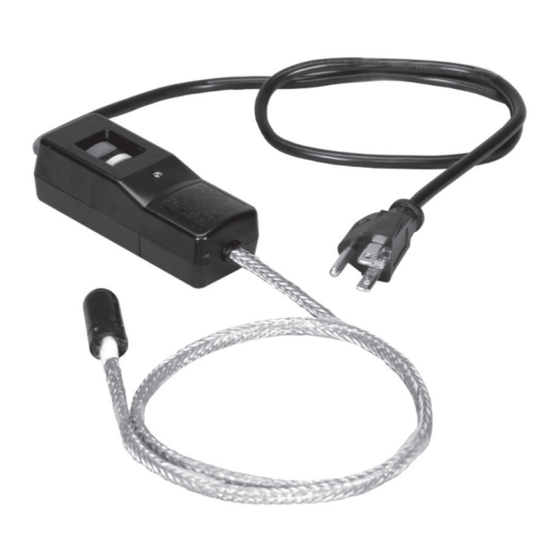
- Page 6 Step 3. Install the 9800 FlexFit plug Reset button Cover Test button Ground-fault unit Cable guide Indicator Back wall light Indicator post Ground contact 3A. Prepare the cable 3C. Complete the connection Cleanly cut off the end of the cable. Push Screw down the cable guide, alternating back the braid 3/4 in (2 cm) and then twist between the two screws, until the cable guide...
- Page 7 Frostex 9610 Important: In a crock or standpipe, run application tape; the Frostex heating cable down and back up 1-foot spacing the pipe (as shown in Figure 6), so that the end seal is well above the ground level and will not be sitting in water.
- Page 8 After plugging in the system, wait about an Install the orange warning labels on the hour. Turn on a water tap on the Frostex- insulation with one near the electrical outlet, as protected pipe and test the temperature of the shown in Figure 7.
-
Page 9: Periodic Inspections
7B. Test the heating cable’s resistance. • Reinstall the screws completely into the heating cable guide before re-attaching. It is possible to test the resistance of Frostex • Repeat installation steps 3A–3D, ensuring no heating cable using a multimeter. Follow these... -
Page 10: Limited Warranty
LIMITED WARRANTY nVent warrants all Frostex self-regulating that such alleged nonconformities actually exist heating cables and components against faulty and occurred in the cause of proper and normal workmanship and use of defective materials use and were not caused by accident, misuse, for two (2) years from the date of purchase.
Need help?
Do you have a question about the FROSTEX and is the answer not in the manual?
Questions and answers