Table of Contents
Advertisement
Quick Links
Advertisement
Table of Contents

Related Manuals for A&D AD-8923-CC


Summary of Contents for A&D AD-8923-CC
- Page 1 AD-8923-CC Remote Controller (CC-Link) INSTRUCTION MANUAL 1WMPD4002124C...
- Page 2 © 2010 A&D Company, Limited. All rights reserved. No part of this publication may be reproduced, transmitted, transcribed, or translated into any language in any form by any means without the written permission of A&D Company, Limited. The contents of this manual and the specifications of the instrument covered by this manual are subject to change for improvement without notice.
-
Page 3: Table Of Contents
2.1. Display ....................7 2.2. Keys ....................7 2.3. Connectors..................7 3. CONNECTION ..................8 3.1. Setting the weighing instrument and the AD-8923-CC ......8 3.2. Connecting the cables ................. 8 3.3. Turning the power on ................. 11 3.4. Operation ..................13 3.5. -
Page 4: Introduction
This manual describes how the AD-8923-CC remote controller works and how to get the most out of it in terms of performance. Read this manual thoroughly before using the AD-8923-CC and keep it at hand for future reference. 1.1. Features... -
Page 5: Applicable Instruments
Applicable Instruments 1.2. The AD-8923-CC functions in two ways as follows, depending on the weighing instrument used: ● A remote controller that displays the weighing data and remotely controls the weighing instrument. ● A remote display that displays the weighing data. -
Page 6: Description Of Each Part
See the note below. RS-232C connector (D-Sub 9-pin) Rear View Connector operation lever 1 pc Note When the AD-8923-CC is to be AC adapter 1 pc built into a weighing system, be sure to ground the FG terminal. Please confirm that... -
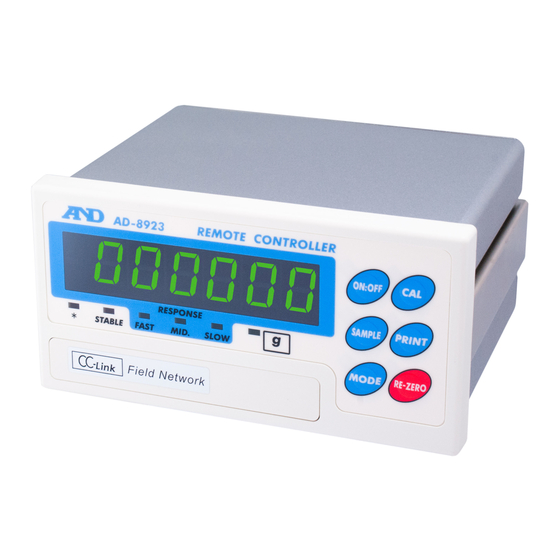
Page 7: Display
When the weight value is stable (the header of the weighing data received is “ST”), the STABLE indicator turns on. If the AD-8923-CC does not receive the weighing data for two seconds or more, - - - - - is displayed (Bar display). -
Page 8: Connection
CONNECTION 3.1. Setting the weighing instrument and the AD-8923-CC Set the following items so that the weighing instrument and the AD-8923-CC have the same value for each item. Item Weighing instrument AD-8923-CC Baud rate 600, 1200, 2400*, 4800, 9600, 19200 bps... - Page 9 Connection example for the CC-Link network (weighing instruments No.1 through No.4) Connect a terminating resistor only to the stations at each end of the network. CC-Link master station AD-8923-CC AD-8923-CC AD-8923-CC AD-8923-CC (Ground) AD-4212C AD-4212C AD-4212C AD-4212C Weighing instrument No.1 No.2...
- Page 10 When connecting the AD-8923-CC to the CC-Link network using the connector provided (721-105 / 037-000 equivalent), use the ferrule listed below (sold separately). (Example: when using the FANC-110SBH cable) Insert the cable into the ferrule and crimp it using the Variocrimp4 206-204 crimping jig, and insert it into the connector.
-
Page 11: Turning The Power On
Do not share the power line with other devices. Strong noises introduced from other devices may cause damage to the AD-8923-CC. Inrush current from other devices may cause the AD-8923-CC not to start up properly. Circuit configuration of the AD-8923-CC may affect other devices to prevent them from functioning properly. - Page 12 Be sure to add a noise filter on the front end of the switching power supply and ground the FG terminal. This will increase the resistance against noises. Be sure to ground the FG terminal of the AD-8923-CC and weighing instruments. This will increase the resistance against noises.
-
Page 13: Operation
3.4. Operation Displays the data transmitted by the weighing instrument connected. The keys on the AD-8923-CC can control the weighing instrument. The key operation depends on the weighing instrument connected. For details, refer to “Table 2” of “1-2 Applicable Instruments”. -
Page 14: Calibrating The Ad-4212C
3.5. Calibrating the AD-4212C The following is the calibration procedure when the AD-4212C is connected. (A calibration weight is used.) Caution Do not allow vibration, drafts or temperature change to affect the AD-4212C during calibration. Caution on using an external calibration weight ... - Page 15 Calibration procedure Calibrates the AD-4212C using the calibration weight. Operation 1. Warm up the AD-4212C for 30 minutes or more with nothing on the pan. RESPONSE STABLE FAST MID. SLOW 2. Press the CAL key. Cal 0 is displayed. Press ...
-
Page 16: Function Setting
Then, press the PRINT key to store the new parameter. Example This example sets “Baud rate” to “9600 bps”. Note The AD-8923-CC may not function properly, depending on the settings and operating environment. Check the settings and change them as necessary. -
Page 17: Display And Keys
4.1. Display and keys The STABLE indicator turns on to indicate that the parameter displayed is in effect. Selects a class or item. Changes the parameter. When a class is displayed, moves to an item in the class. When an item is displayed, stores the new parameter and displays the next class. -
Page 18: Initializing The Ad-8923-Cc
4.3. Initializing the AD-8923-CC Initialization restores the function settings of the AD-8923-CC to factory settings. Operation 1 Turn the power on. - - - - - or weighing mode display appears. While holding ON:OFF down 2 While holding down the ON:OFF key, press... -
Page 19: Rs-232C Connector
(CTS) Used internally (#4-40UNC) (Va) Used internally (The AD-8923-CC is a DTE device. To the weighing instrument Connect to a DCE device such as the weighing instruments using a straight through cable.) Note When the user prepares a cable, do not connect to the pins that are... -
Page 20: Cc-Link Connector
CC-Link CONNECTOR The AD-8923-CC CC-Link is a remote device station of CC-Link ver.1.10. When a CC-Link is used, the AD-8923-CC can be controlled by the PLC remote I/O or remote registers. So, the program can be simple. And connection to a PLC is simple, thus, a weighing system can be built easily. - Page 21 Memory map Remote register (Number of occupied stations: 1) Blank “Name” column: internally reserved (not used). AD-8923-CC --> Master station Master station --> AD-8923-CC Remote Buffer Remote Buffer Name Name memory memory register register RWr0000 RWw0000 Weight value* RWr0001 RWw0001...
- Page 22 Remote I/O (Number of occupied stations: 1) Blank “Name” column: internally reserved (not used). AD-8923-CC --> Master station Master station --> AD-8923-CC Remote Remote Buffer Buffer Name Name memory memory input output RX0000 RY0000 Re-zero State flag of RX0001 RY0001...
- Page 23 Writing is prohibited in the internally reserved areas. Writing in the remote output (RY) and the remote register (RWw) of the internally reserved areas may cause the AD-8923-CC to malfunction. Values of the remote input (RX) and the remote register (RWr) of the internally reserved areas are not fixed.
- Page 24 Decimal point position example When displaying 1.000, express 3 as a decimal point at the third digit, thus 0x011. (RX000A: 0, RX0009: 1, RX0008: 1) State flag of calibration * RX0002 RX0001 RX0000 State Waiting for zero point input Waiting for calibration mass value input Calibration completed Calibration error State flag of calibration progress *...
-
Page 25: Timing Chart
Below examples are when the station number is set to 1. When connecting to a power supply When the AD-8923-CC is connected to a power supply and the CC-Link is ready, the request flag of initialization (RX0018) becomes active. The master station confirms that RX0018 is active, performs initialization and turns the reply flag of initialization (RY0018) ON. - Page 26 CPU operation The CPU normal operation (RX0006) is a signal to check that the AD-8923-CC is connected to a power supply and it functions normally. During normal operation, the signal is reversed at an interval of 0.5 to 1 second.
-
Page 27: Fixing The Decimal Point Position
6.3. Fixing the decimal point position Using the function setting of dpp, the decimal point position of the value displayed on the AD-8923-CC and the decimal point position of the weight value output via CC-Link can be fixed. In this way, even if the minimum display is switched using the SAMPLE key, the digit position for CC-Link output does not change. -
Page 28: Calibration With The Ad-4212C Using The Register Of The Cc-Link
The following describes the calibration procedure using the register of the CC-Link when connecting the AD-8923-CC to the AD-4212C. (Use calibration mass) * Only AD-8923-CC software versions P2.05 or later are compatible with this function. * When calibrating using the key operation, refer to “3.5.Calibrating the AD-4212C”... -
Page 29: Troubleshooting
TROUBLESHOOTING Symptom Description Communication settings of the AD-8923-CC do not match with those of the weighing instrument. appears Check the settings such as baud rate and parity eerror 10 and correct them as necessary. For details, refer to “3.1. Setting the weighing instrument and the AD-8923-CC”. -
Page 30: Specifications
SPECIFICATIONS Power supply : External 24-VDC power supply (24 VDC±10% / 700mA) or C adapter (Output: 12 VDC / 1A) Please confirm that the AC adapter type is correct for your local voltage and receptacle type. Transmission system : CC-Link (CC-Link ver.1.10 remote device station), RS-232C Communications connector : D-Sub 9-pin (male) (RS-232C connector to the weighing... -
Page 31: External Dimensions
EXTERNAL DIMENSIONS AD-8923 REMOTE CONTROLLER ON:OFF Panel cutout dimensions SAMPLE PRINT RESPONSE STABLE FAST MID. SLOW MODE RE-ZERO Panel cutout dimensions when panel mounted Unit: mm... - Page 32 MEMO...
- Page 33 MEMO...
- Page 34 MEMO...
- Page 36 A&D Company, Limited 3-23-14 Higashi-Ikebukuro, Toshima-ku, Tokyo 170-0013, JAPAN Telephone: [81] (3) 5391-6132 Fax: [81] (3) 5391-1566 A&D ENGINEERING, INC. 4622 Runway Boulevard, Ann Arbor, Michigan 48108, U.S.A. Telephone: [1] (800) 726-3364 A&D INSTRUMENTS LIMITED Unit 24/26 Blacklands Way, Abingdon Business Park, Abingdon, Oxfordshire OX14 1DY United Kingdom Telephone: [44] (1235) 550420 Fax: [44] (1235) 550485 A&D AUSTRALASIA PTY LTD...
Need help?
Do you have a question about the AD-8923-CC and is the answer not in the manual?
Questions and answers