
Related Manuals for MTF KD59E

Summary of Contents for MTF KD59E
- Page 1 Instructions for control units WARNING: Read these instructions carefully before using this product! Manufacturer of MTF e-bikes Mountfield a.s., Mirošovická 697, 251 64 Mnichovice, Czech Republic 2020/08 – No. 804B...
-
Page 2: Table Of Contents
Instructions for operating control units Models: KD59E; KD58C; KD218; DP C18; DP C10 Content KD59E - OPERATING INSTRUCTIONS FOR USE OF THE CONTROL UNIT .......... 3 ............................3 Specifications ........................3 Appearance and Size ..................... 3 Control ................................4 KD58C - OPERATING INSTRUCTIONS FOR USE OF THE CONTROL UNIT .......... 5 ............................ -
Page 3: Kd59E - Operating Instructions For Use Of The Control Unit
KD59E - OPERATING INSTRUCTIONS FOR USE OF THE CONTROL UNIT Specifications • Power Supply: 36 V • Rated working current: 10 mA • The maximum working current: 30 mA • Off leakage current: <1 μA • The supply controller working current: 50 mA •... -
Page 4: Control
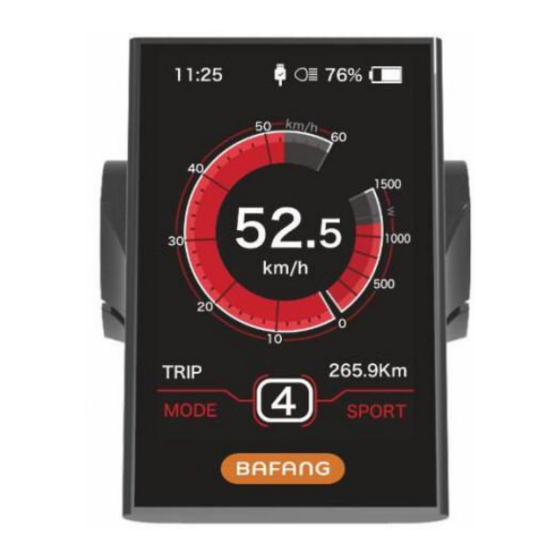
Control ◆ Function Summary KD59E can provide a lot of functions to fit the users’ need. The indicating contents are as following: • Smart battery indicator • Assistance-level indicator • The push-assistance function • The Lighting On/Off (optional) ◆ Button Definition... -
Page 5: Kd58C - Operating Instructions For Use Of The Control Unit
KD58C - OPERATING INSTRUCTIONS FOR USE OF THE CONTROL UNIT Specifications • Power Supply: 36 V • : 10 mA Rated current • : 30 mA The maximum working current • : <1 μA Off leakage current • : 50 mA The supply controller working current •... - Page 6 There are three buttons ( ) on the KD58C display that represented by the following functions respectively: MODE, „+“ a „-“. ◆ Display description ◆ Switching the eBike On/Off To switch on the eBike system, hold the MODE button for 2 s. In the same way to hold the MODE button for 2 s again, the eBike system will be switched off.
-
Page 7: Settings
◆ Assistance Level Selection Assistance levels indicate the output power of the motor. The default value is level “1”. The default power ranges from level “0” to level “5”. The output power is zero on Level “0”. Level “1” is the minimum power. Level “5”... - Page 8 ◆ Unit Mi/KM Conversion Set Unit represents unit settings. To convert unit, press , to increase or decrease until the desired setting is displayed. To store a changed setting, press the . button to access trip distance clearance settings and the display will show OK then returns to general selection settings interface.
- Page 9 ◆ Power-on Password Settings P2:0000 represents power-on password settings. The default value is 1212. To access the power-on password settings, press to modify the value and then press to confirm digit one by one until the correct 4- digit password is completed, and then press to access power-on password enable settings interface, otherwise stay on the password input state.
-
Page 10: Kd218 - Operating Instructions For Use Of The Control Unit
KD218 - OPERATING INSTRUCTIONS FOR USE OF THE CONTROL UNIT Specifications • Power Supply: 24 V / 36 V / 48 V DC • Rated working current: 10 mA • The maximum working current: 30 mA • Off-state leakage current: <1 μA •... -
Page 11: Control
Control Function Summary KD218 has many functions to meet the Users’ needs. The indicating contents are as follows: ●Battery and battery percentage ●Motor Power ●assist-level ●Speed indication (incl. current speed, Max. speed and Ave. speed) ●ODO and trip distance ●The push-assist function ●Trip time ●Backlight On/Off ●Error code indication... - Page 12 Switching Push-assist Mode On/Off ◆ To activate the push-assist function, keep holding button. After 2 seconds, E-bike is activated to go at a uniform speed of 6 Km/h (3.7 mph) while the screen displays The push-assist function is switched off as soon as you release button.
-
Page 13: Settings
◆ Error Code Indication The components of the E-bike system are continuously and automatically monitored. When an error is detected, the respective error code is indicated in text indication area. Here is the detail message of the error code. If an error code is displayed, have the problem corrected. Otherwise, you will not be able to ride the e-bike normally. - Page 14 ◆ Unit km/mile Conversion Toggle Unit represents unit settings. To convert unit, press the button to choose the desired setting item, and then press the button to confirm. To store a changed setting, press the button and move to other setting items. The default value is “Metric (km)”.
- Page 15 ◆ Battery Power Bar Settings Set Voltage represents voltage value settings. Each bar represents a voltage value. 5 bars voltage values must be entered one by one. For example, VOL 1 is first bar voltage value. The default value is 31.5V. To set battery power bar, press the or the button to increase or decrease the number.
- Page 16 PAS sensitivity settings interface ◆ Speed Sensor Speed Sensor represents speed sensor settings. The default value is 1 To change speed sensor settings, press the or the button to select the quantity of magnet heads (the range is from 1 to 15). To store a changed setting, hold the button and then return to previous menu.
- Page 17 ◆ Power-on password enable/disable In “Start PassWord” interface, choose ‘ON’ and short press(less than 0.5S) to confirm. Meanwhile, display interface prompts for a password. Press button to shift numbers from 0 to 9 and press ON/OFF to confirm and input the next digit. After the input is done, the interface will prompt for entering the password again.
- Page 18 ◆ Password Disable In “Start PassWord” interface, choose ‘OFF’ and short press (less than 0.5s) to confirm. Meanwhile, display interface prompts for a password. The display will be powered off automatically when the same password is entered incorrectly after 10 inputs. When a correct password is input, the display will give a prompt of ‘password function disabled’.
-
Page 19: Dp C18 - Operating Instructions For Use Of The Control Unit
DP C18 - OPERATING INSTRUCTIONS FOR USE OF THE CONTROL UNIT Specifications • Power Supply: 36 V / 43 V / 48 V DC • Operating temperature: -20 ~ 45 °C (-4 ~ 113 °F) • Storage temperature: - 20 ~ 50 °C (-4 ~ 122 °F) •... - Page 20 ◆ Display 1. Time 2. USB charging indicator displays the icon , if an external USB device is connected to the display. 3. The display shows this symbol, if the light is on. 4. Speed Graphics 5. Trip: Daily kilometers (TRIP) - Total kilometers (ODO) - Top speed (MAX) - Average speed (AVG) - Range (RANGE) - Energy Consump- tion (CALORIES(only with torque sensor...
- Page 21 Selection of Support Levels ◆ When the display is turned on, press the (<0.5s) button to switch to the support level, the lowest level is 0, the highest level is 5. When the system is switched on, the support level starts in level 1.
-
Page 22: Settings
Walk Assistance ◆ Activation: Press the button until this symbol appears. Next hold down the button whilst symbol is displayed. Now the Walk assistance will activate. The symbol will flashes and the pedelec moves approx. 6 km/h (3.7 mph). After releasing the button, the motor stops automatically and switches back to level 0. - Page 23 Enter the settings interface All settings are made with the e-bike parked. After the display is turned on, quickly press the button twice, to access the “SETTINGS” menu. By pressing the (<0.5s) button, you can select: Display Settings, Information or EXIT. Then press the (<0.5s) button to confirm your selected option.
- Page 24 ◆ “MAX PAS” Support level Press the (<0.5s) button to highlight “Max Pass” in the Display settings menu, and then press (<0.5s) to select. Then with the button choose between “3/5/9” (the amount of support levels). Once you have chosen your desired selection, press the (<0.5s) button to save and exit to the "Display setting"...
- Page 25 “AL Sensitivity” Automatic headlight sensitivity ◆ Press the (<0.5s) button to high- light “AL-Sensetivity” in the Display settings menu, and then press (<0.5s) to select. Then with the button choose between "0" / "1" / "2"/ "3" / "4"/ "5"/ "OFF”. Once you have chosen your desired selection , press the (<0.5s) button to save and exit to the "Display setting".
- Page 26 “Set Clock” ◆ Press the (<0.5s) Button to access the “Set Clock” menu. Then briefly press the (<0.5s) button to confirm selection. Now press the (<0.5s) button and input the correct number (time) and press the (<0.5s) button to move to the next number. After entering the correct time, press the (<0.5s) button to confirm and save.
- Page 27 Display Information ◆ Press the (<0.5s) button and select Display Info, then press the (<0.5s) but- ton to read the software and hardware data in the display. To Exit press the (<0.5s) button, once “EXIT” is highlighted to return to the information settings. Torque Information ◆...
-
Page 28: Dp C10 - Operating Instructions For Use Of The Control Unit
DP C10 - OPERATING INSTRUCTIONS FOR USE OF THE CONTROL UNIT Specifications • Power Supply: 36 V / 43 V / 48 V DC • Operating temperature: -20 ~ 45 °C (-4 ~ 113 °F) • Storage temperature: -20 ~ 50 °C (-4 ~ 122 °F) •... - Page 29 ◆ Display 1. Display of battery capacity in real time. 2. Menu. 3. Service: please see the service section. 4. Digital speed display. 5. Speed mode , top speed (MAXS) - Average speed (AVG). 6. Kilometer stand, Daily kilometers (TRIP) - Total kilometers (ODO).
- Page 30 Normal operation Switching the System ON/OFF ◆ Press and hold (>2s) on the display to turn on the system. Press and hold (>2s) again to turn off the system. If the "automatic shutdown time" is set to 5 minutes (it can be set with the "Auto Off" function, see "Auto Off"), the display will automatically be turned off within the desired time when it is not in operation.
-
Page 31: Settings
If the front or rear light is not connected, the button can only be used to switch the display backlight on / off. Walk Assistance ◆ Activation: Briefly press (<0.5s) the button until to level null, and then press (<0.5s) the button, the symbol is displayed. - Page 32 The individual MENU items are sorted below in the order in which they appear on the screen. Reset mileage „tC“ Now using the button, choose between “y”(YES) or “n”(NO). If choose “y”, the Daily kilometers (TRIP), Maximum speed (MAX) and Average speed (AVG) will be reset.
- Page 33 Set Auto Off „OFF“ Now using the to increase or to reduce (brightness for 1-9minute). Service Tip „nnA“ Now using the to choose between “0” or “1”. Chose 0 means turn off the notification. NOTE: If the “Service" function switch on, every 5000 km (3100 mi) (the mileage of more than 5000 km) the indicator "...
- Page 34 Battery Information „b01“ Content Explanation Current temperature (°C) Voltage (V) Discharge (A) Remaining Capacity (Ah) Total Capacity (Ah) Relative SOC (%) Absolute SOC (%) Charging cycles (number) When the system is on, quickly press Maximum not charging time (Hr) (<0.3S) the button twice to access Recently not charging time (Hr) the “MENU”...
- Page 35 We wish you many happy kilometers (miles) riding your new e-bike! Your MOUNTFIELD team Mountfield a.s. Mirošovická 697, CZ-25164 Mnichovice Tel.: +420 327 777 111, info@mountfield-cz. www.mountfield.cz...
Need help?
Do you have a question about the KD59E and is the answer not in the manual?
Questions and answers