Bosch DIVAR IP DIP-73GC-16HD Installation Manual
Ip all‑in‑one 7000 3u
Hide thumbs
Also See for DIVAR IP DIP-73GC-16HD:
- Quick installation manual (32 pages) ,
- User manual (20 pages) ,
- User manual (24 pages)

Subscribe to Our Youtube Channel
Related Manuals for Bosch DIVAR IP DIP-73GC-16HD


Summary of Contents for Bosch DIVAR IP DIP-73GC-16HD
- Page 1 DIVAR IP all‑in‑one 7000 3U DIP‑73G0‑00N | DIP‑73G8‑16HD | DIP‑73GC‑16HD Installation manual...
-
Page 3: Table Of Contents
Replacement components 10.2 Removing power from the system 10.3 Removing the chassis cover 10.4 Identifying a faulty SSD drive 10.5 Installing a SSD hard drive into a rear drive bay Bosch Security Systems B.V. 2021.10 | V02 | DOC Installation manual... - Page 4 Replacing a system fan 10.11 Replacing the power supply 10.12 Replacing the power distributor 10.13 Service and repair Additional information 11.1 Additional documentation and client software 11.2 Support services and Bosch Academy 2021.10 | V02 | DOC Bosch Security Systems B.V. Installation manual...
-
Page 5: Safety
The Low Voltage power supply unit must comply with EN/UL 60950. The power supply must be a SELV-LPS unit or a SELV - Class 2 unit (Safety Extra Low Voltage - Limited Power Source). Bosch Security Systems B.V. 2021.10 | V02 | DOC Installation manual... - Page 6 Clean only with a dry cloth. Do not use liquid cleaners or aerosol cleaners. – Do not install device near any heat sources such as radiators, heaters, stoves, or other equipment (including amplifiers) that produce heat. 2021.10 | V02 | DOC Bosch Security Systems B.V. Installation manual...
- Page 7 16 A. This must be in accordance with NEC800 (CEC Section 60). – Disconnect the power before moving the unit. Move the unit with care. Excessive force or shock may damage the unit and the hard disk drives. Bosch Security Systems B.V. 2021.10 | V02 | DOC Installation manual...
-
Page 8: Electrical Safety Precautions
SELV circuits. – If safe operation of the unit cannot be ensured, remove it from service and secure it to prevent unauthorized operation. In such cases, have the unit checked by Bosch Security Systems. –... -
Page 9: Esd Precautions
Notice! Video loss is inherent to digital video recording; therefore, Bosch Security Systems cannot be held liable for any damage that results from missing video information. To minimize the risk of losing information, we recommend multiple, redundant recording systems, and a procedure to back up all analog and digital information. -
Page 10: Fcc And Ices Compliance
| Safety DIVAR IP all-in-one 7000 3U Disposal Your Bosch product has been developed and manufactured using high-quality materials and components that can be reused. This symbol means that electronic and electrical devices that have reached the end of their working life must be disposed of separately from household waste. -
Page 11: Use Latest Software
OS security updates. – Limiting local network access to trusted devices is strongly suggested. Details are described in the Technical note Network Authentication 802.1X and in the Bosch IP Video and Data Security Guidebook, available in the online product catalog. –... -
Page 12: About This Manual
This manual is written for professional system integrators and PC technicians. It provides information for the installation and use of the chassis. Installation and maintenance should be performed by experienced and qualified technicians only. 2021.10 | V02 | DOC Bosch Security Systems B.V. Installation manual... -
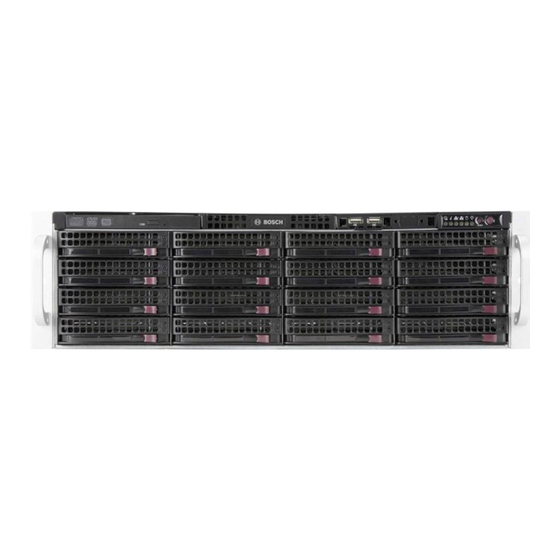
Page 13: System Overview
The chassis includes a control panel on the front that features power buttons and status monitoring LEDs. On the rear there are various I/O ports as well as power supply modules. Bosch Security Systems B.V. 2021.10 | V02 | DOC... - Page 14 (RAID1 mirror) IPMI LAN 3 USB ports 3.1 Gen 2 (Type A) USB port 3.1 Gen 2 (Type C) 2 LAN ports (teamed) Note: Do not change the teaming mode! 2021.10 | V02 | DOC Bosch Security Systems B.V. Installation manual...
-
Page 15: Control Panel Elements
Blinking blue (300 msec) Remote UID has been activated. Use this function to locate the unit from a remote location. This LED indicates network activity on GLAN2 when flashing. Bosch Security Systems B.V. 2021.10 | V02 | DOC Installation manual... -
Page 16: Hard Drive Carrier Leds
Description Green Solid On Power supply is on. Amber Solid On The power supply is plugged in and turned off The system is off but in an abnormal state. 2021.10 | V02 | DOC Bosch Security Systems B.V. Installation manual... - Page 17 The system power supply temperature has reached 63 °C. The system will automatically turn off when the power supply temperature reaches 70 °C and restart when the power supply temperature goes below 60 °C. Bosch Security Systems B.V. 2021.10 | V02 | DOC Installation manual...
-
Page 18: Preparing For Installation
– Allow the hard drives and power supply modules to cool before touching them. 2021.10 | V02 | DOC Bosch Security Systems B.V. Installation manual... -
Page 19: Installation Considerations
A reliable ground must be maintained at all times. To ensure this, the rack itself should be grounded. Particular attention should be given to power supply connections other than the direct connections to the branch circuit (i.e. the use of power strips, etc.). Bosch Security Systems B.V. 2021.10 | V02 | DOC Installation manual... -
Page 20: Rack Installation
To separate the inner and outer rails: Locate the rail assembly in the chassis packaging. Extend the rail assembly by pulling it outward. 2021.10 | V02 | DOC Bosch Security Systems B.V. Installation manual... -
Page 21: Installing The Inner Rails On The Chassis
Make sure the extension faces "outward" just like the pre- attached inner rail. Slide the extension toward the front of the chassis. Secure the chassis with 2 screws as illustrated. Repeat steps 1-3 for the other inner rail extension. Bosch Security Systems B.V. 2021.10 | V02 | DOC Installation manual... -
Page 22: Installing The Outer Rails To The Rack
Mounting the chassis into the rack requires at least two people to support the chassis during installation. Please follow safety recommendations printed on the rails. Notice! Always install chassis into racks from the bottom up. 2021.10 | V02 | DOC Bosch Security Systems B.V. Installation manual... - Page 23 Make sure that the brackets are positioned with just enough space to fit the width of the Telco rack. Slide the chassis into the rack and tighten the brackets to the rack. Bosch Security Systems B.V. 2021.10 | V02 | DOC Installation manual...
-
Page 24: Installing A Sata Hard Drive
Release button Hard drive carrier handle Notice! Except for short periods of time (swapping hard drives), do not operate the unit with the hard drives removed from the bays. 2021.10 | V02 | DOC Bosch Security Systems B.V. Installation manual... -
Page 25: Installing A Hard Drive Into A Hard Drive Carrier
Align the mounting holes in both, the hard drive carrier and the hard drive. Secure the hard drive to the hard drive carrier with the six screws. Hard drive carrier SATA hard drive Bosch Security Systems B.V. 2021.10 | V02 | DOC Installation manual... -
Page 26: Installing A Hard Drive Carrier Into A Front Drive Bay
DIVAR IP all-in-one 7000 3U Notice! Bosch recommends using the respective Bosch hard disk drives. The hard disk drives as one of the critical component are carefully selected by Bosch based on available failure rates. Hard disk drives not delivered from Bosch are not supported. -
Page 27: Turning On The System
Plug the power cord from the power supply unit into a high-quality power strip that offers protection from electrical noise and power surges. Bosch recommends to use an uninterruptible power supply (UPS). Push the power button on the control panel to turn on the system. -
Page 28: System Setup
This mode allows for advanced video management features such as event and alarm handling. – Pure video recording system, utilizing the VRM core components and services. 2021.10 | V02 | DOC Bosch Security Systems B.V. Installation manual... -
Page 29: Preparing Hard Drives For Video Recording
10. In the RAID level: list, select RAID5. 11. In the Select unconfigured drives: list, select the respective hard drives and click Add>. The selected drives are displayed in the Drive groups: box. Bosch Security Systems B.V. 2021.10 | V02 | DOC Installation manual... -
Page 30: Recovering The Unit
Windows performs the initial setup of the operating system. After Windows has completed the setup, the unit restarts. After the restart of the unit, the factory settings are installed. 2021.10 | V02 | DOC Bosch Security Systems B.V. Installation manual... -
Page 31: Troubleshooting
Make sure that the chassis covers are installed. – Make sure that the heat sinks are installed properly. – Make sure that the ambient room temperature is not too high. Bosch Security Systems B.V. 2021.10 | V02 | DOC Installation manual... -
Page 32: Maintenance
To remove the power: Shut down the system. Remove the power cords from the power supplies. Disconnect the cord from the power strip or wall outlet. 2021.10 | V02 | DOC Bosch Security Systems B.V. Installation manual... -
Page 33: Removing The Chassis Cover
To identify and replace SSD drives: Turn on the unit and log on as user BVRAdmin. The default screen is displayed. Double-click the Intel Rapid Storage icon on the screen. Bosch Security Systems B.V. 2021.10 | V02 | DOC Installation manual... -
Page 34: Installing A Ssd Hard Drive Into A Rear Drive Bay
Note: To secure the hard drive, you cannot reuse the screws that are used to secure the dummy drive to the tray. 2021.10 | V02 | DOC Bosch Security Systems B.V. Installation manual... -
Page 35: Installing A Hard Drive Carrier Into A Rear Hard Drive Bay
Maintenance | en Notice! Bosch recommends using the respective Bosch hard disk drives. The hard disk drives as one of the critical component are carefully selected by Bosch based on available failure rates. Hard disk drives not delivered from Bosch are not supported. -
Page 36: Replacing The Front Port Panel
Insert the new front port panel unit in the slot until the tab locks into place. Connect the data and power cables to the backplane and motherboard. DVD-ROM Front port panel 2021.10 | V02 | DOC Bosch Security Systems B.V. Installation manual... -
Page 37: Installing The Motherboard
The fans might still be turning when you remove the fan assembly from the chassis. Keep fingers, screwdrivers, and other objects away from the openings in the fan assembly's housing. Bosch Security Systems B.V. 2021.10 | V02 | DOC Installation manual... -
Page 38: Replacing The Power Supply
This unit might have more than one power supply connection. To de-energize the unit, remove all connections. LED status: – Amber lighted LED: The power supply is off. – Green lighted LED: The power supply is operating. 2021.10 | V02 | DOC Bosch Security Systems B.V. Installation manual... -
Page 39: Replacing The Power Distributor
The power supply can be replaced without turning off the system if a redundant power supply is available. Replacement units can be ordered directly from Bosch RMA desk. To replace the power supply: Unplug the AC power cord of the failed power supply. -
Page 40: Service And Repair
The storage equipment is shipped with an original manufacturer Service and Support agreement. The Bosch Technical Support is the Single Point of Contact in case of failure but the Service and Support obligations are fulfilled by the manufacturer or a partner. -
Page 41: Additional Information
– Repair & Exchange – Product Security Bosch Building Technologies Academy Visit the Bosch Building Technologies Academy website and have access to training courses, video tutorials and documents: www.boschsecurity.com/xc/en/support/training/ Bosch Security Systems B.V. 2021.10 | V02 | DOC Installation manual... - Page 42 | Additional information DIVAR IP all-in-one 7000 3U 2021.10 | V02 | DOC Bosch Security Systems B.V. Installation manual...
- Page 44 Bosch Security Systems B.V. Torenallee 49 5617 BA Eindhoven Netherlands www.boschsecurity.com © Bosch Security Systems B.V., 2021 202110281649...
Need help?
Do you have a question about the DIVAR IP DIP-73GC-16HD and is the answer not in the manual?
Questions and answers