Table of Contents
Advertisement
Available languages
Available languages
Quick Links
DO9207I
Handleiding
Mode d'emploi
Gebrauchsanleitung
Instruction booklet
Manual de instrucciones
Istruzioni per l'uso
Návod k použití
Návod na použitie
Roomijsmachine
Sorbetière
Eismaschine
Ice cream maker
Máquina para hacer helados
Macchina per gelato
Zmrzlinovač s kompresorem
Zmrzlinovač s kompresorom
PRODUCT OF
Advertisement
Table of Contents

Related Manuals for Linea 2000 Domo DO9207I


Summary of Contents for Linea 2000 Domo DO9207I
- Page 1 DO9207I Handleiding Roomijsmachine Mode d’emploi Sorbetière Gebrauchsanleitung Eismaschine Instruction booklet Ice cream maker Manual de instrucciones Máquina para hacer helados Istruzioni per l’uso Macchina per gelato Návod k použití Zmrzlinovač s kompresorem Návod na použitie Zmrzlinovač s kompresorom PRODUCT OF...
- Page 2 Lees aandachtig alle instructies - bewaar deze handleiding voor latere raadpleging. Lisez attentivement les instructions - gardez le mode d’emploi pour utilisation ultérieur. Lesen Sie genau die Anweisungen - bewahren Sie die Gebrauchsanleitung für spätere heranziehung. Read all instructions carefully - save this instruction manual for future reference. Lea detenidamente todas las instrucciones - Conserve este manual para futura referencia.
-
Page 3: Garantie
GARANTIE Geachte klant, Al onze producten ondergaan steeds een strenge kwaliteitscontrole, alvorens ze aan je worden aangeboden. Mocht je desondanks toch nog problemen hebben met jouw toestel, dan betreuren wij dit ten zeerste. In dat geval verzoeken wij je contact op te nemen met onze klantendienst. Onze medewerkers zullen je met plezier verder helpen. - Page 4 VEILIGHEIDSVOORSCHRIFTEN Wanneer je elektrische toestellen gebruikt, moeten volgende veiligheidsinstructies in acht genomen worden: · Lees deze instructies zorgvuldig door. Bewaar deze handleiding om later te raadplegen. · Verwijder voor het eerste gebruik alle verpakkingsmaterialen en eventuele promotionele stickers. Zorg ervoor dat kinderen niet met de verpakkingsmaterialen spelen. ·...
- Page 5 · De voedingskabel moet steeds aangesloten worden op een stopcontact dat geïnstalleerd en geaard is volgens de lokale standaarden en normen. · Gebruik enkel de accessoires die meegeleverd worden bij het toestel. · Gebruik het toestel nooit wanneer de voedingskabel of stekker beschadigd is, na een slechte werking van het toestel of wanneer het toestel beschadigd is.
-
Page 6: Voor Het Eerste Gebruik
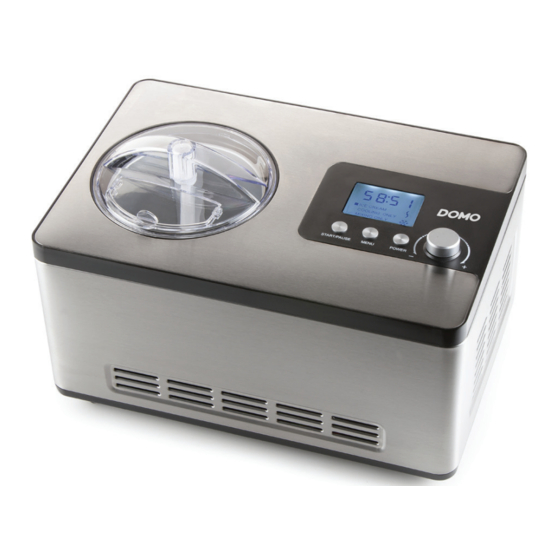
ONDERDELEN Vulopening met deksel Doorzichtig deksel Verwijderbare kom Vaste kom Mengspatel Lcd-display Bedieningspaneel Ventilatie Ijsschep 10. Maatbeker CONTROLEPANEEL Lcd-display POWER-knop Draaiknop: om de tijd in te stellen draai je aan de draaiknop. Draai naar links om de tijd te verminderen en naar rechts om de tijd te vermeerderen. De standaardtijden voor de programma’s ice cream (60 min.), cooling only (30 min.) en mixing only (10 min.). - Page 7 GEBRUIK VOORBEREIDEN VAN DE INGREDIËNTEN Maak de bereiding van de ingrediënten volgens het recept dat je wilt maken. Giet de bereiding in de verwijderbare kom. · Opgelet: het totale volume van de ingrediënten mag niet meer bedragen dan 800-1000 ml. Het roomijs zet nog uit wanneer het gedraaid wordt.
- Page 8 Wanneer de ingestelde tijd om is, stopt het toestel automatisch met werken en zal het 3 bieptonen geven. De lcd-display zal “00:00” weergeven en het achtergrondlichtje zal knipperen. Schep het roomijs uit de kom met de bijgevoegde ijsschep en doe het roomijs in een andere kom of pot.
- Page 9 · 3 eierdooiers · snuifje zout Klop de eierdooiers met de suiker tot een schuimig mengsel. Doe er vervolgens de slagroom en de melk bij. Roer alles door elkaar terwijl je een snuifje zout toevoegt en doe het geheel daarna in de roomijsmachine. Tijd in de roomijsmachine: +/- 30 minuten. ROOMIJS WARM BEREID ·...
- Page 10 · 3 eierdooiers · 2 el lopende honing Klop de eierdooiers met de suiker tot een schuimig mengsel. Verwarm de melk samen met de chocolade en de honing langzaam tot het kookpunt, maar laat het niet koken. Giet de melk bij de opgeklopte eieren en laat het geheel afkoelen.
- Page 11 roomijsmachine gieten. Indien nodig kan je eerst alles zeven. Tijd in de roomijsmachine: +/- 60 minuten. BANANENIJS · 4 bananen · 100 g suiker · 1 1/2 dl melk · 1 1/2 dl slagroom · 1/2 eiwit · 1 snuifje zout ·...
-
Page 12: Reiniging En Onderhoud
· 100 g suiker Mix het fruit. Doe er de suiker en het water bij (eventueel zeven) en giet alles in de roomijsmachine. Tijd in de roomijsmachine: +/- 60 minuten. REINIGING EN ONDERHOUD · Maak de roestvrijstalen behuizing schoon met een vochtige doek en wat mild detergent. ·... - Page 13 GARANTIE Cher client, Tous nos produits sont soumis à des contrôles qualité stricts avant d’être proposés à la vente. Si vous deviez toutefois rencontrer un problème avec votre appareil, nous le déplorons vivement. Dans ce cas, nous vous invitons à prendre contact avec notre service à la clientèle. Nos collaboratrices se feront un plaisir de vous aider ! +32 14 21 71 91 info@linea2000.be...
-
Page 14: Consignes De Sécurité
CONSIGNES DE SÉCURITÉ Les consignes de sécurité suivantes doivent être respectées lors de l’utilisation de tout appareil électrique. · Lisez ces consignes très attentivement. Conservez ce mode d’emploi afin de pouvoir le consulter ultérieurement. · Avant la première utilisation, enlevez tous les éléments d’emballage et les éventuels autocollants promotionnels. - Page 15 · Vérifiez avant usage si la tension indiquée sur l’appareil correspond à la tension du réseau électrique de votre domicile. · Le cordon d’alimentation doit toujours être branché dans une prise de courant placée et mise à la terre conformément aux normes et standards locaux. ·...
-
Page 16: Panneau De Commande
PARTIES Ouverture de remplissage avec couvercle Couvercle transparent Cuve amovible Cuve fixe Mélangeur Écran LCD Panneau de commande Ventilation Cuiller à glace 10. Verre doseur PANNEAU DE COMMANDE Écran LCD Bouton de POWER Bouton : tournez au bouton pour régler le temps Tournez vers la gauche pour diminuer le temps et vers la droite pour l’augmenter. -
Page 17: Montage
UTILISATION PRÉPARATION DES INGRÉDIENTS Préparez les ingrédients suivant la recette que vous voulez suivre. Versez la préparation dans la cuve amovible. · Attention: le volume total des ingrédients ne peut pas dépasser 800-1000 ml. La crème glacée se dilate encore lors de la rotation. ·... - Page 18 Si vous souhaitez arrêter ou redémarrer le mélangeur en cours de fonctionnement, appuyez brièvement sur le bouton START/STOP. Le compresseur continue toutefois de réfrigérer. Pour arrêter complètement l’opération et revenir en condition initiale de base, maintenez le bouton de MENU enfoncé pendant plus de 3 secondes. Lorsque le temps programmé...
- Page 19 RECETTES CRÈME GLACÉE PRÉPARATION À FROID · 3 dl de lait · 150 g de sucre · 2 dl de crème fraîche · 3 jaunes d’oeufs · une pincée de sel Battez (de préférence au mixer) les jaunes d’oeufs et de sucre afin d’obtenir un mélange crémeux.
- Page 20 GLACE AU CHOCOLAT · 120 g de chocolat noir · 0,5 l de lait entier · 75 g de sucre · 3 jaunes d’œufs · 2 c. à s. de miel liquide Fouettez les jaunes d’œuf et le sucre jusqu’à obtenir un mélange mousseux. Faites chauffer le lait, le chocolat et le miel à...
-
Page 21: Sorbet Au Citron
· 1/2 dl de crème fraîche · une pincée de sel Mélangez les fruits avec la moitié du sucre. Battez le blanc d’oeuf en neige. Ajoutez le lait, la crème fraîche, le reste du sucre et le sel. Mélangez bien le tout, puis versez-le dans la machine à... -
Page 22: Nettoyage Et Entretien
SORBET AU FRUITS · 400 à 500 g de fruits au choix · 1 dl d’eau · 100 g de sucre Mixez les fruits, ajoutez-y l’eau et le sucre. Filtrez le mélange si vous le souhaitez. Versez le tout dans la machine à crème glacée. Temps de préparation: +/- 60 minutes. NETTOYAGE ET ENTRETIEN ·... - Page 23 GARANTIE Sehr geehrter Kunde, Sämtliche unserer Produkte unterliegen einer strengen Qualitätskontrolle, bevor Sie Ihnen angeboten werden. Sollten dennoch Probleme mit Ihrem Gerät auftreten, bedauern wir dies zutiefst. Wir möchten Sie in diesem Fall bitten, unseren Kundenservice zu kontaktieren. Unsere Mitarbeiter helfen Ihnen gern weiter! +32 14 21 71 91 info@linea2000.be Montag –...
- Page 24 SICHERHEITSVORKEHRUNGEN Wenn Sie elektrische Geräte verwenden, müssen folgende Sicherheitshinweise beachtet werden: · Lesen Sie diese Hinweise sorgfältig durch. Bewahren Sie diese Bedienungsanleitung zum späteren Nachschlagen auf. · Entfernen Sie vor dem ersten Gebrauch alle Verpackungsmaterialien und möglichen Werbeaufkleber. Sorgen Sie dafür, dass Kinder nicht mit den Verpackungsmaterialien spielen.
- Page 25 · Gerät nur für den vorgesehenen Zweck verwenden. · Vor Gebrauch überprüfen, ob die auf dem Gerät angegebene Spannung mit dem des Stromnetzes übereinstimmt. · Das Netzkabel muss stets an eine Steckdose angeschlossen werden, die gemäß den örtlichen Standards und Normen isoliert und geerdet wurde. ·...
-
Page 26: Vor Der Ersten Inbetriebnahme
TEILE Einfüllöffnung mit Deckel Durchsichtiger Deckel Herausnehmbarer Behälter Fester Behälter Mischer LCD-Display Bedienfeld Lüftung Eisportionierer 10. Messbecher BEDIENFELD LCD-Display POWER-Taste Drehschalter: Zur Zeiteinstellung drehen Sie am Drehschalter. Drehen Sie nach links zur Verringerung der Zeit und nach rechts zur Verlängerung der Zeit. Die Standardzeiten für die Programme sind: Ice Cream (60 min.), Cooling only (30 min.) und Mixing only (10 min.). - Page 27 GEBRAUCH VORBEREITUNG DER ZUTATEN Bereiten Sie Zutaten nach dem Rezept Ihrer Wahl vor. Füllen Sie die Zubereitung in den herausnehmbaren Behälter. · Achtung: Das Gesamtvolumen der Zutaten darf nicht mehr als 800-1000 ml betragen. Das Speiseeis nimmt durch das Rühren an Volumen zu. ·...
- Page 28 Wenn Sie das Rühren während des Vorgangs unterbrechen oder erneut starten möchten, drücken Sie kurz die START/STOP-Taste. Der Kompressor kühlt dabei weiter. Um den Vorgang ganz zu stoppen und zurück in die Anfangsposition zu gehen, halten Sie die MENU-Taste länger als 3 Sekunden gedrückt. Wenn die eingestellte Zeit abgelaufen ist, stoppt das Gerät automatisch und meldet dies durch 3 Pieptöne.
- Page 29 REZEPTE MILCHEIS KALTE ZUBEREITUNG · 3 dl Milch · 150 g Zucker · 2 dl Schlagsahne · Eigelb von 3 Eiern · Prise Salz Schlagen Sie das Eigelb und den Zucker (vorzugsweise mit einem Mixer) zu einem lockeren Gemisch. Geben Sie anschließend die Schlagsahne und die Milch hinzu. Verrühren Sie die Zutaten und fügen Sie eine Prise Salz.
- Page 30 SCHOKOLADENEIS · 120 g Schokolade · 0,5 l Vollmilch · 75 g Zucker · Eigelb von 3 Eiern · 2 EL Honig Schlagen Sie das Eigelb mit dem Zucker auf. Erwärmen Sie die Milch mit der Schokolade und dem Honig langsam bis zum Kochpunkt, lassen Sie das Gemisch aber nicht aufkochen. Giessen Sie die warme Milch auf die geschlagenen Eier und lassen Sie das Ganze abkühlen.
- Page 31 · 1/2 dl Schlagsahne · 1 Prise Salz Mischen Sie die Früchte mit einem Teil des Zuckers. Schlagen Sie das Eiweiß. Fügen Sie die Milch, die Schlagsahne, den Rest des Zuckers und das Salz hinzu. Mischen Sie alle Zutaten und gießen Sie alles in die Eismaschine.
-
Page 32: Reinigung Und Wartung
FRÜCHTESORBET · 400-500 g Früchte nach Wahl · 1 dl Wasser · 100 g Zucker Mischen Sie die Früchte, mit dem Zucker und dem Wasser (ggf. sieben) und gießen Sie das Gemisch in die Eismaschine. Dauer: +/- 60 Minuten. REINIGUNG UND WARTUNG ·... -
Page 33: Warranty
WARRANTY Dear client , All of our products are always submitted to a strict quality control before they are sold to you. Should you nevertheless experience problems with your device, we sincerely regret this. In that case, we kindly request you to contact our customer service. Our staff will gladly assist you. -
Page 34: Safety Instructions
SAFETY INSTRUCTIONS When using electrical appliances, basic safety precautions should always be taken, including the following: · Read all instructions carefully. Keep this manual for future reference. · Make sure all packaging materials and promotional stickers have been removed before using the appliance for the first time. - Page 35 · Do not operate this appliance with a damaged cord or plug or in the event the appliance malfunctions or has been damaged in any manner. Return the appliance to the DOMO Service Department or its service agent for examination, repair, or electrical or mechanical adjustment.
-
Page 36: Control Panel
PARTS Fill opening with cover Transparent lid Removable bowl Fixed bowl Mixer LCD display Control panel Ventilation grid Ice scoop 10. Measuring cup CONTROL PANEL Lcd display POWER button Turning knob: To set the time, you change the turning knob. Turn left to decrease the standard time and turn right to increase it. -
Page 37: Making Ice Cream
PREPARING THE INGREDIENTS Prepare the ingredients according to the recipe you want to make. Pour the mixture into the removable bowl. · Caution: The total volume of the ingredients cannot exceed 800-1,000 ml. The ice cream will expand when it is mixed. ·... - Page 38 When the set time has passed, the appliance will automatically stop operating and produce 3 beeping sounds. The LCD display will indicate «00:00» and the background light will blink. Scoop the ice cream out of the bowl with a plastic spatula and put the ice cream into a different bowl or container.
-
Page 39: Vanilla Ice Cream
· dash of salt Mix the egg yolks and sugar with a mixer to a creamy substance. Add the cream and milk. Mix everything while adding a bit of salt. Put the mixture in the ice cream maker. Time: +/- 30 min. ICE CREAM WARM PREPARATION ·... - Page 40 MOKKA ICE CREAM · 2 cups very strong coffee (or 2 table spoons instant coffee) · 1 table spoon cacao · 2 egg yolks · 150 g sugar · 2 dl cream · 3 dl milk Make ice cream according to the description “ice cream cold preparation.” At the end of the mixture add the cacao and the coffee.
-
Page 41: Banana Ice Cream
BANANA ICE CREAM · 4 bananas · 100 g sugar · 1 1/2 dl milk · 1 1/2 dl whipping cream · 1/2 egg white · a pinch of salt · dash of lemon juice First beat the egg white stiff. Then mix the sugar, milk and whipping cream together well. Add the egg white, the mashed bananas and the other ingredients to the mixture. -
Page 42: Cleaning And Maintenance
CLEANING AND MAINTENANCE · Clean the stainless steel housing with a damp cloth and some mild detergent. · Wash the following loose parts in warm water with soap: transparent lid and removable bowl. The other loose parts (ice scoop & measuring cup) may be washed in the dishwasher. ENVIRONMENTAL GUIDELINES This symbol on the product or on its packaging indicates that this product may not be treated as household waste. - Page 43 GARANTIA Este aparato tiene un periodo de garantía de 2 años a partir de la fecha de compra. Durante el periodo de garantía, el distribuidor será completamente responsable de los defectos directamente asignables a errores del material y fabricación. Cuando se detecten este tipo de errores, y siempre que se estime necesario, el aparato se sustituirá...
-
Page 44: Instrucciones De Seguridad
INSTRUCCIONES DE SEGURIDAD Cuando utilice aparatos eléctricos, se deben seguir las instrucciones de seguridad mencionadas a continuación: · Lea detenidamente estas instrucciones. Conserve este manual para consultarlo posteriormente. · Antes del primer uso retire todos los materiales de embalaje y etiquetas promocionales. Asegúrese de que los niños no puedan jugar con el material de embalaje. - Page 45 · El cable de alimentación debe estar conectado a una toma de corriente que debe haber sido instalada y conectada a tierra de acuerdo con las normas y reglamentos locales. · Solo debe utilizar los accesorios que se suministran con el aparato. ·...
-
Page 46: Panel De Control
PIEZAS Boca con tapa Tapa transparente Cuenco extraíble Cuenco fijo Paleta de mezcla Pantalla LCD Panel de control Ventilación Cuchara de helado 10. Vaso medidor PANEL DE CONTROL Pantalla LCD Botón de POWER Botón giratorio: para ajustar el tiempo debe girar el botón giratorio. Gírelo hacia la izquierda para reducir el tiempo y hacia la derecha para aumentarlo. - Page 47 PREPARACIÓN DE LOS INGREDIENTES Haga la preparación de los ingredientes según la receta que desee. Vierta el preparado en el cuenco extraíble. · Precaución: El volumen total de los ingredientes no debe superar 800-1000 ml. El helado sale todavía cuando gira. ·...
- Page 48 Para detener el proceso por completo y volver al estado básico del principio, mantenga pulsado el botón de MENU durante más de 3 segundos. Cuando ha transcurrido el tiempo establecido, el aparato dejará de funcionar automáticamente y dará 3 pitidos. La pantalla LCD mostrará “00:00” y la luz de fondo parpadeará.
- Page 49 · 3 yemas de huevo · una pizca de sal Bata las yemas con el azúcar hasta que la mezcla esté espumosa. A continuación, añada la nata y la leche. Mezcle todo y añada una pizca de sal, y luego ponga todo en la heladera. Tiempo en la heladera: +/- 30 minutos.
- Page 50 Bata las yemas con el azúcar hasta que la mezcla esté espumosa. Caliente lentamente la leche con el chocolate y la miel hasta el punto de ebullición, pero sin dejar que hierva. Vierta la mezcla en los huevos batidos y deje enfriar. Vierta la mezcla en la heladera. Tiempo en la heladera: +/- 60 minutos.
- Page 51 HELADO DE PLÁTANO · 4 plátanos · 100 g de azúcar · 1 1/2 dl de leche · 1 1/2 dl de nata · 1/2 clara de huevo · 1 pizca de sal · 1 pizca de zumo de limón Primero bata la clara de huevo hasta que adquiera consistencia.
-
Page 52: Limpieza Y Mantenimiento
LIMPIEZA Y MANTENIMIENTO · Limpie la carcasa de acero inoxidable con un paño húmedo y detergente suave. · Lave los siguientes componentes con agua caliente y lavavajillas: la tapa transparente y el cuenco extraíble. Las demás piezas que no se encuentran fijas en el aparato (Cuchara de helado, cuchara y vaso medidor) se pueden lavar en el lavavajillas. -
Page 53: Garanzia
GARANZIA La garanzia dell’apparecchio è valida per 2 anni a partire dalla data di acquisto. Durante il periodo di validità della garanzia, il distributore si assume la piena responsabilità dei difetti dei materiali o di quelli di fabbricazione. In caso di presenza di tali difetti, se necessario, si procederà... - Page 54 · Togliere la spina dalla presa quando l’apparecchio non è in funzione, prima di montarne o smontarne i componenti e prima di pulirlo. Mettere tutti gli interruttori in posizione “off” e afferrare la spina per staccarla dalla presa di corrente. Non tirare mai il cavo di alimentazione per estrarre la spina dalla presa di corrente.
-
Page 55: Pannello Di Controllo
· Se l’apparecchio non viene pulito bene, la sua durata di vita può ridursi in modo drastico e possono verificarsi situazioni pericolose. · Gli incidenti o i danni causati dalla mancata osservanza delle presenti istruzioni sono responsabilità dell’utilizzatore. Non possono essere ritenuti responsabili per tali danni né il produttore, né... -
Page 56: Prima Dell'uso
PRIMA DELL’USO · Prima di utilizzare la gelatiera per la prima volta, lasciarla appoggiata per 4 ore su una superficie stabile. · Lavare tutti gli elementi della gelatiera che entreranno in contatto con gli alimenti: il contenitore fisso, quello rimovibile, la spatola di miscelazione, il coperchio, il coperchio dell’apertura di riempimento, il misurino e la paletta del gelato. - Page 57 freschi gli alimenti all’interno del contenitore (senza miscelazione). Impostare il tempo ruotando la manopola e quindi premere il tasto START/PAUSE. La gelatiera inizia a miscelare. La retroilluminazione del display LCD rimane accesa per tutto il periodo di funzionamento. Se si desidera fermare e poi riattivare la spatola di miscelazione durante il funzionamento, premere brevemente il tasto START/PAUSE.
- Page 58 RICETTE PREPARAZIONE FREDDA PER GELATO · 3 dl di latte · 150 g di zucchero · 2 dl di panna montata · 3 tuorli d’uovo · un pizzico di sale Mescolare i tuorli allo zucchero fino a ottenere una miscela schiumosa. Aggiungere quindi il latte e la panna montata.
- Page 59 GELATO AL CIOCCOLATO · 120 g cioccolato fondente · 0,5 l latte intero · 75 g zucchero · 3 tuorli d’uovo · 2 cucchiai di miele Mescolare i tuorli allo zucchero fino a ottenere una miscela schiumosa. Riscaldare lentamente il latte con il cioccolato e il miele fino a poco prima che raggiunga la bollitura. Versare il latte sui tuorli l’uovo montati e lasciare raffreddare.
- Page 60 · 0,5 dl di panna montata · un pizzico di sale Mescolare la frutta a una parte della zucchero. Montare l’albume. Aggiungere il latte, la panna montata, lo zucchero rimanente e il sale. Mescolare bene e versare il composto nella gelatiera. Se necessario, filtrare prima il composto.
-
Page 61: Pulizia E Manutenzione
SORBETTO ALLA FRUTTA · 400-500 g di frutta a scelta · 1 dl di acqua · 100 g di zucchero Mescolare la frutta. Aggiungere lo zucchero e l’acqua (filtrare se necessario) e versare il composto nella gelatiera. Tempo di lavorazione: +/- 60 minuti. PULIZIA E MANUTENZIONE ·... - Page 62 ZÁRUKA Pro záruku začínající dnem prodeje spotřebiče platí na území ČR tyto podmínky: 1. trvání záruky: 2 roky 2. poskytování záruky: a) záruční opravu provedeme podle našeho zvážení opravou nebo výměnou vadných dílů, jestliže tyto závady vznikly prokazatelně vadou materiálu nebo chybou při výrobě b) záruční...
-
Page 63: Bezpečnostní Pokyny
BEZPEČNOSTNÍ POKYNY Při používání jakkéhokoli el. spotřebiče dbejte zvýšené opatrnosti a dodržujte určitá bezpečnostní pravidla. · Pečlivě si přečtěte tento manuál. Po přečtení ho uschovje pro případné další informace. · Před použitím odrstraňte veškeré reklamní a ochranné fólie i polepky. ·... - Page 64 přístroje z pracovní plochy. Z toho důvodu NEPOUŽÍVEJTE PRODLUŽOVACÍ KABEL. · Přívodní kabel vždy důkladně celý rozviňte, jinak hrozí riziko přehřátí kabelu. · Přívodní kabel nenechávejte ležet přes ostré hrany ani na teplých/horkách plochách. · Přívodní kabel nenechávejte ležet pod (ani okolo přístroje), aby nehrozilo jeho převrácení. ·...
-
Page 65: Ovládací Panel
ČÁSTI Plnící otvor s víčkem Průhledné víko Vyjímatelná nádoba Pevná nádoba Šlehací metla LCD displej Ovládací panel Mřížka ventilace Kleště na zmrzlinu 10. Odměrka OVLÁDACÍ PANEL LCD displej Hlavní spínač POWER Otočný ovladač – nastavení času. Otáčením doleva snižuje a otáčením doprava zvyšuje standartní... -
Page 66: Příprava Ingrediencí
POUŽITÍ PŘÍPRAVA INGREDIENCÍ Připravte si nyní veškeré ingredience, které budete podle receptu potřebovat. Nalijte připravenou směs do vyjímatelné nádoby. · Upozornění: Objem všech připravených ingrediencí by neměl přesáhnout 800-1000 ml. Zmrzlina při míchání nabyde na objemu. · Upozornění: Výrobník zmrzliny má vlastní kompresor, není tedy potřeba nechávat nádobu namrazit v mrazáku předem. - Page 67 Hotovou zmrzlinu z nádoby přendejte do jiné nádoby, či misky a to za pomoci plastové stěrky (vařečky, apod.). Nepoužívejte pro vyškrabávání zmrzliny ostré a kovové předměty, abyste nepoškodili povrch nádoby. Pozor: Nikdy nádobou netlučte, ani do ní, abyste uvolnili zmrzlinu. Mohli byste nádobu poškodit.
-
Page 68: Vanilková Zmrzlina
Vyšlehejte žloutky s cukrem (mixerem) do jemné směsi. Přidejte šlehačku a mléko. Přísady promíchejte a přidejte špetku soli. Směs vložte do stroje na zmrzlinu. Doba přípravy: +/- 30 minut. MLÉČNÁ ZMRZLINA PŘÍPRAVA VAŘENÍM · 4 dl mléka · 150 g cukru ·... -
Page 69: Banánová Zmrzlina
KÁVOVÁ ZMRZLINA · 2 šálky silné kávy (nebo 2 polévkové lžíce rozpustné kávy) · 1 polévková lžíce kakaa · žloutek ze 2 vajec · 150 g cukru · 2 dl šlehačky · 3 dl mléka Zmrzlinu připravte podle receptu „Mléčná zmrzlina, příprava za studena“. Nakonec přidejte ještě... -
Page 70: Čištění A Údržba
Vymačkejte citrony. Šťávu promíchejte s cukrem a nakonec přidejte mléko a šlehačku. Všechny přísady promíchejte a směs dejte do stroje. Doba přípravy: +/- 60 minut. CITRONOVÝ SORBET · 1 vaječný bílek · 2 dl citronové šťávy · 200 g cukru ·... - Page 71 OHLED NA ŽÍVOTNÍ PROSTŘEDÍ Symbol na přístroji či na jeho obalu znamená, že s tímto výrobkem není možno nakládat jako s běžným domovním odpadem, nýbrž musí být odevzdán na místech určených ke sběru a likvidaci elektrických a elektronických zařízení. Dodržením tohoto doporučení chráníte životní prostředí a zdraví...
- Page 72 ZÁRUKA Pre záruku začínajúcich dňom predaja spotrebiča platí na území SR tieto podmienky: 1. trvania záruky: 2 roky 2. poskytovanie záruky: a) záručnú opravu vykonáme podľa nášho zvážení opravou alebo výmenou chybných dielov, ak tieto závady vznikli preukázateľne chybou materiálu alebo chybou pri výrobe b) záručná...
-
Page 73: Bezpečnostné Pokyny
BEZPEČNOSTNÉ POKYNY Pri používaní jakkéhokoli el. spotrebiče dbajte na zvýšenú opatrnosť a dodržujte určitá bezpečnostné pravidlá. · Starostlivo si prečítajte tento manuál. Po prečítaní ho uschovať pre prípadné ďalšie informácie. · Pred použitím odrstraňte všetky reklamné a ochranné fólie i polepky. ·... - Page 74 · Nikdy sa nedotýkajte zmrznuté nádoby mokrými rukami! · Prívodný kábel je zámerne vyrobený kratší, znižuje to riziko o jeho zakopnutia, strhnuti prístroja z pracovnej plochy. Z toho dôvodu Nepoužívajte predlžovacie káble. · Prívodný kábel vždy dôkladne celý rozviňte, inak hrozí riziko prehriatia kábla. ·...
-
Page 75: Pred Prvým Použitím
ČASTI Plniaci otvor s viečkom Priehľadné veko Vyberateľná nádoba Pevná nádoba Šľahacia metla LCD displej Ovládací panel Mriežka ventilácia Kliešte na zmrzlinu 10. Odmerka OVLÁDACÍ PANEL LCD displej Hlavný spínač POWER Otočný ovládač - nastavenie času. Otáčaním doľava znižuje a otáčaním doprava zvyšuje štandardné... - Page 76 POUŽITIE PRÍPRAVA INGREDIENCIÍ Pripravte si teraz všetky ingrediencie, ktoré budete podľa receptu potrebovať. Nalejte pripravenú zmes do vyberateľnej nádoby. · Upozornenie: Objem všetkých pripravených ingrediencií by nemal presiahnuť 800-1000 ml. Zmrzlina pri miešaní nadobudne na objeme. · Upozornenie: Výrobník zmrzliny má vlastné kompresor, nie je teda potrebné nechávať nádobu namraziť...
- Page 77 Po uplynutí nastaveného času sa prístroj sám vypne a ozve sa 3x zvukový signál. Displej bude ukazovať “00:00” a podsvietenie bude blikať. Hotovú zmrzlinu z nádoby preložte do inej nádoby, či misky a za pomoci plastové stierky (varešky, apod.). Nepoužívajte pre vyškrabávanie zmrzliny ostré a kovové predmety, aby ste nepoškodili povrch nádoby.
- Page 78 · žĺtok z 3 vajec · štipka soli Vyšľahajte žĺtky s cukrom (mixérom) do jemnej zmesi. Pridajte šľahačku a mlieko. Prísady premiešajte a pridajte štipku soli. Zmes vložte do stroja na zmrzlinu. Doba prípravy: +/- 30 minút. MLIEČNA ZMRZLINA PRÍPRAVA VARENÍM ·...
- Page 79 Rozohrejte čokoládu (kakao) v malom množstve mlieka a zmrzlinu pripravte podľa receptu “Mliečna zmrzlina, príprava varením”. Rozohriatu čokoládu vmiešajte do pripravenej zmesi a nechajte všetko vychladnúť. Obsah hrnca dajte do stroja. Čas prípravy: +/- 60 minút. KÁVOVÉ ZMRZLINA · 2 šálky silnej kávy (alebo 2 polievkové lyžice rozpustnej kávy) ·...
-
Page 80: Čistenie A Údržba
CITRÓNOVÁ ZMRZLINA · 4 citróny · 150 g cukru · 2 dl mlieka · 2 dl šľahačky Vymačkajte citróny. Šťavu premiešajte s cukrom a nakoniec pridajte mlieko a šľahačku. Všetky prísady premiešajte a zmes dajte do stroja. Čas prípravy: +/- 60 minút. CITRONOVÝ... - Page 81 OHĽAD NA ŽIVOTNÉ PROSTREDIE Symbol na prístroji alebo na jeho obale znamená, že s týmto výrobkom nie je možné nakladať ako s domovým odpadom, ale musí byť odovzdaný na miestach určených na zber a likvidáciu elektrických a elektronických zariadení. Dodržaním tohto odporúčania chránite životné prostredie a zdravie spoluobčanov.
- Page 84 über: webshop.domo-elektro.be or scan here: oder hier scannen: of scan hier: ou scannez ici: LINEA 2000 bvba - Dompel 9 - 2200 Herentals - Belgium - Tel: +32 14 21 71 91 - Fax: +32 14 21 54 63...
Need help?
Do you have a question about the Domo DO9207I and is the answer not in the manual?
Questions and answers