Table of Contents
Advertisement
Quick Links
FM/AM
Digital Media Player
The warranty for this product is included in this manual
(page 38, 39).
La garantie de ce produit est inclus dans le présent manuel
(page 40).
Owner's Record
The model and serial numbers are located on the bottom of the unit.
Record the serial number in the spaces provided below.
Refer to these numbers whenever you call upon your Sony dealer
regarding this product.
Model No. DSX-M55BT
To cancel the demonstration (DEMO) display, see page 21.
To switch the FM/AM tuning step, see page 9.
For the connection/installation, see page 33.
Pour annuler l'affichage de démonstration (DEMO),
reportez-vous à la page 22.
Pour commuter l'intervalle de syntonisation FM/AM, reportez-
vous à la page 9.
Pour le raccordement/l'installation, reportez-vous à la page 35.
Para cancelar la pantalla de demostración (DEMO), consulte
la página 22.
Para cambiar el paso de sintonización de FM/AM, consulte la
página 9.
Para la conexión/instalación, consulte la página 35.
DSX-M55BT
Serial No.
4-588-324-11(1)
Operating Instructions
Mode d'emploi
Manual de instrucciones
GB
FR
ES
Advertisement
Table of Contents

Related Manuals for Sony DSX-M5511BT


Summary of Contents for Sony DSX-M5511BT
- Page 1 Owner’s Record The model and serial numbers are located on the bottom of the unit. Record the serial number in the spaces provided below. Refer to these numbers whenever you call upon your Sony dealer regarding this product. Model No. DSX-M55BT Serial No.
-
Page 2: Warning
For safety, be sure to install this unit in the Warning dashboard of the boat as the rear side of the unit becomes hot during use. FOR THE CUSTOMERS IN THE USA. NOT For details, see “Connection/Installation” APPLICABLE IN CANADA, INCLUDING IN THE (page 33). - Page 3 (2) This device must accept any interference, For EU product compliance: Sony Belgium, including interference that may cause undesired bijkantoor van Sony Europe Limited, Da Vincilaan operation of the device. 7-D1, 1935 Zaventem, Belgium This transmitter must not be co-located or operated...
- Page 4 near automatic doors or a fire alarm suspended, or terminated without prior notice. This unit supports security capabilities that Sony does not bear any responsibility in these sorts of situations. comply with the BLUETOOTH standard to provide a secure connection when the BLUETOOTH...
-
Page 5: Table Of Contents
Settings Table of Contents Canceling the DEMO Mode....21 Warning........2 Basic Setting Operation . -
Page 6: Guide To Parts And Controls
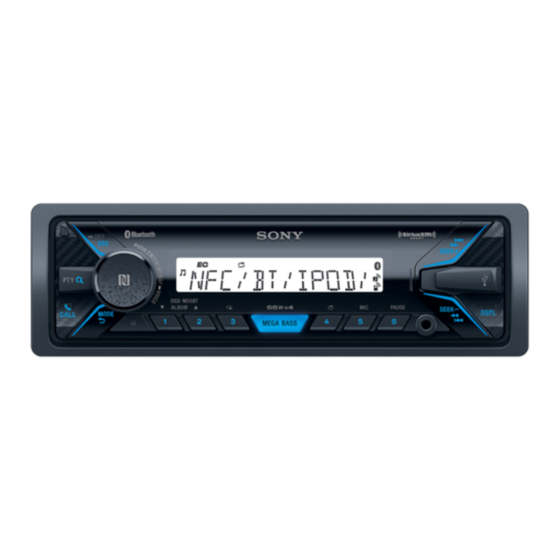
Guide to Parts and Controls Main unit Front panel release button N-Mark Touch the control dial with Android™ SRC (source) smartphone to make Bluetooth® connection. Turn on the power. * Not available when the BT phone is selected. Change the source. - Page 7 Number buttons (1 to 6) RM-X231 Remote commander Receive stored radio stations. Press and hold to store stations. Call a stored phone number. Press and hold to store a phone number. ALBUM / Skip an album for audio device. Press and hold to skip albums continuously.
-
Page 8: Getting Started
Remove the insulation film before use. Getting Started Detaching the Front Panel You can detach the front panel of this unit to prevent theft. Press and hold OFF until the unit turns RM-X11M Marine remote commander off, press the front panel release button , then pull the panel towards you to (not supplied) remove. -
Page 9: Switching The Fm/Am Tuning Step
Switching the FM/AM Tuning Preparing a BLUETOOTH Device Step You can enjoy music, or perform handsfree calling depending on the BLUETOOTH compatible device Set the FM/AM tuning step of your country. This such as a smartphone, cellular phone and audio setting appears only while the source is off and device (hereafter “BLUETOOTH device”... - Page 10 To disconnect by One touch If passkey* input is required on the Touch the N-Mark part of the unit with the N-Mark BLUETOOTH device, input [0000]. part of the smartphone again. * Passkey may be called “Passcode,” “PIN code,” Notes “PIN number”...
-
Page 11: Connecting A Usb Device
Operate the BLUETOOTH device to Connect an iPhone/iPod to the USB port. connect to this unit. lights up. Icons in the display: Lights up when handsfree calling is available by enabling the HFP (Handsfree Profile). Lights up when the audio device is Make sure that lights up on the display of the playable by enabling the A2DP... -
Page 12: Connecting Other Portable Audio Device
Connecting Other Portable Listening to the Radio Audio Device Listening to the Radio Turn off the portable audio device. Tuning step setting is required (page 9). Turn down the volume on the unit. To listen to the radio, press SRC to select [TUNER]. Connect the portable audio device to the AUX input jack (stereo mini jack) on the Storing automatically (BTM) -
Page 13: Using Radio Data System (Rds)
Type of programs (tuner step: 100 kHz/10 kHz, Receiving the stored stations 50 kHz/9 kHz) Select the band, then press a number NEWS (News), AFFAIRS (Current Affairs), INFO button (1 to 6). (Information), SPORT (Sports), EDUCATE (Education), DRAMA (Drama), CULTURE (Culture), SCIENCE (Science), VARIED (Varied), POP M (Pop Music), ROCK M (Rock Music), EASY M (M.O.R. - Page 14 the Radio ID of your tuner. In addition, the Radio ID To receive the stored channel, press MODE to select is located on the bottom of the SiriusXM Connect [SX1], [SX2] or [SX3], then press a number button Vehicle Tuner and its packaging. You will need this (1 to 6).
-
Page 15: Playback
Caution for iPhone When you connect an iPhone via USB, phone call volume is controlled by the iPhone, not the unit. Do Playback not inadvertently increase the volume on the unit during a call, as a sudden loud sound may result Playing a USB Device when the call ends. -
Page 16: Searching And Playing Tracks
To match the volume level of the BLUETOOTH Searching by skipping items device to other sources (Jump mode) Start playback of the BLUETOOTH audio device at a moderate volume, and set your usual listening Press (browse). volume on the unit. Press MENU, then select [SET SOUND] ... -
Page 17: Listening To Pandora
If the device number appears Make sure that the same numbers are displayed (e.g., 123456) in this unit and the mobile device, Listening to Pandora® then press ENTER on this unit and select [Yes] on the mobile device. Pandora® is available to stream music through your When activating the BLUETOOTH function iPhone and Android smartphone. -
Page 18: Handsfree Calling (Via Bluetooth Only)
Rotate the control dial to select a number from the number list, then press Handsfree Calling (via BLUETOOTH only) The phone call starts. From the call history To use a cellular phone, connect it with this unit. For details, see “Preparing a BLUETOOTH Device” Press CALL, rotate the control dial to (page 9). -
Page 19: Available Operations During Call
Presetting phone numbers Available Operations during You can store up to 6 contacts in the preset dial. Call Select a phone number that you want to store in the preset dial, from the phonebook, call history or by inputting the phone number directly. To adjust the ringtone volume The phone number appears in the display of this Rotate the control dial while receiving a call. -
Page 20: Useful Functions
When connecting the iPhone to the unit via USB, do not activate Siri with the iPhone. Siri Eyes Free may not function properly, or may quit. Useful Functions There is no audio sound while Siri Eyes Free is activated. -
Page 21: Settings
General Setup (GENERAL) Settings DEMO (demonstration) Activates the demonstration: [ON], [OFF]. Canceling the DEMO Mode CLOCK-ADJ (clock adjust) (page 9) You can cancel the demonstration display which appears when the source is off and the clock is TUNER-STP (tuner step) (page 9) displayed. -
Page 22: Sound Setup (Sound)
BTA VOL (BLUETOOTH audio volume level) Sound Setup (SOUND) Adjusts the volume level for each connected BLUETOOTH device: [+6 dB] – [0 dB] – [-6 dB]. This setup menu is available when any source This setting negates the need to adjust the except for the BT phone is selected. -
Page 23: Additional Information
AUTOPAIR (auto pairing) Start BLUETOOTH pairing automatically when Additional Information iOS device version 5.0 or later is connected via USB: [ON], [OFF]. Precautions BT SIGNL (BLUETOOTH signal) (page 10) Activates/deactivates the BLUETOOTH function. Cool off the unit beforehand if your boat has been moored in direct sunlight. -
Page 24: Maintenance
If you have any questions or problems concerning About iPod your unit that are not covered in this manual, consult your nearest Sony dealer. You can connect to the following iPod models. Update your iPod devices to the latest software before use. -
Page 25: Specifications
Frequency response: 20 – 15,000 Hz Tuning range: 531 – 1,602 kHz (at 9 kHz step) 530 – 1,710 kHz (at 10 kHz step) AM tuning step: 9 kHz/10 kHz switchable Notes Antenna (aerial) terminal: For safety, turn off the ignition before cleaning the External antenna (aerial) connector connectors, and remove the key from the ignition Sensitivity: 26 μV... - Page 26 The Bluetooth® word mark and logos are registered Power antenna (aerial)/Power amplifier control trademarks owned by Bluetooth SIG, Inc. and any terminal (REM OUT) use of such marks by Sony Corporation is under Inputs: license. Other trademarks and trade names are SiriusXM input terminal (US/Canada only) those of their respective owners.
-
Page 27: Troubleshooting
libFLAC Troubleshooting Copyright (C) 2000-2009 Josh Coalson Copyright (C) 2011-2013 Xiph.Org Foundation The following checklist will help you remedy Redistribution and use in source and binary forms, problems you may encounter with your unit. with or without modification, are permitted Before going through the checklist below, check provided that the following conditions are met: the connection and operating procedures. - Page 28 The display disappears from/does not appear in the display window. PTY displays [- - - - - - - -]. The dimmer is set to [DIM-ON] (page 22). The current station is not an RDS station. The display disappears if you press and hold OFF. ...
- Page 29 BLUETOOTH function Echo or noise occurs in phone call conversations. Lower the volume. The connecting device cannot detect this unit. Set EC/NC Mode to [EC/NC-1] or [EC/NC-2] Before the pairing is made, set this unit to pairing (page 19).
- Page 30 Some functions do not work. OVERLOAD: The USB device is overloaded. Check if the connecting device supports the Disconnect the USB device, then press SRC to functions in question. select another source. The USB device has a fault, or an unsupported A call is answered unintentionally.
- Page 31 For Pandora® operation: PAN OPEN APP - PRESS PAUSE: Pandora® is not running when connecting via the BLUETOOTH CANNOT SKIP: Skipping tracks is not allowed. function. Wait until the commercial ends, next track Launch the Pandora® application on the mobile begins, or select another station on the list.
- Page 32 SiriusXM Connect Vehicle Tuner. The tuner may be disconnected or damaged. If these solutions do not help improve the situation, Verify that the SiriusXM Connect Vehicle Tuner consult your nearest Sony dealer. cable is securely connected to the radio.
-
Page 33: Connection/Installation
Parts List for Installation Connection/Installation Cautions Run all ground (earth) leads to a common ground (earth) point. × 2 Do not get the leads trapped under a screw, or caught in moving parts (e.g., seat railing). ... -
Page 34: Connection
Connection Subwoofer* Power amplifier* Satellite radio tuner (SiriusXM)* White White/black striped Front speaker* Gray Gray/black striped Green Green/black striped Rear speaker* Purple Purple/black striped Black Yellow For details, see “Making connections” (page 35). Blue/white striped Marine remote commander RM-X11M* from a boat antenna (aerial) *1 Not supplied... - Page 35 Memory hold connection Making connections When the yellow power supply lead is connected, To battery or distribution block ground power will always be supplied to the memory circuit even when the ignition switch is turned off. First connect the black ground (earth) lead, then connect the yellow and red power supply leads.
-
Page 36: Installation
Mounting the unit in the dashboard or Installation the cutout hole on boat Before installing, make sure the catches on both Removing the protection collar and the sides of the bracket are bent inwards 2 mm ( bracket in). - Page 37 replace the fuse. If the fuse blows to dashboard/center console again after replacement, there may be an internal malfunction. In such a case, consult your nearest Sony dealer. Bracket Bracket Existing parts supplied with your car NISSAN ...
- Page 38 W 444774702...
- Page 39 W 446022851...
- Page 40 Ελληνικά Nederlands Με την παρούσα η Sony Corporation δηλώνει ότι ο παρόν εξοπλισμός συμμορφώνεται προς της Hierbij verklaart Sony Corporation dat dit toestel in overeenstemming is met de essentiële eisen en de ουσιώδεις απαιτήσεις και τις λοιπές σχετικές...
- Page 41 Lietuvių kalba Slovenščina Šiuo dokumentu Sony Corporation deklaruoja, kad Sony Corporation izjavlja, da je ta oprema v skladu z ši įranga atitinka esminius reikalavimus ir kitas bistvenimi zahtevami in ostalimi relevantnimi 1999/5/EB Direktyvos nuostatas. Susipažinti su visu določili direktive 1999/5/ES. Za podrobnosti vas atitikties deklaracijos turiniu Jūs galite interneto...
- Page 42 If you have any questions/problems regarding this product, try the following: Read Troubleshooting in these Operating Instructions. Please contact (U.S.A. only); 1-800-222-7669 Call http://www.SONY.com http://www.sony.net/ ©2016 Sony Corporation Printed in Thailand...
Need help?
Do you have a question about the DSX-M5511BT and is the answer not in the manual?
Questions and answers