Table of Contents
Advertisement
Quick Links
- 1 Computer / Ordenador / Ordinateur/ Computer/ Komputer / Bedieningspaneel
- 2 Ordering Spare Parts and Accessories / Pedido de Repuestos Yaccesorios / Commander des Pièces Détachées et Accessoires / Ordinazione DI Ricambi E Accessori / Zubehörbestellung - Ersatzteilbestellung / Onderdelen en Accessoires
- Download this manual
Advertisement
Table of Contents

Subscribe to Our Youtube Channel
Related Manuals for FYTTER trainer TR-W7B


Summary of Contents for FYTTER trainer TR-W7B
- Page 1 REF: TRW07B CHEST BELT: INCLUDED...
-
Page 2: Table Of Contents
FYTTER04M2018 TABLE OF CONTENTS / CONTENIDO / MANUEL DES MATIÈRES / INDICE / INHALTSVERZEICHNIS / INHOUD WARNING DECAL PLACEMENT / PRECAUCIONES IMPORTANTES / PRÉCAUTIONS IMPORTANTES / PRECAUZIONI IMPORTANTI / WICHTIGE VORSICHTSMASSNAHMEN / BELANGRIJKE VOORZORGSMAATREGELEN CUSTOMER CARE / SERVICIO DE ATENCIÓN AL CLIENTE / SERVICE CLIENTS / SERVIZIO CLIENTI / KUNDENDIENST / KLANTENSERVICE WARRANTY / GARANTIA / GARANTIE / GARANZIA / GARANTIE/ GARANCIA ASSEMBLY / MONTAJE / ASSEMBLAGE / MONTAGGIO / MONTAGE / MONTAGE... -
Page 3: Warning Decal Placement / Precauciones Importantes / Précautions Importantes / Precauzioni Importanti / Wichtige Vorsichtsmassnahmen / Belangrijke Voorzorgsmaatregelen
FYTTER doesn’t take any responsibility for personal injuries or proterty damages resulting from the use of this product. 1-Before starting any workout programm, consult your doctor. It’s specialky important for people older than 35 years old, people with health problem and pregnant women. - Page 4 Please contact your town council to know more about this procedure. 20-Should you need technical assistance or advise with the installation of pieces, visit our website www.fytter.com, where you will find the section “CUSTOMER SERVICE“ You can also get in touch with us by Email service@fytter.com...
- Page 5 Póngase en contacto con su ayuntamiento para conocer el procedimiento. 20-Si necesitase asistencia técnica, asesoramiento en montaje o piezas, acuda a la web www.fytter.com , dónde encontrará el apartado SERVICIO AL CLIENTE. También puede ponerse en contacto a través del email service@fytter.com...
- Page 6 Per ridurre il rischio di lesioni gravi leggere tutte le precauzioni e le istruzioni importanti di questo manuale e osservare le avvertenze del prodotto prima di usarlo. Fytter non si assume nessuna responsabilitá per lesioni personali o danni alla propietá causati dall'utilizzo del prodotto o dallo stesso.
- Page 7 Paese. Contattare il Comune per conoscere il procedimento. 20-Se dovesse necessitare assistenza tecnica, consigli sul montaggio e sui pezzi, consulti la web www.fytter.com , nella quale troverá la sezione ASSISTENZA CLIENTI. Puó inoltre contattarci attraverso l' e-mail service@fytter.com...
- Page 8 20-Für technische Beratung bei der Montage besuchen Sie unsere Webseite www.fytter.com, wo der Kundenservice zu finden ist. Gerne können Sie uns auch per E-mail erreichen service@fytter.com. BiTTE BEWAHREN SIE DEN RECHNUNGSSBELEG SORGFÄLTIG AUF UM DIESEN SERVICE IN ANSPRUCH ZU NEHMEN. BEWAHREN SIE DIESE ANLEITUNGEN FÜR ZUKÜNFTIGE FÄLLE AUF.
-
Page 9: Customer Care / Servicio De Atención Al Cliente / Service Clients / Servizio Clienti / Kundendienst / Klantenservice
CLIENTI / KUNDENDIENST / KLANTENSERVICE (ENGLISH) Should you need technical assistance or advise with the installation of pieces, visit our website www.fytter.com, where you will find the section CUSTOMER SERVICE. You can also get in touch with us by email service@fytter.com . -
Page 10: Warranty / Garantia / Garantie / Garanzia / Garantie/ Garancia
(GERMAN) Wenn Sie technische Hilfe, Beratung bei der Montage oder Ersatzteile benötigen, besuchen Sie unsere Webseite www.fytter.com und wählen Sie die Sektion „KUNDENSERVICE“. Gerne können Sie uns auch per Email service@fytter.com erreichen. DIESE OPTION IST NUR MIT RECHNUNGSBELEG MÖGLICH. (NETHERLANDS) Zoekt u technische hulp, advies of montage van onderdelen, ga dan naar onze website www.fytter.com, waar u het tabblad KLANTENSERVICE vindt. - Page 11 Para hacer efectiva la garantía, debe conservar el ticket de compra, embalaje original del producto junto con el manual de uso, protecciones y piezas. (FRENCH) La garantie relative à l'appareil ou une pièce de rechange couvre les défauts de conformité qui pourraient exister au moment de la livraison à...
-
Page 12: Assembly / Montaje / Assemblage / Montaggio / Montage / Montage
Falls der Benutzer das zugelassene Höchstgewicht überschreitet, werden die daraus entstandenen Schäden nicht durch die Garntie gedekt. Störungen, die bei einer nicht versicherten Maschine auftreten, z.B Laufbänder oder Ruder (Faltsystem) werden nicht durch die Garantie gedeckt. Schäden, die aufgrund einer schlechten Wartung entstanden sind (Mutter- und Schraubenbefestigung, Schmierung) werden nicht durch die Garantie gedeckt. - Page 13 PRE-ASSEMBLY CHECK LIST PART NO. DESCRIPTION Q’TY Main frame Front stabilizer Slide rail Rear stabilizer Left end cap Right end cap Seat Computer Chest Belt Manual Hardware package...
- Page 14 HARDWARE PACKAGE...
- Page 15 ASSEMBLY INSTRUCTIONS English – STEP 1 Turn over the Slide Rail (No. 3) and Seat (No.36) as above. Slide the Seat (No.36) onto the Slide Rail (No.3). Secure the Stopper (No.35) with 2 Flat Cross Screws (No.67). Then attach the Rear Stabilizer (No.4) to the Slide Rail (No.3) with 4 Washers (No.71) and 4 Outer Hex Screws (No.66). Tighten with Spanner (No.75).
- Page 16 English – STEP 2 Attach L & R End Caps (No.25 & 26) to Front Stabilizer (No.2). Then tighten with 2 Cross Screws (No.68) using Spanner (No.75). Spanish – PASO 2 Coloque las tapas finales L & R (No.25 y 26) en el estabilizador delantero (No.2). Luego apriete con 2 Tornillos Cruzados (No.68) usando la Llave (No.75).
- Page 17 English – STEP 3 Keep the Main Frame (No.1) upright. Attach Front Stabilizer (No.2) to Main Frame (No.1) using 8 Washers (No.71) and 8 Screws (No.60). Tighten with Allen Wrench (No.74). Note: You can put 3~4 screws into the holes first, and start tightening by hand. After all the screws are put in, then tighten with the tool.
- Page 18 English – STEP 4 Note: Move the Seat (No.36) to the front of the Slide Rail (No.3) before assembly to prevent it from gliding down during assembly. Attach the Slide Rail (No. 3) to the Main Frame (No. 1) using 4 Washers (No. 71), 4 Screws (No. 60) and 4 Flat Screws (No.
- Page 19 English – STEP 5 Attach the Support for computer (No.5) to Main Frame, tighten with 4 Washers (No.71) and 4 Screws (No.60). Spanish – PASO 5 Conecte el Soporte para computadora (No. 5) al Marco Principal, apriete con 4 Arandelas (No.71) y 4 Tornillos (No.60).
- Page 20 WATER LEVEL WATER CLEANING TABLET sodium dichlor CHLORINE OR CHLORINE BLEACH (56% chlorine) every 4-6 months.
- Page 21 ADJUSTMENT GUIDE PEDAL ADJUSTMENT...
- Page 22 ADJUSTING THE BALANCE STORAGE...
-
Page 23: Move / Mover / Déplacer / Muovere / Urheber/ Move
MOVE / MOVER / DÉPLACER / MUOVERE / URHEBER/ MOVE... -
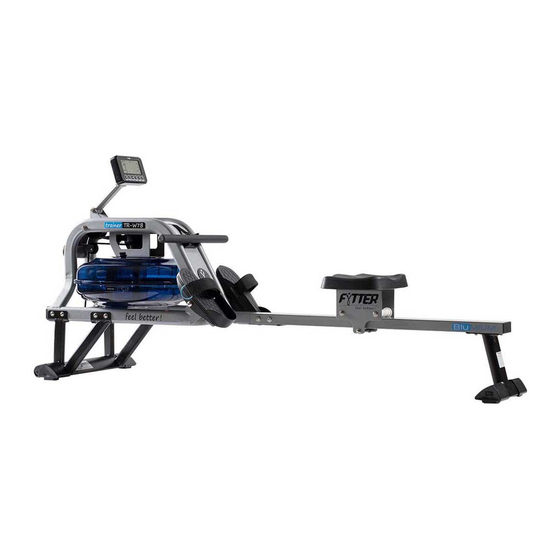
Page 24: Computer / Ordenador / Ordinateur/ Computer/ Komputer / Bedieningspaneel
COMPUTER / ORDENADOR / ORDINATEUR/ COMPUTER/ KOMPUTER / BEDIENINGSPANEEL STROKES TIME TIME/500 CALORIES PULSE DISTANCE [ BUTTON FUNCTION: ] RECOVERY AUTOMATICALLY EVALUATE YOUR FITNESS IMMEDIATELY AFTER YOUR WORK OUT RESET BACK TO THE MAIN MENU START / STOP START AND STOP ENTER TO CONFIRM YOUR SELECTION UP/ DOWN... - Page 25 FIG. 1-2-3 BIP BIP BIP 2 SECONDS 2 PCS AA BATTERIES YEAR HOUR MONTH ALARM MANUAL RACE English – • Install 2PCS AA batteries (included) and computer will beep for 2 seconds (Fig.1). • Then, the computer enters into the CLOCK & CALENDAR MODE (Fig.2). •...
- Page 26 Spanish – • Instale 2 pilas AA (incluidas) y la computadora emitirá un pitido durante 2 segundos (Fig.1). • Luego, la computadora ingresa en el MODO RELOJ Y CALENDARIO (Fig.2). • El RELOJ parpadeará. Presione ARRIBA para ajustar la hora. Presione ENTER para confirmar. •...
- Page 27 RACE FIG. 5-6-7 TIME RACE MODE : English – Select RACE mode and L1 will flash. The TIME/500M will display 8:00.Then, press UP or DOWN to select L1 ~ L15. Press ENTER to confirm. Then, you can set the distance of the race (500M~10000M) while the value of DISTANCE is blinking. Press ENTER and the picture of the race will display on the screen.
- Page 28 stop when either user or computer has reached the race distance that was set. Then the matrix displays “PC WIN” or “USER WIN” (Fig.7). (2) When the race is over, you can press START to start a race once again. Press RESET to leave the RACE screen. Spanish –...
-
Page 29: Parts List / Lista Piezas / Liste Pièces /Elenco Parti / Stückliste / Lijst Met Onderdelen
PARTS LIST / LISTA PIEZAS / LISTE PIÈCES /ELENCO PARTI / STÜCKLISTE / LIJST MET ONDERDELEN... - Page 32 Description Spec. Description Spec. Main frame Computer Front stabilizer Sensor wire Slide rail SPHC,T=1.5 Sensor holder Nylon, black Rear stabilizer Magnet Ø10*5 Support for computer Spacer for mesh belt wheel Ø16* Ø10.2*69 Support Plate Short spacer Ø12.7* Ø8.2*13 Tank plate Screw M10*185 Plate for bushing...
-
Page 33: Periodic Maintenance / Mantenimiento Periódico / Entretiens Périodiques / Manutenzione Periodica / Regelmäßige Wartung / Periodiek Onderhoud
PERIODIC MAINTENANCE / MANTENIMIENTO PERIÓDICO / ENTRETIENS PÉRIODIQUES / MANUTENZIONE PERIODICA / REGELMÄßIGE WARTUNG / PERIODIEK ONDERHOUD AA Batteries WATER CLEANING TABLET sodium dichlor CHLORINE OR CHLORINE BLEACH (56% chlorine) every 4-6 months. - Page 34 (ENGLISH) REGULAR MAINTENANCE: • STORAGE: Keep your equipment in a enclosed place, away from dust or humidity. Don’t store it neither in a garage or in a indoor backyard, or near the water. • Humidity, dust and water could damage it and have an effect on its functioning. •...
-
Page 35: Recycling Information / Información Sobre Reciclaje / Information Pour Le Recyclage / Informazioni Per Il Riciclo / Information Zum Produktrecycling / Recycling Informatie
(GERMAN) REGELMÄßIGE WARTUNG: • LAGERUNG: Lagern Sie ihr Gerät in einem geschlossenen Raum, fern vom Staub oder Feuchtigkeit. Feuchtigkeit, Staub und Wasser könnten das Gerät schädigen und den Betrieb stören. • SCHRAUBEN UND VERBINDUNGSKABEL: Überprüfen Sie und ziehen Sie regelmäßig alle Muttern und Schrauben fest, da sich diese aufgrund der Vibration lockern können. -
Page 36: Workout Guidelines / Ejercicios De Calentamiento / Conseils Pour Lʼentraînement / Consigli Per L'allenamento / Trainingsrichtlinien / Richtlijnen Voor Een Training
WORKOUT GUIDELINES / EJERCICIOS DE CALENTAMIENTO / CONSEILS POUR LʼENTRAÎNEMENT / CONSIGLI PER L'ALLENAMENTO / TRAININGSRICHTLINIEN / RICHTLIJNEN VOOR EEN TRAINING (ENGLISH) BEWARE: Before starting to use this or any exercise programms, consult your doctor. This is specially important for people older than 35 years old, or for people with health problems. - Page 37 Si votre appareil est équipé d'un capteur de pouls, vous devez garder à l'esprit qu'il ne s'agit pas d'un dispositif médical. Divers facteurs peuvent affecter la précision des lectures du rythme cardiaque. Le capteur de pouls est uniquement prévu comme une aide aux exercices, et établit une tendance générale de votre rythme cardiaque.
-
Page 38: Ordering Spare Parts And Accessories / Pedido De Repuestos Yaccesorios / Commander Des Pièces Détachées Et Accessoires / Ordinazione Di Ricambi E Accessori / Zubehörbestellung - Ersatzteilbestellung / Onderdelen En Accessoires
Opwarmen: Strek en buig uw spieren op kalme wijze gedurende 5 à 10 minuten. Het opwarmen verhoogt uw lichaamstemperatuur, uw hartslagritme en de bloedsomloop. Hiermee bereidt u zich voor op de oefeningen. • Oefening op trainingsniveau: Voer uw oefeningen uit gedurende 20 tot 30 minuten met uw hartslagritme op trainingsniveau. (Tijdens de eerste weken van uw trainingsprogramma dient u het hartslagritme nooit meer dan 20 minuten op trainingsniveau te houden.) Adem diep en regelmatig terwijl u de oefeningen doet (hou nooit de adem in). -
Page 39: Precautions / Precauines / Précautions / Vorsichtsmassnahmen / Voorzorgsmaatregelen
PRECAUTIONS / PRECAUINES / PRÉCAUTIONS / VORSICHTSMASSNAHMEN / OORZORGSMAATREGELEN ENG- A correct lubrication of the product with silicon oil or teflon is REALLY IMPORTANT. This lubrication MUST BE PERFORMED REGULARLY DEPENDING ON EACH PERSON, EVEN BEFORE ITS FIRST USE. ESP- Es MUY IMPORTANTE que realice una LUBRICACIÓN adecuada del producto con aceite de silicona o de teflón.
Need help?
Do you have a question about the trainer TR-W7B and is the answer not in the manual?
Questions and answers