Table of Contents
Advertisement
Quick Links
Advertisement
Table of Contents

Related Manuals for Gorenje GS66260


Summary of Contents for Gorenje GS66260
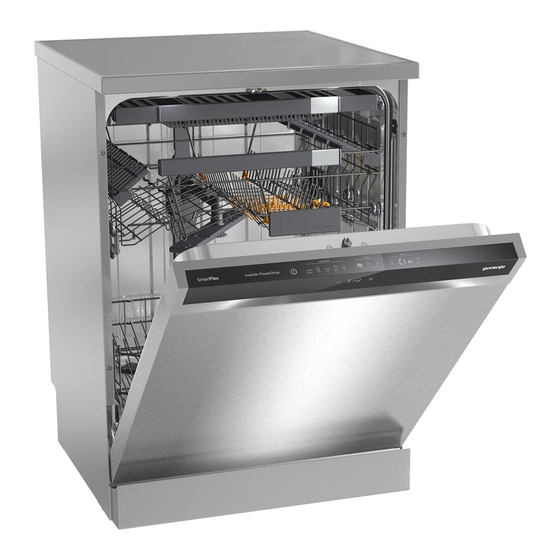
- Page 1 OPERATING INSTRUCTIONS DISHWASHER GS66260 www.gorenje.com...
-
Page 2: Table Of Contents
Contents Your dishwasher ..................Safety instructions ..................Before washing for the first time ............... Loading the dishwasher ................Using the dishwasher ................Settings ..................... Care and cleaning ..................Troubleshooting ..................Installation ....................Service ...................... Information for test institute ............... Technical information ................Your dishwasher 14 15 1. -
Page 3: Safety Instructions
Safety instructions General Installation • Read the operating instructions and See the chapter Installation. keep them in a safe place! Child safety • Never use the dishwasher for any Children must be watched. Do not allow purpose other than that specified in children to use or play with the these operating instructions. -
Page 4: Before Washing For The First Time
Before washing for the first time • Supports made from untreated wood. Checking water hardness • Protective plastic made from In order to achieve good dishwashing results, the dishwasher needs soft water polyethylene (PE). (water with low mineral content). Hard Disposal water leaves a white coating on dishes The dishwasher is manufactured and... - Page 5 achieve a better dishwashing result with Set the Water hardness clear and spotless dishes. Chapter Settings describes how to adjust the water softener. Press to open Top up with salt 1. Open the rinse aid compartment lid. 2. Carefully top up with rinse aid to the Salt compartment lid level marked max.
-
Page 6: Loading The Dishwasher
Loading the dishwasher Greener dishwashing • Angle dishes with hollows, such as cups, so that the rinse water will run off. • Do not rinse under running water. This is also important for plastic items. Simply scrape off large food particles •... - Page 7 Upper basket Place glasses, cups, bowls, side plates and saucers in the upper basket. All dirty surfaces should face inwards and downwards! Wine glasses are placed on the wine glass shelf and knives are placed in the knife stand on the right (if fitted). Foldable tines The foldable tines can be folded up or down to make it easier to load pots, bowls...
-
Page 8: Using The Dishwasher
Using the dishwasher Add detergent catch inwards before adjusting their position. Press to open 1. Prewash detergent compartment 2. Main wash detergent compartment Detergent is added according to water hardness. Follow the instructions on the detergent packaging. This dishwasher is fitted with a water softener, so use detergent and rinse aid doses suitable for soft water. - Page 9 detergent will not be released properly if PROGRAMS - Select a programme the lid is tight and will not open correctly. Select a programme to suit the type of dishes and how dirty they are. Eco wash NOTE! is always pre-selected. Dishwasher tablets are not Press the desired programme until the recommended for short programmes...
- Page 10 Extra hygiene Quick wash This option is intended for situations This programme is used for glasses and where demands on hygiene are especially porcelain that is slightly dirty, such as high, such as when dishwashing baby coffee cups. bottles and cutting boards. The temperature is increased in both the main In combination with SpeedWash, a shorter wash and the final rinse.
- Page 11 This may differ somewhat from time to Once the programme has finished time depending on the temperature of the Once the programme has finished, "End" water supply, the amount of dishes, the appears on the display. ambient temperature and other factors. At the end of the programme one short Front display signal will sound.
- Page 12 The programme starts when the door is Self-cleaning programme (CLn) closed. Self-cleaning programme for hygienic cleaning of the dishwasher tub, spray arms and spray pipes. This programme prevents bad odours from dirty dishes left in the dishwasher. This programme should be run (with no Activate the programme until a dishes in the machine) using normal dishwashing programme is run.
-
Page 14: Settings
Settings Open the settings menu: First, open the door. Turn off the machine. Press and hold the main power switch until the display lights up. Within 10 seconds: - press the programme button for Auto wash and the option button for SpeedWash. - Page 15 Settings Options Water hardness 2:00 - 2:09 Adjusting the water softener. Select a setting depending on the hardness of the water supply. It is important that this setting is correct! German French wa- Recom- water ter hard- mended hardness ness scale setting scale 0-5°dH...
- Page 16 Settings Options 3:00 (Off) You can activate this setting when (3-in-1/all-in-one 3:01 (On) using 3-in-1/ All-in-one detergent. The detergent) dishwashing programmes automatically adapt to provide the best possible dishwashing and drying results every time. If this setting is activated there is no need to add rinse aid since this option disables rinse aid dispensing.
-
Page 17: Care And Cleaning
Care and cleaning WARNING! Top up with rinse aid In order to avoid rust stains a When the rinse aid needs topping up, the dishwashing programme must be started above symbol lights on the display. immediately after adding salt. Press to open Never pour dishwasher detergent into the salt compartment. - Page 18 2. Lift the filter straight up using the Lower spray arm handle. Free the coarse filter to clean • Pull the lower spray arm straight up to the fine filter. release it. 3. Refit in reverse order. Check that the edges seal properly when refitting the fine filter.
- Page 19 • Remove the plug from the wall The dishwasher tub socket. The dishwasher tub is made of stainless • Call the service department. steel and is kept clean through normal use. Limescale deposits If you have hard water, limescale deposits may build up in the dishwasher.
- Page 20 Unblocking the inlet hose filter If the water supply contains small particles, the outer filter on the inlet hose may become blocked, which results in Water inlet fault. 1. Turn off the machine using the main power switch and unplug it from the wall socket.
-
Page 21: Troubleshooting
Troubleshooting Type of fault on the dis- Action play Overfilling Clear the drainage pump. See the chapter Care and cleaning. If the problem persists, call the service department. Water outlet fault See “Water remains in the dishwasher” in the table “Problem”... - Page 22 Problem Possible causes Action Cannot close door. The baskets are not Check that the baskets are correctly positioned. correctly positioned horizontally. Check that the dishes are not blocking the baskets from sliding properly into place. The door lock does not click Check the door lock.
- Page 23 Problem Possible causes Action The dishwasher does not The door is not properly Check. start. closed. You have opened the Close the door and wait. dishwasher to add more After a while, the dishes while a programme dishwasher continues the is in progress.
- Page 24 Problem Possible causes Action The dishes are not clean. The spray arms do not Remove the arms and clean rotate. them. Check that the dishes are not blocking the spray arms. Spray arm holes or bearings Clean the spray arms. See blocked.
- Page 25 Problem Possible causes Action Spots on stainless steel or Some foodstuffs, such as Rinse off these types of silver. mustard, mayonnaise, foodstuffs if not starting the lemon, vinegar, salt and dishwasher immediately. dressings, can mark Use the Rinse programme. stainless steel if left for too long.
- Page 26 Problem Possible causes Action Spots left after washing. Lipstick and tea can be Use a detergent with a difficult to wash off. bleaching agent. Detergent residue in the The detergent compartment The detergent compartment detergent compartment after was damp when adding must be dry when adding dishwashing.
- Page 27 Problem Possible causes Action Water remains in the The filters are blocked. Clean the coarse and fine dishwasher. filters. The filters are not fitted Check that the filter handle correctly. is locked in the stop position. The handle should point straight out from the dishwasher.
- Page 28 Problem Possible causes Action Bad odour outside the The special programme ION Deactivate the special dishwasher. is activated in a confined programme ION. See the space with insufficient chapter Using the ventilation. dishwasher. The dishes are not dry The Auto open option is not Activate the Auto open enough.
-
Page 29: Installation
Installation [mm] 1214 Nominal dimensions. Actual measurements may vary. Safety instructions WARNING! • Connections to electricity, water and Turn off the water supply when installing drainage must be performed by a the dishwasher! qualified professional. The plug must be disconnected or power •... - Page 30 Lean the dishwasher forwards a little Placing the dishwasher and adjust the rear foot with the screw The dishwasher is intended for at the front of the dishwasher. Turn freestanding installation, but can also be clockwise to lower or anticlockwise to installed under a worktop.
- Page 31 No part of the drainage hose may be more Attach the plinth than 950 mm above the bottom of the (Packed inside the dishwasher.) dishwasher. The hose must not be routed directly to a floor drain or the like. In such cases, the hose can act as a siphon and empty the dishwasher.
- Page 32 settle for a while. Check that all NOTE! connections are watertight. Change of electrical cables as well as repairs and maintenance relating to Connection to cold water supply safety or performance must be carried Connect the dishwasher to the cold water out by the manufacturer’s service agent supply if the building is heated using oil, or someone with similar professional...
-
Page 33: Service
The request should include the details on nearest dealer, see www.gorenje.com. the serial number plate. Include the article When making contact, provide the details number (1) and the serial number (2). - Page 34 Your notes...
- Page 35 Your notes...
-
Page 36: Technical Information
Technical information Information on energy labelling Information sheet, in compliance with Commission Delegated Regulation (EU) No. 1059/2010 Gorenje Model designation: GS66260 Number of standard place settings: Energy efficiency class: A+++ Annual energy consumption(AE 245 kWh per year Energy consumption of the standard cleaning cycle(E 0.86 kWh...
Need help?
Do you have a question about the GS66260 and is the answer not in the manual?
Questions and answers