
Subscribe to Our Youtube Channel
Related Manuals for PowerPoint P05E2S1W


Summary of Contents for PowerPoint P05E2S1W
- Page 1 F ree Standing Electric Oven 60x60 cm P05E2S1W 06E2S1W / P 05E2S1BL / P06E2S1BL / T05E2S1W ...
- Page 2 Features ………………………………….………………………………………………………… ……. 3 Safety Instructions..................4 Installation ....................6 Fixing to the Wall …………………………………………………………………….…………….… 8 Electrical Requirements …………………………….…………………………….…………..9 Connecting the Mains Supply Cable…….….………………………………..….………... 10 Using your Hob …………………………………………………………………………………..…. 11...
- Page 3 Using your Oven ……………………….……………………………………………….…….….… 12 Cleaning and Care …………………………………........... Replacing the Bulb/Top Tips ……………….…………………….…...……………………… 15 Disposal of Appliance/Problem Solving ……..……..…........17 Health and Safety ..................18 Technical Data/ Warranty Information………………….……………………………….. 20 Customer Care …………………………………………….……………….…….…………………. 22...
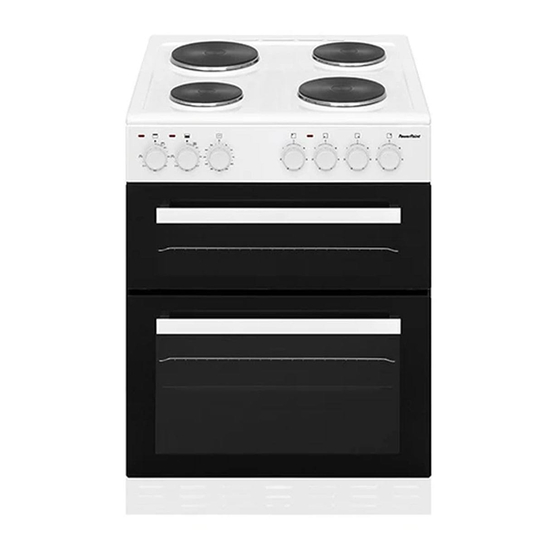
- Page 4 5. Solid Hob 6. Cooker Section Led Lamp 7. Oven Section Led Lamp 8. Control Panel 9. Thermostat Knob 10. Function Knob for Oven For illustration purposes only . Accessories provided with models P06E1S1W /P06E2S1W 1 Cooking Tray & 1 Wire Grid, inner tray grid & Handle...
- Page 5 The use of any electrical appliance requires the following common sense safety rules. There is danger of injury or death to the person and damage to the appliance. Note: If the following instructions are not adhered to the warranty will not Be applicable ●...
- Page 6 ● Before starting to use your appliance ensure that curtains, paper or flammable items are kept away from your appliance. Do not keep flammable materials inside of or around your cooker ● Take care when closing the oven door that there is nothing obstructing it from closing as this may break the glass door ●...
- Page 7 ● This cooker must be installed according to local regulations by a suitably qualified technician ● Carefully unpack the cooker and check for any external visible damage. Do not install or use if it is damaged ● Packaging materials should be collected together and disposed of immediately as they may be harmful to children ●...
- Page 8 Before using the appliance fix it securely to the wall using the chain kit provided. Fix to the wall at the back of the cooker. This will prevent the cooker from toppling forward if excess weight is placed on the oven door. As the chains must be attached to the wall using fixings suitable for your wall type, the wall fixings are not supplied with the cooker.
- Page 9 Supply Connection: 32 A (double pole switched fused outlet with3mm contact gap) Max Rated Inputs: 7.00 kW Mains Supply Lead: 3 core x 6 mm² (not supplied) For future reference please record the following information which can be found on the rating plate and the date of purchase which can be found on your sales invoice.
- Page 10 ● Release the cover plate by removing the cover screw ● Loosen the cable clamp ● Connect the mains supply cable to the terminal block on the cooker using the colour code ● Secure the cable clamp ● Check the cable terminals for tightness and ensure that the terminal links are in place, then replace the cover plate and cover screw Control Panels P06E1S1W...
- Page 11 Before first use switch on each cooking zone at 6 for 5 minutes. There may be an unusual smell and some smoke, this is the burning off of protective material and not a defect. Each zone on the hob top is controlled by a knob. The icon above the dial shows which knob controls which burner.
- Page 12 new cookers. To eliminate this smell run the oven at 240 degrees for 40-60 minutes with the oven empty. When cool, clean with warm soapy water. In order to operate the oven the thermostat must be adjusted to the desired temperature.
- Page 13 Cleaning the Oven ● Do not clean oven using caustic creams, abrasive cleaning powders, wire wool or hard tools to clean any parts of this cooker ● Enamelled parts of the oven can be damaged if excess cleaning liquids are not immediately removed ●...
- Page 14 ● Do not use abrasive cleaners or sharp metal scrapers to clean the oven door glass as it may shatter Removing the Oven Door for Cleaning : To facilitate the cleaning of the inside of the cooker and the outer frame of the oven, the door can be removed as follows:- ●...
- Page 15 ● Open door, unlock by pulling the hinge lock upwards with a screw driver ● Bring the hinge lock to the widest angle, bring both hinges connecting the oven door to the same position ● Close the oven door to lean on the hinge lock ●...
- Page 16 ● Avoid using pans on the hob that are unstable as they may be easily tipped over ● Use pans that have sufficient capacity for the amount of food being cooked so that they don’t boil over ● Use dark coloured enamelled cookware to maximise heat transmission ●...
- Page 17 ● Do not place pans or baking trays directly on the base of the oven cavity, or line it with aluminium foil ● Do not grill food containing fat without using the grill trivet. The Grill trivet should never be covered with aluminium foil ●...
- Page 18 Content. Do not leave food in the oven to cool after it has been cooked. Use a covered container, where practical, when cooking to Reduce the amount of condensation that forms. Location ● This appliance is intended to be used in household and residential type environments.
- Page 19 ● Teach children to be aware of dangers in the kitchen ● Do not allow children to play with the appliance or tamper with the controls Other Safety Considerations ● Do not operate any appliance with a damaged cord or after the appliance malfunctions or has been damaged in any manner ●...
- Page 20 Registering Your 2 Year Guarantee Your standard one year guarantee is extended for an additional 1 year when you register the product within 28 days of purchase with the supplier Shomar Ltd. If you do not register the product with Shomar Ltd within 28 days, your product is guaranteed for 1 year.
- Page 21 Please refer to the one year guarantee for more information. One Year Guarantee It is important to retain the retailer’s receipt as proof of purchase. Staple your receipt to this back cover for future reference. Please quote the following information if the product develops a fault. These numbers can be found on the product.
- Page 22 “safety instructions”. Shomar Ltd has a policy of continuous F7F7the right to change the specification of its models at any time. The After Sales Division for PowerPoint Appliances is located at the offices of the Brand owner and Distributor –...
Need help?
Do you have a question about the P05E2S1W and is the answer not in the manual?
Questions and answers