Table of Contents
Advertisement
Quick Links
Advertisement
Table of Contents

Related Manuals for Samsung SM-C111M


Summary of Contents for Samsung SM-C111M
- Page 1 SM-C111M User Manual English (LTN). 07/2014. Rev.1.0 www.samsung.com...
-
Page 2: Table Of Contents
Table of Contents Read me first Personalising Switching to easy mode Managing the Home and Apps screens Getting started Changing the screen lock method Setting wallpaper Device layout Changing ringtones Buttons Setting up accounts Package contents Moving contacts from other devices to Installing the SIM or USIM card and your device battery... - Page 3 Table of Contents Contacts 107 Using Video clip studio 108 Using Video trimmer Adding contacts Managing contacts Internet & SNS Messages & email 109 Internet 110 Chrome Messages 111 Hangouts Email Google Mail Voice features Camera 112 S Voice 114 Voice Recorder Launching Camera 116 Voice Search Using camera widgets...
- Page 4 Table of Contents Utilities Settings 130 S Finder 161 About Settings 131 S Planner 161 QUICK SETTINGS 134 Calculator 161 NETWORK CONNECTIONS 134 Clock 166 CONNECT AND SHARE 136 Drive 167 SOUND AND DISPLAY 136 Dropbox 171 PERSONALIZATION 137 Google 172 MOTION 138 Kids Mode 173 USER AND BACKUP...
- Page 5 Table of Contents 209 Using single tap mode 209 Configuring accessibility settings 210 Using other useful features Troubleshooting Cleaning the device...
-
Page 6: Read Me First
• D efault apps that come with the device are subject to updates and may no longer be supported without prior notice. If you have questions about an app provided with the device, contact a Samsung Service Centre. For user-installed apps, contact service providers. - Page 7 Read me first Instructional icons Warning: situations that could cause injury to yourself or others Caution: situations that could cause damage to your device or other equipment Note: notes, usage tips, or additional information...
-
Page 8: Getting Started
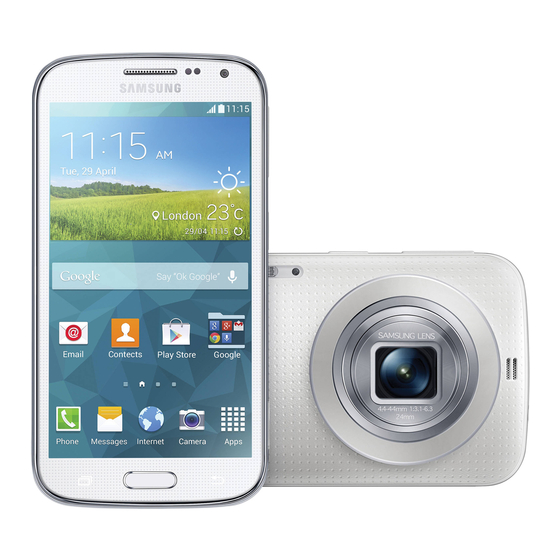
Getting started Device layout Earpiece Front camera Proximity/Light sensor Volume button Touch screen Power button Home button Shutter button Recent apps button Back button Multipurpose jack Microphone Speaker Headset jack Microphone Eyelet for strap GPS antenna Lens AF-assist light Back cover NFC antenna (on the Flash battery) -
Page 9: Buttons
Getting started Do not subject the lens to impacts. Doing so may cause the lens to malfunction. • D o not cover the antenna area with your hands or other objects, except when you are taking photos or videos. This may cause connectivity problems or drain the battery. -
Page 10: Package Contents
• A ppearances and specifications are subject to change without prior notice. • Y ou can purchase additional accessories from your local Samsung retailer. Make sure they are compatible with the device before purchase. • U se only Samsung-approved accessories. Malfunctions caused by using unapproved accessories are not covered by the warranty service. -
Page 11: Installing The Sim Or Usim Card And Battery
Getting started Installing the SIM or USIM card and battery Insert the SIM or USIM card provided by the mobile telephone service provider, and the included battery. Only microSIM cards work with the device. Remove the back cover. Be careful not to damage your fingernails when you remove the back cover. Do not bend or twist the back cover excessively. - Page 12 SIM card slot, take the device to a Samsung Service Centre to remove the memory card. • U se caution not to lose or let others use the SIM or USIM card. Samsung is not responsible for any damages or inconveniences caused by lost or stolen cards.
- Page 13 Getting started Replace the back cover. Removing the SIM or USIM card and battery Remove the back cover. Pull out the battery.
-
Page 14: Charging The Battery
Use the charger to charge the battery before using it for the first time. A computer can be also used to charge the device by connecting them via the USB cable. Use only Samsung-approved chargers, batteries, and cables. Unapproved chargers or cables can cause the battery to explode or damage the device. - Page 15 • W hile charging, the device may heat up. This is normal and should not affect the device’s lifespan or performance. If the battery gets hotter than usual, the charger may stop charging. • I f the device is not charging properly, take the device and the charger to a Samsung Service Centre.
- Page 16 Getting started After fully charging, disconnect the device from the charger. First unplug the charger from the device, and then unplug it from the electric socket. Do not remove the battery before removing the charger. This may damage the device. To save energy, unplug the charger when not in use.
-
Page 17: Inserting A Memory Card
Getting started Inserting a memory card Your device accepts memory cards with maximum capacities of 64 GB. Depending on the memory card manufacturer and type, some memory cards may not be compatible with your device. • S ome memory cards may not be fully compatible with the device. Using an incompatible card may damage the device or the memory card, or corrupt the data stored in it. - Page 18 Do not remove the memory card while the device is transferring or accessing information. Doing so can cause data to be lost or corrupted or damage to the memory card or device. Samsung is not responsible for losses that result from the misuse of damaged memory cards, including the loss of data.
-
Page 19: Attaching A Hand Strap
Getting started Attaching a hand strap Remove the back cover. Slide a hand strap through the slot and hook it over the small projection. Replace the back cover. Turning the device on and off When turning on the device for the first time, follow the on-screen instructions to set up your device. -
Page 20: Holding The Device
Getting started Holding the device Do not cover the antenna area with your hands or other objects. This may cause connectivity problems or drain the battery. Locking and unlocking the device Pressing the Power button turns off the screen and puts the device into lock mode. The device automatically gets locked if it is not used for a specified period. -
Page 21: Basics
Basics Using the touch screen • D o not allow the touch screen to come into contact with other electrical devices. Electrostatic discharges can cause the touch screen to malfunction. • T o avoid damaging the touch screen, do not tap it with anything sharp or apply excessive pressure to it with your fingertips. - Page 22 Basics Tapping and holding Tap and hold an item for more than 2 seconds to access available options. Dragging To move an icon or thumbnail, tap and hold it and drag it to the target position. Double-tapping Double-tap on a webpage or image to zoom in a part. Double-tap again to return.
- Page 23 Basics Flicking Flick left or right on the Home screen or the Apps screen to see another panel. Flick up or down to scroll through a webpage or a list, such as contacts. Spreading and pinching Spread two fingers apart on a webpage, map, or image to zoom in a part. Pinch to zoom out.
-
Page 24: Indicator Icons
Basics Indicator icons The icons displayed on the status bar provide information about the status of the device. The icons listed in the table below are most common. The status bar may not appear at the top of the screen in some apps. To display the status bar, drag down from the top of the screen. -
Page 25: Notifications And Quick Setting Panels
Basics Icon Meaning Vibration mode activated Flight mode activated Error occurred or caution required Battery power level Notifications and quick setting panels Using the notifications panel When you receive new notifications, such as messages or missed calls, indicator icons appear on the status bar. - Page 26 Basics You can use the following functions on the notifications panel. Launch Settings. Activate or deactivate options. Tap and hold options to view View all quick setting buttons. more detailed settings. Launch S Finder. Launch Quick connect. Clear all notifications. Adjust the brightness.
- Page 27 Basics Using the quick setting panel A number of quick setting buttons are available on the notifications panel. To view or access more quick setting buttons, open the quick setting panel. When you open the quick setting panel, you can activate or deactivate various features or configure settings. To open the quick setting panel, drag the status bar downwards with two fingers.
- Page 28 Basics • U . power saving: Activate or deactivate ultra power-saving mode. Refer to Using the power saving feature for details. • T oolbox: Hide or show the toolbox icon. Refer to Toolbox for details. • W i-Fi hotspot: Activate or deactivate the Wi-Fi tethering feature. Refer to Tethering devices and using mobile hotspots for details.
-
Page 29: Home And Apps Screens
Basics Home and Apps screens Home screen The Home screen is the starting point to access all of the device’s features. It displays widgets, shortcuts to apps, and more. Widgets are small apps that launch specific app functions to provide information and convenient access on your Home screen. The Home screen can have multiple panels. - Page 30 Basics Home screen options Tap and hold an empty area, or pinch your fingers together on the Home screen to access the options available on the Home screen.
- Page 31 Basics Using My Magazine or scroll right on the Home screen to open My Magazine. My Magazine displays live social network updates and news that you are interested in. Access additional options. To select the content to be displayed, tap → Settings, and then select the categories that interest you.
- Page 32 Basics Apps screen The Apps screen displays icons for all apps, including any new apps installed. On the Home screen, tap Apps to open the Apps screen. To view other panels, scroll left or right, or select a screen indicator at the bottom of the screen. To customise the Apps screen, refer to Managing the Home and Apps screens for details.
-
Page 33: Opening Apps
Alternatively, tap Installing or uninstalling apps Samsung Apps Use this app to purchase and download dedicated Samsung apps. Tap Samsung Apps on the Apps screen. This app may not be available depending on the region or service provider. Installing apps Browse apps by category or tap to search for a keyword. - Page 34 Basics Play Store Use this app to purchase and download apps and games that are able to run on the device. Tap Play Store on the Apps screen. This app may not be available depending on the region or service provider. Installing apps Browse apps by category or tap to search for a keyword.
-
Page 35: Entering Text
Text entry is not supported in some languages. To enter text, you must change the input language to one of the supported languages. Set options for the Samsung keyboard. Delete a preceding character. Enter uppercase. For all caps, tap it twice. - Page 36 Basics Changing the keyboard layout , select a language under INPUT LANGUAGES, and then select a keyboard layout to use. On 3x4 keyboard, a key has three or four characters. To enter a character, tap repeatedly the key corresponding to the character. Using additional keyboard functions Tap and hold to use the following functions.
-
Page 37: Using The Power Saving Feature
Basics Copying and pasting Tap and hold over text. Drag or to select the desired text, or tap Select all to select all text. Tap Copy or Cut. The selected text is copied to the clipboard. Place the cursor where the text is to be inserted and tap → Paste. To paste text that you have previously copied, tap →... - Page 38 Basics Ultra power saving mode Use this mode to extend the device’s battery power. In ultra power saving mode the device performs the following: • R estricts the available apps to essential and selected apps only. • D eactivates the mobile data connection when the screen turns off. •...
-
Page 39: Accessing Help Information
Basics To add an app on the Home screen, tap and select an app. To remove an app from the Home screen, tap → Remove, select an app with , and then tap OK. To change network connectivity settings and more, tap → Settings. To deactivate the ultra power saving feature, tap →... -
Page 40: Personalising
Personalising Switching to easy mode Easy mode provides an easier user experience by using a simpler layout and bigger icons on the Home screen. You can access the most popular apps and frequently-used settings, and add shortcuts to your favourite contacts. On the Apps screen, tap Settings →... - Page 41 Personalising Moving and removing an item Tap and hold an item on the Home screen, and then drag it to a new location. To move the item to another panel, drag it to the side of the screen. You can also move frequently-used apps to the shortcuts area at the bottom of the Home screen.
- Page 42 Personalising Managing the Apps screen Changing view mode On the Apps screen, tap → View as and select a sorting method. Hiding apps Hide apps that you do not want to see on the Apps screen. On the Apps screen, tap → Hide apps, select apps, and then tap Done. To display hidden apps, tap →...
-
Page 43: Changing The Screen Lock Method
On the Apps screen, tap Settings → Lock screen → Screen lock, and then select a screen lock method. The device requires an unlock code whenever unlocking it. If the unlock code is forgotten, take the device to a Samsung Service Centre to reset it. Pattern Draw a pattern by connecting four dots or more, and then draw the pattern again to verify it. -
Page 44: Setting Wallpaper
Personalising Setting wallpaper Set an image or photo stored on the device as wallpaper for the Home screen or the locked screen. On the Apps screen, tap Settings → Wallpaper. Alternatively, on the Home screen, tap and hold an empty area, and then tap Wallpapers. Select a screen to change or apply wallpaper to. -
Page 45: Setting Up Accounts
Samsung Smart Switch is not supported on some devices or computers. Using Smart Switch Mobile Use this app to transfer contacts from your previous iPhone or Android device to your new device. You can download the app from Samsung Apps or Play Store. - Page 46 Moving contacts using Samsung Kies Import a backup of your contacts from your computer via Samsung Kies to restore contacts on your device. You can also back up contacts to the computer via Samsung Kies. Refer to Connecting with Samsung Kies...
-
Page 47: Network Connectivity
Network connectivity Connecting to a mobile network Connect the device to a mobile network to use the Internet when a Wi-Fi network is not available. On the Apps screen, tap Settings → Data usage, and then tick Mobile data. Alternatively, open the quick setting panel and tap Mobile data to activate it. - Page 48 Network connectivity Adding Wi-Fi networks If the desired network does not appear in the networks list, tap Add Wi-Fi network at the bottom of the networks list. Enter the network name in Network SSID, select the security type and enter the password if it is not an open network, and then tap Connect. Activating Wi-Fi Passpoint Wi-Fi Passpoint enables the device to search for and connect to a certified Wi-Fi network.
-
Page 49: Using Smart Network Switch
Network connectivity Using Smart network switch Use this feature to maintain a stable network connection when you browse webpages, download content, and more. Before using this feature, ensure that the mobile data connection and Wi-Fi features are activated. You may incur additional charges when using this feature via a mobile network. On the Apps screen, tap Settings →... - Page 50 Network connectivity Using the mobile hotspot Use your device as a mobile hotspot to share your device’s mobile data connection with other devices. Before using this feature • E nsure that the Wi-Fi feature is deactivated. • E nsure that the device’s mobile data connection is activated. On the Apps screen, tap Settings →...
- Page 51 Network connectivity Using Bluetooth tethering Share the device’s mobile data connection with connected computers and other devices via Bluetooth. Before using this feature • E nsure that your device is paired with the other device via Bluetooth. Refer to Bluetooth for details.
-
Page 52: Motions & Usability Features
Motions & usability features Control motions Excessive shaking or impact to the device may result in unintended inputs. Control motions properly. Direct call On the Apps screen, tap Settings → Motions and gestures → Direct call, and then drag the Direct call switch to the right. - Page 53 Motions & usability features Smart alert On the Apps screen, tap Settings → Motions and gestures → Smart alert, and then drag the Smart alert switch to the right. When you pick up the device after it has been idle for some time or when the screen has turned off, it vibrates if you have missed calls or new messages.
- Page 54 Motions & usability features Turning device over Turn the device over to mute incoming calls or alarms, or to pause media playback. Smart pause Playback pauses automatically when you look away from the screen. It resumes when you look at the screen again.
-
Page 55: Toolbox
Motions & usability features Palm swipe to capture On the Apps screen, tap Settings → Motions and gestures → Palm swipe to capture, and then drag the Palm swipe to capture switch to the right. Place the side of your hand on the screen and sweep it across the screen from the right to the left or vice versa to capture a screenshot. -
Page 56: Phone
Phone Making calls Tap Phone on the Apps screen. Tap Keypad, enter a phone number, and then tap to make a voice call, or tap to make a video call. You can also make calls to phone numbers listed in Logs, Favorites, and Contacts. View call and message logs. - Page 57 Phone Making calls from call logs or contact lists Tap Logs or Contacts, and then drag a contact or a phone number to the right to make a call. To deactivate the call by dragging an icon to the right feature, tap → Settings → Contacts, and then deselect Swipe to call or send msg.
- Page 58 Phone Number prediction Tap Keypad. When entering numbers on the keypad, automatic predictions appear. Select one of these to make a call. Speed dial numbers Tap Keypad. For speed dial numbers, tap and hold the corresponding digit. To assign a contact to a speed dial number, tap and hold an available speed dial number on the keypad, tap OK, and then select a contact.
-
Page 59: Receiving Calls
Phone Receiving calls Answering a call When a call comes in, drag outside the large circle. If a call notification pop-up window appears while you are using an app, tap Answer in the pop-up window. If the call waiting service is activated, another call can be answered. When the second call is answered, the first call is put on hold. -
Page 60: During A Call
Phone During a call During a voice call The following actions are available: • : Increase the volume. • A dd call: Dial a second call. • K eypad: Open the keypad. • E nd call: End the current call. •... - Page 61 Phone During a video call The following actions are available: • → Hide me: Hide your image from the other party. • → Outgoing image: Select an image to show it to the other party. • → Capture image: Capture the other party’s image. •...
-
Page 62: Adding Contacts
Contacts Adding contacts Moving contacts from other devices You can move contacts from other devices to your device. Refer to Moving contacts from other devices to your device for details. Creating contacts manually On the Apps screen, tap Contacts → Contacts. and enter contact information. -
Page 63: Managing Contacts
Contacts Managing contacts Editing a contact On the Apps screen, tap Contacts → Contacts. Select a contact to edit and tap Edit the contact information or tap Add another field to add more contact information. Tap Save. Deleting a contact Select a contact to delete, and then tap →... - Page 64 Merge contacts that are saved in the device with your accounts. On the Apps screen, tap Contacts → Contacts. Tap → Merge accounts → Google or Samsung account. Importing and exporting contacts Import contacts from storage services to your device or export contacts from the device to storage services.
- Page 65 Contacts Searching for contacts On the Apps screen, tap Contacts → Contacts. Use one of the following search methods: • S croll up or down the contacts list. • D rag a finger along the index at the right side of the contacts list to scroll through it quickly.
-
Page 66: Messages & Email
Messages & email Messages Sending messages Send text messages (SMS) or multimedia messages (MMS). You may incur additional charges for sending or receiving messages while you are outside your home service area. Tap Messages on the Apps screen. Add recipients and enter a message. Access additional options. - Page 67 Messages & email While composing a message, tap to use one of the following options: • Q uick responses: Select a message template and enter a message. • I nsert smiley: Enter emoticons. • A dd subject: Enter a subject. •...
- Page 68 Messages & email Viewing incoming messages Incoming messages are grouped into message threads by contact. Select a contact to view the person’s messages. You may incur additional charges for sending or receiving messages while you are outside your home service area. While viewing a message, tap to use one of the following options: •...
-
Page 69: Email
Messages & email Managing messages While viewing the list of messages, tap and use the following options: • S elect: Select messages to delete or to identify them as spam. • D elete: Delete all or selected messages. •... - Page 70 Messages & email Sending scheduled messages While composing a message, tap → Schedule email. Tick Schedule email, set a time and date, and then tap Done. • I f the device is turned off at the scheduled time, is not connected to the network, or the network is unstable, the message will not be sent.
-
Page 71: Google Mail
Messages & email Adding contacts to the priority list Set contacts that you communicate with frequently as priority contacts. Tap → Priority senders → Tap to add priority senders. → Enter email or Contacts, enter email addresses or select contacts to add, and then tap OK or Done. To add more contacts to the priority list, tap To remove contacts from the priority list, tap and hold a contact, tap Edit list of priority senders, tap... - Page 72 Messages & email Reading messages Tap a message to read. Delete the message. Keep the message for long-term Mark the message as unread. storage. Access additional options. Mark the message as a reminder. Reply to the message. Preview attachment.
-
Page 73: Camera
Camera Launching Camera About launching camera Use this app to take photos or videos. Tap Camera on the Apps screen. Use Gallery to view photos and videos taken with the device’s camera. Refer to Viewing content on the device for details. •... - Page 74 Camera Holding the camera correctly Make sure not to expose the lens to direct sunlight. This may discolour the image sensor, or cause it to malfunction. Make sure not to block the screen, lens, flash, or microphone. Learning the preview screen Switch between the Start taking a video.
- Page 75 Camera Half-pressing the Shutter button Press the Shutter button halfway down to adjust the focus. The camera adjusts the focus, exposure, and white balance automatically, and the focus frame turns green. The focus frame turns red if not focused.
- Page 76 Camera Zooming in and out Use one of the following methods: • U se the Volume button to zoom in or out. • S pread two fingers apart on the screen to zoom in, and pinch to zoom out. •...
- Page 77 Camera Taking videos to take a video. To stop recording, tap While recording, tap where you want to focus to change the focus. • T o change the focus while taking a video, tap where you want to focus. To focus on the centre of the screen, tap •...
-
Page 78: Using Camera Widgets
Camera Using camera widgets Camera Studio widget Use this widget to access various camera-related apps. Refer to Adding items on how to add widgets. Edit app shortcuts. Picture Frame widget Use this widget to play a slideshow on the Home screen. Refer to Adding items on how to add widgets. -
Page 79: Separating The Exposure Area And The Focus Area
Camera Separating the exposure area and the focus area If bright light affects the contrast or the subject is outside the auto focus area, use this feature to achieve an appropriate exposure. You can separate the exposure and focus areas and select the exposure level you want for the subject. -
Page 80: Using Remote Viewfinder
Camera Using remote viewfinder Use your device as a viewfinder for another device. You can control the other device remotely to take photos or videos from a distance. Your device displays the same image that is displayed on the connected device. Tap Camera on the Apps screen. -
Page 81: Using The Shooting Mode
Camera Using the shooting mode About using the shooting mode Various shooting modes are available with the camera. You can use them to customise your photos and videos. On the Apps screen, tap Camera → MODE. Tap Manage modes to select the shooting modes to appear on the mode selection screen. •... - Page 82 Camera • C ontinuous shot: Take a series of photos of moving subjects. • S elfie alarm: Detect a face in a preset area and take multiple photos automatically. You can then select the best photo. • M anual: Use this to adjust the shutter speed and aperture value manually. •...
- Page 83 Camera Using pro suggest mode Use this mode to take photos with one of the automatically suggested smart modes or by applying pre-defined image settings. Image settings can be combined in a film and then applied to shots when you shoot them. You can download various films or upload your own films.
- Page 84 Camera Using manual mode This mode lets you adjust the shutter speed and aperture value manually. In this mode, you can fully control the exposure of your photos. This mode is useful in controlled shooting environments, such as a studio, or when it is necessary to fine-tune camera settings. Tap Camera on the Apps screen.
- Page 85 Camera Using selfie alarm mode Use this to detect a face in a preset area and to take multiple photos automatically. You can then select the best photo. Tap Camera on the Apps screen. Tap MODE → Selfie alarm. Drag or adjust the frame to set a detection area. Compose your shot with the lens facing you.
- Page 86 Camera Using HDR (rich tone) mode Take photos with rich colours and reproduce details even in bright and dark areas. On the Apps screen, tap Camera → MODE → HDR (rich tone), and then take a photo. Without effect With effect →...
- Page 87 Camera Using surround shot mode Use this mode to take multiple shots of your immediate surroundings and combine them as a single spherical image. Tap Camera on the Apps screen. Tap MODE → Surround shot. A target pointer appears on the screen. Move the device to locate the target pointer to the area where you want to the first shot.
- Page 88 Camera Using virtual tour mode About virtual tour mode Use this shooting mode to take photos in a space by moving forwards, or rotating left or right. Photos of the space are taken from different angles. You can view the photos in a slideshow and simulate actually moving through the space.
- Page 89 Camera Move with the device slowly in the direction of the arrow. When the dot is in the centre of the large circle, the device starts taking photos. Repeat this action to take more photos. To see a preview of the photo, tap at the bottom left of the screen. The direction where images were taken is displayed on each preview thumbnail.
- Page 90 Camera Select a shooting mode and apply an effect to the photos. The available modes vary depending on the photo you take. • B est photo: Take a series of photos and save the best one. To view other photos in the series, scroll left or right.
-
Page 91: Configuring Settings
Camera Configuring settings About configuring settings On the Apps screen, tap Camera → . Not all of the following options are available in both still camera and video camera modes. The available options vary depending on the mode used. • S hutter speed: Adjust the shutter speed to capture photos of fast-moving subjects or create tracer effects in a photo. - Page 92 Camera • F ace Detection: Set the device to recognise people’s faces and help you take photos of them. • P icture size: Select a resolution. Use higher resolution for higher quality. But it takes up more memory. •...
- Page 93 Camera Reorganising camera shortcuts On the Apps screen, tap Camera → Tap and hold an item and drag it to a slot at the left of the screen. You can reorganise camera shortcuts for fast and easy access on the preview screen. Shutter speed Shutter speed refers to the amount of time it takes to open and close the shutter.
- Page 94 Camera Aperture The size of the aperture is represented by a value known as an “F-number. ” The smaller the f-number, the greater the size of the aperture. Adjust the aperture value to take portraits, flowers, or landscape shots. Select a lower aperture value to make the photos brighter. Select a higher aperture value to make the photos darker.
- Page 95 Camera WB (light source) The White balance represents the light source that influences on the colour of a photo. The colour of a photo depends on the type and quality of the light source. If you want the colour of your photo to be realistic, select an appropriate lighting condition to calibrate the white balance, or adjust the colour temperature manually.
- Page 96 Camera Face detection Detecting faces The camera automatically detects up to 10 human faces in one scene. → Face Detection → Normal. Aim the camera at a human subject. The camera automatically focuses on their face and displays a yellow frame around it. Press the Shutter button to take a photo. Taking a smile shot The camera automatically detects a smiling face, and releases the shutter.
- Page 97 Camera OIS (anti-shake) Use the Optical Image Stabiliser (OIS) feature to reduce or eliminate blurriness from camera shake. → OIS (anti-shake). Before correction After correction • T his feature may not function properly in the following conditions: – When you move the camera to follow a moving subject. –...
- Page 98 Camera Tracking AF Track your subject, even when the subject is moving or when you change the shooting composition. → Focus area → Tracking AF, and select a subject. Tap the subject to track, and then press the Shutter button halfway down to adjust the focus. •...
-
Page 99: Configuring General Settings
Camera Configuring general settings On the Apps screen, tap Camera → → • C amera function volume: Adjust the volume level for camera function sounds. • B eep: Activate or deactivate beep sounds. • G uide lines: Display viewfinder guides to help composition when selecting subjects. •... -
Page 100: Gallery
Gallery Viewing content on the device Tap Gallery on the Apps screen. Take a photo. Sort images or videos by time, Access additional options. album, and more. Images and videos Select an image. • S electing multiple images: When you tap and hold an image, appears on the image. - Page 101 You can view content stored on other devices if the devices are registered with Samsung Link. Sign in to your Samsung account to view a list of other devices that have content available to view. Ensure that the registered devices are turned on and connected to a Wi-Fi or mobile network.
-
Page 102: Accessing Additional Options
Gallery Accessing additional options Use additional options, such as sorting content, viewing slideshows, and more. On the Apps screen, tap Gallery → , and then use the following options: • S elect: Select images or videos. • D elete: Delete images or videos. •... -
Page 103: Using Tag Buddy
Gallery Select or add a contact to the tag. When the face tag appears on an image, tap the face tag and use available options, such as making calls or sending messages. Face recognition may fail depending on the face angle, face size, skin colour, facial expression, light conditions, or accessories the subject is wearing. -
Page 104: Studio
Studio Using Photo studio Edit images by applying various effects. Tap Studio on the Apps screen. Tap Photo studio, and then select an image. Edit the image by applying various effects. Apply effects to the image. Correct red-eye, adjust and retouch faces, or make the background blurry. -
Page 105: Using Collage Studio
Studio Tap Done → Select a save option and tap OK. The edited photo is saved in the Studio folder. To open the folder, tap Gallery → → Album → Studio. Using Collage studio Combine several images together to create a collage. Tap Studio on the Apps screen. -
Page 106: Using Shot & More
Studio The edited image is saved in the Studio folder. To open the folder, tap Gallery → → Album → Studio. Using Shot & more Apply various effects to the images you have taken. Only photos taken in shot & more mode can be selected. Tap Studio on the Apps screen. -
Page 107: Using Video Clip Studio
Studio Using Video clip studio Edit or create videos with multiple images. To use this feature, you need to download and install the required app. Tap Studio on the Apps screen. Tap Video clip studio. Select videos to edit and tap Done. You can also select images to create a video. -
Page 108: Using Video Trimmer
Studio Select a save option and tap Done. The edited video is saved in the Studio folder. To open the folder, tap Gallery → → Album → Studio. Using Video trimmer Trim video segments. Tap Studio on the Apps screen. Tap Video trimmer, and then select a video. -
Page 109: Internet & Sns
Internet & SNS Internet Browsing webpages Tap Internet on the Apps screen. Tap the address field. To change the search engine, tap the search engine icon next to the web address field. Enter the web address or a keyword, and then tap Go. To search the web by voice, tap . To view the toolbars, drag your finger downwards slightly on the screen. -
Page 110: Chrome
Internet & SNS Managing favourite webpages You can set frequently-used webpages as favourite pages and then access them quickly. Tap Internet on the Apps screen. to view the quick access list. To add a webpage to the quick access list while viewing a webpage, tap → Add to quick access. -
Page 111: Hangouts
Internet & SNS Hangouts Use this app to chat and socialise with your friends individually or in groups. Tap Hangouts on the Apps screen. This app may not be available depending on the region or service provider. Select a friend from the friends list or enter data to search and select a friend from the results to start chatting. -
Page 112: Voice Features
Voice features S Voice About S Voice Use this app to command the device by voice to perform various features. Tap S Voice on the Apps screen. Alternatively, press the Home button twice. To deactivate the access by pressing the Home button, tap → Settings, and then deselect Open via the home key. - Page 113 Voice features Tips for better voice recognition: • S peak clearly. • S peak in quiet places. • D o not use offensive or slang words. • A void speaking in dialectal accents. The device may not recognise your commands or may perform unwanted commands depending on your surroundings or how you speak.
-
Page 114: Voice Recorder
Voice features Voice Recorder Recording voice memos Tap Voice Recorder on the Apps screen. to start recording. Speak into the microphone. Tap to pause recording. To cancel recording, tap . Tap to finish recording. While recording a voice memo, tap to insert a bookmark. - Page 115 Voice features Saving files with contextual tags Add contextual tags, such as locations and dates, to filenames when saving voice memos. Tap → Settings, and then tick Contextual filename. The device adds the recording date to a filename. To add the location where a voice memo is recorded, tap → Settings, and then tick Location tags.
-
Page 116: Voice Search
Voice features Managing voice memos On the Apps screen, tap Voice Recorder → to search for voice memos. to delete voice memos. Tap and select one of the following: • S elect: Select voice memos to share or delete. •... -
Page 117: Multimedia
Multimedia Music Playing music Tap Music on the Apps screen. Select a music category, and then select a song to play. Search for other devices to play Access additional options. the file. Adjust the volume. Set the file as your favourite song. - Page 118 Multimedia To listen to songs at equal volume levels, tap → Settings, and then tick Smart volume. When Smart volume is activated, the volume may end up louder than the device volume level. Use caution to avoid long-term exposure to loud sounds to prevent damage to your hearing.
- Page 119 Accessing music on a registered device Tap Devices and select a device in REGISTERED DEVICES to access and play music. You can play the song on the devices that are registered to Samsung link. Visit link.samsung.com more information. Ensure that the registered devices are turned on and connected to a Wi-Fi or mobile network.
-
Page 120: Video
Multimedia Video Playing videos Tap Video on the Apps screen. Select a video to play. Search for other Adjust the volume. devices to play the file. Access additional options. Move forwards or Pause and resume backwards by playback. dragging the bar. Change screen ratio. - Page 121 Accessing a video on a registered device Tap Devices and select a device in REGISTERED DEVICES to access and play the video. You can play the video on the devices that are registered to Samsung link. Visit link.samsung.com for more information. Ensure that the registered devices are turned on and connected to a Wi-Fi or mobile network.
-
Page 122: Youtube
Multimedia Accessing a video on a nearby device Tap Devices and select a device in NEARBY DEVICES to access and play the video. You can play the video on devices that have the content sharing feature activated. To activate the content sharing feature, on the Apps screen, tap Settings → Nearby devices, and then drag the Nearby devices switch to the right. -
Page 123: Flipboard
Multimedia Flipboard Use this app to access your personalised magazines. Tap Flipboard on the Apps screen. This app may not be available depending on the region or service provider. To start your Flipboard, flick up on the greeting page, select news topics, and then tap Build Your Flipboard. -
Page 124: Play Books
Multimedia Play Books Use this app to read and download book files. Tap Play Books on the Apps screen. This app may not be available depending on the region or service provider. Play Movies & TV Use this app to watch, download, and rent movies or TV shows. Tap Play Movies &... -
Page 125: Safety
Safety Emergency mode About emergency mode Use this mode to extend the device’s standby time when you are in an emergency situation. When this mode is activated, the screen’s brightness decreases and battery consumption is reduced by restricting some features. You can also sound alarms and send your location information to others in a message. - Page 126 Safety Access additional options. Sound alarms. Send your current location information in a message. Make a call. Browse the Internet. Add more apps to use. Remaining battery power and estimated battery standby time Make an emergency call. The estimated maximum standby time shows the time remaining before the battery power runs out if the device is not used.
-
Page 127: Sending Help Messages
Safety Sending help messages About sending help messages You can preset contacts to send a message to in an emergency. Send messages to your primary contacts by quickly pressing the Power button three times. On the Apps screen, tap Settings → Safety assistance. Adding primary contacts On the Apps screen, tap Settings →... -
Page 128: Severe Weather Notification (Geo News)
To view information about severe weather conditions and the regions and languages that the information is available in, visit www.samsung.com/geonews. • Y ou may incur additional charges if you receive notifications from a weather forecasting service while you are roaming. - Page 129 Safety Using the geo news widget You can view your current location and information about severe weather conditions in your region in the Geo News widget. On the Home screen, scroll left and tap the Geo News widget. Access additional options.
- Page 130 Utilities S Finder Use this app to search for content on the device and via the Internet. You can apply various filters and view the search history. Open the notifications panel and tap S Finder. Searching for content Tap the search field and enter a keyword, or tap and say a keyword.
- Page 131 Utilities S Planner Starting S Planner Use this app to manage events and tasks. Tap S Planner on the Apps screen. Change view mode. Access additional options. Go to today's date. Create events or tasks. Tap and use the following: •...
- Page 132 Utilities Creating events or tasks Tap S Planner on the Apps screen. . Alternatively, select a date with no events or tasks in it and tap the date again. If the date already has saved events or tasks in it, tap the date and tap Select either event or task and enter details.
- Page 133 Utilities Syncing events and tasks with your accounts Tap S Planner on the Apps screen. To sync events and tasks with your accounts, tap → Sync. To add accounts to sync with, tap → Calendars → Add account. Then, select an account to sync with and sign in.
-
Page 134: Calculator
Utilities Calculator Use this app for simple or complex calculations. Tap Calculator on the Apps screen. Rotate the device to landscape orientation to display the scientific calculator. If Screen rotation is disabled, tap → Scientific calculator. To see the calculation history, tap to hide the keypad. - Page 135 Utilities Deleting alarms Tap → Delete, select alarms, and then tap Done. World Clock On the Apps screen, tap Clock → World Clock. Creating clocks and enter a city name or select a city from the cities list. To apply summer time, tap and hold a clock, and then tap Deleting clocks Tap →...
-
Page 136: Drive
Utilities Drive Use this app to access files stored in your Google Drive storage service. You can store all your files in one place, access them from anywhere, and share them with others. Tap Drive on the Apps screen. This app may not be available depending on the region or service provider. Dropbox Use this app to save and share files with others via the Dropbox cloud storage. -
Page 137: Google
Utilities Use the following functions: • : Upload or open files. Tap → Upload here to upload files. • : View the uploaded photos or videos. Tap to share or delete files, or create albums. • : Open files in the favourites list. •... -
Page 138: Kids Mode
Utilities Kids Mode Use this widget to provide a fun and safe environment for children by restricting children’s access to certain apps or content. Before you use this widget, you need to download and install it. On the Home screen, tap Kids Mode →... - Page 139 Utilities Use this app to download apps for kids from Samsung Apps. Use this app to view saved images, drawings, voice recordings, and media files that you allow your child to access. Use this app to play video files. Before you use this app, add videos that are saved on the device to the app.
- Page 140 Utilities Kids mode play area Scroll right on the Home screen to open kids mode play area. You can interact with characters, background objects, and more. Parental control Use this feature to set restrictions for kids mode to control access to content and apps. You can change kids mode settings, usage time limits, and more.
-
Page 141: Maps
• M edia: Allow your children to access certain images and videos saved on the device. • G eneral: Configure kids mode settings. • K ids Store: Download apps for kids from Samsung Apps. Maps Use this app to pinpoint the location of the device, search for places, or get directions. -
Page 142: Memo
Utilities Memo Use this app to record important information to save and view at a later date. Tap Memo on the Apps screen. Adding and managing categories Create categories to sort and manage your memos. On the memos list, tap → Manage categories. To add a new category, tap , enter a category name, and then tap OK. -
Page 143: My Files
Utilities My Files About My Files Use this app to access all kinds of files stored in the device, including images, videos, songs, and sound clips. Tap My Files on the Apps screen. Viewing files Tap My Files on the Apps screen. Select a folder to open it. - Page 144 Utilities • → Add shortcut: Add a shortcut of the folder to the Home screen or the My Files main screen. • → Zip: Compress files or folders to create a zip file. • → Details: View file or folder details. Searching for files or folders Tap My Files on the Apps screen.
-
Page 145: Connecting With Other Devices
Connecting with other devices About NFC Your device allows you to read near field communication (NFC) tags that contain information about products. You can also use this feature to make payments and buy tickets for transportation or events after downloading the required apps. The battery contains a built-in NFC antenna. - Page 146 Connecting with other devices Using the NFC feature Use the NFC feature to send images or contacts to other devices, and read product information from NFC tags. If you insert a SIM or USIM card that has a payment feature, you can use the device to make payments conveniently.
-
Page 147: Bluetooth
SIG, may be incompatible with your device. • D o not use the Bluetooth feature for illegal purposes (for example, pirating copies of files or illegally tapping communications for commercial purposes). Samsung is not responsible for the repercussion of illegal use of the Bluetooth feature. - Page 148 Connecting with other devices Before using this feature • E nsure that the Bluetooth feature is activated on your device and the devices you want to connect to. • E nsure that both devices are set as visible to other Bluetooth devices. Pairing with other Bluetooth devices On the Apps screen, tap Settings →...
- Page 149 Connecting with other devices → Bluetooth, and then select a device to pair with. If the device you want to pair with is not on the list, request that the device turns on its visibility option. Or, set your device as visible to other devices. Accept the Bluetooth authorisation request on the other device.
- Page 150 When Touch to beam appears on the screen, tap your device’s screen to send the file. • D o not send copyright-protected data via S Beam. Doing so may violate copyright laws. Samsung is not responsible for any liabilities caused by the illegal use of copyrighted data.
-
Page 151: Quick Connect
Connecting with other devices Quick connect About Quick connect Use this feature to easily search and connect to nearby devices. You can also conveniently share content stored on your device with computers. • C onnection methods may vary depending on the type of connected devices or the shared content. - Page 152 Before using this feature • S earch for or join a created session or create a new session. • I nstall the Group Play app on both devices. You can download the app from Samsung Apps or Play Store.
- Page 153 Before using this feature • E nsure that all devices using this feature are connected to the same network. • E nsure that all computers that the device will connect to are registered with the Samsung Link app.
-
Page 154: Screen Mirroring
Connecting with other devices Screen Mirroring About Screen Mirroring Use this feature to connect your device to a large screen with an AllShare Cast dongle or HomeSync and then share your contents. You can also use this feature with other devices that support the Wi-Fi Miracast feature. - Page 155 Connecting with other devices Before using this feature • E nsure that the screen mirroring-enabled device is connected to the TV using an HDMI cable. • E nsure that the TV is turned on. Viewing content on a TV Before you connect a TV to your device, connect the TV and the screen mirroring-enabled device.
-
Page 156: Using The Mobile Printing Feature
Connecting with other devices Using the mobile printing feature Connect the device to a printer to print images or documents. Some printers may not be compatible with the device. Before using this feature • E nsure that the Wi-Fi feature or Wi-Fi Direct is activated on your device and the printer. Connecting to a printer On the Apps screen, tap Settings →... -
Page 157: Device & Data Manager
Click the Update button in the dialogue box to start upgrading. Refer to the Samsung Kies help for details on how to upgrade. • D o not turn off the computer or disconnect the USB cable while the device is upgrading. -
Page 158: Transferring Files Between The Device And A Computer
Device & data manager Transferring files between the device and a computer Move audio, video, image, or other types of files from the device to the computer, or vice versa. • D o not disconnect the USB cable from the device when you are transferring files. Doing so may cause data loss or device damage. -
Page 159: Backing Up And Restoring Data
Device & data manager Connecting with Samsung Kies Samsung Kies is a computer app that manages media contents and personal information with Samsung devices. Download the latest Samsung Kies from the Samsung website. Connect the device to the computer using the USB cable. -
Page 160: Performing A Data Reset
Device & data manager Using a Samsung account On the Apps screen, tap Settings → Accounts → Add account → Samsung account, and then sign into your Samsung account. Tap Settings on the Apps screen. Tap Cloud → Backup, tick the items to back up, and then tap Back up now → Back up. -
Page 161: Settings
Settings About Settings Use this app to configure the device, set app options, and add accounts. Tap Settings on the Apps screen. To search for settings by entering keywords, tap QUICK SETTINGS View the list of your favourite settings options. To edit the list of favourite settings options, tap →... - Page 162 Settings To use options, tap . • S can: Search for available networks. • W i-Fi Direct: Activate Wi-Fi Direct and connect devices directly via Wi-Fi to share files. • A dvanced: Customise Wi-Fi settings. • W PS push button: Connect to a secured Wi-Fi network with a WPS button. •...
- Page 163 Settings Bluetooth Activate the Bluetooth feature to exchange information over short distances. On the Settings screen, tap Bluetooth, and then drag the Bluetooth switch to the right. To use more options, tap . • V isibility timeout: Set duration that the device is visible. •...
- Page 164 Settings Data usage Keep track of your data usage amount and customise the settings for the limitation. On the Settings screen, tap Data usage. • M obile data: Set the device to use data connections on any mobile network. •...
- Page 165 Settings More networks Customise settings to control networks. On the Settings screen, tap More networks. Default messaging app Select the default app to use for messaging. Mobile networks • M obile data: Set the device to use data connections on any mobile network. •...
-
Page 166: Connect And Share
Settings CONNECT AND SHARE Activate the NFC feature to read or write NFC tags that contain information. On the Settings screen, tap NFC, and then drag the NFC switch to the right. • A ndroid Beam: Turn on the Android Beam feature to send data, such as webpages and contacts, to NFC-enabled devices. -
Page 167: Sound And Display
Settings Screen Mirroring Activate the screen mirroring feature and share your display with others. On the Settings screen, tap Screen Mirroring. SOUND AND DISPLAY Sound Change settings for various sounds on the device. On the Settings screen, tap Sound. • S ound mode: Set the device to use sound mode or silent mode. •... - Page 168 Settings Display Change the settings for the display. On the Settings screen, tap Display. • F ont: – Font style: Change the font type for display text. – Font size: Change the font size. • B rightness: Set the brightness of the display. •...
- Page 169 Settings Wallpaper Change the settings for the wallpaper. On the Settings screen, tap Wallpaper. • H ome screen: Select a background image for the Home screen. • L ock screen: Select a background image for the locked screen. •...
- Page 170 Settings Notification panel Customise the items that appear on the notifications panel. On the Settings screen, tap Notification panel. • B rightness adjustment: Set the device to display the brightness adjustment bar on the notifications panel. • R ecommended apps: Set the device to display a list of recommended apps on the notifications panel based on your actions, such as connecting a headset to the device.
-
Page 171: Personalization
Settings PERSONALIZATION Easy mode Set the device to easy mode. On the Settings screen, tap Easy mode. • S tandard mode: Set the device to standard mode. • E asy mode: Set the device to easy mode. • E ASY APPLICATIONS: Select apps to apply simpler layouts. Accessibility You can use this feature to access settings to improve accessibility to the device. -
Page 172: Motion
Settings MOTION Motions and gestures Activate the motion recognition feature and change the settings that control motion recognition on your device. On the Settings screen, tap Motions and gestures. • D irect call: Set the device to make a voice call by picking up and holding the device near your ear while viewing call, message, or contact details. -
Page 173: User And Backup
Accounts Add email or SNS accounts. On the Settings screen, tap Accounts. Cloud Change settings for syncing data or files with your Samsung account or Dropbox cloud storage. On the Settings screen, tap Cloud. Backup and reset Change the settings for managing settings and data. -
Page 174: System
Select a default keyboard type for text input. Samsung keyboard To change the Samsung keyboard settings, tap The available options may vary depending on the region or service provider. • S elect input languages: Select languages for text input. - Page 175 • C haracter preview: Set the device to display a large image of each character tapped. • P ress and hold delay: Set the recognition time for tapping and holding the screen. • R eset settings: Reset Samsung keyboard settings. Google voice typing To change the voice input settings, tap •...
- Page 176 Settings • O ffline speech recognition: Download and install language data for offline voice input. • P ersonalized recognition: Set the device to use information from your Google dashboard to improve speech recognition accuracy. • B luetooth headset: Set the device to allow a voice search with a Bluetooth headset, when one is connected to the device.
- Page 177 Settings • S et date: Set the current date manually. • S et time: Set the current time manually. • A utomatic time zone: Set the device to receive time zone information from the network when you move across time zones. •...
- Page 178 Settings Battery View the amount of battery power consumed by your device. On the Settings screen, tap Battery. • S how battery percentage: Set the device to display the remaining battery life. Power saving Activate power-saving mode and change the settings for power-saving mode. Refer to Using the power saving feature for details.
- Page 179 • R emote controls: Set the device to allow control of your lost or stolen device remotely via the Internet. To use this feature, you must sign in to your Samsung account. – ACCOUNT REGISTRATION: Add or view your Samsung account.
- Page 180 Settings • M ake passwords visible: Set the device to display passwords as they are entered. • D evice administrators: View device administrators installed on the device. You can allow device administrators to apply new policies to the device. •...
-
Page 181: Applications
Settings APPLICATIONS Application manager View and manage the apps on your device. On the Settings screen, tap Application manager. Default applications Select a default setting for using apps. On the Settings screen, tap Default applications. Call Customise the settings for calling features. On the Settings screen, tap Call. - Page 182 Settings • C all-related pop-ups: – Call notification pop-ups: Set the device to display a pop-up window when you receive an incoming call while using apps. – In-call status pop-ups: Set the device to display a pop-up window that shows the status of a call while using apps.
- Page 183 Settings • A dditional settings: – Caller ID: Display your caller ID to other parties for outgoing calls. – Call forwarding: Divert incoming calls to another number. – Auto area code: Set the device to insert a prefix (area or country code) automatically before a phone number.
- Page 184 Settings Contacts Change settings for using contacts. On the Settings screen, tap Contacts. • I mport/Export: Import or export contacts. • C ontacts to display: Select which contacts to display. • S wipe to call or send msg: Set the device to make a call or send a message when you drag a contact to the left or right in the contacts list.
- Page 185 Change settings for using Internet. On the Settings screen, tap Internet. • A ccount: Sign in to a Samsung account. • S et homepage: Set a default home page. • A uto fill forms: Set the device to automatically enter user information, such as names or phone numbers when you fill out forms on webpages.
- Page 186 Settings Messages Change settings for using messages. On the Settings screen, tap Messages. • D efault messaging app: Select the default app to use for messaging. • D isplay: Change settings for the messaging window, such as the font size, background colour, and more.
- Page 187 Settings S Planner Change settings for using S Planner. On the Settings screen, tap S Planner. • F irst day of week: Select the first day of a week. • S how week numbers: Set the device to display the number of weeks in a year. •...
-
Page 188: Google Settings
Settings • A uto start speakerphone: Set the device to automatically turn on the speakerphone when making a call with S Voice. • S how body of message: Set the device to display the text of a new message. •... -
Page 189: Accessibility
Accessibility Accessibility Accessibility menus are special features for those with certain physical disabilities, such as poor eyesight or hearing impairment. You can use the following features: • T alkBack • C hanging the font size • M agnifying the screen •... -
Page 190: Using The Home Button To Open Accessibility Menus
Accessibility Using the Home button to open accessibility menus You can access the following accessibility menus by pressing the Home button three times quickly. • A ccessibility • T alkBack • I nteraction control On the Apps screen, tap Settings → Accessibility → Direct access, and then drag the Direct access switch to the right. - Page 191 Accessibility When you activate TalkBack, the device provides voice feedback and reads aloud the features you select. Also, the device provides voice feedback when the screen turns off, when you have new notifications, and more. When you activate Explore by touch while using TalkBack, the device reads selected items aloud.
- Page 192 Accessibility • S electing the next item: Scroll quickly downwards or to the right on the screen with one finger. • S crolling the lists: Scroll the screen upwards or downwards with two fingers. • R eturning to the previous page: Scroll the screen to the right with two fingers. •...
- Page 193 Accessibility Configuring settings for shortcut gestures Use this feature to configure eight shortcut gestures. You can configure gestures such as, dragging your finger upwards and then to the right without releasing it, and more. You can change shortcut gestures or assign features to empty shortcuts. On the Apps screen, tap Settings →...
- Page 194 Accessibility Changing reading units When you use TalkBack, you can listen to the text on the screen. You can drag your finger up, down, left, or right to select the text you want. By default, the device reads text aloud in the selected area.
- Page 195 Accessibility Pausing TalkBack Open the global contextual menu by dragging your finger downwards and then to the right on the screen without releasing it. When you select Pause feedback at the top left of the screen, TalkBack pauses. When TalkBack is paused, you can resume it by turning on the screen or other methods. To change the method for resuming TalkBack, on the Apps screen, tap Settings →...
- Page 196 Accessibility Configuring settings for TalkBack Configure settings for TalkBack for your convenience. On the Apps screen, tap Settings → Accessibility → Vision → TalkBack → Settings. Alternatively, open the global contextual menu by dragging your finger downwards and then to the right on the screen without releasing it. Then, drag your finger to the top right of the screen and release it when you hear TalkBack Settings.
- Page 197 Accessibility • F ocus speech audio: Set the device to turn the media volume down when the device reads an item aloud. • S ound volume: Adjust the volume that sound is played when you touch the screen to control it.
- Page 198 Accessibility Reading passwords aloud Set the device to read the password aloud when you enter the password while TalkBack is activated. Use this feature to make sure that you are entering the right password. On the Apps screen, tap Settings → Accessibility → Vision, and then tick Speak passwords. Setting text-to-speech features Change the settings for text-to-speech features used when TalkBack is activated, such as languages, speed, and more.
- Page 199 To add input languages, on the Apps screen, tap Settings → Language and input. Then, tap next to Samsung keyboard → Select input languages, and then select languages. To change the keyboard input language while entering text, tap and hold , and then select a language.
- Page 200 Take photos of documents or business cards and extract and read text from them. The device also reads colour and pattern information aloud when you take photos of coloured or patterned images. Access Samsung Apps, and download and install Optical Reader. Tap Optical Reader on the Apps screen.
-
Page 201: Changing The Font Size
Accessibility Using document mode The default mode of this app is document mode. When you are using colour/pattern mode, select to switch to document mode. In document mode, when you take photos of documents or business cards, the device displays the extracted text. Place an object on a flat surface and select . -
Page 202: Magnifying The Screen
Accessibility Magnifying the screen Use this feature to magnify the screen and to zoom in on a specific area. On the Apps screen, tap Settings → Accessibility → Vision → Magnification gestures, and then drag the Magnification gestures switch to the right. •... -
Page 203: Customising Caption Settings
Accessibility Customising caption settings Samsung caption On the Apps screen, tap Settings → Accessibility → Hearing → Samsung subtitles (CC), and then drag the Subtitles (CC) switch to the right. Use the following options: • A lignment: Change the position of the caption. -
Page 204: Adjusting The Sound Balance
Accessibility Adjusting the sound balance Set the device to adjust the sound balance when using a dual headset. To adjust the sound balance, connect a dual headset to the device. On the Apps screen, tap Settings → Accessibility → Hearing → Sound balance. Drag the adjustment bar to the left or right and adjust the sound balance, and then tap Set. -
Page 205: Using The Assistive Menus
Accessibility Using the assistive menus Displaying the assistive shortcut icon Set the device to display the assistive shortcut icon. You can use the icon to access apps, features, and settings by tapping assistive menus in the icon. Control the device by tapping the assistive menus in the icon without exploring the screen. - Page 206 Accessibility Using the cursor On the assistive menu, tap Cursor. A cursor and a touch area where the cursor can be controlled are displayed on the screen. You can control the screen using small finger movements on the touch area. Drag your finger on the touch area to move the cursor. Also, tap the screen to select items under the cursor.
-
Page 207: Using The Smart Scroll Feature
Accessibility Using the smart scroll feature Set the device to scroll the screen up or down by tilting your head or the device. You can use this feature while viewing emails or webpages. On the Apps screen, tap Settings → Accessibility → Dexterity and interaction → Smart scroll, and then drag the Smart scroll switch to the right. -
Page 208: Using Interaction Control Mode
Accessibility Using interaction control mode Activate interaction control mode to restrict the device’s reaction to inputs while using apps. Use this mode when you want to allow others only limited access and control of your media or data. On the Apps screen, tap Settings → Accessibility → Dexterity and interaction → Interaction control. - Page 209 Accessibility Using single tap mode Set the device to control incoming calls or notifications by tapping the button instead of dragging it. When an alarm sounds or a call comes in, tap the button to stop the alarm or answer the call instead of dragging the button. On the Apps screen, tap Settings →...
- Page 210 Accessibility Viewing accessibility services View accessibility services installed on the device. On the Apps screen, tap Settings → Accessibility, and view the list of accessibility services available in SERVICES. Using other useful features • U sing S Voice: You can use S Voice to perform various functions using voice commands. Launch S Voice and make calls, send messages, and view tasks.
- Page 211 Troubleshooting Before contacting a Samsung Service Centre, please attempt the following solutions. Some situations may not apply to your device. The subject’s eyes appear red Red eyes occur when the subject’s eyes reflect light from the camera flash. Set the flash option to Red-eye.
- Page 212 Troubleshooting Subjects come out too dark because of backlighting When the light source is behind the subject or when there is a high contrast between light and dark areas, the subject may appear too dark. • A void shooting toward the sun. •...
- Page 213 Troubleshooting When the colours in the photo do not match the actual scene Select an appropriate white balance option to suit the light source. Refer to WB (light source) for details. When the photo is too bright • T urn the flash off. •...
- Page 214 • R estart your device to clear any temporary software bugs. • E nsure that your device software is upgraded to the latest version. • I f the touch screen is scratched or damaged, visit a Samsung Service Centre. Your device freezes or has fatal errors If your device freezes or hangs, you may need to close apps or reinsert the battery and turn on the device to regain functionality.
- Page 215 Troubleshooting Calls are not connected • E nsure that you have accessed the right cellular network. • E nsure that you have not set call barring for the phone number you are dialling. • E nsure that you have not set call barring for the incoming phone number. Others cannot hear you speaking on a call •...
- Page 216 Troubleshooting The battery does not charge properly (For Samsung-approved chargers) • E nsure that the charger is connected properly. • I f the battery terminals are dirty, the battery may not charge properly or the device may turn off. Wipe both gold-coloured contacts and try charging the battery again.
- Page 217 • E nsure that the Bluetooth wireless feature is activated on the device you wish to connect • E nsure that your device and the other Bluetooth device are within the maximum Bluetooth range (10 m). If the tips above do not solve the problem, contact a Samsung Service Centre.
- Page 218 • I f you are a Windows XP user, ensure that you have Windows XP Service Pack 3 or higher installed on your computer. • E nsure that you have Samsung Kies or Windows Media Player 10 or higher installed on your computer.
- Page 219 Cleaning the device Use a blower brush to remove dust, and then wipe the lens gently with a soft cloth. If any dust remains, apply lens cleaning liquid to a lens cleaning paper, and wipe gently. Never use benzene, thinners, or alcohol to clean the device. These solutions can damage the device or cause it to malfunction.
- Page 220 Samsung Electronics. Trademarks • S AMSUNG and the SAMSUNG logo are registered trademarks of Samsung Electronics. ® • B luetooth is a registered trademark of Bluetooth SIG, Inc. worldwide.
Need help?
Do you have a question about the SM-C111M and is the answer not in the manual?
Questions and answers