Table of Contents
Advertisement
Quick Links
Advertisement
Table of Contents

Related Manuals for Crosley CFDD265TS


Summary of Contents for Crosley CFDD265TS
- Page 1 CFDD265TS Code: F74MCL-01-V1...
-
Page 2: Table Of Contents
Contents Be sure to keep for safety ........1~2 Installation Guide ............3 Control Panel ............4 Temperature Control ..........5 How to use Interior Parts .......... 6 How to use the Dispenser ........7 How to use the Automatic Icemaker ......8 Care &... -
Page 3: Be Sure To Keep For Safety
Be sure to keep for safety! Never use a damaged power cord or plug, or loose main socket. Read these safety instructions thoroughly and carefully ● There is a risk of fire, electric shock or before using. Please keep this user guide on hand for serious injury. - Page 4 Do not move or remove compartment CAUTION shelves/pockets while foods and containers are on them. Be sure to unplug the refrigerator when it is not going to be used for a long time. ● Hard containers (of glass, metal etc.) can fall to hurt you and can break glass shelf Never touch foods and containers and interior parts.
-
Page 5: Installation Guide
Installation Guide ✽ Read these safety instructions carefully before use and follow precautions for your safety. Precautions in installation and power connection ■ To prevent fire, electric shock or leakage ❶ Never install the refrigerator on a wet, watery floor or where water can gather easily. -
Page 6: Control Panel
Control Panel 1. Ice Maker button ) / Quick Refrigerator ( ) 5. Quick Freezer ( P ress to turn Ice Maker On or Off. If you do not intend Illuminates when quick function is on. to use any ice cubes for longer than one week (e.g. because you are going on holiday), shut down the ice 6. -
Page 7: Temperature Control
Refrigerator Compartment Temperature Control Push the Refrigerator button and the temperature setting changes in the sequence as shown below: When changing control settings, wait 24 hours >>> Sequential Temperature Change <<< before making additional adjustments. The Note controls are set correctly when milk or juice is as cold as you would like and when ice cream is firm. -
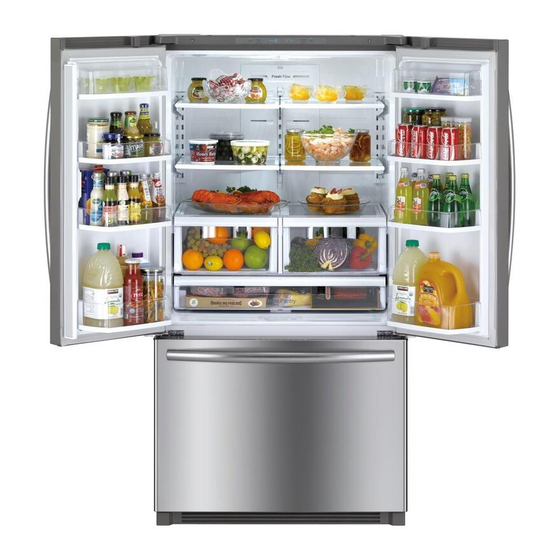
Page 8: How To Use Interior Parts
How to use the interior parts * This instruction manual refers to several models. The real features are model dependent. 1. Covered Dairy Bin or Covered 5. Adjustable glass shelf 9. Lower freezer basket Storage Bin for items of medium to large size. for general freezer storage for storing butter and cheese. -
Page 9: How To Use The Dispenser
Food Storage Tips Icemaker Wash food before storing. In case the icemaker doesn’t work If the ice maker doesn’t work, check the following: ● Has it been less than 12 hours since the water supply line installation? Divide and separate food into ●... -
Page 10: How To Use The Automatic Icemaker
Automatic Icemaker When to set icemaker to off ● When the water supply will be shut off for several hours. Caution ● When the ice bin is removed for more than one or two minutes. ● When the refrigerator will not be used for several days. ●... -
Page 11: Care & Cleaning
Care & Cleaning Be sure to unplug first * Features may vary according to model. ❶ Ice Storage Bin ❷ Refrigerator Shelves Cleaning: Empty the ice cube bin and clean with To remove a shelf: lukewarm water. Thoroughly dry the bin and screw Lift up on front of shelf conveyor to prevent new ice cubes from sticking with one hand and with... - Page 12 ❺ Vegetable case & Wide case How to Clean ● Pull out the cases as far as possible. Lift up the front of the cases and pull them out. Interior Parts ● Insert the cases into the rail and aapush towards the ●...
-
Page 13: Before You Call For Service
Before You Call for Service... Problem Please check the following troubleshooting tips before you Strange sounds from call for service! the refrigerator. Problem Checkup Point It never gets cold inside. ❶ Is the floor beneath the refrigerator uneven? Freezing & refrigerating is ❷... -
Page 14: Something Strange? Don't Worry. Here Is The Answer
Something strange? Don’t worry. Here is the answer. Case Explanation ● Pipes (refrigerant vessel) are placed beneath the Front and side of refrigerator feels Heat warm or hot. surface to prevent moisture forming on it. ● When you close the door and then open again immediately, the door is not easy to open Door because warm air rushes in and creates... -
Page 15: Installation Preparation
Installation Preparation If the refrigerator can not pass through a door Check if the refrigerator can pass a during installation, follow doorway or enter a door first. these steps. Dimensions (including Door Handles) ※This instruction manual refers to several models. The real 906 mm x 735 mm x 1,770 mm (Width*Depth*Height) features are model dependent. -
Page 16: Refrigerator Leveling & Door Adjustment (If Needed)
Removing right refrigerator door Push and assemble another gear rail on opposite side of the rail. 1. Turn top hinge fastener counterclockwise and remove the top hinge. (After the hinge is removed the door can fall down forward. Be careful!) 2. - Page 17 Aligning the refrigerator doors Front Cover After installation and/or door leveling, fasten front Caution cover with screws. (Remove the screws on the front bottom panel first. Click and screw the cover.) ※ Risk of electric shock! Before removing top hinge cover Caution 1.
-
Page 18: Water Filter
Foldaway door bar (mullion bar) Water Connector - When closing the left refrigerator door, the mullion bar folds behind the right refrigerator door, forming a seal between the refrigerator doors. - When opening the left refrigerator door, the mullion bar folds back to the left door automatically. - Page 19 Your freezer is protected by this warranty Crosley Corporation 99 Bruce Crescent Carleton Place ON K7C3T3, Fairfield, NJ 07004 Canada...
Need help?
Do you have a question about the CFDD265TS and is the answer not in the manual?
Questions and answers