Table of Contents
Advertisement
Available languages
Available languages
Distributed by / Distribuido por:
Lidl US LLC., Arlington, VA 22202
Model No. / Modelo Núm.: Z31915-US
(Z31915-US-RX & Z31915-US-TX)
Version / Versión: 02 / 2017
Made in / Hecho en: China
Last Information Update · Estado
de las informaciones: 02 / 2017
Ident.-No.: Z31915-US022017-9
IAN 282650
282650_aur_Funk-Wetterstation_Cover_US.indd 3-5
DIGITAL WEATHER STATION /
ESTACIÓN METEOROLÓGICA DIGITAL PORTÁTIL
ESTACIÓN METEOROLÓGICA
DIGITAL WEATHER STATION
Operation and Safety Notes
DIGITAL PORTÁTIL
Instrucciones de utilización y de seguridad
IAN 282650
US-EN
Operation and Safety Notes
US-ES
Instrucciones de utilización y de seguridad
Page
5
Página
46
14.02.17 08:26
Advertisement
Chapters
Table of Contents

Related Manuals for lidl 282650


Summary of Contents for lidl 282650
- Page 1 DIGITAL WEATHER STATION / Distributed by / Distribuido por: ESTACIÓN METEOROLÓGICA DIGITAL PORTÁTIL Lidl US LLC., Arlington, VA 22202 Model No. / Modelo Núm.: Z31915-US (Z31915-US-RX & Z31915-US-TX) ESTACIÓN METEOROLÓGICA DIGITAL WEATHER STATION Version / Versión: 02 / 2017 Operation and Safety Notes DIGITAL PORTÁTIL...
- Page 2 0.4 in / 10 mm 0.3 in / 8 mm 282650_aur_Funk-Wetterstation_Cover_US.indd 6-8 14.02.17 08:26...
-
Page 3: Table Of Contents
Description of signal words ............................Page Customer service ................................Page Introduction ..................................Page Intended use ................................... Page Parts description ................................Page Technical data ................................Page 13 Included items ................................Page 14 Important safety notes ............................... Page 14 General safety information ............................Page 14 Safety instructions for batteries / rechargeable batteries ................ -
Page 4: Description Of Signal Words
NOTICE indicates information considered im- portant, but not hazard related (e.g. messages related to property damage). CUSTOMER SERVICE Call customer service at Visit a LIDL store for further assistance. 1 (844) 543-5872 Please have IAN 282650 Visit the Website Customer... -
Page 5: Introduction
Digital weather station Introduction Congratulations on your purchase. You have chosen a high quality product. The in- structions for use are a part of the product. They contain important information on safety, use and disposal. Please familiarize yourself with the safety information and instructions for use before using the product. -
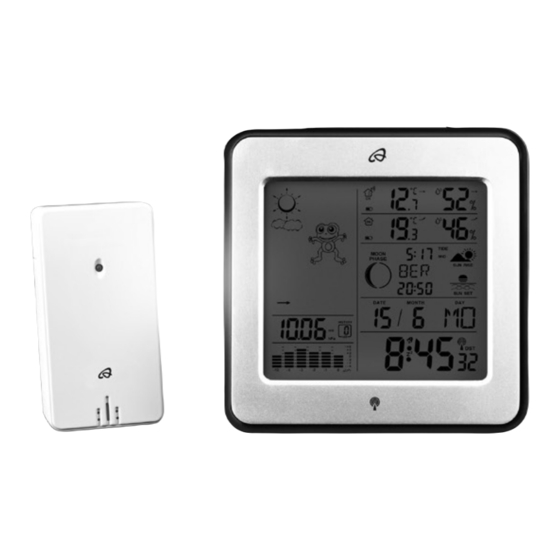
Page 6: Parts Description
Parts description Weather station: Date display Humidity trend (outdoor) Month display Humidity (outdoor) Alarm 1 Temperature and frost alarm SNOOZE display (maximum / minimum) Radio tower symbol Temperature trend (outdoor) DST display (daylight saving time) Outdoor temperature (°C / °F) Time display Battery level display (outdoor sensor) Alarm 2... - Page 7 25 23 US-EN 282650_aur_Funk-Wetterstation_Content_US.indd 9 14.02.17 14:19...
- Page 8 Barometric pressure Absolute / relative SNOOZE / LIGHT bar graph barometric pressure button Barometric pressure Barometric pressure display of the last trend hour Weather forecast 10 US-EN 282650_aur_Funk-Wetterstation_Content_US.indd 10 14.02.17 14:19...
- Page 9 MODE button Channel button (CH) CITY button + button HISTORY ABS / Battery compartment – button REL button US-EN 282650_aur_Funk-Wetterstation_Content_US.indd 11 14.02.17 14:19...
- Page 10 Outdoor sensor: RESET button Battery compartment Control LED Channel selector Mount switch 12 US-EN 282650_aur_Funk-Wetterstation_Content_US.indd 12 14.02.17 14:19...
-
Page 11: Technical Data
Technical data Weather station: Temperature measurement range: +32 to +122 °F (0 to +50 °C) Temperature resolution: 33.8 °F (0.1 °C) Humidity measurement range: 20 %–95 % Humidity resolution: Radio signal: WWVB Batteries: 3 x AA, 1.5 V (direct current) Air pressure range: 25–31 inHg Outdoor sensor:... -
Page 12: Included Items
Included items 1 Weather station 1 Outdoor sensor 3 Batteries AA, 1.5 V (pre-installed) 2 Batteries AA, 1.5 V (pre-installed) 1 Instructions for use IMPORTANT SAFETY NOTES READ ALL INSTRUCTIONS. KEEP FOR FUTURE REFERENCE. INCLUDE ALL DOCUMENTATION WHEN PASSING THIS PRODUCT ON TO OTHERS. General safety information Failure to observe the following warnings can result in death or serious injuries. - Page 13 Children frequently underestimate the dangers. Always keep this product out of the reach of children. This product may be used by children 8 years and older and individuals with physical, sensory or cognitive impairments or lacking experience and knowledge when instructed on safe product use and understand the associated risks. Do not allow children to play with the product.
-
Page 14: Safety Instructions For Batteries / Rechargeable Batteries
• Connect the product into an outlet on a circuit different from that to which the receiver is connected. • Consult the dealer or an experienced radio / TV technician for help. • Model: Z31915-US-RX / FCCID: 2AJ9O-Z31915R • Model: Z31915-US-TX / FCCID: 2AJ9O-Z31915T •... - Page 15 Risk of battery leakage Failure to observe the following warnings can result in injuries or property damage. Avoid extreme environmental conditions and temperatures, which could affect batteries / rechargeable batteries, e.g. radiators / direct sunlight. Avoid contact with the skin, eyes and mucous membranes. In the event of con- tact with battery acid, thoroughly flush the affected area with plenty of clean water and seek immediate medical attention.
-
Page 16: Before Use
Clean the contacts on the battery and in the battery compartment before in- serting! Remove drained batteries / rechargeable batteries from the product immediately. SAVE THESE INSTRUCTIONS Before use Setting up the devices First install the batteries in the outdoor sensor. Failure to observe the following warnings can result in injuries or property damage. -
Page 17: Preparing To Use The Outdoor Sensor
Do not place the devices next to or on metal plates. Otherwise the quality of radio wave transmission may be reduced. Do not install the devices in buildings made of reinforced concrete, e.g. airports, high-rise buildings, factories or cellars. Otherwise the transmission of the radio waves between the devices may be severely impaired. -
Page 18: Preparing The Weather Station For Use
Use the included drill template (shown on the fold-out page) intended for mark- ing drill holes. Preparing the weather station for use Removing the battery insulation strip: Open the battery compartment on the back of the weather station. Remove the battery insulation strip. Then close the battery compartment. - Page 19 outdoor sensor as shown under “Setting the channel”). If the connection with the out- door sensor is not established automatically, this can be done manually as follows: 1. Press the channel button (CH) . The icon of the selected channel will flash in the LC display.
-
Page 20: Operation
Operation Receiving the WWVB radio time signal After connecting with the outdoor sensor or 3 minutes after the battery insulation strip is removed, the weather station automatically begins to search for the WWVB radio signal. The LC display will show a flashing radio tower symbol during this process. -
Page 21: Setting The 12 / 24 Hour Mode / °C / °F / Hpa / Inhg / Time Zone / Time / Date / Language Manually
manually. If reception of the WWVB signal is successful, the manual settings are overwritten. Setting the 12 / 24 Hour Mode / °C / °F / hPa / inHg / Time zone / time / date / language manually The reception of WWVB radio signal where the weather station has been positioned may deteriorate or be interrupted. - Page 22 Note: If you’re in a country where the WWVB signal can be received but the time is different from your current local time, you can use the time zone setting to have the product display your current local time. For example, if you’re in a country where the local time is an hour ahead of Pacific Standard Time (PST), set the time zone to -8.
-
Page 23: Setting The Alarm Time
10. Confirm your setting by pressing the MODE button. The day indicator in the date display will flash. Press the + or – button to set the desired value. 11. Confirm your setting by pressing the MODE button. At the place of the day of the week display , the language indicator of this display flashes. -
Page 24: Turning The Alarm On / Off
6. Press the MODE button twice briefly if the weather station is in time display mode. Press the MODE button once briefly if the weather station is in ALARM 1 mode. This will take you to ALARM 2 mode. 7. Repeat steps 2–5 to set the value for ALARM 2. Turning the alarm on / off 1. -
Page 25: Snooze Function
SNOOZE function Press the SNOOZE- / LIGHT button when the alarm sounds to SNOOZE the alarm. The alarm signal sounds again after 5 minutes. Preparing to use the weather forecasting function Note: Please take the weather forecast from your local weather forecasting service into account as well as the forecast from your weather station. - Page 26 cloudy rainy rain + snow The weather symbols indicate the weather fluctuation over the next eight hours and not the current weather. The weather station can display the barometric pressure trend 28 US-EN 282650_aur_Funk-Wetterstation_Content_US.indd 28 14.02.17 14:19...
-
Page 27: Selecting The Location
You may see the following displays: The barometric pressure will rise. The barometric pressure will remain constant. The barometric pressure will fall. Selecting the location Press the CITY button . The location display blinks and the longitude and latitude are displayed. Press the + or –... -
Page 28: Selecting The Location Manually
Selecting the location manually Press the CITY button down for 2 seconds and keep it pressed. Press the + or – button to select the beginning letters of your location. Press the CITY button to confirm your entry. Enter the 2nd and 3rd letters in the same fashion. - Page 29 You can choose from the following countries and cities: Germany Berlin Saarbrücken Bosnia & Sarajevo (DE) Herzego- Stuttgart vina (BA) Bremen Croatia Split Köln Würzburg (HR) Dortmund Australia Canberra Zagreb Dresden (AU) Czech Brno Düsseldorf Melbourne (CZ) Erfurt Sydney Prague Frankfurt Austria Bregenz...
- Page 30 Lyon Milan Wellington Zealand Marseille Naples (NZ) Metz Palermo Norway Bergen Nantes Parma (NO) Nice Perugia Lillehammer Orleans Rome Oslo Paris San Remo Poland Cracow (PL) Perpignan Triest Gdansk Rouen Turin Poznan Strasbourg Venice Warsaw Toulouse Verona Portugal Faro Greece Athens Liechten- Vaduz...
- Page 31 Andorra Geneva Badajoz Lucerne Barcelona Lugano Bilbao Sion Cordoba St. Gallen Zurich Eivissa Ibiza United Aberdeen La Coruña Kingdom Las Palmas (GB) Leon Belfast Madrid Birmingham Malaga Cardiff Palma de Mal- Glasgow lorca London Salamanca Manchester Sevilla Newcastle Valencia upon Tyne Zaragoza Plymouth Sweden...
-
Page 32: Lunar Phases
Lunar phases The weather station has a display which automatically displays the current lunar phase New moon Waxing half- Half-moon Waxing full moon moon Full moon Waning full Half-moon Waning half- moon moon Reading the barometric pressure for the last 12 hours Press the HISTORY ABS / REL button repeatedly to read the barometric pressure values for the last 12 hours. -
Page 33: Adjusting The Air Pressure Indication
Adjusting the air pressure indication The forecast of this weather station is basing on an analysis of the change of the air pressure. The barometric pressure is factory provided adjusted to the absolute air pressure. As the air pressure generally decreases with the elevation above sea level, the public weather service always announces the so-called relative air pressure. -
Page 34: Setting The Channel
If you want your weather station to announce the absolute air pressure: Press and hold the HISTORY ABS / REL button for 3 seconds. Then press the + or – button to change to the absolute air pressure. Confirm by pressing the HISTORY ABS / REL button. -
Page 35: Displaying Temperature And Temperature Trend
Displaying temperature and temperature trend The current indoor temperature and the temperature trend (indoors) shown in the LC display. After successfully connecting with the outdoor sensor, the weather station can dis- play the outdoor temperature and the temperature trend (outdoor) . -
Page 36: Displaying The Maximum / Minimum Temperature / Humidity
The categories are: = Humidity < 40 % COMFORT = Humidity 40–70 %, indoor temperature –4 to +149 °F (20 °C–28 °C) = Humidity > 70 % After successfully connecting with the outdoor sensor, the weather station shows the humidity trend (outdoors) and the humidity (outdoors) in the LC display. -
Page 37: Temperature And Frost Alarm
Temperature and frost alarm The temperature alarm is a short beep, which sounds as soon as the outdoor tem- perature exceeds or falls below the preset temperature range. Follow the below procedures to set the desired temperature range. Press the – button to access the temperature alarm mode. -
Page 38: Background Lighting
If the temperature alarm is activated, the corresponding symbol appears next to the outdoor temperature. The alarm signal sounds at the set values. If the temperature and frost alarm are activated, both symbols appear in the display. Background lighting Press the SNOOZE / LIGHT button . -
Page 39: Troubleshooting
Remove the battery cover on the back of the weather station. Remove the used batteries. Insert 3 new batteries type AA, 1.5 V. Note: Make sure that the polarity is correct when you insert the battery. The correct polarity is shown inside the battery compartment Close the battery compartment. -
Page 40: Cleaning And Care
If the display indicates a problem, move such objects away from the weather station or outdoor sensor or remove the batteries from the weather station or outdoor sensor for a short while and then replace them. Obstacles such as concrete walls can also interfere with reception. In this case, change the location (e. -
Page 41: Disposal
Disposal Dispose of the packaging through your local recycling facilities and in compliance with all federal, state and local regulations. Please note the package markings regarding waste separation, indicated by abbreviations (a) and numbers (b), meaning: 1–7: plastics / 20–22: paper and cardboard / 80–98: composite materials. -
Page 42: Warranty
Warranty What does this warranty cover? The warranty covers: · Damage, breakage or inoperability due to defect. · Damage not accounted for by normal wear and tear or following the safety and maintenance instructions provided in the user manual. What is not covered by the warranty? The warranty does not cover damage caused by: ·... - Page 43 We recommend first either: · Call customer service at 1 (844) 543-5872 · Visit the Website Customer Service Platform at www.lidl.com / contact-us · Visit a LIDL store for further assistance To ensure the quickest warranty return process, please have the following available: ·...
- Page 44 Descripción de las palabras de advertencia ....................Página 47 Servicio al cliente ................................Página 47 Introducción ..................................Página 48 Uso previsto .................................Página 48 Descripción de las partes ............................Página 49 Información técnica ..............................Página 54 Artículos incluidos ...............................Página 55 Importantes instrucciones de seguridad ......................Página 55 Información general de seguridad ..........................Página 55 Instrucciones de seguridad para baterías / baterías recargables ............Página 57 Antes de usar ................................Página 60...
-
Page 45: Descripción De Las Palabras De Advertencia
(p. ej. mensajes relacionados con daños materiales). SERVICIO AL CLIENTE Llame al Servicio de atención al Visite una de nuestras tiendas LIDL cliente al 1 (844) 543-5872 en caso de cualquier inquietud. Visite el Portal de atención... -
Page 46: Introducción
Estación meteorológica digital portátil Introducción Felicitaciones por la compra de su nuevo producto. Usted se decidió por un producto de alta calidad. Las instrucciones de uso forman parte del producto. Contienen in- formación importante respecto a la seguridad, el uso y la eliminación. Antes de usar el producto, familiarícese con toda la información de seguridad y las instrucciones de uso. -
Page 47: Descripción De Las Partes
Descripción de las partes Estación meteorológica: Indicación de fecha Tendencia de humedad (exterior) Indicación de mes Humedad (exterior) Alarma 1 Temperatura y alarma de helada Indicación de SNOOZE (máxima / mínima) Símbolo de torre de radio Tendencia de temperatura (exterior) Indicación de horario de verano Temperatura exterior (°C / °F) Indicación de hora... - Page 48 25 23 50 US-ES 282650_aur_Funk-Wetterstation_Content_US.indd 50 14.02.17 14:19...
- Page 49 Indicación de presión Presión barométrica Botón de barométrica en bar absoluta / relativa SNOOZE / LUZ Indicación de presión Tendencia de presión barométrica en la barométrica última hora Pronóstico del tiempo US-ES 282650_aur_Funk-Wetterstation_Content_US.indd 51 14.02.17 14:19...
- Page 50 Botón de MODE Botón de canal (CH) Botón CITY Botón + Botón HISTORY Compartimiento de Botón – ABS / REL baterías 52 US-ES 282650_aur_Funk-Wetterstation_Content_US.indd 52 14.02.17 14:19...
- Page 51 Sensor exterior: Botón RESET Compartimiento de LED de control Interruptor de selec- las baterías Montaje ción de canal US-ES 282650_aur_Funk-Wetterstation_Content_US.indd 53 14.02.17 14:19...
-
Page 52: Información Técnica
Información técnica Estación meteorológica: Rango de medición de temperatura: +32 a +122 °F (0 a +50 °C) Resolución de temperatura: 33.8 °F (0.1 °C) Rango de medición de humedad: 20 %–95 % Resolución de humedad: Señal de radio: WWVB Baterías: 3 x AA, 1.5 V (corriente directa) Rango de presión de aire:... -
Page 53: Artículos Incluidos
Artículos incluidos 1 estación meteorológica 1 sensor exterior 3 baterías AA, 1.5 V (preinstaladas) 2 baterías AA, 1.5 V (preinstaladas) 1 instrucciones de uso IMPORTANTES INSTRUCCIONES DE SEGURIDAD LEA TODAS LAS INSTRUCCIONES. GUARDAR PARA FUTURAS REFERENCIAS. INCLUYA TODA LA DOCUMENTACIÓN AL PASAR ESTE PRODUCTO A TERCEROS. - Page 54 Los niños suelen subestimar los peligros. Los niños deben permanecer siempre alejados del producto. Este producto puede ser usado por niños a partir de los 8 años y por personas con capacidades físicas, sensoriales o mentales reducidas o con falta de ex- periencia y conocimiento si han sido supervisadas o instruidas respecto al uso del producto de una manera segura y entienden los riesgos involucrados.
-
Page 55: Instrucciones De Seguridad Para Baterías / Baterías Recargables
• Oriente o localice de nuevo la antena receptora. • Aumente la separación entre el producto y el receptor. • Conecte el producto a la toma de corriente en un circuito distinto de aquel al que esté conectado el receptor. •... - Page 56 ¡PELIGRO DE EXPLOSIÓN! Nunca recargue baterías no recargables. No cause corto circuito o abra las baterías / baterías recargables. Se puede provocar sobrecalentamiento, incendio o quemaduras. Nunca arroje las baterías / baterías recargables al fuego o al agua. No someta las baterías / baterías recargables a cargas mecánicas. Riesgo de chorreo de batería El no tomar en cuenta las siguientes advertencias puede resultar en heridas o daños a propiedad.
- Page 57 Remueva las baterías / baterías recargables del producto si éste no será usado por un largo periodo. Riesgo de daño del producto ¡Utilice sólo el tipo específico de baterías / baterías recargables! ¡Asegúrese de usar la polaridad correcta al insertar las baterías! ¡Esta se muestra dentro del compartimientos para la batería! ¡Limpie los contactos de la batería y dentro del compartimiento para baterías antes de insertarlas!
-
Page 58: Antes De Usar
Antes de usar Configurar los dispositivos Primero coloque las baterías en el sensor exterior. El incumplimiento de las siguientes advertencias puede provocar lesiones o daños materiales. Cuando elija dónde colocar la estación meteorológica, asegúrese de que no esté expuesta a la luz directa del sol, vibraciones, polvo, calor, frío o humedad. No coloque los dispositivos cerca de fuentes de calor, p. -
Page 59: Preparar El Sensor Exterior Para Su Uso
Preparar el sensor exterior para su uso Retire la cubierta del compartimiento de las baterías de la parte trasera del sensor exterior. Retire la tira de seguridad de las baterías. El sensor exterior está listo para operar y el LED de control se enciende brevemente. -
Page 60: Preparar La Estación Meteorológica Para Su Uso
Preparar la estación meteorológica para su uso Retirar la tira de seguridad de las baterías: Abra el compartimiento de las baterías en la parte trasera de la estación meteorológica. Jale la tira de seguridad de las baterías. Luego cierre el compartimiento de las baterías. Tan pronto como haya retirado la tira de seguridad de las baterías, la estación meteorológica comenzará... - Page 61 1. Presione el botón de canal (CH) . El ícono del canal seleccionado par- padeará en la pantalla LC. 2. Luego presione el botón RESET del sensor. Tan pronto como la estación meteorológica haya establecido una conexión con el sensor exterior, automáticamente comenzará a recibir la señal de radio de la WWVB. Este proceso dura varios minutos y se indica en la pantalla LC mediante el símbolo de torre de radio parpadeando.
-
Page 62: Operación
Operación Recepción de la señal de radio de la WWVB para la hora Después de que se estableció la conexión con el sensor exterior o 3 minutos después de retirar la tira de seguridad de las baterías, la estación meteorológica comenzará automáticamente a buscar la señal de radio de la WWVB. -
Page 63: Hora / Fecha / Idioma
Nota: si el reloj de la estación meteorológica no puede recibir la señal de radio de la WWVB debido a errores, o la distancia al transmisor es demasiado grande u otros motivos similares, es posible establecer de forma manual la hora. Si la recep- ción de la señal de la WWVB es exitosa, se sobreescribe la configuración manual. - Page 64 3. Confirme su configuración presionando el botón MODE. La unidad de presión barométrica parpadeará en la pantalla. Presione el botón + o – para establecer la unidad deseada (hPa / inHg). 4. Confirme su configuración presionando el botón MODE. El indicador de zona horaria parpadeará...
- Page 65 para otras configuraciones. Si no presiona ningún botón durante 20 segundos, la pantalla LCD se regresará automáticamente a la indicación estándar. 7. Confirme su configuración presionando el botón MODE. El indicador de minutos de la indicación de hora parpadeará. Presione el botón + o – para configurar el valor deseado.
-
Page 66: Configurar La Hora De Alarma
Configurar la hora de alarma 1. Presione el botón MODE brevemente para entrar en el modo de alarma. Aparecerá la hora actual de alarma en la pantalla LC. 2. Mantenga presionado el botón MODE durante unos 2 segundos. Parpadeará la indicación de hora. 3. -
Page 67: Activar / Desactivar La Función De Alarma
Activar / desactivar la función de alarma 1. Presione brevemente el botón MODE una o dos veces para llegar los modos ALARM 1 o ALARM 2. 2. Presione el botón + . El símbolo de ALARM 1 o ALARM 2 aparecerá... -
Page 68: Preparar Para Usar La Función De Pronóstico Del Tiempo
Preparar para usar la función de pronóstico del tiempo Nota: tome en cuenta el pronóstico del tiempo del servicio local de pronóstico del tiempo, así como el pronóstico de su estación meteorológica. Si existen discrepan- cias entre la información de su producto y el servicio local de pronóstico del tiempo, siga las indicaciones de éste último. - Page 69 lluvioso lluvia y nieve Los símbolos climatológicos indican la fluctuación del clima durante las siguientes ocho horas y no el clima actual. La estación meteorológica puede mostrar la tendencia de presión barométrica Puede ver las siguientes indicaciones: La presión barométrica aumentará. La presión barométrica permanecerá...
-
Page 70: Seleccionar La Ubicación
Seleccionar la ubicación Presione el botón CITY . La indicación de ubicación parpadeará y se mostrará la longitud y la latitud. Presione el botón + o – para seleccionar su ubicación. Presione el botón CITY para confirmar los valores. Si la abreviatura de su ubi- cación no aparece en la pantalla, puede ingresar una ubicación personali- zada (véase “Seleccionar la ubicación manualmente”). - Page 71 Presione el botón CITY para confirmar los valores. Establezca la longitud y la latitud de su ubicación de la misma forma. Después de un momento breve, la estación meteorológica mostrará las horas de salida y puesta del sol, las fases lunares, así como la amplitud de marea - baja (TIDE LO), media (TIDE MID) y alta (TIDE TH).
- Page 72 Alemania Berlín Puede seleccionar entre (DE) Würzburg los siguientes países y Bremen Australia Canberra ciudades: Colonia (AU) Dortmund Melbourne Dresde Sydney Düsseldorf Austria Bregenz (AT) Erfurt Graz Fráncfort Innsbruck Friburgo Linz Hamburgo Salzburgo Hannover Viena Villach Kaiserslautern Wels Kassel Bélgica Amberes Kiel (BE)
- Page 73 República Brno París San Remo Checa Perpignan Trieste (CZ) Rouen Turín Praga Estrasburgo Venecia Dinamarca Aalborg Toulouse Verona (DK) Grecia Atenas Liechten- Vaduz Copenhague (GR) stein (LI) Odense Hungría Budapest Luxem- Luxemburgo Finlandia Helsinki (HU) burgo (LU) (FI) Irlanda Dublín Mónaco Monte Carlo Francia...
- Page 74 Gdansk León Birmingham Poznan Madrid Cardiff Varsovia Málaga Glasgow Portugal Faro Palma de Mal- Londres (PT) lorca Manchester Lisboa Salamanca Newcastle Porto Sevilla upon Tyne Federació San Peters- Valencia Plymouth Rusa (RU) burgo Zaragoza Estados Los Ángeles Serbia Belgrado Unidos Suecia Gotemburgo (RS)
-
Page 75: Fases Lunares
Fases lunares La estación meteorológica indica automáticamente la fase lunar actual. Luna nueva Luna creciente Cuarto Luna creciente creciente gibosa Luna llena Luna mengu- Cuarto mengu- Luna mengu- ante gibosa ante ante Lectura de la presión barométrica de las últimas 12 horas Presione el botón HISTORY ABS / REL de forma repetida para leer los valores de la presión barométrica de las últimas 12 horas. -
Page 76: Ajustar La Indicación De Presión Del Aire
Ajustar la indicación de presión del aire El pronóstico de esta estación meteorológica se basa en el análisis del cambio de la presión de aire. La presión barométrica viene ajustada de fábrica en relación a la presión ab- soluta del aire. Conforme la presión del aire va disminuyendo con la altura sobre el nivel del mar, el servicio meteorológico nacional siempre anuncia lo que se conoce como presión del aire relativa. -
Page 77: Configurar El Canal
Si desea que su estación meteorológica indique la presión del aire absoluta, proceda como sigue: Mantenga presionado el botón HISTORY ABS / REL durante 3 segundos. Luego presione el botón + o –, para cambiar a presión del aire absoluta. Confirme presionando el botón HISTORY ABS / REL. -
Page 78: Indicación De Temperatura Y Tendencia De Temperatura
Indicación de temperatura y tendencia de temperatura La temperatura interior actual y la tendencia de temperatura (interior) muestran en la pantalla LC. Después de conectarse exitosamente con el sensor exterior, la estación meteorológica puede mostrar la temperatura exterior y la tendencia de temperatura (exterior) . -
Page 79: Indicación De La Temperatura / Humedad Máxima / Mínima
Las siguientes categorías están disponibles: = Humedad < 40 % COMFORT = Humedad 40–70 %, temperatura interior –4 a +149 °F (20 °C–28 °C) = Humedad > 70 % Después de conectarse exitosamente con el sensor exterior, la estación meteorológica muestra la tendencia de humedad (exterior) y la humedad (exterior) en la... -
Page 80: Alarma De Temperatura Y Alarma De Helada
Mantenga presionado el botón + durante 3 segundos para borrar los valores máximos y mínimos almacenados. Alarma de temperatura y alarma de helada La alarma de temperatura es un pitido breve, que suena en cuanto la temperatura exterior supera o está por debajo del rango de temperatura establecido. Siga los siguientes procedimientos para configurar el rango de temperatura deseado. -
Page 81: Activar / Desactivar La Alarma De Temperatura Y La Alarma De Helada
Activar / desactivar la alarma de temperatura y la alarma de helada Si está activado más de un sensor exterior, presione el botón de canal para seleccionar uno. Presione el botón – de forma repetida para activar la alarma de tempera- tura y la alarma de heladas. -
Page 82: Indicación Del Nivel De Batería
Indicación del nivel de batería La indicación del nivel de batería aparece en la pantalla LC de la estación meteorológica’s pantalla LC si las baterías están casi agotadas. Asegúrese de re- emplazar las baterías en cuanto sea posible (véase “Cambiar las baterías”). Cambiar las baterías Estación meteorológica: Reemplace las baterías si la pantalla LC es ilegible o si se muestra la indicación de... -
Page 83: Resolución De Problemas
Retire la cubierta del compartimiento de las baterías de la parte trasera del sensor exterior. Retire las baterías usadas. Inserte 2 baterías nuevas tipo AA, 1.5 V. Nota: asegúrese de insertar las baterías con la polaridad correcta. La polari- dad correcta se muestra dentro del compartimiento de baterías Cierre el compartimiento de las baterías. -
Page 84: Limpieza Y Mantenimiento
entre el sensor remoto y la estación base. Un “contacto visual” entre el sensor remoto y la estación base suele mejorar la transmisión. El frío (temperatura exterior debajo de 32 °F (0 °C)) puede reducir la potencia de la batería del sensor exterior y, por tanto, afectar negativamente la transmisión de radio. - Page 85 Siga las instrucciones en el empaque en relación a la separación de ba- sura, que se indican mediante abreviaturas (a) y números (b), significado: 1–7: plásticos / 20–22: papel y cartón / 80–98: materiales compuestos. Contacte a las autoridades locales de eliminación de residuos para obtener información adicional sobre cómo deshacerse del producto usado.
-
Page 86: Garantía
Garantía ¿Lo que cubre la presente garantía? La garantía incluye: · Daños, quebraduras o incapacidad para funcionar debido a defectos. · Daños que no se expliquen por el desgaste propio del uso o al seguir las instruc- ciones de seguridad y mantención incluidas en el manual para el usuario. ¿Lo que no cubre esta garantía? La garantía no cubre daños causados por: ·... - Page 87 Recomendamos que primero: · Llame al Servicio de atención al cliente al 1 (844) 543-5872. · Visite el Portal de atención al cliente en www.lidl.com / contact-us · Visite una de nuestras tiendas LIDL en caso de cualquier inquietud. A fin de acelerar el trámite de la garantía, tenga a bien contar con lo siguiente: ·...
Need help?
Do you have a question about the 282650 and is the answer not in the manual?
Questions and answers