
Related Manuals for lidl 288624


Summary of Contents for lidl 288624
- Page 1 PREMIUM WEATHER STATION PREMIUM WEATHER STATION Operation and Safety Notes IAN 288624...
- Page 2 GB / IE / NI Operation and Safety Notes Page...
-
Page 3: Table Of Contents
1. Introduction .............................Page 4 2. General information ........................Page 4 3. Intended use ...........................Page 4 4. Technical data ..........................Page 4 5. Simplified EU declaration of conformity..................Page 5 6. Safety information ..........................Page 5 7. Scope of delivery..........................Page 6 8. Definition of terms ...........................Page 6 9. -
Page 4: Introduction
Premium weather station wind gauge, barometer, radio clock and calendar. Only for personal use. Not for commercial use. 1. Introduction 4. Technical data We congratulate you on the purchase of your new Measuring Range: product. You have chosen a high quality product. The instructions for use are part of the product. -
Page 5: Simplified Eu Declaration Of Conformity
Values above the measurement values: compliance with Directives 2014/53/EU, 2011/65/ – Room temperature above 50 °C: HH.H EU and 2009/125/EC. – Outdoor temperature above 70 °C: HH.H – Air humidity above 99 %: 99 % The full text of the EU declaration of conformity is avail- –... -
Page 6: Scope Of Delivery
7. Scope of delivery 1 weather station with stand 1 wind gauge with integrated temperature and air humidity sensor 1 rain gauge with leaf filter 6 screws suitable for ø 5 mm dowels 6 dowels ø 5 mm 4 hexagonal socket head bolt M6 including 4 nuts and 8 washers 2 mounting clamps for wind gauge 10 pcs AA battery... -
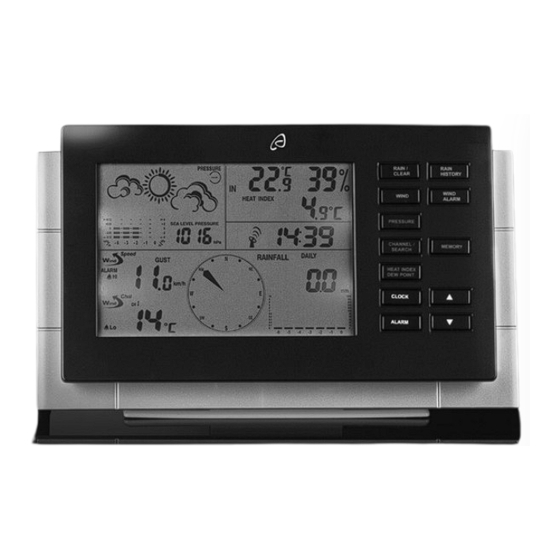
Page 7: Functions
temperature felt on the human body, which depends – Easy to stand or mount with screws on an even on the wind speed. The wind chill is the measurement surface used for wind-dependant cooling of an object. – It is best to stand or mount the rain gauge in an Humans feel this wind chill particularly on the face. - Page 8 0.5 x 3 Wind gauge assembly: Choose a suitable location for your wind gauge. ø 5 mm 5 mm – The wind gauge must be set up outdoors. – The wind must be able to access the wind gauge from all sides to enable the wind force 10 mm and wind direction to be measured accurately.
-
Page 9: Inserting And Replacing Batteries
11. Inserting and replacing batteries Vane Mast Put the batteries first into the outdoor sensor (wind gauge / rain gauge), then into the weather station. Wind gauge: – The wind gauge must be recalibrated when using Wind Hexagonal socket head bolt it for the first time as well as every time the battery wheel Washer... -
Page 10: Rain Gauge
Weather station: Socket for 6 V (direct current) – Open the battery compartment on the rear of adaptor (adaptor not included) the weather station in the direction of the arrow. – Insert the batteries (6 x 1.5 V type AA) ensuring correct polarity. -
Page 11: Product Overview
12. Product overview Button Press once Press for ap- prox. 3 sec. Weather Station: CLOCK Switch display Set date and between local time Temperature display and air time, date and Weather forecast and air pressure humidity indoors / outdoors day of the week ALARM Display and Set alarm time... -
Page 12: Preparing The Wind Gauge And Rain Gauge And Registering On The Weather Station
Rain gauge: Button Press once Press for ap- Leaf filter prox. 3 sec. WIND UNIT Set the wind speed unit (Beaufort, mph, m / s, km / h or knots) RAIN UNIT Set the rainfall quantity meas- Battery Rain rocker urement unit compartment (mm or inch) -
Page 13: Automatic Wind Gauge And Rain Gauge Registration On The Weather Station
14. Weather station basic settings 14.1 Setting – 12 / 24 hour format – Time – Date format – Date Jump to the next menu item with the CLOCK button. Press ▲ and ▼ to make the settings. If none of the set- ting buttons has been pressed for approx. -
Page 14: Dcf-77 Synchronisation
14.2 DCF-77 synchronisation Year: Press the CLOCK button a second time to set the year. The year now appears on the display. Use ▲ This functions sets the time and date automatically. and ▼ to set the year. Press on the back side to activate the synchronisa- tion for radio-controlled DCF-77 time information. -
Page 15: Alarm Function
Set +1 Hr.: Bulgaria, Estonia, Finland, Greece, Latvia, Lithuania, Moldova, Romania, Turkey, Ukraine, Cyprus All other time zones can be found in your Atlas or on the Internet. Press ▲ and ▼ to set the time zone. You can select 15. -
Page 16: Setting The Air Pressure Unit
Press the ALARM button again to reactivate the alarm the current air pressure value, e.g. from the newspaper function. Press the CLOCK button to return to the or Internet. time display. Hold the PRESSURE button down for approx. 3 seconds If no button is pressed for approximately 20 seconds until you hear a confirmation tone. -
Page 17: Setting The Wind Chill Alarm
Hold the WIND ALARM button down for approx. Hold the WIND ALARM button down for approx. 3 seconds until a confirmation tone sounds and the 3 seconds until a confirmation tone sounds and the value flashes. value flashes. Use ▲ or ▼ to set the desired value. Press the Use ▲... -
Page 18: Setting The Rain Gauge Unit
24.1 Date and time Wind Alarm on Press the CLOCK button to switch between the time, date and day of the week. If no button has been pressed for a period of approximately 20 seconds, the time display appears automatically. Wind Chill Alarm on Time Date... -
Page 19: Ice / Frost Alarm
displayed in different chronicles either as a digital value or in diagram form: Digital value: Value Unit Press the RAIN HISTORY button to view the details. Every time the button is pressed, the display moves Diagram: forward by one day. Below, you will find a display for the past 2 days: Unit in inches Unit in millimetres... -
Page 20: Wind Direction
24.10 Minimum and maximum values Use the MEMORY button to display saved minimum and maximum values. 24.7 Wind direction The wind gauge automatically shows the average wind direction for the last 2 minutes. N = North NE = North East 24.11 Weather forecast E = East SE = South East... -
Page 21: Rain Gauge Leaf Filter
If the indoors tempera- = Always have a ”Beep” sound at the main unit. ture is displayed, the = Wind-chill alert was activated. When the wind- battery charge indica- chill alert is activated, in the 1st minute, first tor applies for weather 10s “Beep”, 2nd “Beep, Beep”, after that 40s station. -
Page 22: Cleaning
Cold (outdoor temperatures below 0°C) can reduce on collection points and their opening the battery power of the outdoor sensor and thereby hours can be obtained from your local negatively impair the radio transmission. authority. Another factor that may cause harmful interference, Faulty or used batteries / rechargeable batteries are dead or weak batteries in the outdoor sensor. - Page 23 OWIM GmbH & Co. KG Stiftsbergstraße 1 DE-74167 Neckarsulm GERMANY Model-No.: H13726 Version: 07 / 2017 Last Information Update: 08 / 2017 Ident.-No.: H13726082017-IE/NI IAN 288624...
Need help?
Do you have a question about the 288624 and is the answer not in the manual?
Questions and answers