
Related Manuals for DTM Print CX86e

Summary of Contents for DTM Print CX86e
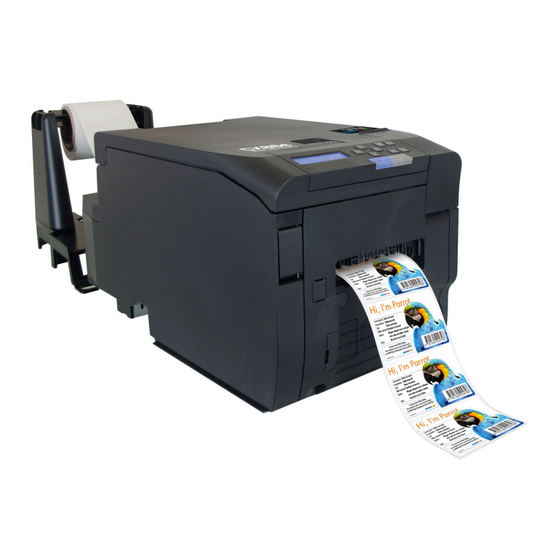
- Page 1 User’s Manual ©2019, DTM Print GmbH. All rights reserved For the most recent version of this manual please visit dtm-print.eu/manuals Version 01 - CX86e-190808BETA...
-
Page 3: Table Of Contents
Table of Contents 1. Read This First ................................... 8 Safety Precautions ........................................... 8 General Precautions ..........................................8 Other Cautions ............................................10 Regarding the Printing of Paper Currency and Securities, etc..............................10 Regarding the Prevention of Electromagnetic Interference ................................. 10 Regarding the Regulation of Harmonic Waves ....................................10 Caution When Taking This Product Outside of Japan .................................. - Page 4 Entering and Viewing the Menu .......................................41 Entering Characters ..........................................43 Printing a Demonstration Page ......................................44 Adjusting the Volume ...........................................44 Setting the Volume ............................................... 44 Setting the Volume for the Printing Complete Buzzer ..................................45 Checking Information About the Machine...................................46 Printing and Checking a Report..........................................46 Checking the Operation Panel ..........................................
- Page 5 Printing from a Computer ........................................93 Printer Driver Screens and Functions .....................................93 [Setup] Tab ..................................................93 [Color] Tab ..................................................94 [Overlays] Tab ................................................. 95 [Extend] Tab..................................................96 Registering Frequently Used Settings (Favorites) ..............................96 Specifying the Print Orientation .......................................97 Rotating the Print Result 180 Degrees ...................................97 Specifying the Number of Prints ......................................97 Printing from the Last Page ........................................98 Cutting Every Specified Number of Pages ..................................98...
- Page 6 When the Paper Is Jammed......................................137 Error 381/730-06 (Paper on the Transfer Belt Unit) ..................................137 Error 382 (Paper Jammed in the Fuser Unit) ......................................139 Error 380/390 (Paper Jammed Near the Cutter) ....................................142 Canceling Printing ..........................................144 Pressing «CANCEL» Button ............................................144 Canceling from a Computer ............................................144 Cannot Print ............................................
- Page 7 The Paper Curls/The Paper Wrinkles ........................................167 The Paper Gets Stuck in the Roller of the Fuser Unit ..................................167 Paper Sticks to the Transfer Belt Unit ........................................167 Paper Corners Are Folded ............................................167 The “308:PAPER JAM” error occurs when paper is not loaded ..............................168 When a Power Failure Occurs ......................................
-
Page 8: Read This First
Read This First Safety Precautions Ignoring these instructions and improperly handling the machine may lead to death or serious injury. Ignoring these instructions and improperly handling the machine may lead to injury. General Precaurions Do not touch the safety switch inside the machine. High voltage that can cause electric shock may result. Injury may also result from the turning of gears. - Page 9 Do not place objects such as cups of water on the machine. Electrocution or fire may result. Ensure that pet urine does not enter or wet the machine. Electrocution or fire may result. If you open the cover of the machine, do not touch the fuser unit. Burns may result. Do not throw a used image drum or toner cartridge into a fire.
-
Page 10: Other Cautions
Other Cautions Regarding the Printing of Paper Currency and Securities, etc. — The duplication and printing of items such as paper currency (including foreign paper currency), national bonds, municipal bonds, postage stamps, and revenue stamps or the creation of similar misleading objects is a crime and punishable by the law, regardless of the intended use. -
Page 11: Screens
Screens Unless otherwise specified, this manual uses screens from the following operating system in examples. — Windows 10 Screens may differ from those in this manual, depending on the operating system, model, and version you are using. Marks This manual uses the following marks. Mark Meaning Indicates cautions for operating the machine correctly. -
Page 12: Licenses
Property Rights and Responsibilities • DTM Print GmbH and its licensers reserve the right to copy, publish, and own the software and its copies. The configuration, structure, and code of the software are important confidential information for the business of DTM Print GmbH and its licensers. - Page 13 Limited Liability • DTM Print GmbH and its licensers will not be held responsible for any direct, indirect, or derivative damages or losses caused by the software, even if DTM Print GmbH was aware of the possible of such damages occurring, even if the claim for those damages is based on an illegal act (including, but not limited to negligence), or based on any other legal grounds.
-
Page 14: Unpacking
Main Body Toner Cartridge A toner cartridge can print approximately 5,000 pages (reference value based on DTM Print GmbH tests printing sim- plex 1 inch square black mark patterns). Guide Rib Power Cord A LAN cable and USB cable are not included. -
Page 15: Installing Consumables
Installing Consumables Do not turn the power of the machine on. X Install the consumables after confirming that the power of the machine is off. X Use extra care when handling the image drum (the glossy cylinder), because it is fragile. X Do not expose the image drum unit to direct sunlight or strong light (approximately 1,500 lux or more). - Page 16 Peel off the protective tape. Peel off the protective tape, and remove the desiccant. Remove the cover toner.
- Page 17 Close the top cover. Open the toner cartridge cover. Take out the toner cartridge from the packaging bag, and shake it several times vertically and horizontally.
- Page 18 Place the toner cartridge in the direction that it will be attached to the machine. Attach the toner cartridge. Close the toner cartridge cover.
-
Page 19: Using The Machine
Using the Machine Installation Installation Environment Install the machine in the following environment. X Ambient temperature: 10°C to 32°C X Ambient humidity: 20% to 80% RH (relative humidity) X Maximum wet bulb temperature: 25°C Use care to prevent condensation. It may cause a malfunction. —... -
Page 20: Installation Space
Installation Space Install the machine on a flat surface that is wide enough to accommodate the legs of the machine. As shown in the following figures, allow enough space around the machine. Top View User-Defined Side View... -
Page 21: Names Of Components
Names of Components Front View No. Name Description Top Cover The top cover of the machine. Close this when printing. Top Cover Lever Use this to open the top cover. LCD Panel Indicates the status of the machine and the settings. Toner Cartridge Cover Opens and closes when replacing the toner cartridge. -
Page 22: Rear View
Rear View No. Name Description Feeder Cover The cover of the paper feeder. Feeder Cover Lever Use this to open the feeder cover. AC Inlet The terminal for the power cable. Paper Inlet Load paper here. Paper Sensor The sensor for detecting the paper. Paper Guide Align this with the paper width. -
Page 23: Inside Of The Machine
Inside of the Machine No. Name Description LED Heads The LED heads. Image Drum Unit The image drum unit. The fuser unit. Take care, as this becomes hot while print- Fuser Unit ing. Toner Cartridge The toner cartridge. The transfer belt unit. This is set below the image drum Transfer Belt Unit unit. -
Page 24: Installing The Wireless Lan Module
Installing the Wireless LAN Module Install the Wireless LAN Module to connect the machine and a computer via wireless LAN. Turn off the machine. For information on turning off the machine, refer to "Turning Off the Machine". Insert the Wireless LAN Module into the connector on the side of the machine. Attach the Wireless LAN Module anywhere on the machine using the supplied hook-and-loop fastener. - Page 25 Turn the machine on while holding «OK» button on the operation panel. X Hold «OK» button until [BOOT MENU] is displayed on the screen. When [BOOT MENU] is displayed, release your finger and press «OK» button again. When [ENTER PASSWORD] is displayed, enter the password. X The default password is "999999."...
- Page 26 When the password has been entered, press OK button. Press ∧ button or ∨ button to display [WIRELESS MODULE], and press «OK» button. Press ∧ button or ∨ button to display [ENABLE], and press OK button. X * is displayed on the right edge of the bottom of the screen. Press «ONLINE»...
-
Page 27: Installing The Presenter Unit
Installing the Presenter Unit The Presenter Unit is installed to retain the printed paper in the outlet without ejecting it. When installation of the Presenter Unit is complete, set the Presenter Unit to [ENABLE] on the operation panel. Turn off the machine. For information on turning off the machine, refer to "Turning Off the Machine". - Page 28 Remove the Cap-Cover-PSNT (x 2) of the Presenter Unit. Mount the Presenter Unit to the machine. Take care, as it will not be completely secure. Tighten the screws (x 2). Connect the connector.
- Page 29 Attach the Cover-Cable-PSNT. Attach the Cap-Cover-PSNT (x 2). Enable the Presenter Unit on the operation panel. Turn on the machine. For information on turning on the machine, refer to “Turning On the Machine”. — Confirm that [READY TO PRINT] is displayed on the machine. Press ∧...
- Page 30 About the Power Supply — Ensure the following conditions for the power supply. — CX86e: 110 to 127V AC (Range 99 to 140V AC) — CX86e: 220 to 240V AC (Range 198 to 264V AC) — Power frequency: 50/60 Hz ± 2% —...
-
Page 31: Turning On Or Off The Machine
Turning On the Machine Turning On the Machine Connect the power cable to the power connector on the rear of the machine. Insert the power plug into the outlet. Open the cover on the front left of the machine and press and hold the power switch for approximately one sec- ond. -
Page 32: Turning Off The Machine
Turning Off the Machine Open the cover on the front left of the machine and press and hold the power switch for one second. Wait until [SHUTTING DOWN. PLEASE WAIT/TURN OFF AUTOMATICALLY] is displayed on the operation panel and the operation panel turns off. Remove the power plug from the outlet. -
Page 33: Connecting A Lan Cable
Connecting a LAN Cable A LAN cable can be used to connect the machine to a computer via a wired network. Before installing the printer driver, connect the printer to the network using a LAN cable. Prepare a LAN cable and hub. Make sure that the machine and the computer are turned off. -
Page 34: Connecting Via Wireless Lan
Insert the other end of the LAN cable into the hub. Insert the LAN cable into the network interface connector of the hub. Connecting via Wireless LAN Preparing to Connect via Wireless LAN Connecting via an Access Point Check whether your wireless LAN access point supports the following environment. Standard: IEEE 802.11 a/b/g/n —... - Page 35 X Enter the Admin password, and then press the OK button. X Press∧ button or ∨ button on the operator panel to display [NETWORK SETUP], and then press the OK but- ton. X Press ∧ button or ∨ button on the operator panel to display [ENABLING DEFAULT GATEWAY], and then press the «OK»...
-
Page 36: Directly Connecting To The Machine (Ap Mode)
Press OK button when [IP ADDRESS SET] is displayed. — Press ∧ button or ∨ button on the operator panel to select [AUTO] or [MANUAL]. — If [MANUAL] is selected, manually input the IPv4 Address, Subnet Mask and Gateway Address. Directly Connecting to the Machine (AP Mode) Automatic Setup (Push Button) If the wireless terminal (computer, tablet, smartphone, etc.) supports «WPS-PBC»... -
Page 37: Connecting A Usb Cable
Connected with Wireless LAN Wireless LAN LAN Cable (Infrastructure) (AP Mode) Available Combinations Connecting a USB Cable A USB cable is not included with the machine. Prepare an A-B type cable separately. X For Windows, do not insert the other end of the USB cable into the computer until an instruction appears on the screen during the printer driver installation. -
Page 38: Installing The Printer Driver To A Computer
Installing the Printer Driver to a Computer See separate instructions which came with the download of the printer driver. -
Page 39: Using The Operation Panel
Using the Operation Panel Name and Function Name Description Displays the status of the machine and the menu items. Turns off when the machine is in the Power Save mode. Enters the Menu mode. Returns to the previous item when the machine is in the ∧... -
Page 40: Description Of The Display
Description of the Display The display indicates the status of the machine and the menu items, etc. When Printing Can Be Performed When the machine can perform printing, [READY TO PRINT] is displayed on the top of the screen. When an Error Has Occurred in the Machine Top: Displays the solution. -
Page 41: Entering And Viewing The Menu
Entering and Viewing the Menu Confirm that [READY TO PRINT] is displayed on the machine. Press ∧ button or ∨ button to enter the Menu mode and display the menu categories. Press ∧ button or ∨ button several times to display the category you want to set, and press «OK» button. Display the lower menu categories. - Page 42 When an item is displayed on the top and a setting is displayed on the bottom, press «OK» button to make the setting flash and become changeable. Press «∧» button or «∨» button several times to display the value you want to set, and press «OK»...
-
Page 43: Entering Characters
Entering Characters When the screen for entering the password, etc. is displayed, press ∧ button or ∨ button to select the character to enter. Press ∧ button to display characters starting with lower case letters. — X The characters are displayed in the following order: lower case letters → symbols → upper case letters → numbers (0 to 9) Press ∨... -
Page 44: Printing A Demonstration Page
Printing a Demonstration Page Use cut sheet cut to the following size or continuous paper (roll paper) without a mark. The operation is not guaran- teed for other paper. When printing on cut sheet — X Prepare paper that is 74 mm wide and 210 mm long. X Print after setting [MENUS] >... -
Page 45: Setting The Volume For The Printing Complete Buzzer
When the password has been entered, press OK button. — Press ∧ button or ∨button several times to display [BUZZER SETUP]. — Press OK button. — Press OK button when [ERROR VOLUME] is displayed. — With the setting flashing, press ∧ button or ∨ button to display the value you want to set, and press OK button. —... -
Page 46: Checking Information About The Machine
Checking Information About the Machine Printing and Checking a Report Perform the procedure below to print and check the values set in the machine. Use cut sheet cut to the following size or continuous paper (roll paper) without a mark. The operation is not guar- —... -
Page 47: Setting The Power Save Mode Transition Time
Setting the Power Save Mode Transition Time The machine enters the Power Save mode when it has not been used for a certain period of time. 0 minutes is set by default. Confirm that [READY TO PRINT] is displayed on the machine. —... -
Page 48: Setting The Auto Power Off Time
Setting the Auto Power Off Time If the machine is not used for a certain period of time, it automatically turns off. By default, the machine does not automatically turn off. To make the machine automatically turn off, enable the Auto Power Off setting on the operation panel, and then set the time until the power turns off. -
Page 49: Initializing The Flash Memory
Initializing the Flash Memory When you initialize the flash memory, the following data is deleted. X Form data X Download demo print data X Saved menu settings Confirm that [READY TO PRINT] is displayed on the machine. — Press ∧ button or ∨ button several times to display [ADMIN SETUP]. —... -
Page 50: Initializing The Network Settings
Confirm that [READY TO PRINT] is displayed on the machine. — Press ∧ button or ∨ button several times to display [ADMIN SETUP]. — Press «OK» button. — When [ENTER PASSWORD] is displayed, enter the password. — The default password is “999999. ” When the password has been entered, press «OK»... -
Page 51: Initializing The Settings Of The Machine
Initializing the Settings of the Machine The default settings of the machine can be restored. When this operation is performed, the machine automatically restarts. Confirm that [READY TO PRINT] is displayed on the machine. — Press ∧ button or ∨ button several times to display [ADMIN SETUP]. —... -
Page 52: Correcting The Color Density
Correcting the Color Density This section describes the procedure for correcting the density on the operation panel. Confirm that [READY TO PRINT] is displayed on the machine. — Press ∧ button or ∨ button several times to display [CALIBRATION], and press «OK» button. —... -
Page 53: Adjusting The Paper Sensors (Sensor Calibration)
Adjusting the Paper Sensors (Sensor Calibration) If paper jams or paper mark detection errors occur frequently, follow the procedure below to perform sensor calibra- tion. For the paper with black mark, cut it so that the black mark is at the leading edge of the paper, and then load it. Print area The paper sensors are adjusted to the position suitable for the paper to use. -
Page 54: Menu List
Menu List This section describes the menu items that can be set on the operation panel. Menu DEMO PAGE For details, refer to "DEMO PAGE". CONFIGURATION For details, refer to "CONFIGURATION". PRINT INFO For details, refer to "PRINT INFO". MENUS For details, refer to "MENUS". -
Page 55: Configuration
REMAINING nnn% Displays the remaining life of the fuser unit. Displays the remaining life of the toner car- TONER (n.nK) REMAINING nnn% tridge. PRINTER NAME CX86e Displays the machine name. SHORT NAME CX86e Displays the short name. IPV4 ADDRESS xxx.xxx.xxx.xxx Displays the IPv4 address. - Page 56 Item Setting Description FW VERSION Displays the version of the wireless LAN firmware. ENABLE WIRELESS (INFRA- Displays whether wireless (infrastructure) is enabled or STRUCTURE) disabled. DISABLE SSID Displays the SSID of the connection destination. DISABLE SECURITY WPA/WPA2-PSK Displays the type of security for the wireless LAN func- *1: Can only be set tion.
-
Page 57: Print Info
Item Setting Description xxxxxxxxxxxxxxxxxx SERIAL NUMBER Displays the serial number of the printer. xxxxxxxx xxxxxxxxxxxxxxxxxx ASSET NUMBER Displays the asset number of the printer. xxxxxxxxxxxxxx xxxxxxxxxxxxxxxxxx LOT NUMBER Displays the lot number of the machine. xxxxxxxx FW VERSION xxx.xx_x_x Displays the firmware version. SYSTEM Displays the firmware version of the control CU VERSION... - Page 58 Item Setting Description CONTINUOUS PAPER PAPER FORM Sets the paper format. CUT PAPER 1.00 IN / 25.0 MM ~ X DIMENSION 2.91 IN / 74.0 MM ~ Sets the paper width. 3.40 IN / 86.0 MM 2.10 IN / 53.0 MM ~ Y DIMENSION 8.27 IN / 210.0 MM ~ Sets the paper length.
- Page 59 Item Setting Description 0 MIN 1 MIN 2 MIN 3 MIN 4 MIN SYSTEM Sets the time until the machine enters the Power POW SAVE TIME ADJUST Save mode. 5 MIN 10 MIN 15 MIN 30 MIN 60 MIN 1 MIN 2 MIN 3 MIN 4 MIN...
- Page 60 Item Setting Description 5 SEC 10 SEC 20 SEC 30 SEC 40 SEC 50 SEC 60 SEC Sets the time until forced printing is performed TIMEOUT INJOB when print data stops being received. 90 SEC 120 SEC 150 SEC 180 SEC 210 SEC 240 SEC 270 SEC...
- Page 61 Item Setting Description TIMEOUT NET 0 SEC Sets the time that the network ports are left open when an operation finishes. 5 SEC ~ 90 SEC ~ 290 SEC 295 SEC 300 SEC JAM RECOVERY Sets whether to print the page where a paper jam oc- curred again.
-
Page 62: Admin Setup
Item Setting Description BG SETTING 0, +1, +2, +3, -3, -2, -1 Corrects uneven printing due to differences in the print density/ print frequency or temperature/humidity. Change this value when the background is dense. DRUM CLEANING Set ON to reduce white horizontal streaks that appear in the print results. - Page 63 Item Setting Description SNMP ENABLE; DISABLE Sets whether to enable or disable SNMP. NETWORK SCALE NORMAL NORMAL: Operates efficiently even when connected to a hub with the span- ning tree function. However, the printer startup time may become longer SMALL when connected to a small LAN with two or three computers.
- Page 64 Item Setting Description PRESENTER MODE Configures paper output. MODE1 OFF: Outputs paper with the regular output method. MODE2 MODE1: Retains the paper with the Presenter Unit and prints the next page when the paper is pulled out. MODE2: Retains the paper with the Presenter Unit and prints the next page when print data exists.
- Page 65 Item Setting Description Wingdings, Dingbats MS, Symbol, OCR-A, OCR-B, OCRB Subset2, HP ZIP, USPSFIM, USPSSTP, USPSZIP, Arabic-8, Bulgarian, CWI Hung, DeskTop, German, Greek-437, Greek-437 Cy, Greek-737, Greek-8, Greek-928, Hebrew NC, Hebrew OC, Hebrew-7, Hebrew-8, IBM-437, IBM-850, IBM-860, IBM-86, IBM-865, ISO Dutch, ISO L1, ISO L, ,ISO L4, ISO L5, ISO L6, ISO L9, ISO Swedish1, ISO Swedish2, ISO Swedish3, ISO-2 IRV, ISO-4 UK, ISO-6 ASC, ISO-10 S/F, ISO-11 Swe, ISO-14 JASC, ISO-15 Ita, ISO-16 Por, ISO-17 Spa, ISO-21 Ger, ISO-25 Fre,...
- Page 66 Item Setting Description OTHERS RECEIVE AUTO, 0.5 MB Sets the reception buffer size to secure for the local interface. SETUP SETUP BUF SIZE 1 MB, 2 MB Normally, [AUTO] is used. When memory overflow errors occur, lowering this setting may 4 MB, 8 MB improve the problem.
- Page 67 Item Setting Description NEARLIFE DRUM 500, 1000, 1500 Sets the timing for displaying the near life warning for the image SETUP NEARLIFE drum unit. 2000, 2500, 3000 Displays the near life warning for the image drum unit in front of the 3500, 4000, 4500 selected value for the image drum unit lifetime.
-
Page 68: Print Statistics
PRINT STATISTICS Settings related to print statistics. Item Setting Description USAGE REPORT ENABLE Sets whether to enable or disable the print statistics function. DISABLE The device restarts if this setting is changed. RST MAIN CNT EXECUTE Resets the main counter. CHANGE NEW PASSWORD ****... -
Page 69: Wireless Setting
WIRELESS SETTING Settings related to wireless LAN. Item Setting Description WIRELESS (INFRASTRUCTURE) ENABLE Sets whether wireless (infrastructure) is enabled or disabled. DISABLE NETWORK IP ADDRESS SET AUTO Sets the method for setting the IP address. SETTING MANUAL IPV4 ADDRESS xxx.xxx.xxx.xxx Sets the IP address. -
Page 70: Wireless (Ap Mode) Setting
WIRELESS (AP MODE) SETTING Settings related to wireless LAN. Item Setting Description WIRELESS(AP MODE) ENABLE Sets whether wireless (AP mode) is enabled or disabled. DISABLE AUTOMATIC SETUP (PUSHBUT- When YES is selected, automatic connection via a push button is started. TON) If the connection fails, the machine returns to the previous screen. - Page 71 Item Setting Description MENU OPERATION UP/DOWN NORMAL Sets the operation performed when «∧» button or «∨» button is pressed when SETUP TYPE selecting a category/item/value in a menu. OLD TYPE NORMAL TYPE: When «∧» button is pressed, the machine returns to the pre- vious item (up in the displayed list).
-
Page 72: Loading Paper
Loading Paper Available Paper Sizes Paper Format Paper Format Description Continuous Paper Paper wound into a roll or paper folder along a perforation Cut Sheet Paper cut into rectangles in the range of 25 mm to 86 mm width and 53 mm to 551 mm length Paper Type Paper Type... - Page 73 Continuous Paper: With Black Mark Guaranteed Print Range B Printable Range Paper Thickness 0.080 to 0.250 mm Paper Width 25 to 86 mm Cut Length 53 to 551 mm Side margin 4.2 mm 2 mm Top margin 4.2 mm 2 mm Bottom margin 6.3 mm 2 mm Black Mark Width 9 mm or more Black Mark Length 2.5 to 13 mm...
- Page 74 Continuous Paper: With Holes + GAP With holes in the paper center Without holes in the paper center Guaranteed Print Range Guaranteed Print Range B Printable Range B Printable Range Paper Thickness 0.080 to 0.250 mm Paper Width 36 to 86 mm Cut Length 53 to 551 mm Side margin...
- Page 75 Cut Sheet Guaranteed Print Range B Printable Range Paper Thickness 0.060 to 0.250 mm Paper Width 25 to 86 mm Cut Length 53 to 551 mm Side margin 4.2 mm 2 mm Top margin 4.2 mm 2 mm Bottom margin 6.3 mm 2 mm Paper Format Setting CUT PAPER Cut Type Setting Usage Conditions Guaranteed Print Range...
-
Page 76: Paper Storage
Paper with Perforation Paper Thickness 0.060 to 0.250 mm Cut position 1.5 mm or more When cutting paper with perforation, cut the paper at a position at least 1.5 mm away from the perforation. Paper Storage Store paper under the following conditions to maintain quality. In a dark, dry, and flat location such as inside a cabinet. -
Page 77: Flow Of Loading Paper
Flow of Loading Paper Setting Paper Information to the For details, refer to "Setting Paper Information on the Machine Operation Panel". Setting the Paper Sensors For details, refer to "Setting the Paper Sensors". Attaching the Guide Ribs For details, refer to "Attaching the Guide Ribs". Loading Paper For details, refer to "Loading Paper". -
Page 78: Setting Paper Information On The Operation Panel
Setting Paper Information on the Operation Panel Use the operation panel to set the information for the paper to use to the machine. Set the information in the following order: paper format → paper size → paper weight → cut type → cut position Paper Format For roll paper or continuous paper folded along a perforation (z-fold), set [CONTINUOUS PAPER]. - Page 79 Cut Type Set the type of mark used for cutting the paper. Set it according to the paper to use. When the paper has a black mark on the surface that is printed on: B/M(FRONT) When the paper has a black mark on the surface that is not printed on: B/M(BACK) For paper with a hole in the center: CENTER HOLE For paper without a hole in the center: SIDE HOLE For label stock with GAP set to: CENTER HOLE...
-
Page 80: Setting The Paper Sensors
Setting the Paper Sensors Checking the Paper Sensor Position The position for setting the paper sensors differs according to the paper to use. Adjust the paper sensors while checking the position based on the table below. A paper jam will be incorrectly detected if the sensor position and cut type setting of the machine do not match. In this case, change the position of the top sensor and bottom sensor so that they do not overlap if their positions were matching or to match if their positions were overlapped. - Page 81 Supported Printer Driver or Operation Panel Setting* Sensor Position Paper Type PAPER FORM CUT TYPE Paper with black Top: Position that does not overlap CONTINUOUS B/M(BACK) mark on the back with the black mark on the back PAPER Bottom: Position of black mark Paper with holes Top: Position of hole CONTINUOUS...
-
Page 82: Adjusting The Paper Sensor Position
Supported Printer Driver or Operation Panel Setting* Sensor Position Paper Type PAPER FORM CUT TYPE Cut Sheet Top: Position that does not overlap CUT PAPER with the bottom sensor Bottom: Center *The setting of the printer driver is prioritized. Adjusting the Paper Sensor Position If the guide ribs are attached, remove them before adjusting the position of the paper sensors. - Page 83 Hold the both ends of the upper sensor and move it to the correct position. Push in the metal part of the upper sensor to fix the sensor. Insert a stick-shaped thing with a pointing tip (such as a ball-point pen) below the metal part of the lower sensor, and pull it out to unlock it.
-
Page 84: Attaching The Guide Ribs
Push in the metal part of the lower sensor to fix the sensor. Close the feeder cover. Attaching the Guide Ribs Feed Direction Feed Direction Feed Direction Turn the machine to make its rear side face to you. Insert your finger below the gray lever on the left of the machine rear, and lift it up to open the feeder cover. - Page 85 Attach the guide rib to the position where the paper edge will be retained of the groove where the paper sensors move. Paper Sensor Guide Rib Guide Rib Ensure that the paper sensors are not moved. — Take care of the orientation of the guide rib. —...
-
Page 86: Loading Paper
Loading Paper Set the roll paper its side on a flat surface so that it dose not roll or fall. Dropping a roll paper may cause injury. Be careful not to soil the printing surface of the roll paper. The print quality may deteriorate. —... - Page 87 The roll paper has holes in it. The roll paper is torn. When cutting the leading edge of the paper with scissors, cut the paper vertically to the feed direction, so that — it can be fed into the machine. Be careful not to cut through any barcodes printed on the roll paper.
- Page 88 Turn up the paper guide lever on the left side on the front of the machine to unlock it. Align the paper guide with the paper width. Adjust the paper guide so that there is no gap between it and the paper. Turn down the paper guide lever toward you to lock it.
-
Page 89: Feeding The Paper
Remove the paper temporarily, and close the feeder cover. Insert the paper into the inlet until it stops. X The paper is automatically loaded. Feeding the Paper Feeding is performed for the paper set in the machine according to the machine settings. Execute feeding in the following cases. - Page 90 • Press «FEED/CUT» button. When a paper jam occurs during printing, the paper may be removed from the machine in order to clear the paper jam. When paper is set in the machine again after clearing a paper jam, a screen similar to the following is displayed. Press «FEED/CUT»...
-
Page 91: Printing
Printing Registering Paper Information to the Printer Driver Register the information for the paper to use. Click [Start], and select [Control Panel] in [Windows System]. — Click [View devices and printers]. — Right-click the [cCX86e PCL6] icon, and select [Printing Preferences]. —... -
Page 92: Adjusting The Paper Sensors (Sensor Calibration)
Click [Start] on the computer, and select [Control Panel] in [Windows System]. — Click [View devices and printers]. — Right-click the [CX86e PCL6] icon, and select [Printing Preferences]. — Click [Sensor Calibration…] on the [Setup] tab. — Remove the paper from the machine when [Would you like to execute sensor calibration] is displayed. -
Page 93: Printing From A Computer
Open the file to print. — Select [Print] from the [File] menu. — Select [CX86e] as the printer, and click [Preferences]. — Select the paper to use in [Paper Settings] on the [Setup] tab. — If the paper to use does not exist, click [User-defined paper] and register the paper. For details, refer to "Registering Paper Information to the Printer Driver". -
Page 94: [Color] Tab
No. Item Description Favorites Enables the printer driver settings to be saved to a file. Paper settings Sets the paper to print on. User-defined paper Adds, changes, and deletes paper. Paper Form Displays the paper format set for the user-defined paper. Cut Type Displays the cut type set for the user-defined paper. -
Page 95: [Overlays] Tab
No. Item Description Color Mode Displays the color mode set with the [Detail] button. Detail Configures settings related to color printing. Toner Saving Configures settings related to saving toner when printing. [Overlays] Tab No. Item Description Overlay Selects whether to print the document with a form overlaid, register the document as a new form, or save the document to a file as a form. -
Page 96: [Extend] Tab
[Extend] Tab No. Item Description Watermarks You can print data created by an application with a water- mark over it. Fonts Configures settings related to TrueType fonts and printer fonts. Drawing position adjustment Adjusts the position of the drawing data created by the printer driver. -
Page 97: Specifying The Print Orientation
Specifying the Print Orientation Perform the procedure below to change the print orientation. Open the file to print. — Select [Print] from the [File] menu. — Click [Preferences]. — Select the desired print orientation in [Orientation] on the [Setup] tab. —... -
Page 98: Printing From The Last Page
Printing from the Last Page The document will be in page order if the print results are stacked with the printed surface facing up. — Open the file to print. — Select [Print] from the [File] menu. — Click [Preferences]. —... -
Page 99: Printing With The Photo Mode
Printing with the Photo Mode Perform the procedure below to print the image data of photos in detail. — Open the file to print. — Select [Print] from the [File] menu. — Click [Preferences]. — Select [Photo Enhance] on the [Setup] tab. —... -
Page 100: Changing The Color Settings
Changing the Color Settings You can adjust color printing. — Open the file to print. — Select [Print] from the [File] menu. — Click [Preferences]. — Select a value of your choice in [Color Mode] on the [Color Settings] tab. —... -
Page 101: Registering Print Documents As New Forms
To add a form registered in the Configuration Tool: Click [Add a registered form], enter the form name in [Form name] and the form ID registered in the Storage Manager plug-in of the Configuration Tool in [ID], select the pages to apply that form to in [Print on Pages], and click [OK]. —... -
Page 102: Printing Hidden Text (Watermarks)
— Click [Print] on the [Print] screen. — In [Save the form with a name], enter [ID] and click [OK]. The position for performing overlay printing can also be specified. — Click [OK]. Forms do not include a watermark. Printing Hidden Text (Watermarks) You can overlay user-defined text over files to print. -
Page 103: Adjusting The Rendering Position
Adjusting the Rendering Position Perform the procedure below to adjust the position of the render data. — Open the file to print. — Select [Print] from the [File] menu. — Click [Preferences]. — Click [Adjustment] on the [Extend] tab. — Enter the vertical (Y) and horizontal (X) values on the [Adjustment] screen, and click [OK]. —... -
Page 104: Correcting Faintness In Thin Lines And Small Text
— Click [OK]. — Click [OK]. — Click [Print]. Correcting Faintness in Thin Lines and Small Text Perform the procedure below to improve faintness in thin lines and small text. — Open the file to print. — Select [Print] from the [File] menu. —... -
Page 105: Skipping Blank Pages
Skipping Blank Pages You can skip the printing of blank pages to save paper. — Open the file to print. — Select [Print] from the [File] menu. — Click [Preferences]. — Click [Advanced] on the [Extend] tab. — On the [Advanced] screen, click [Skip White Pages], and select [ON] from the [Settings] drop-down box. —... - Page 106 — Press ∧ button or ∨ button several times to display [PRESENTER MODE], and press «OK» button. — With the setting flashing, press ∧ button or ∨ button to display the value you want to set, and press «OK» button. —...
-
Page 107: Removing The Windows Printer Driver
— Click [Devices and Printers]. — Right-click the icon for the printer to delete, and select [Remove device]. If the icons are grouped, select [Remove Print Queue] > [CX86e PCL6]. — When a confirmation message is displayed, click [Yes]. When a message is displayed to inform you of the device in use, repeat steps 1 to 3. -
Page 108: Replacing Consumables
Replacing Consumables Cautions for Replacing Consumables Observe the following cautions when replacing consumables. Do not throw toner or a toner cartridge into a fire. The toner will scatter, resulting in burns. Do not store a toner cartridge in a location where it is exposed to fire. The toner may ignite, resulting in fire or burns. -
Page 109: Replacing The Toner Cartridge
If toner is spilled on the floor, gently wipe it away with a wet rag, etc. to ensure that the toner does not scat- ter. — Use genuine DTM Print GmbH consumables to ensure product performance. — Problems caused by using non-genuine consumables require a payment, regardless of the warrant or mainte- nance contract. - Page 110 Open the toner cartridge cover. — Pull out the toner cartridge. Burns may result. Never throw used toner cartridges into a fire. They may explode, and the toner in- side may be scattered and cause burns. Place paper under the removed toner cartridge, as toner may leak from the bottom. —...
- Page 111 — Take out the new toner cartridge, and shake it several times vertically and horizontally. — Place the toner cartridge in the direction that it will be attached to the machine. — Attach the toner cartridge. — Close the toner cartridge cover.
-
Page 112: Replacing The Image Drum Unit
— The "ORDER IMAGE DRUM" message is not displayed when [ADMIN SETUP] > [PANEL SETUP] > [NEARLIFE STATUS] is set to [DISABLE]. — Use genuine DTM Print GmbH consumables to ensure product performance. — Problems caused by using non-genuine consumables require a payment, regardless of the warrant or mainte- nance contract. - Page 113 Turn off the machine. — For information on turning off the machine, refer to "Turning Off the Machine". — Insert your finger into the recess on the top of the machine and pull up the lever. — Open the top cover until it stops. Burns may result.
- Page 114 — Hold the blue handle of a new image drum unit, confirm the position to install it to the machine, and lower it ver- tically. — Peel off the protective tape. — Peel off the protective tape, and remove the desiccant.
- Page 115 — Remove the cover toner. — Close the top cover. — Open the toner cartridge cover.
- Page 116 — Take out the new toner cartridge from the packaging bag, and shake it several times vertically and horizontally. — Place the toner cartridge in the direction that it will be attached to the machine. — Attach the toner cartridge.
-
Page 117: When The Lightproof Film Is Dirty
— Close the toner cartridge cover. — Turn on the machine. For information on turning on the machine, refer to "Turning On the Machine". — When the Lightproof Film Is Dirty When the lightproof film of the image drum unit is dirty, wipe it clean with a soft tissue. Insert your finger into the recess on the top of the machine and pull up the lever. -
Page 118: Replacing The Fuser Unit
— Wipe the lightproof film with a soft tissue paper lightly. Replacing the Fuser Unit When "ORDER FUSER UNIT" is displayed on the screen of the operation panel, prepare a replacement fuser unit. The estimated timing for the next message to be displayed is when printing approximately 5,000 pages. When "FUSER UNIT LIFE"... - Page 119 — "ORDER FUSER UNIT" is not displayed when [ADMIN SETUP] > [PANEL SETUP] > [NEARLIFE STATUS] is set to [DIS- ABLE]. — Do not expose the image drum unit to direct sunlight or strong light (approximately 1,500 lux or more). Do not leave the image drum unit exposed for 5 minutes or more, even under room lighting.
- Page 120 — Hold the blue handle of a new fuser unit, align the red ▲ on the right side and the red ▼ in the machine, and low- er it vertically to set the unit in the machine. — Turn down the blue handle of the fuser unit toward you to put it away.
-
Page 121: Replacing The Transfer Belt Unit
— Hold the blue handle of a image drum unit, confirm the position to install it to the machine, and lower it vertical- — Close the top cover. Replacing the Transfer Belt Unit When "ORDER BELT UNIT" is displayed on the screen of the operation panel, prepare a replacement transfer belt unit. The estimated timing for the next message to be displayed is when printing approximately 5,000 pages. - Page 122 — "ORDER BELT UNIT" is not displayed when [ADMIN SETUP] > [PANEL SETUP] > [NEARLIFE STATUS] is set to [DISABLE] on the operation panel. — Use extra care when handling the image drum (the glossy cylinder), because it is fragile. —...
- Page 123 — Hold the handle (black) of a new transfer belt unit, and lower it vertically to set the unit into the machine. — Hold the blue handle of a image drum unit, confirm the position to install it to the machine, and lower it vertical-...
-
Page 124: Replacing The Feed Roller
— Close the top cover. Replacing the Feed Roller When paper jams frequently occur or the color is shifted, replace the feed roller. The feed roller should be replaced after approximately 60 km of printing. — The actual lifetime of a feed roller depends on environment and paper. —... - Page 125 — Hold the blue handle and pull out the image drum unit vertically. Pull it out after opening the top cover fully. — — Place the image drum unit you took out on a flat surface and cover it with black paper, etc. so that the image drums are not exposed to light.
- Page 126 — Insert your fingers in the both ends of the recess in the center bottom of the back of the machine interior, and turn down the sensor lever towards yourself. — Slide the blue levers (two locations) inside the machine inward to unlock it. —...
-
Page 127: Replacing The Paper Feed Roller
— Close the top cover. Replacing the Paper Feed Roller When paper jams frequently occur, replace the paper feed roller. The paper feed roller should be replaced after ap- proximately 60 km of printing. Turn the machine to make its rear side face to you. —... - Page 128 — Loosen the right screw with a driver. — Lift up the right-side side cover to remove it. — Loosen the left screw with a driver.
- Page 129 — Lift up the left-side side cover to remove it. Lift the front up and pull it out forwards. — Turn up the left lever of the paper feed roller to unlock it. — Turn up the right lever of the paper feed roller to unlock it.
- Page 130 — Hold the right and left levers of the paper feed roller and lift it directly up. — Hold the right and left levers of a new paper feed roller and insert the roller vertically. With the side with the white gear on the right, hold the blue levers on both ends and insert it from directly above —...
- Page 131 — Turn down the right lever of the paper feed roller until it stops to lock it. — Attach the left-side side cover over the top and tighten the screw. — Attach the right-side side cover over the top and tighten the screw. —...
-
Page 132: Cleaning The Machine
Cleaning the Machine Cleaning the Surface of the Machine — Turn off the machine. For information on turning off the machine, refer to “Turning Off the Machine”. — Wipe the surface of the machine with a cloth that has been moistened with water or neutral detergent and squeezed well. - Page 133 — Open the top cover until it stops. — Cover the image drum unit with black paper, etc. so that it is not exposed to light. — Wipe the three lenses of the LED heads with a soft tissue lightly.
-
Page 134: Cleaning The Feed Rollers
— Remove the black paper, etc. on the image drum unit, and close the top cover. Cleaning the Feed Rollers — Insert your finger into the recess on the top of the machine and pull up the lever. — Open the top cover until it stops. Burns may result. - Page 135 — Hold the blue handle and pull out the image drum unit vertically. Pull it out after opening the top cover fully. — Place the image drum unit you took out on a flat surface and cover it with black paper, etc. so that the image drums are not exposed to light.
-
Page 136: Cleaning The Paper Feed Rollers
Cleaning the Paper Feed Rollers — Turn the machine to make its rear side face to you. — Insert your finger below the gray lever on the left, and lift it up to open the feeder cover. — Wipe the paper feed roller with a soft cloth that has been moistened with water and then squeezed well. -
Page 137: Troubleshooting
Troubleshooting When the LED Lights Up When a problem occurs in the machine, the ERROR LED or WARNING LED lights up or flashes and a message is dis- played on the screen. Check the message and perform the remedy. For details, refer to “List of Messages”. When the Paper Is Jammed Error 381/730-06 (Paper on the Transfer Belt Unit) —... - Page 138 — Hold the blue handle and pull out the image drum unit vertically. — Pull it out after opening the top cover fully. — Place the image drum unit you took out on a flat surface and cover it with black paper, etc. so that the image drums are not exposed to light.
-
Page 139: Error 382 (Paper Jammed In The Fuser Unit)
— If paper is jammed in the fuser unit, refer to “Error 382 (Paper Jammed in the Fuser Unit)”. — Return the image drum unit to its original position in the machine. — Close the top cover. Error 382 (Paper Jammed in the Fuser Unit) —... - Page 140 — Hold the blue handle and pull out the image drum unit vertically. Pull it out after opening the top cover fully. — — Place the image drum unit you took out on a flat surface and cover it with black paper, etc. so that the image drums are not exposed to light.
- Page 141 — Gently pull the paper out to the back of the fuser unit (the opposite direction from the paper feed direction). — Align the red ▲ on the right side of the fuser and the red ▼ in the machine, and lower it vertically, and return it to its original position in the machine.
-
Page 142: Error 380/390 (Paper Jammed Near The Cutter)
— Close the top cover. Error 380/390 (Paper Jammed Near the Cutter) — Turn the machine to make its rear side face to you. — Insert your finger below the gray lever on the left, and lift it up to open the feeder cover. - Page 143 — Gently pull out the jammed paper.
-
Page 144: Canceling Printing
— Close the feeder cover until it clicks. Canceling Printing Pressing «CANCEL» Button — Press «CANCEL» button on the operation panel to cancel printing. Canceling from a Computer You can cancel printing from a computer when a large amount of data has been accidentally sent to the printer. —... -
Page 145: List Of Messages
Cause Remedy Reference Press «ONLINE» button on the op- — The machine is offline. eration panel to display [READY TO — — PRINT]. An error message is displayed — Check the displayed error message — on the screen of the operation List of Messages —... - Page 146 Message Description MENU RESETTING The menu items are being reset. Wait until the machine becomes ready to print. WAIT A MOMENT The network settings are being initialized. Wait until the machine NETWORK INITIAL becomes ready to print. DETECTED AN ABNORMALITY OF INTERNAL DATABASE An error occurred in the internal database of the machine.
- Page 147 Message Description FEEDING Paper is being fed. □ USB memory is connecting to the machine. USB MEMORY CONNECTING PLEASE LOAD PAPER The paper sensors are being adjusted. SENSOR CALIBRATING □ Paper is waiting to be pulled out from the machine. Pull out the TAKE LABEL paper.
- Page 148 Message Description PRESS OK BUTTON Invalid data was received. INVALID DATA Press «OK» button to clear the error. CHANGE IPV4 ADDRESS The IPv4 address is the same as another device. IPV4 ADDRESS IS CONFLICTED Check the IPv4 address. PAPER DETECTION ERROR The paper sensor could not detect the paper correctly.
- Page 149 Message Description REPLACE TONER The toner has run out. Replace the toner cartridge with a new one. 412:TONER EMPTY TONER NOT RECOMMENDED Replace the toner cartridge with a recommended one. 556:ERROR INSTALL TONER A toner cartridge is not installed in the machine. Set the toner car- [ERRCODE]:TONER MISSING tridge in the machine.
-
Page 150: Connection Problems
Message Description CHECK IMAGE DRUM AND TONER CARTRIDGE An error has occurred in the toner cartridge. Remove the toner car- 546:TONER CARTRIDGE MISSING tridge, and set it again. IMAGE DRUM MISSING The image drum unit is not set correctly. Set the image drum unit- 342:ERROR again. -
Page 151: Usb Connection Problems
Cause Remedy Reference The WSD port is being used. Change the destination port for printing to the standard TCP/IP port. Wireless LAN Connection Problems Cause Remedy Reference The wireless LAN module is not Set [WIRELESS MODULE] in [BOOT MENU] to Menu List enabled. - Page 152 Cause Remedy Reference [Wireless (AP Mode)] Check whether [WIRELESS Connecting via Wireless LAN A wireless device (such as a com- (AP MODE)] is set to [ENABLE] in the machine. puter, tablet, or smartphone) is not Check the SSID/password of the machine, and connected to the machine.
-
Page 153: Print Result Problems
Print Result Problems List of Print Result Problems White streaks appear in the vertical Horizontal white streaks periodically The printing is faint in the vertical direc- direction appear in the paper feed direction tion Feed direction Feed direction Feed direction Printing is light White dots and lines appear Condensation occurs in the printed paper... -
Page 154: Horizontal White Streaks Periodically Appear In The Paper Feed Direction
The colors of the image are unexpected The black of CMY 100% is light The precision of barcode reading is low White Streaks Appear in the Vertical Direction Cause Remedy Reference The LED head is dirty. Wipe the LED head clean with a soft tissue. Cleaning the LED Head Toner is low. -
Page 155: The Printing Is Faint In The Vertical Direction
Cause Remedy Reference The image drum unit is not set Set the image drum unit correctly. Replacing the Image Drum Unit correctly. The image drum is dirty. Enable drum cleaning. Using the Operation Panel The lifetime of the image drum unit is shorter when this is set to ON. -
Page 156: White Dots And Lines Appear
White Dots and Lines Appear Cause Remedy Reference The paper contains humidity or is Use paper that is stored in an environ- Loading Paper dry. ment with suitable temperature and humidity. Condensation Occurs in the Printed Paper Cause Remedy Reference The paper contains humidity. -
Page 157: Dots And Horizontal Streaks Periodically Appear In The Paper Feed Direction
Dots and Horizontal Streaks Periodically Appear in the Paper Feed Direction Cause Remedy Reference If the period is approximately Gently wipe it with a soft tissue. Replacing the Image Drum Unit 63 mm, the glossy cylinder of the Replace the image drum unit if it is damaged. image drum is damaged or dirty. -
Page 158: Toner Comes Off When Rubbed
Toner Comes off When Rubbed Cause Remedy Reference The paper weight setting is not Set [MENUS] > [FEEDER CONFIG] > [MEDIAWEIGHT] Loading Paper suitable. to a suitable value on the operation panel. Or, set [MEDIAWEIGHT] to a heavier value. Gloss Is Uneven Cause Remedy Reference... -
Page 159: Dirt Is Printed
Dirt Is Printed Cause Remedy Reference The paper contains humidity. Replace the paper with new paper. Loading Paper The Entire Page Is Printed in Black Cause Remedy Reference The machine may have failed. Contact your dealer. Nothing Is Printed Cause Remedy Reference The machine may have failed. -
Page 160: The Area Around The Image Is Dirty
The Area Around the Image Is Dirty Cause Remedy Reference The image is not reduced to a ratio Reduce the image to a ratio that Keeping the Page Layout when that matches the paper size. matches the paper size. Resizing a Document The Colors of the Image Are Unexpected Cause Remedy... -
Page 161: The Precision Of The Barcode Reading Is Low
The Precision of the Barcode Reading Is Low Cause Remedy Reference The color of barcodes/two-dimen- Disable the toner save function if it is enabled. Reducing Toner Consumption sional barcodes is light when Printing If the remaining toner is low, replace the toner cartridge. -
Page 162: Software Problems
Software Problems Web Browser Problems Symptom Cause/Solution Reference Cannot connect to the machine. The LAN cable is disconnected. Connecting a LAN Cable Check the connection of the LAN cable. The IP addresses are incorrect. Starting the Webpage Check the IP address of the machine, and enter the correct address. -
Page 163: Machine Problems
Problems Common to the Printer Driver and Utilities Symptom Cause/Solution [Help] is not displayed. The help function is not supported. The [User Account Control] screen is The [User Account Control] screen may be displayed when start- displayed. ing the installer or a utility. Click [Yes] or [Continue] to execute the installer or utility as an administrator. -
Page 164: Print Data Is Not Sent
Cause Remedy Reference There may be a problem with the Execute [PRINT INFO] > [CONFIGU- Printing and Checking a Report print function. RATION] on the operation panel to print the settings, and check the print performance. The communication protocol is Select [ADMIN SETUP] >... -
Page 165: An Abnormal Smell Is Emitted
An Abnormal Smell Is Emitted Cause Remedy Reference The machine is not level. Install the machine in a flat and stable location. Paper waste or foreign material is Inspect the inside the machine and inside the machine. remove the material. A Resonant Sound Is Emitted Cause Remedy... -
Page 166: The Power Turns Off Automatically
The Power Turns Off Automatically Cause Remedy Reference If the machine is not used for a To prevent the power from turning off, Setting the Auto Power Off Time certain period of time (4 hours by set [ADMIN SETUP] > [POWER SETUP] default), it automatically turns off. -
Page 167: The Paper Curls/The Paper Wrinkles
The Paper Curls/The Paper Wrinkles Cause Remedy Reference The paper contains humidity or has Use paper that is stored in an environ- Loading Paper an electrostatic charge. ment with suitable temperature and humidity. Light paper is being used. Set [MENUS] > [FEEDER CONFIG] > Loading Paper [MEDIAWEIGHT] to a lighter value on the operation panel. -
Page 168: The "308:Paper Jam" Error Occurs When Paper Is Not Loaded
The „308:PAPER JAM“ error occurs when paper is not loaded Cause Remedy Reference There may have been a problem Execute [BOOT MENU] > [SENSOR RE- BOOT MENU with the position of the paper sen- SET] on the operation panel. Adjusting the Paper Sensors sors when sensor calibration was (Sensor Calibration) executed, which caused an invalid... -
Page 169: Transporting The Machine
Transporting the Machine Use the packaging, cushioning material, and cover toner that came with the machine when the product was purchased. — Turn off the machine. X For information on turning off the machine, refer to “Turning Off the Machine”. —... -
Page 170: Management Software
Management Software Type of Software — System Requirements Windows 10/Windows 8.1/Windows 8/Windows 7 Windows Server 2016/Windows Server 2012 R2/Windows Server 2012 Windows Server 2008 R2/Windows Server 2008 Software Name Description Configuration Tool Changes the menu settings of the machine, performs cloning, and sets the net- work of the machine. - Page 171 Item Description Status Displays the current status of the machine. Displays warnings and errors that have occurred in the machine. Also enables you to check the operation status of the network services, a list of the machine information, and the IP address set in the machine.
- Page 172 Item Description General Network Settings Configures the network connection method. Wireless LAN (Infrastructure) Setting Configures wireless LAN (infrastructure). Wireless (AP Mode) Setting Configures wireless (AP mode) connections. TCP/IP Configures information regarding TCP/IP. Configures information regarding NetBIOS over TCP. E-mail Alert Setting Configures e-mail notifications for errors that have occurred in the machine, etc.
-
Page 173: Starting The Web Page
— You must log in as the administrator to change the settings of the machine via the Web page. The example environment used in the following description is indicated below. — Machine name: CX86e — Machine IP address: 192.168.0.2 Start the Web browser. -
Page 174: Logging In As The Administrator
Logging In as the Administrator You must log in as the administrator to change the settings of the machine via a Web browser. Click [Admin Login]. Enter “admin” in [User Name] and the current password in [Password], and click [OK]. —... -
Page 175: Checking Or Changing The Status Of The Machine
Settings can be omitted by clicking [SKIP]. — Select [Do not show this page again] and click [OK] or [SKIP] to prevent this from being displayed again. — The following screen is displayed. Checking or Changing the Status of the Machine The following operations can be executed from the Web page on a computer. - Page 176 — To connect via a USB cable, refer to “Connecting a USB Cable”. — To connect via wireless LAN, refer to “Connecting via Wireless LAN”. The example environment used in the following description is indicated below. — Machine name: CX86e — Machine IP address: 192.168.0.2 — Displaying the machine status Open the Web page of this machine.
-
Page 177: Encrypting Communication (Ssl/Tls)
The settings of the machine can be changed from the [Admin Setup] tab. Encrypting Communication (SSL/TLS) You can encrypt the communication between the computer and the machine. Communication is encrypted via SSL/ TLS in the following cases. A certificate is installed in the machine by default, which enables communication using HTTPS to be performed. - Page 178 Select [Network] > [Security] > [SSL/TLS] — To delete a certificate that is already installed, click [Delete Certificate]. Follow the on-screen instructions to configure the detailed settings. Confirm the settings, and click [OK]. X If the certificate is a self-signed certificate, follow the on-screen instructions to close the Web page, and pro- ceed to “Enabling Encryption.
- Page 179 Proceed to “Enabling Encryption. ” — Enabling Encryption Encryption can be enabled after creating a certificate. This section describes how to enable encryption using the Web page. When encryption is enabled, the communication is immediately encrypted after the setting is changed from the Web page.
-
Page 180: Using Ipp
Using IPP The machine can be added to a computer as an IPP printer. When IPP printing is enabled, data can be sent to the machine via the Internet. — Adding the Machine as an IPP Printer Click [Start], and select [Devices and Printers] > [Add a Printer]. Select [Add a network, wireless or Bluetooth printer] in the [Add a Printer] wizard. - Page 181 50 hosts can be specified with an IP address. Access to the machine from unregistered hosts is refused. Access to un- registered hosts is also disabled. Configure the computer after configuring the machine. The pre-shared key must be prepared in advance. —...
- Page 182 — Configuring the Computer X Creating an IP Security Policy X Setting Key Exchange X Setting the IP Filter X Setting the Filter Operations X Assigning an IP Security Policy Configure IPSec on the computer. Follow the procedure below in order. —...
- Page 183 — Setting Key Exchange Select the [General] tab in the IP security policy properties window. Click [Setup]. Enter a value (in minutes) in [Authenticate and generate a new key after every] in the [Key Exchange Settings] win- dow. Enter the same value as specified in [Lifetime] in “Phase1 Proposal” in “Configuring the Machine. ” [Lifetime] is —...
- Page 184 Click [Next] on the [IP Traffic Destination] screen. Click [Next] on the [IP Protocol Type] screen. Click [Complete]. — Setting the Filter Operations Click [OK] in the [IP Filter List] window. In [Security Rules Wizard], select the new IP filter in the list, and click [Next]. Click [Add] on the [Filter Action] screen.
-
Page 185: Using The Ip Address Access Control Function (Ip Filter)
(preshared key)” on the [Authentication Method] screen and enter the preshared key. — Click [Complete]. — Click [OK] in the IP security policy properties window. — Select the new IP security policy in the [Local Security Policy] window. — Select [Assign] in the [Action] menu. —... -
Page 186: Using The Mac Address Access Control Function
Using the MAC Address Access Control Function MAC addresses can be used to restrict access to the machine. You can allow or refuse access from specified MAC ad- dresses. — Make sure to specify the correct MAC address. If an incorrect MAC address is specified, the machine will become unable to be accessed from the network. - Page 187 Select [Admin Setup]. Select [Network] > [E-mail] > [Alert Settings]. Enter the e-mail address to notify in [Failure Notification Settings]. Click [Setup] for the entered e-mail address. Click [COPY] to apply the notification conditions to another address. Select [Upon occurrence of an event] in [Failure Notification Method], and click [To Step 2]. Follow the on-screen instructions to configure the detailed settings.
-
Page 188: Using Snmpv
Click [OK]. Click [View a summary of current configuration], confirm the current settings, and click [X] to close the window. You can also check the current settings for a maximum of two addresses in the main window. Select the address to check from the list box. - Page 189 — Using EAP-TLS This section describes how to set EAP-TLS, which is a type of IEEE802.1X authentication. Open the Web page of this machine. — For information on starting the Web page, refer to “Starting the Web Page”. Log in as the administrator. Select [Admin Setup].
- Page 190 Open the Web page of this machine. For information on starting the Web page, refer to “Starting the Web Page”. — Log in as the administrator. Select [Admin Setup]. Select [Network] > [IEEE802.1X]. Select [Enabled] for [IEEE802.1X]. Select [PEAP] in [EAP Type]. Enter the user name in [EAP User].
-
Page 191: Configuring Ieee802.1X (Wireless Lan)
Turn on the machine. — For information on turning on the machine, refer to “Turning On the Machine”. Set the IP address, etc. of the machine. Configuring IEEE802.1X (Wireless LAN) You can use wireless LAN to configure IEEE802.1X authentication. First configure IEEE802.1X authentication on the Web page of the machine, and then configure the wireless connection on the Web page. - Page 192 Specify the certificate of the certificate authority (CA) used for the RADIUS server authentication. PEM, DER, — and PKCS#7 files can be imported. Click [Submit]. If the machine becomes online, proceed to “Configuring Wireless LAN (WPA/WPA2-EAP). ” — Using PEAP Open the Web page of this machine.
-
Page 193: Configuration Tool
Select [Network] > [Wireless(Infrastructure)] > [Manual Setup]. Select [Enabled] in [Wireless(Infrastructure)] in [Setup]. The default setting is [Disabled]. — Enter the SSID name of the wireless AP to connect to in [SSID]. Select [WPA/WPA2-EAP] in [Security] in [Security Settings]. When all the basic settings and security settings are complete, click [Submit] on the bottom left of the Web screen to reflect the settings. -
Page 194: Changing The Menu Settings
Select this machine from [Registered Device Table]. Select the [Device Info] tab. If the machine is connected to the network, [Device Status] is displayed. — Click [Update Device Information] to update the information. — Changing the Menu Settings You can check the status and information of the machine. You can change the menu settings of the machine or copy the settings to another machine. - Page 195 Click [Menu settings].
- Page 196 Click [Backup settings]. Enter the file name, select the folder to save the file, and click [Save]. Restoring the Settings from a File Click [Start], and select [General] > [Configuration Tool]. Select this machine from [Registered Device Table]. Select the [Device Setting] tab. Click [Menu settings].
- Page 197 Click [Restore Settings]. Check the displayed message, and click [Yes]. Select the file to restore, and click [Open]. Click [Save to device]. Changing the Administrator Password of the Machine Click [Start], and select [General] > [Configuration Tool]. Select this machine from [Registered Device Table]. Select the [Device Setting] tab.
- Page 198 Click [Change password]. Enter the current password and new password, and click [OK].
-
Page 199: Copying Settings (Cloning)
Copying Settings (Cloning) Menu settings can be copied to another machine. Click [Start], and select [General] > [Configuration Tool]. Select the machine to clone from [Registered Device Table]. Select the [Device Setting] tab. Click [Cloning]. Enter the administrator password, and then click [OK]. —... -
Page 200: Configuring The Network
Enter the administrator password of the destination device, and click [OK]. The result is displayed. Configuring the Network You can configure the network of the machine. — Searching for the Machine on a Network Click [Start], and select [General] > [Configuration Tool]. Select [Network Setting] in the [Plug-in] menu. - Page 201 Configure the search conditions as required, and click [OK]. — Changing the IP Address Click [Start], and select [General] > [Configuration Tool]. Select [Network Setting] in the [Plug-in] menu. Select [Discover Devices]. Select the machine from the list of devices. Click [Device Settings].
-
Page 202: Registering Forms (Form Overlay)
Registering Forms (Form Overlay) Forms for logos, etc. can be registered in the machine for performing overlay printing. This section describes how to register forms. — For information on performing overlay printing, refer to “Overlaying Text or Logos when Printing”. —... - Page 203 Do not change [Target Volume] or [Path]. — Specify the form ID entered in [ID] when performing overlay printing. — Select the machine in the window on the bottom of the Storage Manager plug-in screen. You can select multiple ma- chines to register forms to.
-
Page 204: Checking The Free Memory/Storage Space
Checking the Free Memory/Storage Space Click [Start], and select [General] > [Configuration Tool]. Select [Storage Manager] in the [Plug-in] menu. Click the device name in the device selection area on the bottom of the Storage Manager plug-in screen. Communicating with the device displays the storage, volume name, size, free space, location name, label, status, file name, size, and comment, etc. - Page 205 Configures and copies the menus of the machine. Item Description Menu settings Changes the settings of the menu items of the machine. Cloning Copies the settings of the menu items of the machine to another machine. Change password Changes the administrator password of the machine.
- Page 206 — [Network Setting] Plug-in Configures the network. Item Description Discover Devices Discovers network devices. Environment Settings Changes the device detection standard and communication options. — [Storage Manager] Plug-in Registers and edits the files to download to the machine.
-
Page 207: Status Monitor
Starting the Status Monitor The Status Monitor automatically starts when printing is performed. Perform the procedure below to start it manual- Select [Start] > [General] > [CX86e Status Monitor] to start the Status Monitor. Displaying the Printer Status [Printer State] Tab No. -
Page 208: Displaying The Printer Status
Switching the Printer Settings [Printer Setup] Tab Description Select Printer Changes the destination printer. Output Report Data Select [Setting] or [Error Log] from the pull-down menu, and click the [Exe- cute] button to output the report data in the CSV format. Configuration Outputs detailed information on the printer settings. - Page 209 Description Alert View Specifies the display position of the status monitor when a warning occurs in the printer. When selected, a popup is displayed in front when an error occurs in the printer. When deselected, a popup is not displayed, even when an error occurs in the printer.
-
Page 211: Specifications
Specifications General Specifications Model Model Number CX86e N36700A/N36700B Item CX86e ARM Cortex A9(533MHz) Memory DDR3 16bit 512MB 64MB Weight Approx. 9.5kg (including consumables) Dimensions (W x D x H) 198mm(7.8") x 380mm(15") x 195mm(7.7") Power supply N36700A : 110 - 127V AC +/-10%... -
Page 212: Network Related
Item CX86e Resident fonts Bitmap: 4 fonts Scalabel: 27 fonts Resolution 1200x1200dpi Color Yellow, Magenta, Cyan Print speed Max 6 IPS Paper size Width: 25 - 86 mm Length: 53 - 551 mm Media type Plain, User Type 1 - 5... -
Page 213: List Of Included Fonts
Wireless LAN Specifications Item CX86e Wireless LAN Standard IEEE802.11a/b/g/n (2.4 GHz/5 GHz) Security Disabled, WEP, WPA-PSK, WPA2-PSK, WPA-EAP, WPA2-EAP List of Included Fonts Consumables/Maintenance Parts/Options Purchase these consumables, maintenance parts, and options from the dealer where you bought the machine. - Page 214 DTM Print GmbH Mainzer Strasse 131 65187 Wiesbaden Germany Phone: +49 611 92777-0 Mail: support@dtm-print.eu http://dtm-print.eu...
Need help?
Do you have a question about the CX86e and is the answer not in the manual?
Questions and answers