Advertisement
Available languages
Available languages
Quick Links
Advertisement

Subscribe to Our Youtube Channel
Related Manuals for Kruger&Matz KM0104


Summary of Contents for Kruger&Matz KM0104
- Page 1 Krüger Matz & CAR RECEIVER KM0104...
-
Page 3: Table Of Contents
Bedienungsanleitung INHALT Installation Anschlussdiagramm Frontplatte Allgemeine Funktionen RDS Funktionen Fernbedienung Batterie Austauschen Technische Daten... -
Page 4: Installation
Bedienungsanleitung INSTALLATION VORSICHTSMASSNAHMEN Der Ort der Montage sollte so gewählt werden, dass das Gerät den Fahrer nicht stört. Vor dem endgültigen Einbau, vorübergehend Gerät mit Spannung versorgen und sicherstellen, dass es richtig angeschlossen ist und dass sowohl das Gerät als auch das System in normalen Parameter funktionieren. - Page 5 Bedienungsanleitung Fig.2 Fig.3 1. Armaturenbrett 1. Rahmen (Abb. 3) 2. Mutter (5mm) 2. Legen Sie die Finger in die Nut im vorderen 3. Sicherungsscheibe Rahmen und ziehen Sie um den Rahmen zu 4. Schraube (5 x 25mm) entfernen. (Um den Rahmen wieder zu 5.
-
Page 6: Anschlussdiagramm
Bedienungsanleitung ANSCHLuSSdIAGRAMM YELLOW BLUE BLACK GREY WHITE GREY/BLACK WHITE/BLACK VIOLET GREEN VIOLET/BLACK GREEN/BLACK A) ANTENNE B) LINIENAUSGANG HINTEN RECHTS C) LINIENAUSGANG HINTEN LINKS D) LINIENAUSGANG VORNE RECHTS E) LINIENAUSGANG HINTEN LINKS F) SUBWOOFER IGNITION SWITCH (B+); RED – ZÜNDSCHLÜSSEL (B+); rotes Kabel AUTO ANTENNA, BLUE –... -
Page 7: Frontplatte
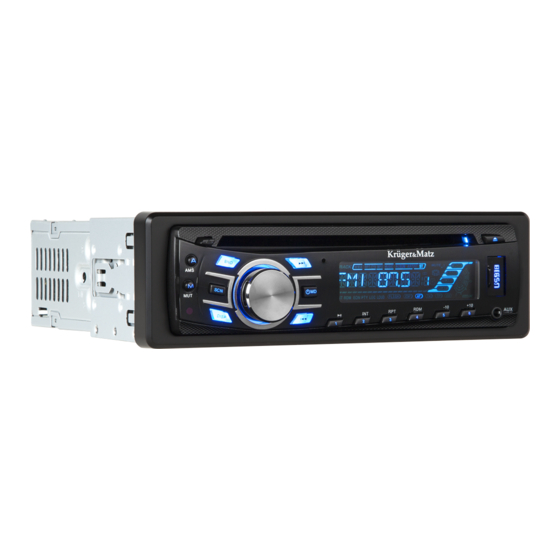
Bedienungsanleitung FRONTPLATTE 1. Taste Ein/Aus /Modus 13. Taste Wiedergabe/Pause & Stationstaste 1 2. Taste Lösen der Frontplatte 14. Taste Intro & Stationstaste 2 3. Lautstärkeregler / Auswahltaste 15. Taste Wiederholung & Stationstaste 3 4. Taste Ton aus 16. Taste zufällige Reihenfolge & Stationstaste 4 5. -
Page 8: Allgemeine Funktionen
Bedienungsanleitung ALLGEMEINE FuNkTIONEN AbNEHMEN dER FRONTPLATTE Drücken Sie die Taste Entriegeln der Frontplatte (2) zum entfernen der Frontplatte. REGLAREA SuNETuLuI Accesand aceasta setare (3) puteti regla calitatea volumului dorita. Apasati butonul SEL (3) pentru a schimba setarile in urmatoarea ordine: LAuTSTäRkE Durch drehen der Taste (3) kann die gewünschte Lautstärke geregelt werden. -
Page 9: Rds Funktionen
Bedienungsanleitung RdS FuNkTIONEN (RAdIO INFORMATIONEN SYSTEM) AF – ALTERNATIVE FREQuENZEN Drücken Sie die Taste (20) [AF] um den RDS – Modus Ein- oder Auszuschalten. Wenn der RDS – Modus Eingeschaltet ist, erscheint die Anzeige „AF“ am Display. Die Anzeige „AF“ Erscheint sobald AF Eingeschaltet wird. Die Suche nach einer alternativen Fre- quenz startet sobald das Radiosignal zu schwach wird. -
Page 10: Fernbedienung
Bedienungsanleitung FERNbEdIENuNG 1. Taste Ein/Aus 11. Taste Alternative Frequenzen (RDS) 2. Taste Wiedergabe/ Pause/ 12. Taste Verkehrs-Mitteilungen (RDS) Stationstaste 1 13. Taste suchen 3. Taste Intro & Stationstaste 2 14. Taste Display 4. Taste Wiederholung/ Stationstaste 3 15. Taste APS/AMS 5. -
Page 11: Batterie Austauschen
Bedienungsanleitung bATTERIE AuSTAuSCHEN Wenn die Reichweite der Fernbedienung nachläst, oder nicht mehr Funktioniert, muss die Batte- rie Ausgetauscht werden. Verwenden Sie für die neue Batterie den Typus CR2025. Beim Einlegen der Batterie achten Sie auf die korrekte Polarität. 1. Ziehen Sie das Batteriefach hinaus bei gedrückter Sicherung. 2. -
Page 12: Technische Daten
SENSIBILITÄT (S/N-20 dB): <42dBu TECHNISCHE DATEN KÖNNEN OHNE VORANKÜNDIGUNG GEÄNDERT WERDEN „Hiermit erklär die Firma Lechpol dass sich das Gerät KM0104 im Einklang mit den grundlegen- den Anforderungen und anderen relevanten Bestimmungen der Richtlinie 1999/5/EG befindet. Konformitätserklärung zum Download auf www.lechpol.eu”... - Page 13 Owner’s manual ITEM Precautions Wire connection diagram Front panel layout General operations RDS Operations Remote control layout Replacing the battery Specification...
- Page 14 Owner’s manual PRECAuTIONS Choose the mounting location where the unit will not interfere with the normal driving function of the driver. Before finally installing the unit, connect the wiring temporarily and make sure it is all connected up properly and the unit and the system work properly. Use only the parts included with the unit to ensure proper installation.
- Page 15 Owner’s manual Fig.2 Fig.3 1. Dashboard 1. Frame 2. Nut(5 mm) 2. Insert fingers into the groove in the front 3. Spring Washer of frame and pull out to remove the frame. 4. Screw (5x25rnm) (When reattaching the frame, point the side 5.
- Page 16 Owner’s manual wIRE CONNECTION dIAGRAM YELLOW BLUE BLACK GREY WHITE GREY/BLACK WHITE/BLACK VIOLET GREEN VIOLET/BLACK GREEN/BLACK...
- Page 17 Owner’s manual FRONT PANEL LAYOuT 1. Power / Mode Button 14. Intro & Preset Button 2 2. Release Button 15. Repeat & Preset Button 3 3. Volume / Sel Button 16. Random & Preset Button 4 4. Mute Button 17. Preset Button 5 5.
- Page 18 Owner’s manual GENERAL OPERATIONS FRONT PANEL RELEASE Press REL button (2) to detach the removable front panel. SOuNd AdJuSTMENT Turn on (3) can adjust the desired volume quality. Press SEL button (3) will change in the following order. Option: VOLuME Rotating this knob, you can adjust VOL/BASS/TREB/BAL/FAD .
- Page 19 Owner’s manual RdS (RAdIO dATA SYSTEM) OPERATlON AF :Alternative Frequencies ~ Setting RDS Mode Press AF button (20) and release immediately to switch on or off RDS mode. Whenever RDS is switched on, symbol “AF” appears on the display. AF / REG - AF I REG key directs the activation of AF SEARCH.
- Page 20 Owner’s manual REMOTE CONTROL LAYOuT 1. PowerButton 10. Mode Switch 2. Pause / Play / Preset Button1 11. Alternative Frequencies Button 3. Intro / Preset Button2 12. TrafficAnnouncement Button 4. Repeat Playing / Preset Button3 13. Scan Button 5. Random / Preset Button4 14.
- Page 21 Owner’s manual REPLACING THE bATTERY When the operational range of the remote control becomes short or non functions while operating Replace a new CR2025 battery Make sure the battery polarity before replacement 1. Pull out Battery Holder while pressing the stopper 2.
- Page 22 Frequency Coverage (KHz): 450KHz <42dBu Sensitivity (S/N-20dB): Specifications subject to change without notice. „The Lechpol company declares that product KM0104 is consistent with the essential require- ments and other relevant provisions of directive 1999/5/EC. The proper declaration for download from www.lechpol.eu”...
- Page 23 Instrukcja obsługi SPIS TREŚCI Instalacja Schemat podłączenia przewodów Panel przedni Podstawowe operacje Pilot zdalnego sterowania Wymiana baterii Specyfikacja techniczna...
- Page 24 Instrukcja obsługi INSTALACJA Radio należy zainstalować w taki sposób, aby nie utrudniało prowadzenia pojazdu. Przed ostatecznym zainstalowaniem radia w kieszeni, należy podłączyć wszystkie przewody oraz włączyć radio w celu sprawdzenia czy cały system nagłośnienia działa poprawnie. Do poprawnej instalacji radia, należy użyć dołączonych do niego akcesoriów. Użycie niekompaty- bilnych komponentów może skutkować...
- Page 25 Instrukcja obsługi Rys.2 Rys.3 1. Deska rozdzielcza 1. Ramka 2. Nakrętka (5mm) 2. Należy złapać palcami za brzeg ram- 3. Podkładka ki (jak na rysunku powyżej) i ją wyciągnąć. 4. Śruba Przy ponownym montażu, należy zwró- 5. Śruba cić uwagę, aby nie zamontować ramki od- 6.
- Page 26 Instrukcja obsługi SCHEMAT PODŁĄCZENIA PRZEWODÓW TYLNY PRAWY GOŚNIK PODTRZYMANIE PAMIĘCI +12V PRZEDNI PRAWY GOŚNIK PRZEDNI LEWY GOŚNIK ANTENA ZASILANIE TYLNY LEWY GOŚNIK ZASILANIE (B+) CZERWONY ŻÓŁTY PODTRZYMANIE PAMIĘCI ZASILANIE ANTENY NIEBIESKI UZIEMIENIE (B-) CZARNY SZARY GŁOŚNIK PRAWY PRZÓD + GŁOŚNIK LEWY PRZÓD + BIAŁY SZARO-CZARNY GŁOŚNIK PRAWY PRZÓD -...
- Page 27 Instrukcja obsługi PANEL PRZEDNI - OBJAŚNIENIE PRZYCISKÓW 1. Przycisk power / wybór trybu 15. Repeat & przycisk numeryczny 3 2. Przycisk opuszczania panelu 16. Random & przycisk numeryczny 4 3. Regulacja poziomu dźwięku / menu 17. Przycisk numeryczny 5 4. Wyciszenie 18.
- Page 28 Instrukcja obsługi POdSTAwOwE OPERACJE POwER / MOd 1. Naciśnięcie przycisku POWER/MOD spowoduje włączenie radia. 2. Jeżeli radio jest włączone, naciśnięcie przycisku POWER/MOD spowoduje zmianę trybu od- twarzania. Aby wyłączyć radio, należy nacisnąć i przytrzymać przycisk. OPuSZCZANIE PANELu Należy nacisnąć przycisk REL (2) aby opuścić panel. USTAWIENIA DŹWIĘKU Należy nacisnąć...
- Page 29 Instrukcja obsługi RdS (RAdIO dATA SYSTEM) AF: częstotliwość alternatywna Aby włączyć /wyłączyć funkcję AF wciśnij przycisk AF (11 na pilocie). Funkcja aktywuje się gdy odbierana stacja ma słaby sygnał. Gdy funkcja AF jest włączona funkcje SEEK, SCAN, AUTO, MEMORY wyszukują tylko stacje z RDS-em. Ikona Opis AF ON...
- Page 30 Instrukcja obsługi PILOT ZdALNEGO STEROwANIA 1. Włącznik 10. Przełącznik trybu pracy 2. Pauza / Play / przycisk numeryczny 1 11. AF (RDS) 3. Intro / przycisk numeryczny 2 12. TA (RDS) 4. Powtarzanie / przycisk numeryczny 3 13. Scan 5. Random (odtwarzanie losowe) / 14.
- Page 31 Instrukcja obsługi wYMIANA bATERII Gdy skróci się zasięg działania pilota lub pilot przestanie funkcjonować, należy wymienić baterię na nową (typ baterii: CR2025). Podczas wymiany, należy zwrócić uwagę na poprawną polaryza- cję baterii. 1. Należy zdjąć pokrywę baterii pilota. 2. Należy włożyć nową baterie zgodnie z oznaczona polaryzacją. 3.
- Page 32 Zakres (KHz): 450KHz <42dBu Czułość użytkowa (S/N-20dB): Specyfikacja urządzenia może ulec zmianie bez wcześniejszego powiadamiania. „Niniejszym firma Lechpol oświadcza, że urządzenie KM0104 jest zgodne z zasadniczymi wyma- ganiami oraz innymi stosownymi postanowieniami dyrektywy 1999/5/WE. Właściwa deklaracja do pobrania na stronie www.lechpol.eu”...
- Page 33 Manual de utilizare CUPRINS Instalare Schema de conectare Panoul frontal Functii generale System RDS Telecomanda Inlocuirea bateriei la telecomanda Specyficatii...
- Page 34 Manual de utilizare INSTALARE Locul de instalare trebuie ales astfel incat aparatul sa nu deranjeze conducatorul auto . Inainte de instalarea finala, conectati temporar aparatul si asigurati-va ca este conectat in mod adecvat si ca atat el cat si sistemul functioneaza in parametri normali. Folositi numai componentele din dotare pentru a va asigura ca instalarea este corecta.
- Page 35 Manual de utilizare Fig.2 Fig.3 1. Tablou de bord 1. Cadru 2. Piulita (5mm) 2. Introduceti degetele in canelura din fata 3. Saiba de siguranta cadrului si trageti pentru a scoate cadrul. 4. Surub (5 x 25mm) (Pentru a fixa cadrul inca o data, formati 5.
- Page 36 Manual de utilizare SCHEMA dE CONECTARE YELLOW BLUE BLACK GREY WHITE GREY/BLACK WHITE/BLACK VIOLET GREEN VIOLET/BLACK GREEN/BLACK IGNITION SWITCH (B+); RED – BUTON CONTACT (B+); cablu rosu AUTO ANTENNA, blue – ANTENA AUTO, cablu albastru FRONT Lch SPEAKER „+” ,WHITE – DIFUZOR FATA Lch „+”, cablu alb FRONT Lch SPEAKER „-„...
- Page 37 Manual de utilizare PANOuL FRONTAL 1. Tasta Pornire/Mod 13. Tasta Redare/Pauza & Buton presetat 1 2. Tasta de eliberare a panoului frontal 14. Tasta Intro & Buton presetat 2 3. Tasta Volum/Selectare 15. Tasta Repetare & Buton presetat 3 4. Taste Silentios 16.
- Page 38 Manual de utilizare FuNCTII GENERALE deconectare panou frontal Apasati butonul REL (2) pentru demontarea panoului frontal detasabil. Reglarea sunetului Apasarea butonului (3) poate regla calitatea dorita a volumului. A) Apasarea butonului SEL (3) va schimba urmatoarea ordine: Optiuni: Controlul Volumului/ Selectare Rotiti acest buton pentru a regla Volumul/Bass/Treb/Bal/Fad.
- Page 39 Manual de utilizare FuNCTII RdS (SISTEM dE dATE RAdIO) AF: Frecvente Alternative - pentru a seta Modul RDS, apasati butonul AF (20) si eliberati butonul pentru a porni sau opri mo- dul RDS. Ori de cate ori modul RDS este pornit, simbolul AF va aparea pe afisaj. AF/REG - tasta AF/REG indica activarea CAUTARII FRECVENTELOR ALTERNATIVE.
- Page 40 Manual de utilizare TELECOMANdA 1. Tasta Pornire 11. Tasta Frecvente alternative (RDS) 2. Tasta Pauza/ redare/ Buton presetat 1 12. Tasta Informatii din trafic (RDS) 3. Tasta Intro & Buton presetat 2 13. Tasta cautare 4. Tasta Repetare redare/ Buton presetat 3 14.
- Page 41 Manual de utilizare INLOCuIREA bATERIEI LA TELECOMANdA Cand raza de operare a lelecornenzii slabeste sau telecomanda nu mai functioneaza este recornandata inlocuirea bateriei vechi si inlocuirea cu o baterie noua. Asigurati-va ca polaritatea bateriei este corecta ínainte de inlocuire, in caz contrar telecomanda se poate defecta.
- Page 42 Frequency Coverage (KHz): 450KHz <42dBu SENSIBILITATE (S/N-20dB): SPECIFICATIILE SE POT SCHIMBA FARA O INSTIINTARE PREALABILA „Compania Lechpol declară că produsul KM0104 este în conformitate cu cerinţele esenţiale şi alte prevederi relevante ale Directivei 1999/5/CE. Declaraţia pentru descărcare este postata pe site-ul www.lechpol.eu”...
Need help?
Do you have a question about the KM0104 and is the answer not in the manual?
Questions and answers