Table of Contents
Advertisement
Quick Links
User Manual
This is the functional description of CPS-121 operation with the firmware versions listed above.
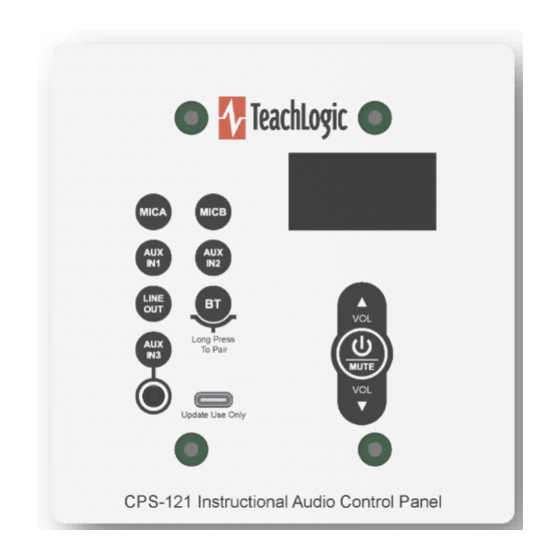
Using Control Panel Buttons
Press any button to activate the control panel. If the panel display is dim, the panel is not active and
pressing any button is required. When a button is pressed, the screen will brighten. Once the screen is
bright, the panel is active.
Setting Volume Levels
The channels adjustable are
input port on the control panel.
To change the volume level of any input or the Line Out output, first select the channel to be adjusted by
pressing its labeled button. For example, Press MICA to change the volume of the wireless microphone
on channel A.
Press the VOL▲ and VOL▼ buttons to control the level.
•
Press MUTE to silence the channel. Press MUTE again will un-silence it.
•
TeachLogic LLC | 541 Main St, Suite B, Longmont CO 80501 |
Power ON/OFF
Long-press the
The same long-press will switch the amplifier into OFF
mode from the ON mode. And it will switch the amplifier
from OFF mode to the ON mode.
Standby (sleep mode)
TeachLogic
have a standby (or sleep) energy saving mode that
causes the amplifier to enter a standby mode after two
hours without audio activity. At this point, the CPS-121
control panel display will go dark (not just dim) and it will
repeat the word "Standby" on the display every minute.
The panel is still powered, however, and will respond to
the command to change the amplifier power mode to ON
(or wake the amplifier).
The amplifier's front panel power LED
(see below) is Blue when ON, Red
when OFF, and Amber when in
Standby.
,
,
1
MICA
MICB
AUXIN
AUXIN
P
CPS-121
Wall Mount Control Panel
Firmware versions 1.0 and 1.1
- Mute key 3-4 seconds
Matrix™ (IMA-121 and IMA-120) amplifiers
®
2,
,
(for Bluetooth
LINEOUT
BT
760-631-7800 |
E
support@teachlogic.com | teachlogic.com
), and
3, a 3.5mm
®
AUX
Advertisement
Table of Contents

Subscribe to Our Youtube Channel
Summary of Contents for TeachLogic CPS-121
- Page 1 CPS-121 Wall Mount Control Panel Firmware versions 1.0 and 1.1 User Manual This is the functional description of CPS-121 operation with the firmware versions listed above. Power ON/OFF - Mute key 3-4 seconds Long-press the The same long-press will switch the amplifier into OFF mode from the ON mode.
- Page 2 CPS-121 Control Panel User Manual Bluetooth Connections ® Pair: means the exchange of information and mutual validation between two devices (i.e., the control panel and a portable Bluetooth device). Connect: means the active and current wireless linking of the control panel’s Bluetooth receiver and a device with which it has paired.
- Page 3 (e.g., 0168 from s/n 000000168) and it is readable on the control panel screen. This allows a user to identify the control panel they desire for pairing or connection. If you see more than one TeachLogic device, select your desired device by its serial number.
- Page 4 If ON, it will respond only to remote volume change and mute commands from CPS-12x panels or other RS-232 controller devices (made by parties). The CPS-121 screen is dark or dim when I want to enter a command or does not respond to my commands at first.
- Page 5 Alternatively, independently check that the device sending audio (e.g. a microphone, computer, television) can successfully send audio to another system (over the same cables) such as a powered speaker or another room’s TeachLogic system.
- Page 6 CPS-121 Control Panel User Manual Changing Passcode for Bluetooth Pairing The passcode for Bluetooth pairing may be changed. To change it, removed the CPS-121 from the wall by removing the four Phillips drive screws on front panel, and locate the 8-position DIP switch centered on the circuit board.

Need help?
Do you have a question about the CPS-121 and is the answer not in the manual?
Questions and answers