Table of Contents
Advertisement
Trademarks
FOXWELL is trademark of Shenzhen Foxwell Technology Co., Ltd.
All other marks are trademarks or registered trademarks of their respective holders.
Copyright Information
©2014 Shenzhen Foxwell Technology Co., Ltd.
All rights reserved.
Disclaimer
The information, specifications and illustrations in this manual are based on the latest information
available at the time of printing.
Foxwell reserves the right to make changes at any time without notice.
Visit our website at:
www.foxwelltech.com
For Technical Assistance, send us email at
support@foxwelltech.com
1
NT201 OBDII/EOBD Code Reader User's Guide_English Version_V1.00
Advertisement
Table of Contents

Related Manuals for Foxwell NT201


Summary of Contents for Foxwell NT201
- Page 1 Disclaimer The information, specifications and illustrations in this manual are based on the latest information available at the time of printing. Foxwell reserves the right to make changes at any time without notice. Visit our website at: www.foxwelltech.com For Technical Assistance, send us email at support@foxwelltech.com...
-
Page 2: One-Year Limited Warranty
The customer will be billed for any parts or labor charges not covered by this limited warranty. d) FOXWELL will repair the Product under the limited warranty within 30 days after receipt of the product. If FOXWELL cannot perform repairs covered under this limited warranty within 30 days,... - Page 3 OF THE PRODUCT OR ARISING FROM BREACH OF THE WARRANTY, BREACH OF CONTRACT, NEGLIGENCE, STRICT TORT, OR ANY OTHER LEGAL OR EQUITABLE THEORY, EVEN IF FOXWELL KNEW OF THE LIKELIHOOD OF SUCH DAMAGES. FOXWELL SHALL NOT BE LIABLE FOR DELAY IN RENDERING SERVICE UNDER THE LIMITED WARRANTY, OR LOSS OF USE DURING THE PERIOD THAT THE PRODUCT IS BEING REPAIRED.
-
Page 4: Safety Information
Block drive wheels before testing with engine running. Put the transmission in park (for ● automatic transmission) or neutral (for manual transmission). And never leave a running engine unattended. Do not wear jewelry or loose fitting clothing when working on engine. ● NT201 OBDII/EOBD Code Reader User’s Guide_English Version_V1.00... -
Page 5: Table Of Contents
4.3 LIVE DATA..............................13 4.4 VIEW FREEZE FRAME...........................15 4.5 READ I/M READINESS STATUS DATA....................16 4.6 REQUEST VEHICLE INFORMATION....................18 5 SYSTEM SETUP.............................. 20 5.1 SELECT LANGUAGE..........................20 5.2 CONFIGURE MONITORS........................21 5.2.1 SPARK IGN REQUIRED MONITORS..................22 NT201 OBDII/EOBD Code Reader User’s Guide_English Version_V1.00... - Page 6 5.6.1 DISPLAY TEST..........................28 5.6.2 KEYPAD TEST..........................28 5.6.3 LED TEST............................29 6 TOOL INFORMATION.............................30 7 NT WONDER INTRODUCTION........................31 7.1 UPDATE THE CODE READER......................31 7.2 SEARCHING DTC............................32 7.3 USER MANUAL............................33 7.4 UPDATE TOOL SETTINGS........................33 NT201 OBDII/EOBD Code Reader User’s Guide_English Version_V1.00...
-
Page 7: Using This Manual
IMPORTANT indicates a situation which, if not avoided, may result in damage to the test equipment or vehicle. Example: IMPORTANT Do not soak keypad as water might find its way into the code reader. NT201 OBDII/EOBD Code Reader User’s Guide_English Version_V1.00... -
Page 8: Introduction
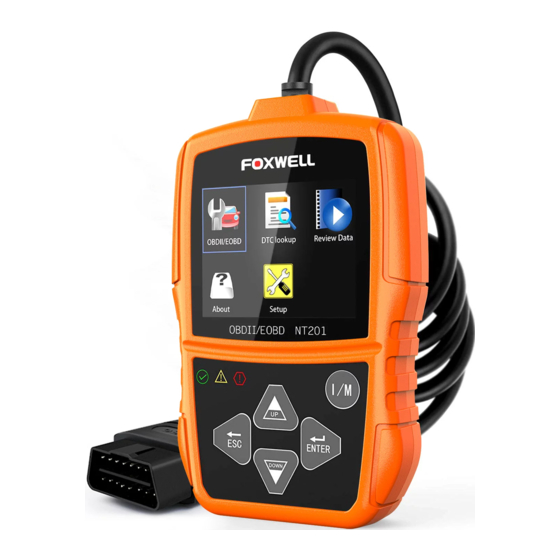
2 Introduction NT201 is developed by the most distinguished mind of the industry. It is specially designed to support all 10 OBDII service modes, including live data and on so, on OBDII/EOBD compliant cars, SUVs, light-duty truck and mini-vans sold worldwide since 1996. -
Page 9: Technical Specifications
1. Insert the small end of the USB cable to the USB port at the right side of the code reader and the large end to a computer. 2. Press the power switch of the code reader to power it on. NT201 OBDII/EOBD Code Reader User’s Guide_English Version_V1.00... -
Page 10: Application Overview
When the code reader links to vehicle, it checks the status of I/M Monitors automatically, and gives a summary report on the display as illustrated below. NT201 OBDII/EOBD Code Reader User’s Guide_English Version_V1.00... -
Page 11: Read Codes
If a fault occurs a specific number of times, the code matures into a DTC and the MIL illuminates or blinks. There are two ways to read codes using NT201. ● Press the Read hot key to read codes from home screen. -
Page 12: Erase Codes
Figure 4-5 Sample DTC Description Screen NOTE If no DTCs are present, the message “No (Pending) Codes Found!” is displayed. If any manufacturer specific or enhanced codes detected, NT201 reads the correct DTC information automatically according to the VIN. 4.2 Erase Codes Erase Codes menu lets you to clear all current DTCs from the control module. -
Page 13: Live Data
Live Data menu lets you view real time PID data from the electronic control module. 4.3.1 View Data The View Data function allows real time viewing of the vehicle’s electronic control unit’s PID data, including sensor data, operation of switches, solenoids and relays. Menu options typically include: NT201 OBDII/EOBD Code Reader User’s Guide_English Version_V1.00... - Page 14 Figure 4-9 Sample View Data Menu Screen 3. Scroll with the up and down arrow keys to scroll through data to select lines, and left and right arrow keys to scroll back and forth through different screens of data. NT201 OBDII/EOBD Code Reader User’s Guide_English Version_V1.00...
-
Page 15: View Freeze Frame
2. Use the up and down arrow keys to scroll through data to select lines, and ESC arrow keys to scroll back and forth through different screens of data. If no freeze frame detected, the message “No freeze frame data stored!” is displayed. NT201 OBDII/EOBD Code Reader User’s Guide_English Version_V1.00... -
Page 16: Read I/M Readiness Status Data
Yellow - The tool finds a possible problem. It indicates the following two conditions: ● (1) Pending DTCs exist. Please check the I/M Readiness test result screen and use the Read Codes function to view detailed codes information. NT201 OBDII/EOBD Code Reader User’s Guide_English Version_V1.00... - Page 17 Select a monitor type and press the ENTER key. Figure 4-15 Sample Diagnostic Menu Screen 2.If the vehicle being tested supports both types of monitors, following screen displays. Figure 4-16 Sample I/M Readiness Screen NT201 OBDII/EOBD Code Reader User’s Guide_English Version_V1.00...
-
Page 18: Request Vehicle Information
NOTE Available options will vary depending on the vehicle under test. To request vehicle information: 1.Use the UP/DOWN key to highlight Vehicle Info. from Diagnostic Menu and press the ENTER key. NT201 OBDII/EOBD Code Reader User’s Guide_English Version_V1.00... - Page 19 3.Use the UP/DOWN key to highlight an available option and press the ENTER key. A screen with details of the selected option displays. Figure 4-21 Sample Calibration ID Screen 4. Press the ESC key to exit and return. NT201 OBDII/EOBD Code Reader User’s Guide_English Version_V1.00...
-
Page 20: System Setup
2.A screen of a list of menu options displays. Figure 5-2 Sample Setup Screen 3.Press the UP/DOWN key select a language and press the ENTER key to confirm. Press the BACK key to exit and return. NT201 OBDII/EOBD Code Reader User’s Guide_English Version_V1.00... -
Page 21: Configure Monitors
EGR (Exhaust Gas Recirculation) and/or VVT System ● Compression ignition vehicles (Diesel) NMHC Catalyst ● NOx/SCR After treatment ● Boost Pressure ● Exhaust Gas Sensor ● PM Filter ● EGR and/or VVT System ● NT201 OBDII/EOBD Code Reader User’s Guide_English Version_V1.00... -
Page 22: Spark Ign Required Monitors
1. Use the UP/DOWN key to highlight Spark IGN Required Monitors from menu and press the ENTER key to confirm. 2. The custom monitors selection screen displays. Figure 5-6 Sample Custom Monitors Selection Screen NT201 OBDII/EOBD Code Reader User’s Guide_English Version_V1.00... -
Page 23: Compression Ign Required Monitors
2. The custom monitors selection screen displays and Use the RIGHT key to select or deselect a monitor or press the LEFT key to deselect all the monitors. Press the ENTER key to confirm and BACK key to cancel. NT201 OBDII/EOBD Code Reader User’s Guide_English Version_V1.00... -
Page 24: Allowed Inc Monitors
Emissions tests vary depending on the geographic or regional area in which the vehicle is registered. NT201 provides a more flexible way to meet different standards, which allows the user to select 0, 1, 2, 3 INC monitors in test. -
Page 25: Reset Factory Default
Unit of measure opens a dialog box that allows you to choose between US customary or metric units of measure. To change the unit setup: 1. Scroll the UP/DOWN keys to highlight Unit of Measure from Setup menu and press the ENTER key. NT201 OBDII/EOBD Code Reader User’s Guide_English Version_V1.00... -
Page 26: Key Beep Set
1. Use the UP/DOWN key to highlight Key beep set from Setup menu and press the ENTER key. Figure 5-16 Sample Setup Screen 2. Press the UP/DOWN arrow key select an item and press the ENTER key to save and return. NT201 OBDII/EOBD Code Reader User’s Guide_English Version_V1.00... -
Page 27: Diag Beep Set
1. Use the UP/DOWN key to highlight Diag Beep Set from Setup menu and press the ENTER key. Figure 5-18 Sample Setup Screen 2. Press the UP/DOWN key to select an item and press the ENTER key to save and return. Figure 5-19 Sample Diag Beep Selection Screen NT201 OBDII/EOBD Code Reader User’s Guide_English Version_V1.00... -
Page 28: Tool Self-Test
Selecting Key Test option opens a screen that allows you to check the functionality of the keypad. To test the keypad: 1. Use the UP/DOWN key to highlight Keyboard Test from Setup menu and press the ENTER key. NT201 OBDII/EOBD Code Reader User’s Guide_English Version_V1.00... -
Page 29: Led Test
Figure 5-24 Sample Tool Self-test Screen 2. Scroll with the up and down arrow keys to select the desired LED lamps to check. The LED should turn on/off according to the selected commands. NT201 OBDII/EOBD Code Reader User’s Guide_English Version_V1.00... -
Page 30: Tool Information
Figure 6-1 Sample Home Screen 2. A screen with detailed information of the code reader displays. Figure 6-2 Sample Tool Information Screen 3. Press the BACK key to exit and return to the Setup menu. NT201 OBDII/EOBD Code Reader User’s Guide_English Version_V1.00... -
Page 31: Nt Wonder Introduction
7 NT Wonder Introduction NT Wonder is an extremely easy-to-use that is used to update NT201 code reader. Also, it allows you to upload recorded test results to your PC or laptop for analysis and printing. Still, it enables you to search DTC, read the manuals as well set up the language and style of the application. -
Page 32: Searching Dtc
● Update online: With internet connection, the tool NT Wonder automatically detects the software version of the code reader and read the latest software version from the server. If any new diagnosis software found, it will automatically upgrade your NT201. Otherwise a prompt of new version not detected displays. -
Page 33: User Manual
3.Select the language and the style you want from the left to right column. 4.Select and tick the “Auto check for updates” on the bottom of the screen, then press Apply key to confirm. Figure 7-6 Sample of Setting Menu NT201 OBDII/EOBD Code Reader User’s Guide_English Version_V1.00...
Need help?
Do you have a question about the NT201 and is the answer not in the manual?
Questions and answers