
Subscribe to Our Youtube Channel
Related Manuals for LEGRAND Raritan T1700-LED

Summary of Contents for LEGRAND Raritan T1700-LED
- Page 1 Raritan LED KVM Console (T1700-LED/T1900-LED) User Guide Release 1.1 Copyright © 2018 Raritan, Inc. T1700LED_T1900LED-1C-v1.1-E October 2018 255-37-0002-00 RoHS...
- Page 2 This document contains proprietary information that is protected by copyright. All rights reserved. No part of this document may be photocopied, reproduced, or translated into another language without express prior written consent of Raritan, Inc. © Copyright 2018 Raritan, Inc. All third-party software and hardware mentioned in this document are registered trademarks or trademarks of and are the property of their respective holders.
- Page 3 Rack-mount Safety Instructions Elevated Operating Ambient: If installed in a closed or multi-unit rack assembly, the operating ambient temperature of the rack environment may be greater than room ambient. Therefore, consideration should be given to installing the equipment in an environment compatible with the maximum ambient temperature (Tma) specified by the manufacturer.
-
Page 4: Table Of Contents
Contents Rack-mount Safety Instructions What's New in the LED KVM Console User Guide Important Safeguards What the Warranty Does Not Cover ....................vii Safety Instructions..........................viii Chapter 1 Introduction Package Content..........................1 Structure Diagram..........................2 Chapter 2 Installation ... - Page 5 Contents Language..........................19 Recall ........................... 20 Information........................... 20 Selecting the Video Source (Optional).................... 21 Appendix A Specifications Technical Specifications......................... 22 T1700-LED..........................22 T1900-LED..........................24 Environmental Specifications......................25 Dimensions ............................. 26 Appendix B Ground Screw ...
- Page 6 What's New in the LED KVM Console User Guide The following sections have changed or information has been added to the LED KVM Console Online Help based on enhancements and changes to the equipment and/or user documentation. T1700-LED (on page 22) T1900-LED (on page 23) Taiwan BSMI Certification...
-
Page 7: Important Safeguards
Important Safeguards Read all these instructions carefully before you use the device. Save this manual for future reference. What the Warranty Does Not Cover Any product, on which the serial number has been defaced, modified or removed. Damage, deterioration or malfunction resulting from: ... -
Page 8: Safety Instructions
Chapter 1: Important Safeguards Safety Instructions Unplug equipment before cleaning. Don't use liquid or spray detergent; use a moist cloth. Keep equipment away from excessive humidity and heat. Preferably, keep it in an air-conditioned environment with temperatures not exceeding 40º... -
Page 9: Chapter 1 Introduction
Chapter 1 Introduction This User Guide introduces Raritan's 1U rackmount LED KVM Consoles: T1700-LED and T1900-LED, which are used to operate a KVM switch or server in the data center or server room. A Raritan LED KVM Console features an LED-backlit LCD display and a DVI port... -
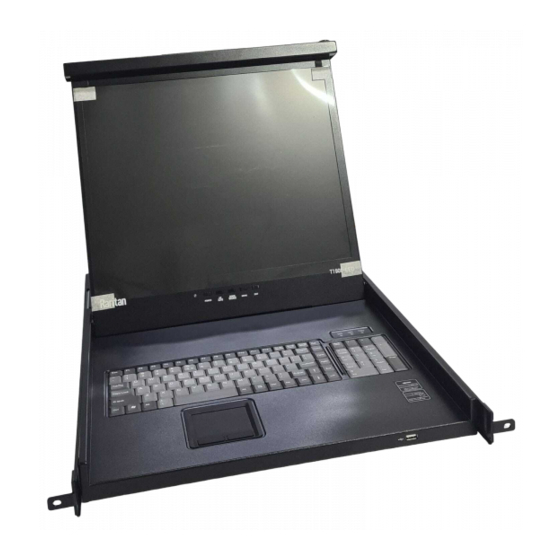
Page 10: Structure Diagram
Chapter 1: Introduction Structure Diagram 1. Touchpad 2. Keyboard 3. Indicators for Num Lock, Caps Lock and Scroll Lock status 4. LCD display 5. OSD buttons and indicator lamp 6. Adjustable mounting brackets 7. Ergonomic concave handle 8. Lock... -
Page 11: Chapter 2 Installation
Chapter 2 Installation In This Chapter Before Installation..................3 Installing the LED KVM Console ..............4 Connecting a Server or KVM Switch ............7 Connecting an External USB Device (Optional) ........10 Before Installation It is very important to locate this product in a suitable environment. ... -
Page 12: Installing The Led Kvm Console
Chapter 2: Installation Installing the LED KVM Console Follow the procedure below to install the LED KVM Console. To rack-mount the LED KVM Console: 1. Slightly loosen the fasteners on the brackets, adjust the length of the brackets to match the mounting depth of the rack, and then tighten the fasteners. - Page 13 Chapter 2: Installation 2. Fasten the brackets to the rack rails securely with your own screws or cage nuts. 3. Slide the LED KVM Console between the brackets.
- Page 14 Chapter 2: Installation 4. Fasten the LED KVM Console to the rack. The diagram below illustrates how the LED KVM Console moves between the brackets.
-
Page 15: Connecting A Server Or Kvm Switch
Chapter 2: Installation Connecting a Server or KVM Switch The LED KVM Console can be connected to either a KVM (keyboard/video/mouse) switch or a server. You must always use the Raritan-provided KVM combo cable to make the connection. A DVI cable is required if the server's or KVM switch's video port is a DVI port, or if you prefer using the DVI port. - Page 16 Chapter 2: Installation Server - VGA and PS/2 connection KVM switch - VGA and USB connection KVM combo cable VGA-based KVM switch KVM switch - VGA and PS/2 connection...
-
Page 17: Connections Via Dvi And Usb Or Ps/2
Chapter 2: Installation Connections via DVI and USB or PS/2 You can make a connection to a DVI-based server or KVM switch, such as Raritan's Dominion KX III KVM switch, via a combination of DVI and USB or PS/2 interface. Do NOT connect both USB and PS/2 connectors simultaneously. -
Page 18: Connecting An External Usb Device (Optional)
Chapter 2: Installation Tip: If both DVI and VGA ports are available on the server, you may make connections to both ports, and then press the DOWN/SOURCE button to switch between different video sources. KX III KVM switch - DVI and USB connection KVM combo cable DVI cable KX III or any DVI-based KVM... - Page 19 Chapter 2: Installation b. Plug the USB-B connector into the USB-B port on the rear side of the LED KVM Console. Note: Raritan does not provide the USB-A to USB-B cable. 2. Connect any USB device to the front panel USB-A port of the LED KVM Console.
-
Page 20: Chapter 3 Operation
Chapter 3 Operation In This Chapter Locking or Unlocking the LED KVM Console ..........12 Operating the LED KVM Console............... 13 Closing the LED KVM Console ..............14 Locking or Unlocking the LED KVM Console The LED KVM Console has a lock to the right side. When locked, you cannot draw this product out of the rack. -
Page 21: Operating The Led Kvm Console
Chapter 3: Operation Operating the LED KVM Console 1. Gently pull the concave handle toward the front of the LCD display. 2. Flip up the LCD display to a suitable angle. 3. Operate the LED KVM Console. For information on LCD buttons and Using the OSD Menu onscreen menu, see (on page 15). -
Page 22: Closing The Led Kvm Console
Chapter 3: Operation Closing the LED KVM Console 1. Locate a gray-arrow release button on two sides of the LED KVM Console. 2. Push both gray-arrow buttons in the direction as indicated by the arrow head before pushing the LED KVM Console into the rack. 3. -
Page 23: Chapter 4 Using The Osd Menu
Chapter 4 Using the OSD Menu You can customize the video properties of the built-in LCD display, such as colors and image position, and the OSD settings, such as the language displayed in the OSD, by changing the settings of the OSD menu. In This Chapter Onscreen Display Operation.............. -
Page 24: Onscreen Menu
Chapter 4: Using the OSD Menu Buttons Function UP/AUTO This button has two functions: When no OSD is displayed, pressing this button optimizes the visual settings. While the OSD is being displayed, pressing this button moves up the selection. DOWN/SOURCE This button has two functions: ... -
Page 25: Luminance
Chapter 4: Using the OSD Menu Auto Adjust: Fine tune the video signals to eliminate waviness and distortion. An "Auto Adjusting" message is displayed during the process. Luminance Brightness: Make the screen image brighter or darker. Contrast: Adjust the difference between the background black level and foreground white level. -
Page 26: Color
Chapter 4: Using the OSD Menu V. Position: Move the screen image up or down. Pixel Clock: Adjust the clock/pitch to synchronize the sampling clock of the LCD with the pixel clock of the connected equipment. This adjustment is needed only for VGA signals when Auto Tune does not get the optimum video performance and vertical dark bands are visible on the screen. -
Page 27: Osd
Chapter 4: Using the OSD Menu H. Position: Adjust the OSD's horizontal position. V. Position: Adjust the OSD's vertical position. OSD Time: Set the time duration in seconds for which the OSD remains visible after the last button is pressed. The factory default is 10 seconds. Language Select the language in which the OSD menu is displayed. -
Page 28: Recall
Chapter 4: Using the OSD Menu Recall Recall Color: Reset all colors to factory defaults. Recall All: Reset all settings to factory defaults except for the language setting. A confirmation message appears after selecting either Recall option. Press UP/AUTO to select Yes and then press MENU to confirm the operation. -
Page 29: Selecting The Video Source (Optional)
Chapter 4: Using the OSD Menu Selecting the Video Source (Optional) If both VGA and DVI ports are available on the server, you can make connections to both ports through the 3-in-1 and DVI cables respectively. When both video ports are used, you can switch between these two video sources by operating the OSD. -
Page 30: Appendix A Specifications
Appendix A Specifications In This Chapter Technical Specifications................22 Environmental Specifications ..............25 Dimensions....................26 Technical Specifications T1700-LED Item Description 1U rack mounting on slide-out rails Form factor 17.3" TFT Diagonal size 16:9 Screen aspect ratio 1920 x 1080 @60Hz Max. - Page 31 Appendix A: Specifications Item Description 1152 x 870 @75Hz 1280 x 720 @60Hz 1280 x 960 @60Hz 1280 x 1024 @60/75Hz 1360 x 768 @60Hz 1366 x 768 @60Hz 1440 x 900 @60Hz 1600 x 900 @60Hz 1600 x 1200 @60Hz 1680 x 1050 @60Hz 1920 x 1080 @60Hz DDC, DDC2, and DDC2B...
-
Page 32: T1900-Led
Appendix A: Specifications T1900-LED Item Description 1U rack mounting on slide-out rails Form factor 19" TFT Diagonal size Screen aspect ratio 1280 x 1024 Max. resolution Brightness (cd/m²) 16.7M Color support 1000:1 Contrast ratio (typ.) 80° x 80° Viewing angle (H/V) 376 x 301 Display area (mm) Response time (ms) -
Page 33: Environmental Specifications
Appendix A: Specifications Item Description DDC, DDC2, and DDC2B DDC support EDID 1.3 Plug & play DDC 3-in-1 DB-15 connector for VGA / keyboard / mouse Console port (combo) Support USB & PS/2 servers or KVM switches Auto-sensing 100 to 240VAC, 50 / 60Hz Power input Max. -
Page 34: Dimensions
Appendix A: Specifications Dimensions Model Product dimension Packing dimension Net weight Gross (W x D x H) (W x D x H) weight 434 x 569 x 43.5 mm 742 x 602 x 178 mm 16 kg 17.6 kg T1700-LED 17.1 x 22.4 x 1.71"... -
Page 35: Appendix B Ground Screw
Appendix B Ground Screw If you want to prevent any electrical shock, you can use the ground screw on the rear panel to provide a safe electrical path to the ground. To prevent any potential shock hazard: Connect the ground screw to a wiring system or wiring device. - Page 36 Appendix C Taiwan BSMI Certification...
- Page 37 Index A O Auto Adjust • 16 Onscreen Display Operation • 15 Onscreen Menu • 16 B Operating the LED KVM Console • 13 Operation • 12 Before Installation • 3 OSD • 19 C P Closing the LED KVM Console • 14 Package Content •...
Need help?
Do you have a question about the Raritan T1700-LED and is the answer not in the manual?
Questions and answers