Table of Contents
Advertisement
Advertisement
Table of Contents

Subscribe to Our Youtube Channel
Related Manuals for La Crosse Technology WT-5442U


Summary of Contents for La Crosse Technology WT-5442U
- Page 1 WT-5442 433 MHz Radio Controlled Projection Alarm Instruction Manual...
-
Page 2: Table Of Contents
TABLE OF CONTENTS Topic Page Inventory of Contents/ Additional Equipment About WWVB Quick Set-Up Guide Detailed Set-Up Guide Battery Installation Program Mode Programming Sequence Function Buttons Time Zone Setting DST (Daylight Saving Time) Setting Adjustable Snooze Time Setting Date Setting Selecting °F or °C 12/24-Hour Setting Features &... -
Page 3: Inventory Of Contents/ Additional Equipment
INVENTORY OF CONTENTS 1) WT-5442 Alarm Clock 2) TX6U Remote temperature transmitter 3) AC adapter/transformer 4) Instruction manual and warranty card. ADDITIONAL EQUIPMENT (not included) 1) Three fresh 1.5V AA batteries (optional for alarm clock) 2) Two fresh 1.5V AA batteries (for remote transmitter) Note: Alkaline batteries are recommended for use in both pieces. -
Page 4: Quick Set-Up Guide
variance in the quartz. However, the clock will adjust the quartz timing over the course of several days to be very accurate; under 0.10 seconds per day. QUICK SET-UP GUIDE 1) Insert two AA batteries into the remote transmitter. 2) Insert three AA batteries into the projection alarm and/or plug into wall. -
Page 5: Program Mode
batteries will fit tightly (to avoid start-up problems make sure that they do not spring free during installation). 2. Replace the battery cover. B. PROJECTION ALARM 1. Remove the battery cover. 2. Observe the correct polarity, and install 3 AA batteries. -
Page 6: Programming Sequence
Guide is laid out in a manner that allows you to program each function separately, or you can follow the instructions entirely to program the Projection alarm. Complete programming is usually done for the initial set-up, and will require you to skip step 1 of programming sections “D” through “H”. -
Page 7: Dst (Daylight Saving Time) Setting
3. From –5h to –8h, a US map with the highlighted time zone will also be displayed to the right of the time display. Atlantic Time Eastern Time (default setting) Central Time Mountain Time Pacific Time Alaskan Time -10h Hawaiian Time -11h, -12h Next two time zones West of HAW Greenwich Mean Time... -
Page 8: Time Setting
3. Press and release the “SET” button to confirm the snooze setting, and to advance to manually set the time. F. TIME SETTING Note: When the WWVB signal is found, that time will over-ride the manually set time. 1. Hold down the “SET” button for 1 second (the selected time zone will flash), press the “SET”... -
Page 9: Features & Operations Features
1. Hold down the “SET” button for 1 second (the selected time zone will flash), press the “SET” button 9 more times, until the “12” or “24” hour time display flashes in the time LCD. 2. Press and release the “Mode/+” button to toggle between 12 and 24- hour time. -
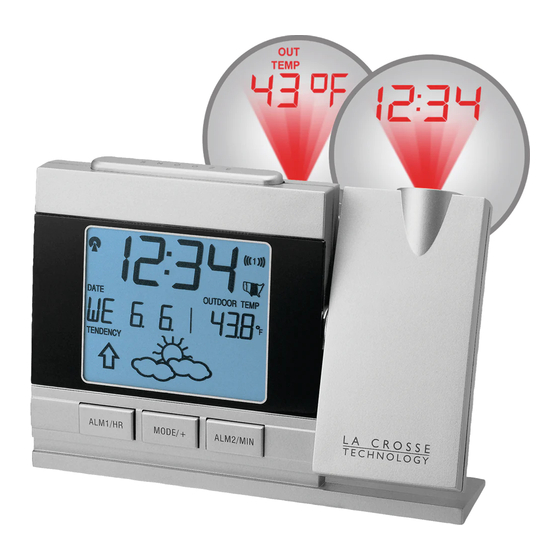
Page 10: Projection
you to an automated time, announced at the top of the minute in “Coordinated Universal Time”, which is also known as Greenwich Mean Time (GMT). This time does not follow Daylight Saving Time changes. After the top of the minute, a tone will sound for every second. -
Page 11: El Backlight
D. EL BACKLIGHT 1. The projection alarm has an EL backlight designed for night viewing. This will light up for 2 seconds whenever a button is pressed. 2. The EL backlight cannot be turned on constantly; this would drain the batteries and burn out the EL. -
Page 12: Time Alarm
temperature will be in °F. When in 24-hour mode, the temperature will be in °C. G. TIME ALARM The Projection Alarm has two separate alarms for time, “ALM1” and “ALM2”. The alarms have a different sound; ALM1 increases in volume after 25 seconds, and again after 50 seconds. -
Page 13: Changing Display Mode (Viewing Seconds)
H. CHANGING DISPLAY MODE (DAY, SECONDS, AND TEMPERATURE) 1. There are six possible display modes to view the day, seconds, and temperature (remote temperature is constantly displayed). To change the display (starting at the default of Day.Date.Year/Remote Temperature): 2. Press and release the “MODE/+” button. The display should now show month.day.year/remote temperature 3. -
Page 14: Mounting
The weather icons change when the unit detects a change in air pressure. The icons change in order, from “sunny” to “partly sunny” to “cloudy” or the reverse. It will not change from “sunny” directly to “rainy”, although it is possible for the change to occur quickly. -
Page 15: Maintenance & Care
D. Immediately remove all low powered batteries to avoid leakage and damage. E. Replace with new batteries only, and of recommended size. F. Opening the casings invalidates the warranty. Do not try to repair the units. Contact La Crosse Technology for Repairs. -
Page 16: Troubleshooting
1) Remote temperature is out of range. 2) Check batteries. 3) Interference from an outside source (cordless telephone, etc.) 4) Contact La Crosse Technology. Note: For any questions not answered, contact La Crosse Technology with the contact information found at the end of this instructional manual. -
Page 17: Specifications
SPECIFICATIONS FOR WT-5442 Temperature: Measuring range: 32°F to 122°F with 0.2°F resolution (indoor) -21.8°F to 140°F with 0.2°F resolution (outdoor) (0°C to 50°C with 0.1°C resolution) Checking intervals: Every 10 seconds indoor, 3 times in 10 minutes for remote temperature. Power source: AC Adapter (included) Input: 120VAC/60Hz Output: DC 6V/100MA... -
Page 18: Warranty And Contact Information
WARRANTY INFORMATION La Crosse Technology provides a 1-year warranty on this Projection alarm. Contact La Crosse Technology immediately upon discovery of any defects covered by this warranty. Before sending the Projection alarm in for repairs, contact La Crosse Technology. The Projection alarm will be repaired or replaced with the same or similar model.
Need help?
Do you have a question about the WT-5442U and is the answer not in the manual?
Questions and answers