
Related Manuals for Gigabyte GS-R127H-RH


Summary of Contents for Gigabyte GS-R127H-RH
- Page 1 GS-R127-RH Series GS-R127V-RH GS-R127H-RH 1U Rack Mount Server System Installation Guide Intel Pentium Xeon Processor Serverboard ® Rev. 1.0 25A08G-01270-F00...
-
Page 2: Table Of Contents
Step 2-7: FAN Duct Removal and Installation ... 17 Chapter 3 Appearance of GS-R127V-RH ... 18 3-1: Front View of GS-R127V-RH ... 18 3-2: Front View of GS-R127H-RH ... 18 3-3: Rear View of GS-R127V-RH/GS-R127H-RH ... 19 3-4: Switch and LED Indicators Introduction ... 20 3-5: LAN LED Description ... - Page 3 B. ATI ES1000 VGA Driver Installation ... 67 C. Intel LAN Driver Installation ... 70 D. AIC-7901 RAID Driver Installation (GS-R127V-RH) ... 74 E. LSI-1068 RAID Driver Installation (GS-R127H-RH) ... 76 F. DirectX 9.0C Driver Installation ... 78 Chapter 7 Appendix ... 81 7-1: Acronyms ...
-
Page 4: Safety, Care And Regulatory Information
GS-R127-RH Series Rack Mount Server Safety, Care and Regulatory Information Important safety information Read and follow all instructions marked on the product and in the documentation before you operate your system. Retain all safety and operating instructions for future use. * The product should be operated only from the type of power source indicated on the rating label. - Page 5 * To reduce the risk of fire, use only No. 26 AWG or larger telecommunications line cord. * Do not plug a modem or telephone cable into the network interface controller (NIC) receptacle. * Disconnect the modem cable before opening a product enclosure, touching or installing internal components, or touching an uninsulated modem cable or jack.
- Page 6 GS-R127-RH Series Rack Mount Server Your telephone company may make changes in its facilities, equipment, operations, or procedures that could affect proper operation of your equipment. If they do, you will be notified in advance to give you an opportunity to maintain uninterrupted telephone service. The FCC prohibits this equipment to be connected to party lines or coin-telephone service.
- Page 7 NOTICE: The Load Number (LN) assigned to each terminal device denotes the percentage of the total load to be connected to a telephone loop which is used by the device, to prevent overloading. The termination on a loop may consist of any combination of devices subject only to the requirement that the sum of the Load Numbers of all the devices does not exceed 100.
-
Page 8: Server Warnings And Cautions
GS-R127-RH Series Rack Mount Server Server Warnings and Cautions W ARNING: To reduce the risk of electric shock or damage to the equipment: Disconnect power from the system by unplugging all power cords from the power supplies. Do not disable the power cord grounding plug. The grounding plug is an important safety feature. -
Page 9: Introduction
For your protection, please read and undertand all of the safety and operating instructions regarding your Gigabyte Server and retain for future reference. The procedures in this guidebook assume that your are a system or network administrator experienced in installing similar hardware. -
Page 10: Chapter 1 Features Summary
GS-R127-RH Series Rack Mount Server Chapter 1 Features Summary Motherboard GA-7BPSH00-RH (GS-R127V-RH) GA-7BPSH01-RH (GS-R127H-RH) Processor Supported Dual Intel Supports 667/1066MHz FSB (Dempsey) Supports 1066/1333MHz FSB (Woodcrest) 2nd cache depend on CPU Chipset Intel Intel System Memory: Memory Capacity Supports 4 Channel memory bus up to 32GB... - Page 11 Integrated Graphics: Controller ATI ES1000 Mass Storage System 4 x Hot Swapable HDDs 1 Slim Type 24X CD-ROM Front Panel Power SW, Reset SW, NMI SW, UID SW, 2 x LAN LED 1 x Power/Sleep LED 1 x HDD LED...
- Page 12 GS-R127-RH Series Rack Mount Server Server Management Functions: BMC Chip IPMI 2.0 controller Failure Detection IPMI 2.0 specification of Server management Event Logging 32KB Nonvolatile Memory to Log System Failure Events Remote Management Follow the IPMI 2.0 specification of Server management Environment Ambient Temperature Operating Temperature: 5...
-
Page 13: Chapter 2 System Hardware Installation
Chapter 2 System Hardware Installation Please observe the safety information in chapter “Important Safety Information” Do not expose the server to extreme environmental conditions. Protect it from dust, humidity, and heat. Step 2-1: Chassis Removal and Installation Step 1 Loosen thscrew from the top cover. Step 2 Push down the indentation located at two sides of the chassis, and slide toward to remove the top cover. -
Page 14: Step 2-2: Cpu Installation
GS-R127-RH Series Rack Mount Server Step 2-2: CPU Installation Please make sure the CPU type and speed that are supported by the motherboard. Step 1 Raise the metal locking lever on the socket. Step 2 Remove the plastic covering on the CPU socket and lift the metal cover. Step 3 Insert the CPU with the correct orientation. -
Page 15: Step 2-3: Heat Sink Installation
Step 2-3: Heat Sink Installation Step 1 Place the Heat Sink on the CPU. Before putting the heat sink on the CPU, please well remember to apply the thermal conductivity compound on the CPU. Step 2 Seat the heat sink with the four screws. Installation completed. Step 1 Step 2-4: Memory Installation 1. -
Page 16: Step 2-5: Pci Expansion Card Installation
GS-R127-RH Series Rack Mount Server Step 2-5: PCI Expansion Card Installation GS-R127V-RH provides expansion riser slot for one PCI-X 64/100MHz slot; and one with PCI-E x8. To install the peripheral, please go through the following steps. Note: Before installing the PCI expansion card, please check the card size limitation. Size limitation for PCI-E is listed below: Heigth: 18.73mm(max) ;... -
Page 17: Step 2-6: Hard Disk Drive Installation
Step 2-6: Hard Disk Drive Installation Step 1 Press the release button and pull the blank out of the drive bay. Step 2 Remove the hard disk blank. Slide hard disk into blank and secure it with screws. Step 3 Slide the drive into the cage until it clicks, locking the drive into place. Connect cable and power. -
Page 18: Chapter 3 Appearance Of Gs-R127V-Rh
GS-R127-RH Series Rack Mount Server Chapter 3 Appearance of GS-R127V-RH 3-1: Front View of GS-R127V-RH 3-2: Front View of GS-R127H-RH... -
Page 19: 3-3: Rear View Of Gs-R127V-Rh/Gs-R127H-Rh
3-3: Rear View of GS-R127V-RH/GS-R127H-RH t r o t r o H - l t r o t r o e l i f E - I X - I t o l System Appearance t o l... -
Page 20: 3-4: Switch And Led Indicators Introduction
GS-R127-RH Series Rack Mount Server 3-4: Switch and LED Indicators Introduction Reset Switch NMI Switch Name Color Condition Power Green Green Blink Amber Blink (System) Amber Green Blink LAN1 Green Activity Green Blink Green LAN2 Activity Green Blink Blue (Identification) LAN1/2 Activities System Event LED ID BTN&LED... -
Page 21: 3-5: Lan Led Description
3-5: LAN LED Description Name Color Condition Green Link/Activity Green BLINK 10 LAN Speed 100 LAN Green Speed Green BLINK GbE LAN Yellow Speed Yellow BLINK LED Description Description LAN Link / no Access LAN Access Idle 10Mbps connection 100Mbps connection Port identification with 10 or 100Mbps connection 1Gbps connection Port identification with 1Gbps connection... -
Page 22: 3-6 : Connector Icon Description
GS-R127-RH Series Rack Mount Server 3-6 : Connector Icon Description i r c i t p l a i... -
Page 23: Chapter 4 Motherboard Layout & Jumper Setting
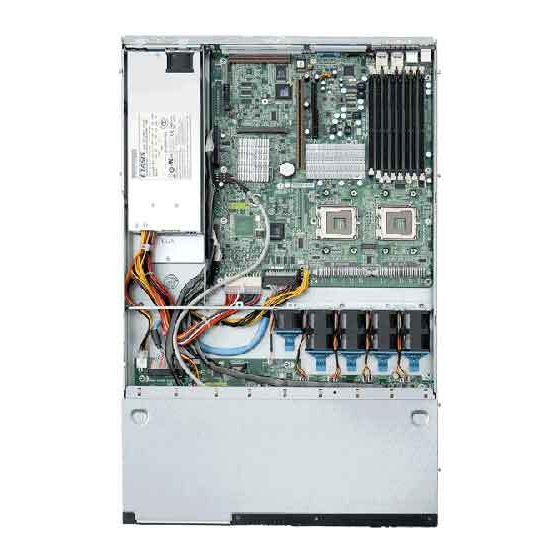
Motherboard Layout Chapter 4 Motherboard Layout & Jumper Setting 4-1: GA-7BPSH-RH Motherboard Layout... - Page 24 Front USB connector Adaptec AIC-7901 (GS-R127V-RH) IPMI module SCSI Connector Fan Connector Fan Connector PCI-E x8 Slot PCI-X Slot (64/100MHz) F u l l y B u ffered DIMM A1/A2/A3/A4 Fully Buffered DIMM B1/B2/B3/B4 Battery i-button (GS-R127H-RH) LSI 1068 (GS-R127H-RH)
-
Page 25: 4-2: Jumper Setting
Jumper Setting 4-2: Jumper Setting BIOS_WP (BIOS Write Protect Function) BIOS_WP 1-2 close: Disable BIOS Write Protect Function (Default setting) 2-3 close: Enable BIOS Write Protection Function... - Page 26 GS-R127-RH Series Rack Mount Server BIOS_TBL (CMOS Lock Function) BIOS_TBL 1-2 close: Disable Top BlockFunction (Default setting) 2-3 close: Enable CMOS Top Block Lock...
- Page 27 Jumper Setting LAN1_DIS/LAN2_DIS (Lan1/Lan2 Enable/Disable Function) LAN1_DIS LAN2_DIS 1-2 close: Enable onboard LAN1/LAN2 device (Default setting) 2-3 close: Disable onboard Lan//Lan2 device...
- Page 28 GS-R127-RH Series Rack Mount Server JP19 (Clear CMOS Function) You may clear the CMOS data to restore its default values by this jumper. Default value doesn’t include the “Shunter” to prevent from improper use this jumper. To clear CMOS, temporarily short 2-3 pin. 1-2 close: Normal (Default setting) 2-3 close: Clear CMOS...
-
Page 29: Chapter 5 Bios Setup
Chapter 5 BIOS Setup BIOS Setup is an overview of the BIOS Setup Program. The program that allows users to modify the basic system configuration. This type of information is stored in battery-backed CMOS RAM so that it retains the Setup information when the power is turned off. ENTERING SETUP Power ON the computer and press <F2>... -
Page 30: Getting Help
GS-R127-RH Series Rack Mount Server GETTING HELP Main Menu The on-line description of the highlighted setup function is displayed at the bottom of the screen. Status Page Setup Menu / Option Page Setup Menu Press F1 to pop up a small help window that describes the appropriate keys to use and the possible selections for the highlighted item. -
Page 31: Main
Main Once you enter Phoenix BIOS Setup Utility, the Main Menu (Figure 1) will appear on the screen. Use arrow keys to select among the items and press <Enter> to accept or enter the sub-menu. System Time The time is calculated based on the 24-hour military time clock. Set the System Time (HH:MM:SS) System Date Set the System Date. - Page 32 GS-R127-RH Series Rack Mount Server IDE Primary Master, Slave / Secondary Master, Slave The category identifies the types of hard disk from drive C to F that has been installed in the computer. There are two types: auto type, and manual type. Manual type is user-definable; Auto type which will automatically detect HDD type.
-
Page 33: Advanced Processor Options
BIOS Setup Advanced Processor Options Advanced Processor Options: Dempsey CPU Advanced Processor Options: Woodcrest CPU... -
Page 34: Thermal Management
GS-R127-RH Series Rack Mount Server Advanced Processor Option This category includes the information of CPU Speed, Processor ID and Per Processor Core L2 Cache. And setup menu for Hyperthreading, Intel Virtualizational Technology, Thermal Management 2, C1 Enhanced Mode, Execute Disable Bit. Setup menu options will be variable depends on the type of CPU. - Page 35 PECI Interface The Platform Environmental Control Interface (PECI Interface) is designed specifically to convey system management information from the processor. It is a proprietary single wire bus between the processor and the chipset or other health monitoring device. Data from the Digital Thermal Sensors are processed and stored in a processor register (MSR) which is queried through the Platform Environment Control Interface (PECI).
-
Page 36: Advanced
GS-R127-RH Series Rack Mount Server Advanced About This Section: Advanced With this section, allowing user to configure your system for basic operation. User can change the processor options, chipset configuration, PCI configuration and chipset control. Figure 2: Advanced... -
Page 37: Memory Configuration
Memory Configuration Figure 2-1: Memory Configuration System Memory/Extended Memory/DIMM Group 1~8 Status These category is display-only which is determined by POST (Power On Self Test) of the BIOS. Memory Reset Select ‘Yes’, system will clear the memory error status. Save the changes and restart system. - Page 38 GS-R127-RH Series Rack Mount Server Extend RAM Step Enabled Enable test extended memroy process. Disabled Disable this function. (Default setting) Memory Branch Mode Sequential Memory will use sequential mode to save date. Interleave Memory will use Interleave mode for to distribute every one memory to save date.
-
Page 39: Pci Configuration
PCI Configuration Figure 2-2: PCI Configuration Embedded NIC LAN 1 Option ROM Scan Enabled Enable onboard LAN1 device and initialize device expansion ROM. (Default setting) Disabled Disable this function. LAN2 Option ROM Scan Enabled Enable onboard LAN2 device and initialize device expansion ROM. - Page 40 GS-R127-RH Series Rack Mount Server PCI Slot 1/2 Option ROM Enabled Enableing this item to initialize device expansion ROM. (Defualt setting) Disabled Disable this function. Adaptec 7901 Option ROM Enabled Enableing this item to initialize device expansion ROM. (Default setting) Disabled Disable this function.
-
Page 41: I/O Device Configuration
I/O Device Configuration Figure 2-3: I/O Device Configuration Serial Port A This allows users to configure serial prot A by using this option. Enabled Enable the configuration (Default setting) Disabled Disable the configuration. Base I/O Address/IRQ 3F8/IRQ4 Set IO address to 3F8. (Default setting) 2F8/IRQ3 Set IO address to 2F8. - Page 42 GS-R127-RH Series Rack Mount Server PS/2 Mouse Set this option ‘Enabled’ to allow BIOS support for a PS/2 - type mouse. Enabled ‘Enabled’ forces the PS/2 mouse port to be enabled regardless if a mouse is present. (Default setting) Disabled ‘Disabled’...
-
Page 43: Serial Ata
Parallel ATA Enabled Enable Parallel ATA. (Default setting) Disabled Disable the device. Serial ATA Enabled Disabled Native Mode Operation This option allows user to set the native mode for Serial ATA function. Auto Serial ATA SATA Controller Mode Option Compatible Enhanced Note: Pre-Win2000 operating system do not work in Enhanced mode. -
Page 44: Advanced Chipset Control
GS-R127-RH Series Rack Mount Server Advanced Chipset Control Figure 2-4: Advanced Chipset Control Enable Multimedia Timer Enable Multimedia Timer support. Disable this function. (Default setting) Crystal Beach Configure Enable Enable Configuration/Memory mapped accesses to the Crystal Beach Configuration sapce located in Device 8, Fn0, and Fn1. Enabled Crystal Beach Configure function. - Page 45 I/O Acceleration Technology It addresses all segments of the server I/O bottleneck problem using TCP/IP and without requiring any modification of existing or future applications. Enabled Enable I/O Acceleration Technology. (Default setting) Disabled Disable this function. Wake On Ring This option allow user to determine the action of the system power is off and the modem is ringing.
-
Page 46: Hardware Monitor
GS-R127-RH Series Rack Mount Server Hardware Monitor CPU1/2 Core1/2 Temperature/ Motherboard Temperature Display the current CPU1/CPU2 Core1/2 temperature, and Motherboard temperature. Voltage Monitor: +3.3V, +5V, VCOREA, VCOREB, VBAT Detect system's voltage status automatically. FAN Monitor: System 1/3/4/5/6/7/8/9/10 (RPM) Display the current System FAN 1/3/4/5/6/7/8/9/10 speed. This Menu will disappear when BMC module is populated. - Page 47 Boot -time Diagnostic When this item is enabled, system will shows Diagnostic status when system boot. Enabled Enable Boot-time Diagnostic. Disabled Disable this function. (Default setting) Reset Configuration Data Reset all configuration data. Do not make any changes. (Default setting) NumLock This option allows user to select power-on state for NumLock.
- Page 48 GS-R127-RH Series Rack Mount Server Multiprocessor Specification This option allows user to configure the multiprocessor(MP) specification revision level. Some operating system will require 1.1 for compatibility reasons. Support MPS Version 1.4 . (Default setting) Support M PS Version 1.1. Case Open Status This item shows the Case Open Status.
-
Page 49: Security
BIOS Setup Security Figure 3: Security Set Supervisor Password You can install and change this options for the setup menus. Type the password up to 6 characters in lengh and press <Enter>. The password typed now will clear any previously entered password from the CMOS memory. - Page 50 GS-R127-RH Series Rack Mount Server Set User Password You can only enter but do not have the right to change the options of the setup menus. When you select this function, the following message will appear at the center of the screen to assist you in creating a password.
-
Page 51: Server
BIOS Setup Server Figure 4: Server... -
Page 52: Server Management
GS-R127-RH Series Rack Mount Server Server Management Figure 4-1: Server Managerment Server Management This category allows user to view the server management features. Including information of BIOS Version and GBIA Module Version. All items in this menu cannot be modified in user’s mode. -
Page 53: Console Redirection
Console Redirection Figure 4-2: Console Redirection COM Port Address If this option is set to enabled, it will use a port on the motherboard. On-board COMA Use COMA as he COM port address. Disabled Disable this function. (Default setting) Baud Rate This option allows user to set the specified baud rate. -
Page 54: Flow Control
GS-R127-RH Series Rack Mount Server Flow Control This option provide user to enable the flow control function. None Not supported. XON/OFF Software control. CTS/RTS Hardware control. (Default setting) Continue C.R. after POST This option allows user to enable console redirection after O.S has loaded. Enable console redirection after O.S has loaded. -
Page 55: Fan Speed Control
Post Error Pause If this item is set to enabled, the system will wai for user intervention on critical POST errors. If this item is disabled, the system will boot with no intervention if possible. Enabled Enable Post Error Pause. (Default setting) Disabled Disable this function. - Page 56 GS-R127-RH Series Rack Mount Server Mini BMC Function Enabled Enable Mini BMC function. (Default value) Disabled Disable this function. This option will disappear and disable when BMC module is populated. Mini BMC SEL View Press [Enter] to view the Mini BMC SEL. This option will disappear and disable when BMC module is populated.
-
Page 57: Boot
Boot About This Section: Boot The “Boot” menu allows user to select among four possible types of boot devices listed using the up and down arrow keys. By applying <+> and <Space> key, you can promote devices and by using the <-> key, you can demote devices. Promotion or demotion of devices alerts the priority that the system uses to search for boot device on system power on. - Page 58 GS-R127-RH Series Rack Mount Server Boot Priority Order This field determines which type of device the system attempt to boot from after PhoenixBIOS Post completed. Specifies the boot sequence from the available devices. If the first device is not a bootable device, the system will seek for next available device. Key used to view ot configure devices: Up and Down arrows select a device.
-
Page 59: Exit
Exit About This Section: Exit Once you have changed all of the set values in the BIOS setup, you should save your chnages and exit BIOS setup program. Select “Exit” from the menu bar, to display the following sub-menu. Exit Saving Changes Exit Discarding Changes Load Settup Default Discard Change... -
Page 60: Exit Saving Changes
GS-R127-RH Series Rack Mount Server Exit Saving Changes This option allows user to exit system setup with saving the changes. Press <Enter> on this item to ask for the following confirmation message: Pressing ‘Y’ to store all the present setting values tha user made in this time into CMOS. Therefore, whenyou boot up your computer next time, the BIOS will re-configure your system according data in CMOS. -
Page 61: Exit Discarding Changes
BIOS Setup Exit Discarding Changes This option allows user to exit system setup without changing any previous settings values in CMOS. The previous selection remain in effect. This will exit the Setup Utility and restart your compuetr when selecting this option. Load Settup Default This option allows user to load default values for all setup items. -
Page 62: Discard Changes
GS-R127-RH Series Rack Mount Server Discard Changes This option allows user to load previos values from CMOS for all setup item. When you press <Enter> on this item, you will get a confirmation dialog box with a message as below:... -
Page 63: Save Changes
BIOS Setup Save Changes This option allows user to save setup dat ato CMOS. When you press <Enter> on this item, you will get a confirmation dialog box with a message as below: Press [Yes] to save setup daya to CMOS. -
Page 64: Chapter 6 Driver Installation
GS-R127-RH Series Rack Mount Server Revision History Chapter 6 Driver Installation Intel Chipset Software Installation Utility Insert the driver CD-title that came with your motherboard into your CD-ROM driver, the driver CD-title will auto start and show a series of Setup Wizard dialog boxes. If not, please double click the CD-ROM device icon in "My computer", and execute the setup.exe. - Page 65 Driver Installation 2. Setup Wizard 2. Click "Next". 3. License Aggremment 3. Click "Yes".
- Page 66 GS-R127-RH Series Rack Mount Server 4. Readme Information 4. Click "Next". 5. Installation Completed 5. Installation completed, Click "Finish" to restart computer.
-
Page 67: Ati Es1000 Vga Driver Installation
Driver Installation ATI ES1000 VGA Driver Installation Insert the driver CD-title that came with your motherboard into your CD-ROM driver, the driver CD-title will auto start and show a series of Setup Wizard dialog boxes. If not, please double click the CD-ROM device icon in "My computer", and execute the setup.exe. - Page 68 GS-R127-RH Series Rack Mount Server 2. Setup Wizard 2. Click "Next". 3. License Aggremment 3. Click "Yes".
- Page 69 Driver Installation 4. Installation Complete 4. Click "Finish".
-
Page 70: Intel Lan Driver Installation
GS-R127-RH Series Rack Mount Server Intel LAN Driver Installation Insert the driver CD-title that came with your motherboard into your CD-ROM driver, the driver CD-title will auto start and show a series of Setup Wizard dialog boxes. If not, please double click the CD-ROM device icon in "My computer", and execute the setup.exe. - Page 71 Driver Installation 2. Installation Wizard Welcom Window 2. Click "Install Driver" Item. 3. InstallShield Wizard Welcome Window 3. Click "Next".
- Page 72 GS-R127-RH Series Rack Mount Server 4. License Agreement 4. Select ‘I accept the term in the license agreement’ and click ‘Next’ 5. Select Setup Type 5. Click "Next". Step 5. User can select either Complete or Custom Setup Types. Complete setup type allows users to Installs drivers, Intel PROSet for Windows* Device Manager, and Advanced Networking Services.
- Page 73 Driver Installation 6. Ready to instll program 6. Click "Install" to start installation. 7. Installation Complete 7. Wizard Completed. Click "Finish".
-
Page 74: Aic-7901 Raid Driver Installation (Gs-R127V-Rh)
GS-R127-RH Series Rack Mount Server AIC-7901 RAID Driver Installation (GS-R127V-RH) Installation Procedures: 1. The CD auto run program starts, Double click on “AIC-7901 RAID Driver” to make a driver disk. 2. Select a folder refering to your operating system. 3. Insert a flopp disk in the floppy drive. Copy file and paste to the floppy disk. 4. - Page 75 Driver Installation 2. Select RIAD Driver Folder 3. Start to make a driver disk Insert a floppy disk, copy file to Insert a floppy disk, copy file and the floppy disk. paste to the floppy disk.
-
Page 76: Lsi-1068 Raid Driver Installation (Gs-R127H-Rh)
GS-R127-RH Series Rack Mount Server LSI-1068 RAID Driver Installation (GS-R127H-RH) Installation Procedures: 1. The CD auto run program starts, Double click on “LSI-1068 RAID Driver” to make a driver disk. 2. Select a folder refering to your operating system. 3. Insert a flopp disk in the floppy drive. Copy file and paste to the floppy disk. - Page 77 Driver Installation 2. Select RIAD Driver Folder 3. Start to make a driver disk Insert a floppy disk, copy file and paste to the floppy disk.
-
Page 78: Directx 9.0C Driver Installation
GS-R127-RH Series Rack Mount Server DirectX 9.0C Driver Installation Insert the driver CD-title that came with your motherboard into your CD-ROM driver, the driver CD-title will auto start and show the installation guide. If not, please double click the CD-ROM device icon in "My computer", and execute the setup.exe. - Page 79 Driver Installation 2. License Agreement 2. Select “I accept the agreement and click "Next" to process the installation. 3. Start Installaiton 3. Click “Next” to start the installation .
- Page 80 GS-R127-RH Series Rack Mount Server 4. Installaiton Wizard completed 4. Click "Finish". Installation complete.
-
Page 81: Chapter 7 Appendix
Chapter 7 Appendix 7-1: Acronyms Acronyms Meaning ACPI Advanced Configuration and Power Interface Advanced Power Management Accelerated Graphics Port Audio Modem Riser Advanced Communications Riser BIOS Boot Specification BIOS Basic Input / Output System Central Processing Unit CMOS Complementary Metal Oxide Semiconductor CRIMM Continuity RIMM Communication and Networking Riser... - Page 82 GS-R127-RH Series Rack Mount Server Acronyms Meaning Input / Output IOAPIC Input Output Advanced Programmable Input Controller Industry Standard Architecture Local Area Network Logical Block Addressing Light Emitting Diode Megahertz MIDI Musical Instrument Digital Interface Memory Translator Hub Memory Protocol Translator Network Interface Card Operating System Original Equipment Manufacturer...
Need help?
Do you have a question about the GS-R127H-RH and is the answer not in the manual?
Questions and answers