Table of Contents
Advertisement
Quick Links
Advertisement
Table of Contents

Subscribe to Our Youtube Channel
Related Manuals for Eclipse P327


Summary of Contents for Eclipse P327
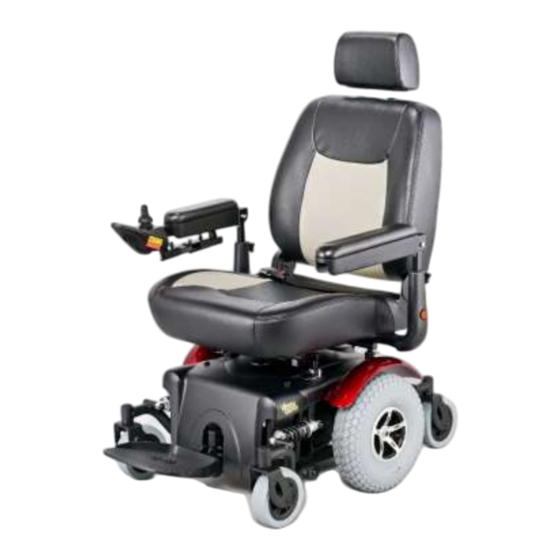
- Page 1 *Product may not be exactly as shown P327 Instruction Manual...
-
Page 2: Table Of Contents
Table of Contents Introduction ............................... 2 EMI Warning ..............................3 Safety Guidelines ............................. 5 Preparation for Use ............................6 Features................................7 Free Wheel Mode............................11 Disassembly ....................Error! Bookmark not defined. Batteries and Battery Charging ........................14 Controller Operation ............................16 Controller Flash Codes .......................... -
Page 3: Introduction
Introduction Congratulations on the purchase of your Eclipse Powerchair. Please carefully read this owner’s manual before attempting to use your Powerchair. After reading the manual if you still have any questions or concerns please feel free to contact your local authorized dealer. -
Page 4: Emi Warning
EMI Warning This vehicle has an immunity level of 30 v/m which should protect it from Electromagnetic Interference (EMI) from radio wave sources. The rapid development of electronics, especially in the area of communications, has saturated our environment with electromagnetic (radio) waves that are emitted by television, radio and communication signals. - Page 5 TURN OFF YOUR POWER WHEELCHAIR AS SOON AS POSSIBLE WHEN EXPERIENCING ANY OF THE FOLLOWING: Unintentional motions. Unintended of uncontrollable direction. Unexpected brake release. The FDA has written to the manufacturers of power wheelchairs, asking them to test their new products to be sure they provide a reasonable degree of immunity against EMI.
-
Page 6: Safety Guidelines
Safety Guidelines Your Powerchair is a powerful electric device. Please read the following notes carefully to ensure safety at all times. Always make certain your Powerchair is in full working order before use. Do not exceed any incline over 6 / 10% Do not reverse while driving up any incline or hill. -
Page 7: Preparation For Use
Powerchair. Do not turn on or use hand-held personal communications devices such as radios or cellular phones. PLEASE GIVE CONSIDERATION TO PEDISTRIANS WHEN OPERATING YOUR ECLIPSE POWERCHAIR. Preparation for Use Your Powerchair has many features designed to provide you with maximum comfort, and will be ready for immediate use upon assembly and delivery by your dealer. -
Page 8: Features
Features WARNING: All adjustments must not be made while user is seated on Powerchair. All other adjustments should be carried out while seated in your Powerchair. Footrest Angle Adjustment Flip-up the footplate for easy access to bolt. With an Allen wrench, simple turn the bolt clockwise to increase the angle or counter-clockwise to decrease the angle. - Page 9 Seat Removal 1. Disconnect the controller connector from the joystick. 2. Turn the backrest angle adjustment lever up and tilt the backrest forward. 3. At the rear of the seat release the lock holding the seat and carefully lift the rear part of the seat and remove the seat vertically.
- Page 10 Seat Height Adjustment Take off the seat. Remove the retaining clips. Pull the trapeze bar out as far as the required height until the correct hole appears in the seat tubes. Insert the pins back into the correct height hole on all four tubes. Reinstall the seat.
- Page 11 Joystick Controller Conversion You can move the joy stock controller so the operator can use it with either their left or right hand. Beneath the armrests there is a hand knob (same know to adjust the armrests). Remove the hand knob completely and slide off the armrests.
-
Page 12: Free Wheel Mode
Free Wheel Mode The powerchair has a manual freewheel model lever on each motor. Manual freewheel levers enable you to disengage the drive motors from the gearboxes and maneuver the chair manually. WARNING: DO NOT USE THE POWERCHAIR WHILE THE DRIVE MOTORS ARE DISENGAGED! DO NOT DISENGAGE THE DRIVE MOTORS WHEN THE POWERCHAIR IS ON AN INCLINE, AS THE UNITCOULD ROLLON ITS OWN, CAUSING INJURY! To engage or disengage the drive motors:... -
Page 13: Disassembly
Disassembly DISASSEMBLY INSTRUCTIONS WARNING: CAUTION IS ADVISED WHEN DISASSAMBLING AND LIFTING ITEMS. YOU MUST ENSURE THAT THE PERSON UNDERTAKING THIS PROCEDURE IS PHYSICALLY CAPABLE OF LIFTING THE WEIGHT INVOLVED. Seat Removal 1. Disconnect the controller connector from the joystick. 2. Turn the backrest angle adjustment lever up and tilt the backrest forward. 3. - Page 14 4. To install the seat, insert the from seat hook into the cross bar. Carefully lower the seat down towards rear and lock into position. Before operating make sure the seat is fully locked into position. Battery Removal Unscrew the four plastic lock pins then remove top shroud. Disconnect the battery cables.
-
Page 15: Batteries And Battery Charging
PLEASE NOTE: Each carrier reserves the right to carry what may be termed “HAZARDOUS CARGO” Eclipse Medical Inc. cannot be responsible for their final decision. WARNING! Battery posts, terminals and related accessories contain lead and lead compounds. - Page 16 Battery Break-In To break in your new powerchair batteries for maximum efficiency: Fully recharge any new battery prior to initial+ use. This will bring the battery up to about 90% of its peak performance level. Drive your powerchair for a small amount of time while you become accustomed to the controls.
-
Page 17: Controller Operation
Controller Operation Controller Diagram Horn Battery Gauge Decrease Speed Attendant Control LED On / Off Joystick Speedometer Increase Speed Service Indicator LED Shark Bus Socket Turning Controller ON / OFF Turn the Power ON Press the On/Off button. All battery gauge indicators will light briefly. Either the current battery charge or lock mode will then be indicated. - Page 18 Turn the Power OFF Press the On/Off button. All LED’s will turn off. Using the Horn Press the Horn button. The horn will sound for as long as the button is pressed. Battery Gauge The battery gauge is used to indicate power on and provides an estimate of remaining battery capacity.
- Page 19 Press and release the “SLOWER” button to decrease the max speed of the chair by 20%. Press and hold the “SLOWER” button to decrease the max speed of the chair in fine steps*. Press and release the “FASTER” button to increase the max speed of the chair by 20%.
- Page 20 Less LED’s imply a All LED’s ON steady Power is ON reduced battery charge Left RED LED is Battery charge is Batteries should be flashing almost empty recharged NOW. To UNLOCK, Press LED’s flash Right to Controller is being HORN button 2X Left LOCKED within 10 SEC.
-
Page 21: Controller Flash Codes
Controller Flash Codes If a fault condition exists, the Fault Indicator LED shows a Flash Code. Flash Code A flash code is a specific number of short flashes, followed by a pause. If the fault is a serious fault that prevents the chair from driving, additionally the Battery Gauge shows a 'Drive Inhibit' indication. -
Page 22: Dynamic Controller Operation
Flash Fault Source Meaning Code The parkbrake has been released manually. • Enable the parkbrake, and then turn the Joystick off and on. Parkbrake 1 (Right) The parkbrake is not connected to the Controller, or there is a short-circuit in the parkbrake connection. Parkbrake 2 (Left) •... -
Page 23: Inspection And Maintenance
Inspection and Maintenance Your Powerchair, like any other electro-mechanical machine, will benefit from regular servicing by your Eclipse Medical dealer. You, too, can help keep your Powerchair in tiptop condition by following simple guide to home maintenance. CAUTION: Only qualified technical people should carry out service work. - Page 24 These batteries will probably have a longer life (12 to 24 months or longer). When you need to replace the batteries, always insist on the model fitted as standard equipment to your Powerchair. If in doubt, consult your local Eclipse Medical authorized dealer.
-
Page 25: Warranty
God. This warranty does to cover neglect or abuse, use of parts or changes not authorized by Eclipse Medical Inc., or exceeding weight limit specifications as outlined in your Product User Manual. -
Page 26: Specifications P326A
Specifications P327 Eclipse P327 Dimensions: L x W x H cm (in) 90 (35.4) x 69 (27.1) x 127 (50) Total Weight w/o Batteries kg (lb.) 106 (233) Battery _V_Ah x Pcs 12V / 55 AH x 2 Charger Off Board 5 Amp 2 x 6”... -
Page 27: Options
REAR TOTE Rear foldable storage bag OXYHOLDER Oxygen Holder WALKHOLD Walker Holder ADAPTER Adapter for second accessory on Canopy Eclipse Medical Inc. 110 – 725 Eaton Way Delta, B.C. V3M 6S5 Canada Tel. (604) 540-0114 Fax. (604) 540-0172 www.eclipsemedical.com Eclipse Medical Inc.
Need help?
Do you have a question about the P327 and is the answer not in the manual?
Questions and answers