Table of Contents
Advertisement
WEEE Warning Message
Symbol for Separate Collection in European Countries
This symbol indicates that this product is to be collected
separately.
The following apply only to users in European countries:
This product is designated for separate collection at an
appropriate collection point. Do not dispose of as
household waste.
For more information, contact the retailer or the local
authorities in charge of waste management.
FCC STATEMENT
This device complies with Part 15 of the FCC Rules. Operation is subject to the
following two conditions:
(1).
This device may not cause harmful interference, and
(2).
This device must accept any interference received, including interference that
may cause undesired operation.
Note:
This equipment has been tested and found to comply with the limits for Class B digital
devices, pursuant to Part 15 of the FCC rules. These limits are designed to provide
reasonable protection against harmful interference in a residential installation. This
equipment generates uses and can radiate radio frequency energy and, if not installed
and used in accordance with the instructions, may cause harmful interference to radio
communications.
However, there is no guarantee that interference will not occur in a particular
installation. If this equipment does cause harmful interference to radio or television
reception, which can be determined by turning the equipment off and on, the user is
encouraged to try to correct the interference by one or more of the following
measures:
Reorient or relocate the receiving antenna
Increase the separation between the equipment and receiver
Connect the equipment into an outlet on a circuit different from that to which the
receiver is connected
-1-
English
Advertisement
Table of Contents

Related Manuals for Genius G-Shot HD520


Summary of Contents for Genius G-Shot HD520
-
Page 1: Fcc Statement
WEEE Warning Message Symbol for Separate Collection in European Countries This symbol indicates that this product is to be collected separately. The following apply only to users in European countries: This product is designated for separate collection at an appropriate collection point. Do not dispose of as household waste. -
Page 2: Product Information
Use of shielded cable is required to comply with Class B limits in Subpart B of Part 15 of the FCC rules. Do not make any changes or modifications to the equipment unless otherwise specified in the manual. If such changes or modifications should be made, you could be required to stop operation of the equipment. - Page 3 English Do not disassemble, change or repair the camera. This might cause fire or electric shock. For repair or internal inspection, ask retailer where you purchased it. Do not use the camera in areas near water. This might cause fire or electric shock. Take special care during rain, snow, on the beach, or near the shore.
- Page 4 Before you move the camera, disconnect cords and cables. Failure to do this might damage cords and cables, resulting in fire and electric shock. Notes on Battery Usage When you use the battery, carefully read and strictly observe the Safety Instructions and the notes described below: Use only the specified battery Avoid using the battery in extremely cold environments as low temperatures can...
-
Page 5: Table Of Contents
CONTENTS GETTING TO KNOW YOUR CAMERA ___________________ 8 ____________________________________________ 8 VERVIEW TANDARD CCESSORIES ___________________________________________ 9 RONT AD ILLUSTRATION ___________________________________________ 10 ____________________________________________ 10 ________________________________________ 10 OTTOM GETTING STARTED __________________________________ 11 NSTALLING THE ATTERY NSERTING AND EMOVING AN RECORD MODE ______________________________________ 12 _____________________________________ 12 UTTON UNCTION... - Page 6 Video Size___________________________________________ 16 Possible recording time / sec (video clip) __________________ 16 Possible number of shots (still image)_____________________ 16 IMAGE SIZE ________________________________________ 17 Select Image size for the image resolution. _________________ 17 QUALITY___________________________________________ 17 METERING _________________________________________ 17 EFFECT ___________________________________________ 18 EIS ________________________________________________ 18 SET UP ____________________________________________ 18 MODE/PLAYBACK ___________________________________ 20...
- Page 7 English ARCSOFT MEDIAIMPRESSION ________________________ 28 ________________ 36 ONNECTING AMERA TO A OMPUTER Web Camera Mode ___________________________________ 36 SPECIFICATIONS ____________________________________ 37 TROUBLESHOOTING_________________________________ 38...
-
Page 8: Getting To Know Your Camera
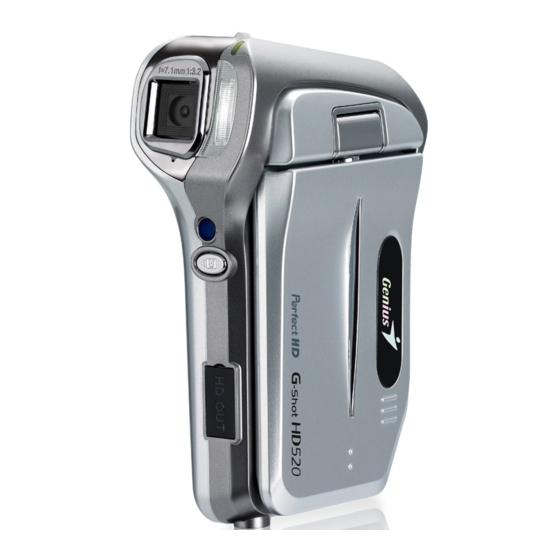
Getting to Know Your Camera Overview Thank you for purchasing the new digital video camera! This multi-function digital video camera with a 5 Mega Pixel CMOS sensor can take H.264 movies which videos can be taken with in certain amount of memory. High quality images with up to 11 mega pixels can also delivered smoothly. -
Page 9: Front View
English Warranty Card Front View Lens Flash Microphone Movie Shutter Button LCD Panel HDMI Port KeyPad illustration Menu Button Camera Button Mode/Playback Button Delete/Exposure Function Button AV/Earphone Button USB 2.0 port/ Adaptor... -
Page 10: Side View
English Side View Tele/Wide Speaker Flash Battery cover Memory card slot Top View Macro/Landscape Bottom View Tripod Slot -10-... -
Page 11: Getting Started
Getting Started Installing the Battery Before using the camera, you must insert the NP60 rechargeable Li-ion Battery. 1. Follow the arrow direction and slide it outwards to remove the battery cover. 2. Insert the batteries according to the correct polarity marks ( + or -). 3. -
Page 12: Record Mode
Record Mode Button Function Power Button: Press down for one second to turn on or turn off the camera. Movie Shutter Button: 1. Press Start to take a movie, or record voice. 2. To stop recording, press it again. OK Button: Used to move cursor to sub menu or confirm action. -
Page 13: Lcd Monitor Information
Use this mode when taking images in a place where flash photography is prohibited, or when the subject is distant (beyond the range of the flash). the shutter speed at proper speed. Macro switch: Switch between Macro Mode and Normal Mode. -
Page 14: H.264 Movie Recording
English H.264 Movie Recording Press the Movie Shutter button ( ) to start recording. When a movie is recording, a time indicator will display on the LCD monitor. To stop recording, press the Movie Shutter Button ( ) again. Picture Recording Press the Picture Shutter Button ( ) to take a picture. -
Page 15: Menu Mode
MENU MODE MODE SET VIDEO SIZE AUTO HD1280X PROGRAM 720) DAWN TV (640 x AUCTION 480) EXIT Web (320 x 240) EXIT SHOOTING EFFECT SINGLE Normal CONTINUOUS EXIT Sepia Negative EXIT IMAGE SIZE QUALITY HIGH (11M) S.FINE STANDARD FINE (5M) NORMAL LOW (VGA) EXIT... -
Page 16: Menu Mode
Menu Mode Mode set 1. Press the Menu button to open the menu setting, 2. Use the OK button up and down to move to the sub menu, and use press it right and left to move between main menus. 3. -
Page 17: Image Size
IMAGE SIZE Select Image size for the image resolution. HIGH (11M) STANDARD (5M) LOW (VGA) EXIT QUALITY Select Quality to set the appropriate compression ratio for the captured and recorded images. S.FINE FINE NORMAL EXIT METERING Metering gives you more superior exposure conditions and a brighter picture. -
Page 18: Effect
EFFECT Normal Sepia Negative EXIT OSD INF. BASIC DETAIL GRID 3X3 GRID 6X4 EXIT EIS can only be used in Movie Recording. If you prefer to record a movie not using EIS, turn it OFF to cancel the setting. EXIT SET UP Enter SET UP mode by pressing the Menu Button and pressing the OK button to select SETUP. - Page 19 DATE & TIME Select the type of date and time. LANGUAGE 1. English 2. Japanese 3. French 4. German 5. Spanish FILE This setting allows you to name the files. If RESET is selected, the next file name will be set from 0001 even after formatting, deleting all, or inserting a new memory card.
-
Page 20: Mode/Playback
Mode/Playback Playback Mode Press the Mode/Playback Button, then press the OK button to go to last still image, movie clips, or voice clip that are stored in the memory. 1. Select an image that you want to playback by moving the OK left or right. -
Page 21: Pmp Mode
PMP Mode Under this mode you can view all the still images and movie clips recorded by this camera or other cameras or other devices (all files must be converted by ArcSoft MediaImpression included in the CD-ROM.) 1. File name of the selected file 2.Back to the previous page 3.Folder 4.Movie Clip... -
Page 22: Trimming
Trimming 1. Select an image. 2. Slide the T Button ( ) or W Button ( ) to select the size of the enlargement. 3. Press OK button and select “TRIM” and press the OK Button again to confirm the request. 4. -
Page 23: Delete
Delete You can delete the selected image or all images. Copy to Card Copy the images stored in the internal flash memory to the memory card. Resize Resize a still image. 1. Select the image and select Resize. 2. Press OK button and select RESIZE. 3. -
Page 24: Delete Button
Delete Button Press button to delete the photo you want to cancel under playback mode. To change White Balance / Exposure Value setting: 1. In menu mode, select MODE SET and move to PROGRAM. 2. Press delete, and press OK to move UP/DOWN to choose white balance or Exposure Value. -
Page 25: Viewing Movie On Pc
Viewing Movie on PC When playing a movie for the first time, Video Codec should be installed in the PC. To do this: Insert the CD-ROM into the computer’s CD-ROM drive. Click “Arcsoft Media Impression” and follow the on-screen instructions to complete the installation. System Requirement Windows Windows 2000/XP/Vista,... -
Page 26: Viewing Pictures And Movies On A Tv
English Viewing Pictures and Movies on a TV Connecting to a high-definition TV 1. Connect HDMI cable to a HD TV 2. Set video input source of a TV to “HDMI” option. 3. The steps for viewing stored pictures and movie on a TV are exactly the same as for viewing them on the LCD monitor. - Page 27 Connecting to a non-high-definition 16:9 (Wide) or 4:3 TV Connect one end of the AV cable to your camera’s AV out port. Connect the other end of the cable to a television. The option menu of Earphone/TV pops out on the LCD Screen. Choose TV option and press OK button to validate the setting.
-
Page 28: Arcsoft Mediaimpression
English ArcSoft MediaImpression 1. Install ArcSoft MediaImpression 2. Click Start Select Programs ArcSoft MediaImpression 3. Media Impression main Screen will appear on your desktop 4. Select the Video file you want to play -28-... - Page 29 English Uploading Video Files to YouTube The bundled software CD contains Arcsoft MediaImpression which features uploading the recorded videos to YouTube. It will help you can share them with your family and friends on YouTube website. Also bundled Youtube-Link software inside camera which allows uploading your favorite video to Youtube web site easily.
- Page 30 English 5. Select the video file you want to upload and click [ Upload to YouTube] option at the bottom menu. -30-...
- Page 31 English 6. If this is your first using this function, please follow the instruction on YouTube Setting Panel. -31-...
- Page 32 English 7.Go to http://www.youtube.com/login, then Log onto your YouTube account. (If you do not have YouTube account, sign up here first.) -32-...
- Page 33 English 8. After you log onto your YouTube account, Click [ Get Authorization ] button below. -33-...
- Page 34 English Then, Click [Allow] Button shown on YouTube website. -34-...
- Page 35 English 9. Click [Save] Button to upload the video. -35-...
-
Page 36: Connecting Your Camera To A Computer
English Connecting Your Camera to a Computer You can transfer pictures, movies or voice recordings stored on your camera to a computer and send them in emails to friends or post them on websites. To do this you should: 1. Connect the computer and camera with the supplied mini USB cable. 2. -
Page 37: Specifications
Specifications Item Image Sensor Lens Focus Range LCD monitor Digital Zoom Shutter Type Storage Media Image Resolution Movie Resolution White Balance Exposure Self-Timer Flash File Format Image Play Interface TV Output Description 5 Mega Pixel CMOS Sensor F3.2 (f=7.0mm) Macro: 20cm; Normal: 200cm~infinite 2.5”... -
Page 38: Troubleshooting
Battery type Dimensions Weight Troubleshooting Refer to the symptoms and measures listed below before sending the digital video camera for repairs. If the problem persists, contact your local reseller or service OK. Power Supply Cause Symptom The power does not The battery is not loaded. - Page 39 The battery or digital video camera feels warm. Shooting Symptom Cause The battery is Even if I press the running low. shutter button, the The power is not on. digital video camera The digital video does not shoot. camera is not in shooting mode.
- Page 40 Symptom Cause The flash does not The flash is set to fire. The flash cannot flash off. recharge. Symptom Even though the flash fired, the image is dark. The image is too dark. The image is too bright. The image lacks natural color.
-
Page 41: Other Problems
Symptom Cannot format a memory card. The playback image is dark though I used the flash. Other Problems Symptom Cannot load the memory card. Even when the digital video camera’s buttons are pressed, it does not operate. The date and time is wrong.
Need help?
Do you have a question about the G-Shot HD520 and is the answer not in the manual?
Questions and answers