Philips FWM996 User Manual
Mp3-cd
Hide thumbs
Also See for FWM996:
- Service manual (37 pages) ,
- Specifications (2 pages) ,
- User manual (34 pages)

Related Manuals for Philips FWM996


Summary of Contents for Philips FWM996
- Page 1 FWM996 MP3-CD Mini Hi-Fi System Register your product and get support at www.philips.com/welcome...
- Page 2 LEA CUIDADOSAMENTE ESTE INSTRUCTIVO ANTES DE USAR SU APARATO. AVISO IMPORTANTE Philips Mexicana, S.A. de C.V. no se hace responsable por daños o desperfectos causados por: – Maltrato, descuido o mal uso, presencia de insectos o roedores (cucarachas, ratones etc.).
- Page 3 § ∞ ≤ £ ™ ¡ &...
- Page 4 CAUTION Use of controls or adjustments or performance of procedures other than herein may result in hazardous radiation exposure or other unsafe operation. (for tuner installation)
- Page 5 Index English ------------------------------------------------ 6...
-
Page 6: Table Of Contents
Contents General Information Radio Reception Supplied accessories ..........7 Tuning to radio stations ........19 Environmental information ........ 7 Programming radio stations ...... 19~20 Automatic programming Safety information ..........7 Manual programming Tuning to preset radio stations ....... 20 Preparations Changing tuning grid .......... -
Page 7: General Information
Where the MAINS plug or an appliance coupler to Philips! is used as the disconnet device, the disconnet device shall remain readily operable. To fully benefit from the support that Philips ● Place the system in a location with adequate offers, register your product at www.philips.com/ ventilation to prevent internal heat build-up in welcome. -
Page 8: Preparations
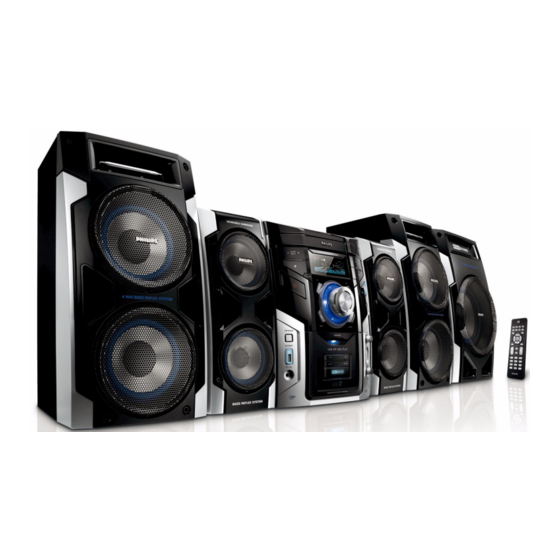
Preparations FM antenna AM antenna Front Front speaker speaker (right) (left) AC power cord AC power cord Rear speaker Rear speaker (right) (left) Subwoofer To avoid overheating of the system, a safety Rear connections circuit has been built in. Therefore, your system may switch to Standby mode The type plate is located at the rear of the automatically under extreme conditions. -
Page 9: Speakers Connection
Preparations ● Position the antenna as far as possible from a TV, Optional connection VCR or other radiation source. The optional equipment and connecting cords are not supplied. Refer to the operating FM Antenna instructions of the connected equipment for details. -
Page 10: Inserting Batteries Into The Remote
Preparations Using MP3 LINK (3.5 mm jack ) ● Use a MP3 link cable (supplied) to connect MP3 LINK jack of the main unit (3.5 mm, located on the front panel) to an AUDIO OUT or headphone jack on an external equipment (such as CD player, or VCR). -
Page 11: Controls On The System
Controls (illustrations on page 3) Controls on the system LIGHT – to select different lighting effects for some Disc tray buttons on the main unit (Light 1/2/3/4/Off). Display screen – to view the current status of the system. USB RECORD –... -
Page 12: Controls On Remote Control
Controls Controls on remote control – to activate or deactivate the optimal mix of various sound features. – to switch the system on or to standby mode. VOL +/- Source selection – to select the following: – to increase or decrease the volume. CD 1/2/3 DBB/IS (Incrediable Surround) –... -
Page 13: Basic Functions
Basic Functions IMPORTANT! To exit without storing the Plug and Play ● Press Ç. Before you operate the system, complete ➜ If you do not complete the Plug and Play the preparation procedures. installation, the function will be restarted when you next turn on the main supply again. -
Page 14: Switching The System To Standby Mode
Basic Functions Switching the system to standby Karaoke mode Connect a microphone (not supplied) to the system allowing you to sing along with the music In any other source mode source. ● Press 2. ➜ The clock will appear on the display when the Connect a microphone to the MIC 1/2 jack. -
Page 15: Sound Control
Basic Functions Light mode demonstration DSC (Digital Sound Control) ● Press once or repeatedly LIGHT on the set to The DSC feature enables you to enjoy special demonstrate different lighting styles. sound effects that have preset equaliser settings, ● providing the best music reproduction. First press ->... -
Page 16: Cd/Mp3-Cd/Wma Operations
CD/MP3-CD/WMA Operations IMPORTANT! About MP3 disc – This system is designed for regular discs. Supported formats Therefore, do not use any accessories such – ISO9660, Joliet, Multisession as disc stabiliser rings or disc treatment – Number of albums/ folders: maximum 99 sheets, etc., as offered on the market, –... -
Page 17: Playing Discs
CD/MP3-CD/WMA Operations Text display during playback Press OPEN•CLOSE to close the disc tray. ➜ READING is displayed as the CD player scans In CD mode the contents of a disc, and then the total number ● Press DISPLAY to show the current track of tracks and playing time (or the total number number and remaining playback time. -
Page 18: Different Play Modes: Shuffle And Repeat
CD/MP3-CD/WMA Operations Press PROG/CLOCK (or PROGRAM on Different play modes: SHUFFLE the remote control) to store the track. and REPEAT To end programming, press 9 once. You can select and change the various play ➜ stays and the programme mode PROG modes before or during playback. -
Page 19: Radio Reception
Radio Reception Tuning to radio stations Programming radio stations You can store up to a total of 40 radio stations Press TUNER. ➜ in the memory. "FM" or “AM” is displayed. A few seconds later, the current radio frequency will appear on the Automatic programming display. -
Page 20: Manual Programming
Radio Reception Changing tuning grid Manual programming Tune to your desired radio station (refer to In some countries, the frequency step between “Tuning to radio stations”). adjacent channels is 9 kHz (10 kHz in some areas). The preset frequency step in the factory is Press PROG/CLOCK (or PROGRAM on 10 kHz. -
Page 21: Usb
Supported formats: Using a USB mass storage device – USB or memory file format FAT12, FAT16, By connecting a USB mass storage device or SD/ FAT32 (sector size: 512 bytes) MMC memory card to the Hi-Fi system, you can – MP3 bit rate (data rate): 32-320 Kbps and enjoy the device's or card’s stored music through variable bit rate the powerful speakers of Hi-Fi system. - Page 22 How to transfer music files from PC to a Notes: USB mass storage device – If you have not organized MP3/WMA files into any albums on your disc, an album "01" will be By dragging and dropping music files, you can automatically assigned for all those files.
-
Page 23: Ripping Function
Notes: Ripping function – This function can also be combined with the This function enables you to record music to a programme function. In this case, selection of connected USB mass storage device from any "RIPPING ALL" in DISC mode will record all other source (i.e., DISC, TUNER or AUX) programmed tracks from the starting point to the without interrupting your enjoyment of the... -
Page 24: Tuner Record Timer Setting
Notes: Tuner record timer setting – It is impossible to set a sleep timer more than This function enables you to set a timer for 12 hours later than the start timer. starting and stopping ripping from the tuner – During timer setting, if no button is pressed source automatically. -
Page 25: External Sources
External Sources Listening to external sources Using AUX IN (white/red jacks) Use the audio cables (white/red, not supplied) to connect AUX IN (L/R) jacks of the main unit (located on the back panel ) to the corresponding AUDIO OUT jacks on an external device (such as TV or VCR). -
Page 26: Clock/Timer
Clock/Timer Clock setting Timer setting The system can switch on to DISC, TUNER or The clock can be set in either 12-hour or 24-hour mode ("AM 12:00" or "00:00" for USB mode automatically at a preset time, serving as an alarm to wake you up. example). -
Page 27: To Deactivate The Timer
Clock/Timer Press S / T (or TITLE +/- (í / ë) on Sleep timer setting the remote control ) repeatedly to set the The sleep timer enables the system to switch to minute for the timer to start. standby mode automatically at a preset time. Press SLEEP/TIMER on the remote control to In active mode, press SLEEP/TIMER on the store the start time. -
Page 28: Maintenance
Do not use a solution accumulate at the disc lens. To ensure good containing alcohol, spirits, ammonia or abrasives. playback quality, clean the disc lens with Philips CD Lens Cleaner or any commercially available cleaner. Follow the instructions supplied with Cleaning Discs ●... -
Page 29: Specifications
Specifications AMPLIFIER REAR SPEAKERS RMS output power System full range satellite Impedance ............... 3 Ω Total output power ....... 800 W RMS Signal-to-noise ratio ......67 dB A (IEC) Speaker driver ........... 4” + 4” (fake) Frequency response ......150Hz-16KHz Frequency response ...... -
Page 30: Troubleshooting
Do not open the system as there is a risk of electric shock. If a fault occurs, first check the points listed below before taking the system for repair. If you are unable to remedy a problem by following these hints, consult your dealer or Philips for help. - Page 31 Troubleshooting Problem Solution ✔ Select the source (DISC or TUNER, for example) The remote control does not function before pressing the function button (ÉÅ ,í,ë). properly. ✔ Reduce the distance between the remote control and the system. ✔ Insert the batteries with their polarities (+/–...
- Page 36 Meet Philips at the Internet http://www.philips.com FWM996 CLASS 1 LASER PRODUCT Printed in China PDCC-ZYL-0823...
Need help?
Do you have a question about the FWM996 and is the answer not in the manual?
Questions and answers