Table of Contents

Related Manuals for Russell Hobbs RHBU60FRIDGE-N


Summary of Contents for Russell Hobbs RHBU60FRIDGE-N
- Page 1 Built Under 60cm Wide Fridge Instruction Manual Model number(s): RHBU60FRIDGE-N For Customer Services & Spare Parts please call 0345 208 8750 or visit us at https://mda.russellhobbs.com IMPORTANT: RETAIN FOR FUTURE REFERENCE...
-
Page 2: Table Of Contents
Contents Safety Instructions ………………………………………. Electrical Safety ………………………………………. Transportation & Handling ………………………………………. Installing & Switching on your Appliance ………………………………………. Before Switching On ………………………………………. Product Overview ………………………………………. Unit & Spare Parts ………………………………………. Usage ………………………………………. 9-10 Temperature Selection ………………………………………. 9-10 Installation ………………………………………. 11 - 17 Fitting the Plinth ………………………………………. -
Page 3: Safety Instructions
Safety Instructions Important note: Please read this booklet before installing and switching on this appliance. The manufacturer assumes no responsibility for incorrect installation and usage as described in this booklet. Warning: When positioning the appliance, ensure the supply cord is not trapped or damaged. - Page 4 • Do not pull, twist or damage the power cable. • Do not plug-in or un-plug the appliance with wet hands to prevent electrical shock. • This appliance can be used by children aged from 8 years and above and persons with reduced physical, sensory or mental capabilities or lack of experience and knowledge if they have been given supervision or instruction concerning use of the appliance in a safe way and understand the hazards...
-
Page 5: Electrical Safety
• One-, two- and three -star compartments (if they are presented in the appliance) are not suitable for the freezing of fresh food. • If the appliance is left empty for long periods, switch off, defrost, clean, dry and leave the door open to prevent mount developing within the appliance. -
Page 6: Installing & Switching On Your Appliance
Installing and Switching on Your Appliance • Operating voltage for your appliance is 220-240V at 50Hz. • Before plugging in the power supply, ensure that the voltage on the rating label corresponds to the working voltage of your electrical system in your home. •... -
Page 7: Before Switching On
Before Switching On • Before using your appliance, add a teaspoon of bicarbonate of soda to warm water and with a damp cloth wipe down all parts of the new appliance, then repeat the process with a clean damp cloth and dry. (ensure the appliance is not connected to the power when performing this task). -
Page 8: Product Overview
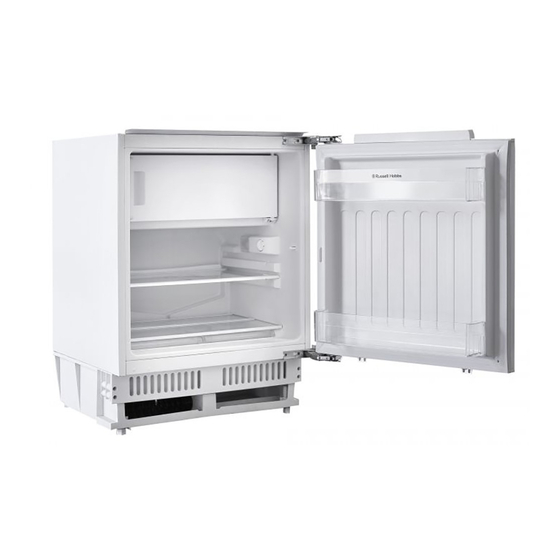
Product Overview Freezer compartment Adjustable feet Light & thermostat Door racks Adjustable shelf 1 x egg tray, 1 x ice cube tray, 1 x Drainage hole ice scrapper & drainage hole plug Non-adjustable shelf Installation accessories Crispers (under shelf) Unit Parts & Spare Parts Before installation, check that all parts detailed in the product overview are present. -
Page 9: Usage
Usage Allow to stand for a minimum of 3 hours before plugging in to the mains The temperature in the appliance is controlled by the temperature control dial or thermostat located inside the fridge. Rotate the control dial up or down to regulate the temperature inside the fridge. - Page 10 Usage Allow to stand for a minimum of 3 hours before plugging in to the mains Note: The standard operating temperature for the fridge compartment should be between 0ºC and 4ºC and the standard operating temperature for the freezer compartment should be between -18°C and -25°C. Note: The temperature of the freshly stored food and how often the door is opened affects the temperature in the refrigerator compartment.
-
Page 11: Installation
Installation • This appliance can be installed as a built under unit only. The clearances shown in the below drawing must be followed. • Avoid damaging the product during installation, positioning of the appliance requires two people in order to avoid injuries or damage to the appliance. •... - Page 12 Installation The aperture size has to be a minimum of (H)825 x (W)600 x (D)550mm. Adjust the height of the appliance by adjusting the 4 adjustable feet (2 at the rear and 2 at the front). The height can be adjust from 820mm to 870mm. If needed a spanner can be used to adjust the feet.
- Page 13 Installation Carefully push the appliance into the housing, ensuring that the cabinet door is able to fully close. If required the feet should be further adjusted. To fit the cabinet door you will need to remove the decorative cover from the fixing bracket.
- Page 14 Installation With the door appliance closed and the appliance situated in the aperture, you will need to: Measurement A – Measure from the underside of the kitchen unit to the bottom of the bottom of the fixing bracket. Measurement B - measure from the underside of the kitchen unit to the top of a kitchen cabinet door on a adjacent kitchen unit/door Remove the 2 screws that fix the fixing bracket to the appliance door and carefully remove the fixing bracket.
- Page 15 Installation Subtract measurement A from measurement B and put the fixing bracket in place using this measurement from the top of the cabinet door (you must ensure it is on the back of the cabinet door). The 2 holes in the centre of the fixing bracket must be centralised on the vertical mark put on the back of the cabinet door in the previous step.
- Page 16 Installation Align the cabinet door to the adjacent cabinets by using the horizontal adjustment holes on the fixing bracket and the height adjustment screw on the fixing bracket. To adjust the height you will have to loosen the locking nut and adjust the screw with a flat headed screwdriver.
- Page 17 Installation Refit the decorative cover that was removed in the first step on to the fixing bracket. Ensure the cabinet door and the appliance door can open and close fully, before finally tightening all screws. Now fix the appliance to the worktop with screws. To do this you may need to drill holes in the underside of the worktop, if so drill Ø...
-
Page 18: Fitting The Plinth
Fitting the plinth The ventilation grill the appliance has been manufactured with must used, if it isn’t or modified then the operation of the appliance could be affected. The plinth must also be positioned at least 25mm from the appliance door. If the height of the appliance is 820mm then a plinth that is 90mm in height can be fitted without any modification. -
Page 19: Door Reversal
Door Reversal To reverse the door you will need to tilt the appliance backward to access the lower hinge which holds screws. Do not tilt the appliance more than 45 degrees and do not lay the appliance flat on its side. For your own safety, a minimum of 2 people should lift or tilt this product. - Page 20 Door Reversal 3. Support the door at the bottom and open the hinges away from the appliance door. Carefully lift the appliance door away, ensuring you don’t damage the hinges or the door. 4. Remove the 4 screw hole covers on the cabinet of the appliance at the top and the bottom on the opposite side of where the hinges are currently fixed.
- Page 21 Door Reversal 6. Flip over the top hinge (by 180°) and fix it in place on the diagonally opposite corner of the appliance cabinet. Flip 180° 7. Repeat the previous step with the bottom hinge and then replace the screw hole covers on the opposite side.
-
Page 22: Replacing The Light
Door Reversal 8. Reattach the door by fixing the outside screws of the hinge to the door. You must ensure the fridge door is aligned horizontally and vertically, so that the seals are closed on all sides before finally tightening. 9. -
Page 23: Energy Saving Advice
Energy Saving Advice • Do not install the appliance close to sources of heat, such as a cooker, dishwasher or radiator. • Locate the appliance in a cool well-ventilated room and make sure that the air vents are clear. • Try to avoid keeping the doors open for a long time, as warm air will enter the cabinet and may cause a build-up of ice as well as affecting the energy consumption. -
Page 24: Food Storage Advice
Food Storage Guidelines Refrigerator compartments Type of food Door or balconies of fridge Foods with natural preservatives, such as jams, compartment juices, drinks, condiments. Do not store perishable foods. Crisper drawer (salad Fruits, herbs and vegetables should be placed drawer) separately in the crisper bin. -
Page 25: Maintenance & Cleaning
Maintenance & Cleaning Disconnect the appliance from the power supply before cleaning. Internal Cleaning • Do not pour water over the appliance. • The cavity should be cleaned periodically using a solution of bicarbonate of soda and lukewarm water (5ml to 0.5 litre of water) •... -
Page 26: Defrosting
Maintenance & Cleaning Defrosting Note: Care must be taken when performing the following procedure. Defrost twice a year or when a frost layer of approximately 7 mm (1/4”) has formed. • 2 hours before the defrosting process, set the thermostat knob at the “6” position to make sure the food is at the lowest temperature before removing the frozen foods. -
Page 27: Trouble Shooting
Trouble shooting Problem Solution Check that the appliance is switched on. Check that there has not been a power cut. Check that the plug is not faulty. Check that the fuse has not blown. The fridge doesn't work Check that the voltage is correct for the appliance. Are there any faults with the socket? For this purpose, try the plug of your appliance by connecting it to a socket which you are sure is working. - Page 28 Trouble shooting Problem Solution Check all the food and drink that is in the fridge is in date and correctly packaged. If it isn’t then it should be removed immediately or repackaged. Check for spillages on each shelf, rack and drawer. You may need to remove the drawers to check that no spillages have settled underneath them.
-
Page 29: Connection To The Mains Supply
Connection to the Mains Supply WARNING- THIS APPLIANCE MUST BE EARTHED This appliance is designed to operate from a mains supply of AC220V - 240V; 50HZ. Check that the voltage marked on the product corresponds with your supply voltage. For UK use only – Plug fitting details (where applicable): As the colours of the wires in the mains lead of this appliance may not correspond with the coloured markings identifying the terminals in your plug, proceed as follows: The GREEN/YELLOW wire is the EARTH and must be connected to the terminal which... -
Page 30: Guarantee
Guarantee This product is guaranteed for 12 months from the date of the original purchase. If any defect arises due to faulty materials or workmanship you must contact Customer Service with the original proof of purchase so a replacement or refund can be arranged. Refund or replacement is at the discretion of Customer Service. -
Page 31: Technical Specification
Technical Specification Model number RHBU60FRIDGE-N Rated Voltage 220V – 240V ~ 50Hz Capacity 111L External Dimensions(HxWxD) 820mm x 596mm x 550mm... - Page 32 For Customer Services & Spare Parts please call 0345 208 8750 or visit us at https://mda.russellhobbs.com This symbol is known as the 'Crossed-out wheelie bin Symbol'. When this symbol is marked on a product/batteries, it means that the product/batteries should not be disposed of with your general household waste. Only discard electrical/electronic/battery items in separate collection schemes, which cater for the recovery and recycling of materials contained within.
Need help?
Do you have a question about the RHBU60FRIDGE-N and is the answer not in the manual?
Questions and answers